2017 NISSAN QASHQAI change time
[x] Cancel search: change timePage 324 of 508

LDP SYSTEM LIMITATIONS
WARNING
Listed below are the system limitations
for the LDP system. Failure to follow
the warnings and instructions for prop-
er use of the LDP system could result in
serious injury or death.
.The LDP system may activate if you
change lanes without first activating
your turn signal or, for example, if a
construction zone directs traffic to
cross an existing lane marker. If this
occurs you may need to apply cor-
rective steering to complete your
lane change.
.Because the LDP may not activate
under the road, weather, and lane
marker conditions described in this
section, it may not activate every
time your vehicle begins to leave its
lane and you will need to apply
corrective steering.
.The LDP system will not operate at
speeds below approximately 37
MPH (60 km/h) or if it cannot detect
lane markers..Do not use the LDP system under
the following conditions as it may
not function properly:
— During bad weather (rain, fog,
snow, etc.) .
— When driving on slippery roads,
such as on ice or snow.
— When driving on winding or
uneven roads.
— When there is a lane closure due
to road repairs.
— When driving in a makeshift or
temporary lane.
— When driving on roads where
the lane width is too narrow.
— When driving without normal
tire conditions (for example, tire
wear, low tire pressure, installa-
tion of spare tire, tire chains,
non-standard wheels) .
— When the vehicle is equipped
with non-original brake parts or
suspension parts.
.The system may not function prop-
erly under the following conditions:— On roads where there are multi-
ple parallel lane markers; lane
markers that are faded or not
painted clearly; yellow painted
lane markers; non-standard lane
markers; or lane markers cov-
ered with water, dirt, snow, etc.
— On roads where discontinued
lane markers are still detect-
able.
— On roads where there are sharp
curves.
— On roads where there are shar-
ply contrasting objects, such as
shadows, snow, water, wheel
ruts, seams or lines remaining
after road repairs. (The LDP
system could detect these items
as lane markers.)
— On roads where the traveling
lane merges or separates.
— When the vehicle’s traveling di-
rection does not align with the
lane marker.
— When traveling close to the
vehicle in front of you, which
obstructs the lane camera unit
Starting and driving5-39
Page 353 of 508

5-68Starting and driving
JVS1073X
When passing another vehicle,the set
speed indicator
*Bwill flash when the vehicle
speed exceeds the set speed. The vehicle
detect indicator will turn off when the area
ahead of the vehicle is open. When the pedal is
released, the vehicle will return to the previously
set speed.
Even though your vehicle speed is set in the ICC
system, you can depress the accelerator pedal
when it is necessary to accelerate your vehicle
rapidly.
How to change the set vehicle speed
To cancel the preset speed,use any of these
methods:
.Push the CANCEL switch. The set vehicle
speed indicator will go out.
.Tap the brake pedal. The set vehicle speed
indicator will go out.
.Turn the CRUISE ON/OFF switch off. The
ICC indicators will go out.
To reset at a faster cruising speed,use one
of the following methods:
.Depress the accelerator pedal. When the
vehicle attains the desired speed, push and
release the SET/- switch.
.Push and hold the RES/+ switch. The set
vehicle speed will increase by approximately
5 MPH (5 km/h) .
.Push, then quickly release the RES/+
switch. Each time you do this, the set speed
will increase by approximately 1 MPH (1
km/h) .
To reset at a slower cruising speed,use one
of the following methods:
.Lightly tap the brake pedal. When the
vehicle attains the desired speed, push the
SET/- switch and release it.
.Push and hold the SET/- switch. The set
vehicle speed will decrease by approxi-mately 5 MPH (5 km/h) .
.Push, then quickly release the SET/- switch.
Each time you do this, the set speed will
decrease by approximately 1 MPH (1 km/h) .
To resume the preset speed,push and
release the RES/+ switch. The vehicle will
resume the last set cruising speed when the
vehicle speed is over 20 MPH (32 km/h) .
Page 354 of 508
JVS0965X
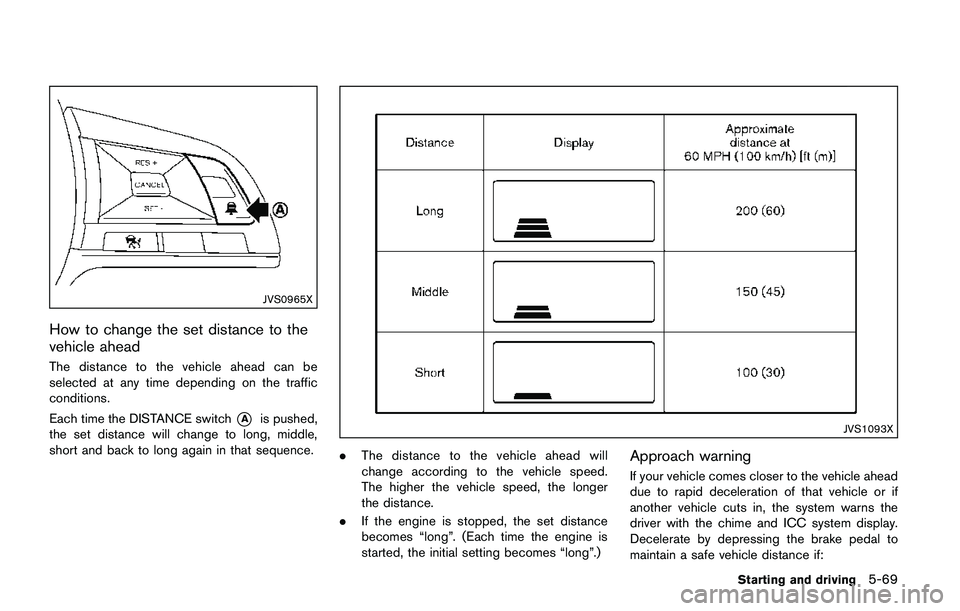
How to change the set distance to the
vehicle ahead
The distance to the vehicle ahead can be
selected at any time depending on the traffic
conditions.
Each time the DISTANCE switch
*Ais pushed,
the set distance will change to long, middle,
short and back to long again in that sequence.JVS1093X
.The distance to the vehicle ahead will
change according to the vehicle speed.
The higher the vehicle speed, the longer
the distance.
.If the engine is stopped, the set distance
becomes “long”. (Each time the engine is
started, the initial setting becomes “long”.)Approach warning
If your vehicle comes closer to the vehicle ahead
due to rapid deceleration of that vehicle or if
another vehicle cuts in, the system warns the
driver with the chime and ICC system display.
Decelerate by depressing the brake pedal to
maintain a safe vehicle distance if:
Starting and driving5-69
Page 363 of 508

5-78Starting and driving
system completely off.
When the ignition switch is placed in the OFF
position, the system is also automatically turned
off.
To use the ICC system again, quickly push and
release the CRUISE ON/OFF switch (vehicle-
to-vehicle distance control mode) or push and
hold it (conventional cruise control mode) again
to turn it on.
CAUTION
To avoid accidentally engaging cruise
control, make sure to turn the CRUISE
ON/OFF switch off when not using the
ICC system.JVS1077X
To set cruising speed,accelerate your vehicle
to the desired speed, push the SET/- switch
*B
and release it. (The color of the cruise indicator
changes to green and set vehicle speed
indicator comes on.) Take your foot off the
accelerator pedal. Your vehicle will maintain the
set speed.
.To pass another vehicle,depress the
accelerator pedal. When you release the
pedal, the vehicle will return to the previously
set speed.
.The vehicle may not maintain the set speed
when going up or down steep hills. If this
happens, manually maintain vehicle speed.To cancel the preset speed,use any of the
following methods:
1. Push the CANCEL switch. The vehicle
speed indicator will turn off.
2. Tap the brake pedal. The vehicle speed
indicator will turn off.
3. Turn the CRUISE ON/OFF switch off. Both
the cruise indicator and set vehicle speed
indicator will turn off.
To reset at a faster cruising speed,use one
of the following three methods:
1. Depress the accelerator pedal. When the
vehicle attains the desired speed, push and
release the SET/- switch.
2. Push and hold the RES/+ switch. When the
vehicle attains the desired speed, release
the switch.
3. Push, then quickly release the RES/+
switch. Each time you do this, the set speed
will increase by about 1 MPH (1.6 km/h) .
To reset at a slower cruising speed,use one
of the following three methods:
1. Lightly tap the brake pedal. When the
vehicle attains the desired speed, push the
SET/- switch and release it.
2. Push and hold the SET/- switch. Release
the switch when the vehicle slows down to
Page 364 of 508

the desired speed.
3. Push, then quickly release the SET/- switch.
Each time you do this, the set speed will
decrease by about 1 MPH (1.6 km/h) .
To resume the preset speed,push and
release the RES/+ switch. The vehicle will
resume the last set cruising speed when the
vehicle speed is over 25 MPH (40 km/h) .
System temporarily unavailable
A chime sounds under the following conditions
and the control is automatically canceled.
.When the vehicle slows down more than 8
MPH (13 km/h) below the set speed
.When the shift lever is not in the D (Drive) or
manual shift mode
.When the parking brake is applied.
.When the VDC (including the traction
control system) operates
.When a wheel slips
JVS1003X
Warning
When the system is not operating properly, the
chime sounds and the color of the cruise
indicator will change to yellow.
Action to take:
If the color of the cruise indicator changes to
yellow, park the vehicle in a safe place. Turn the
engine off, restart the engine, resume driving
and then perform the setting again.
If it is not possible to set or the indicator
stays on, it may indicate that the system is
malfunctioning. Although the vehicle is
still driveable under normal conditions,
have the vehicle checked. It is recom-mended that you visit a NISSAN dealer
for this service.
Starting and driving5-79
Page 380 of 508

CAUTION
During the first 1,200 miles (2,000 km) ,
follow these recommendations to ob-
tain maximum engine performance and
ensure the future reliability and econo-
my of your new vehicle. Failure to
follow these recommendations may
result in shortened engine life and
reduced engine performance.
.Avoid driving for long periods at constant
speed, either fast or slow. Do not run the
engine over 4,000 rpm.
.Do not accelerate at full throttle in any gear.
.Avoid quick starts.
.Avoid hard braking as much as possible.Follow these easy-to-use Fuel Efficient Driving
Tips to help you achieve the most fuel economy
from your vehicle.
1. Use smooth accelerator and brake pedal
application.
.Avoid rapid starts and stops..Use smooth, gentle accelerator and
brake application whenever possible.
.Maintain constant speed while commut-
ing and coast whenever possible.
2. Maintain constant speed.
.Look ahead to try and anticipate and
minimize stops.
.Synchronizing your speed with traffic
lights allows you to reduce your number
of stops.
.Maintaining a steady speed can minimize
red light stops and improve fuel effi-
ciency.
3. Use air conditioning (A/C) at higher vehicle
speeds.
.Below 40 MPH (64 km/h) , it is more
efficient to open windows to cool the
vehicle due to reduced engine load.
.Above 40 MPH (64 km/h) , it is more
efficient to use A/C to cool the vehicle
due to increased aerodynamic drag.
.Recirculating the cool air in the cabin
when the A/C is on reduces cooling load.
4. Drive at economical speeds and distances.
.Observing the speed limit and not ex-
ceeding 60 MPH (97 km/h) (where
legally allowed) can improve fuel effi-
ciency due to reduced aerodynamic
drag.
.Maintaining a safe following distance
behind other vehicles reduces unneces-
sary braking.
.Safely monitoring traffic to anticipate
changes in speed permits reduced brak-
ing and smooth acceleration changes.
.Select a gear range suitable to road
conditions.
5. Use cruise control.
.Using cruise control during highway
driving helps maintain a steady speed.
.Cruise control is particularly effective in
providing fuel savings when driving on
flat terrains.
6. Plan for the shortest route.
.Utilize a map or navigation system to
determine the best route to save time.
7. Avoid idling.
.Shutting off your engine when safe for
stops exceeding 30-60 seconds saves
Starting and driving5-95
BREAK-IN SCHEDULE FUEL EFFICIENT DRIVING TIPS
Page 431 of 508
8-8Do-it-yourself
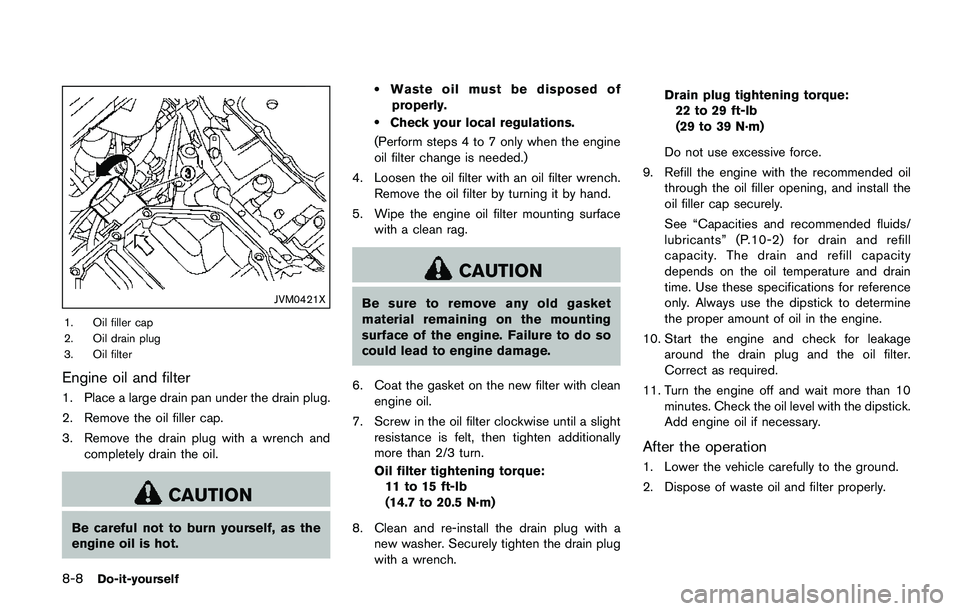
JVM0421X
1. Oil filler cap
2. Oil drain plug
3. Oil filter
Engine oil and filter
1. Place a large drain pan under the drain plug.
2. Remove the oil filler cap.
3. Remove the drain plug with a wrench and
completely drain the oil.
CAUTION
Be careful not to burn yourself, as the
engine oil is hot.
.Waste oil must be disposed of
properly.
.Check your local regulations.
(Perform steps 4 to 7 only when the engine
oil filter change is needed.)
4. Loosen the oil filter with an oil filter wrench.
Remove the oil filter by turning it by hand.
5. Wipe the engine oil filter mounting surface
with a clean rag.
CAUTION
Be sure to remove any old gasket
material remaining on the mounting
surface of the engine. Failure to do so
could lead to engine damage.
6. Coat the gasket on the new filter with clean
engine oil.
7. Screw in the oil filter clockwise until a slight
resistance is felt, then tighten additionally
more than 2/3 turn.
Oil filter tightening torque:
11 to 15 ft-lb
(14.7 to 20.5 N·m)
8. Clean and re-install the drain plug with a
new washer. Securely tighten the drain plug
with a wrench.Drain plug tightening torque:
22 to 29 ft-lb
(29 to 39 N·m)
Do not use excessive force.
9. Refill the engine with the recommended oil
through the oil filler opening, and install the
oil filler cap securely.
See “Capacities and recommended fluids/
lubricants” (P.10-2) for drain and refill
capacity. The drain and refill capacity
depends on the oil temperature and drain
time. Use these specifications for reference
only. Always use the dipstick to determine
the proper amount of oil in the engine.
10. Start the engine and check for leakage
around the drain plug and the oil filter.
Correct as required.
11. Turn the engine off and wait more than 10
minutes. Check the oil level with the dipstick.
Add engine oil if necessary.
After the operation
1. Lower the vehicle carefully to the ground.
2. Dispose of waste oil and filter properly.
Page 483 of 508

10-4Technical and consumer information
.E-15 fuel contains more than 10%
oxygenate. E-15 fuel will adversely
affect the emission control devices
and systems of the vehicle and should
not be used. Damage caused by such
fuel is not covered by the NISSAN new
vehicle limited warranty.
.If a methanol blend is used, it should
contain no more than 5% methanol
(methyl alcohol, wood alcohol) . It
should also contain a suitable amount
of appropriate cosolvents and corro-
sion inhibitors. If not properly formu-
lated with appropriate cosolvents and
corrosion inhibitors, such methanol
blends may cause fuel system damage
and/or vehicle performance problems.
At this time, sufficient data is not
available to ensure that all methanol
blends are suitable for use in NISSAN
vehicles.
If any driveability problems such as engine
stalling and difficult hot-starting are experienced
after using oxygenate-blend fuels, immediately
change to a non-oxygenate fuel or a fuel with a
low blend of MTBE.
Take care not to spill gasoline during
refueling. Gasoline containing oxygenates
can cause paint damage.E-15 fuel
E-15 fuel is a mixture of approximately 15% fuel
ethanol and 85% unleaded gasoline. E-15 can
only be used in vehicles designed to run on E-
15 fuel. Do not use E-15 in your vehicle. U.S.
government regulations require fuel ethanol
dispensing pumps to be identified with small,
square, orange and black label with the common
abbreviation or the appropriate percentage for
that region.
E-85 fuel
E-85 fuel is a mixture of approximately 85% fuel
ethanol and 15% unleaded gasoline. E-85 can
only be used in a Flexible Fuel Vehicle (FFV) . Do
not use E-85 fuel in your vehicle. U.S. govern-
ment regulations require fuel ethanol dispensing
pumps to be identified by a small, square,
orange and black label with the common
abbreviation or the appropriate percentage for
that region.
Fuel containing MMT
MMT, or methylcyclopentadienyl manganese
tricarbonyl, is an octane boosting additive.
NISSAN does not recommend the use of fuel
containing MMT. Such fuel may adversely affect
vehicle performance, including the emissions
control system. Note that while some fuel pumps
label MMT content, not all do, so you may haveto consult your gasoline retailer for more details.
Aftermarket fuel additives
NISSAN does not recommend the use of any
aftermarket fuel additives (for example, fuel
injector cleaner, octane booster, intake valve
deposit removers, etc.) which are sold commer-
cially. Many of these additives intended for gum,
varnish or deposit removal may contain active
solvent or similar ingredients that can be harmful
to the fuel system and engine.
Octane rating tips
Using unleaded gasoline with an octane
rating lower than recommended can cause
persistent, heavy “spark knock”. (Spark
knock is a metallic rapping noise.) If
severe, this can lead to engine damage. If
you detect a persistent heavy spark knock
even when using gasoline of the stated
octane rating, or if you hear steady spark
knock while holding a steady speed on
level roads, it is recommended you have a
NISSAN dealer correct the condition. Fail-
ure to correct the condition is misuse of
the vehicle, for which NISSAN is not
responsible.
Incorrect ignition timing will result in spark
knock, after-run and/or overheating, which may
cause excessive fuel consumption or engine