2017 NISSAN QASHQAI warning
[x] Cancel search: warningPage 437 of 508

8-14Do-it-yourself
WARNING
Be sure the engine and ignition switch
are off and that the parking brake is
applied.
CAUTION
Be sure to use the correct socket to
remove the spark plugs. An incorrect
socket can damage the spark plugs.
SDI2670
REPLACING SPARK PLUGS
If replacement is required, it is recommended
you visit a NISSAN dealer for this service.
Iridium platinum-tipped spark plugs
It is not necessary to replace the iridium
platinum-tipped spark plugs as frequently as
the conventional type spark plugs since they will
last much longer. Follow the maintenance
schedule shown in the “9. Maintenance and
schedules” section. Do not reuse the iridium
platinum-tipped spark plugs by cleaning or
regapping.
Always replace spark plugs with recom-
mended or equivalent ones.
JVM0378X
Example
To remove the filter, unlatch the retaining clips
*1, and pull the cover*2upward.
The air cleaner filter should not be cleaned and
reused. Replace it according to the maintenance
schedule shown in the “9. Maintenance and
schedules” section. When replacing the filter,
wipe the inside of the air cleaner housing and
the cover with a damp cloth.
WARNING
.Operating the engine with the air
cleaner filter off can cause you or
others to be burned. The air cleaner
SPARK PLUGS AIR CLEANER
Page 440 of 508

It is recommended you contact a NISSAN dealer
if checking or replacement is required.If the brakes do not operate properly, it is
recommended you have the brakes checked by
a NISSAN dealer.
SELF-ADJUSTING BRAKES
Your vehicle is equipped with self-adjusting
brakes.
The disc-type brakes self-adjust every time the
brake pedal is applied.
WARNING
Have your brake system checked if the
brake pedal height does not return to
normal. It is recommended you visit a
NISSAN dealer for this service.
BRAKE PAD WEAR WARNING
The disc brake pads have audible wear warn-
ings. When a brake pad requires replacement, it
will make a high pitched scraping sound when
the vehicle is in motion. This scraping sound will
first occur only when the brake pedal is
depressed. After more wear of the brake pad,
the sound will always be heard even if the brake
pedal is not depressed. Have the brakes
checked as soon as possible if the wear warning
sound is heard.
Under some driving or climate conditions,occasional brake squeak, squeal or other noise
may be heard. Occasional brake noise during
light to moderate stops is normal and does not
affect the function or performance of the brake
system.
Proper brake inspection intervals should
be followed.For additional information, see the
maintenance schedule shown in the “9. Main-
tenance and schedules” section.
Do-it-yourself8-17
REAR WINDOW WIPER BLADE BRAKES
Page 441 of 508
8-18Do-it-yourself
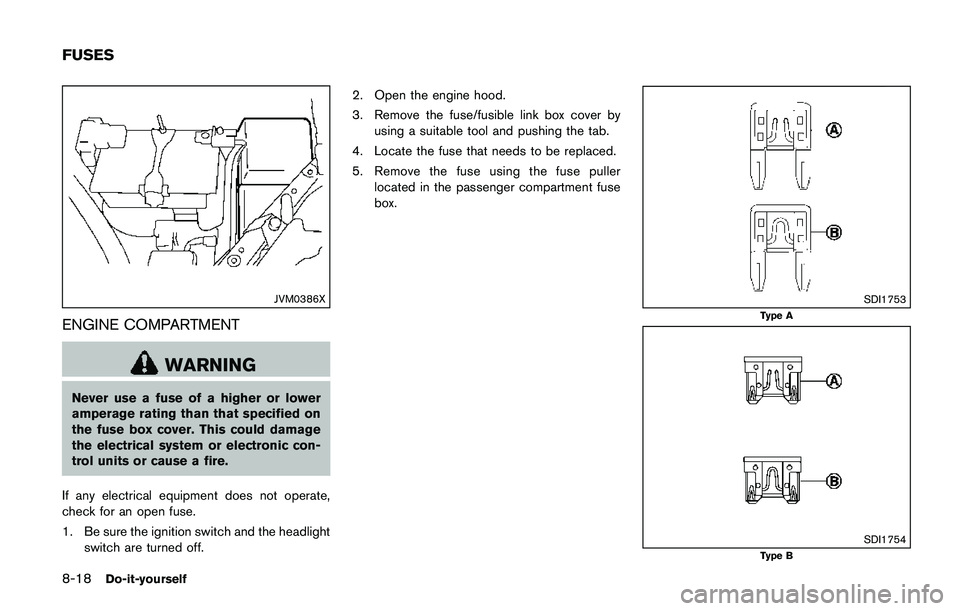
JVM0386X
ENGINE COMPARTMENT
WARNING
Never use a fuse of a higher or lower
amperage rating than that specified on
the fuse box cover. This could damage
the electrical system or electronic con-
trol units or cause a fire.
If any electrical equipment does not operate,
check for an open fuse.
1. Be sure the ignition switch and the headlight
switch are turned off.2. Open the engine hood.
3. Remove the fuse/fusible link box cover by
using a suitable tool and pushing the tab.
4. Locate the fuse that needs to be replaced.
5. Remove the fuse using the fuse puller
located in the passenger compartment fuse
box.
SDI1753
Type A
SDI1754Type B
FUSES
Page 443 of 508

8-20Do-it-yourself
JVM0387X
PASSENGER COMPARTMENT
WARNING
Never use a fuse of a higher or lower
amperage rating than that specified on
the fuse box cover. This could damage
the electrical system or electronic con-
trol units or cause a fire.
If any electrical equipment does not operate,
check for an open fuse.
1. Be sure the ignition switch and the headlight
switch are turned off.2. Remove the fuse box cover.
3. Remove the fuse with the fuse puller
*A.
SDI1754
4. If the fuse is open*A, replace it with a new
fuse
*B.
5. If a new fuse also opens, have the electrical
system checked and repaired. It is recom-
mended you visit a NISSAN dealer for this
service.
Page 444 of 508
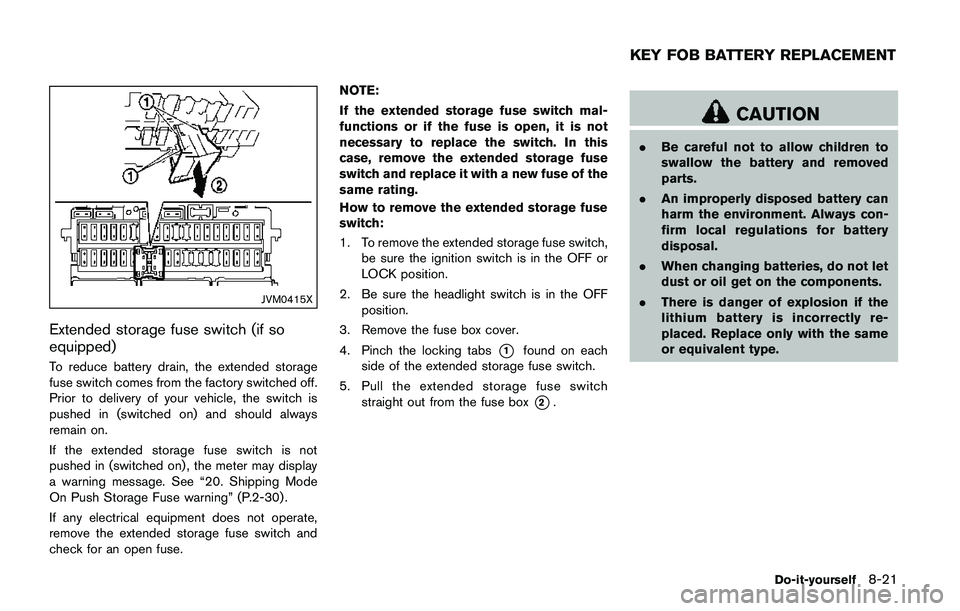
JVM0415X
Extended storage fuse switch (if so
equipped)
To reduce battery drain, the extended storage
fuse switch comes from the factory switched off.
Prior to delivery of your vehicle, the switch is
pushed in (switched on) and should always
remain on.
If the extended storage fuse switch is not
pushed in (switched on) , the meter may display
a warning message. See “20. Shipping Mode
On Push Storage Fuse warning” (P.2-30) .
If any electrical equipment does not operate,
remove the extended storage fuse switch and
check for an open fuse.NOTE:
If the extended storage fuse switch mal-
functions or if the fuse is open, it is not
necessary to replace the switch. In this
case, remove the extended storage fuse
switch and replace it with a new fuse of the
same rating.
How to remove the extended storage fuse
switch:
1. To remove the extended storage fuse switch,
be sure the ignition switch is in the OFF or
LOCK position.
2. Be sure the headlight switch is in the OFF
position.
3. Remove the fuse box cover.
4. Pinch the locking tabs*1found on each
side of the extended storage fuse switch.
5. Pull the extended storage fuse switch
straight out from the fuse box
*2.
CAUTION
.Be careful not to allow children to
swallow the battery and removed
parts.
.An improperly disposed battery can
harm the environment. Always con-
firm local regulations for battery
disposal.
.When changing batteries, do not let
dust or oil get on the components.
.There is danger of explosion if the
lithium battery is incorrectly re-
placed. Replace only with the same
or equivalent type.
Do-it-yourself8-21
KEY FOB BATTERY REPLACEMENT
Page 452 of 508

If you have a flat tire, see “Flat tire” (P.6-3) .
TIRE PRESSURE
Tire Pressure Monitoring System (TPMS)
This vehicle is equipped with the Tire Pressure
Monitoring System (TPMS) . It monitors tire
pressure of all tires except the spare. When
the low tire pressure warning light is lit, and the
“Tire Pressure Low - Add Air” warning message
is displayed in the vehicle information display,
one or more of your tires is significantly under-
inflated.
The TPMS will activate only when the vehicle is
driven at speeds above 16 MPH (25 km/h) .
Also, this system may not detect a sudden drop
in tire pressure (for example a flat tire while
driving) .
For more details, see “Low tire pressure warning
light” (P.2-13) , “Tire Pressure Monitoring Sys-
tem (TPMS)” (P.5-5) and “Tire Pressure Mon-
itoring System (TPMS)” (P.6-3) .
Tire inflation pressure
Check the pressure of the tires (including
the spare) often and always prior to long
distance trips. The recommended tire
pressure specifications are shown on the
Tire and Loading Information label underthe “Cold Tire Pressure” heading. The
Tire and Loading Information label is
affixed to the driver side center pillar.
Tire pressures should be checked reg-
ularly because:
.Most tires naturally lose air over time.
.Tires can lose air suddenly when
driven over potholes or other objects
or if the vehicle strikes a curb while
parking.
The tire pressures should be checked
when the tires are cold. The tires are
considered COLD after the vehicle has
been parked for 3 or more hours, or
driven less than 1 mile (1.6 km) at
moderate speeds.
TPMS with Easy Fill Tire Alert provides
visual and audible signals outside the
vehicle for inflating the tires to the
recommended COLD tire pressure.
(See “TPMS with Easy Fill Tire Alert”
(P.5-7) .)
Incorrect tire pressure, including
under inflation, may adversely affect
tire life and vehicle handling.
WARNING
.Improperly inflated tires can
fail suddenly and cause an
accident.
.The Gross Vehicle Weight rat-
ing (GVWR) is located on the F.
M.V.S.S./C.M.V.S.S. certifica-
tion label. The vehicle weight
capacity is indicated on the
Tire and Loading Information
label. Do not load your vehicle
beyond this capacity. Over-
loading your vehicle may re-
sult in reduced tire life, unsafe
operating conditions due to
premature tire failure, or un-
favorable handling character-
istics and could also lead to a
serious accident. Loading be-
yond the specified capacity
may also result in failure of
other vehicle components.
.Before taking a long trip, or
whenever you heavily load
Do-it-yourself8-29
WHEELS AND TIRES
Page 458 of 508

4. Three-digit code: Tire type code
(Optional)
5. Four numbers represent the week
and year the tire was built. For
example, the numbers 3103 means
the 31st week of 2003. If these
numbers are missing, then look on
the other sidewall of the tire.
*3Tire ply composition and material
The number of layers or plies of rubber-
coated fabric in the tire.
Tire manufacturers also must indicate the
materials in the tire, which include steel,
nylon, polyester, and others.
*4Maximum permissible inflation pres-
sure
This number is the greatest amount of air
pressure that should be put in the tire.
Do not exceed the maximum permissible
inflation pressure.
*5Maximum load rating
This number indicates the maximum load
in kilograms and pounds that can becarried by the tire. When replacing the
tires on the vehicle, always use a tire that
has the same load rating as the factory
installed tire.
*6Term of “tubeless” or “tube type”
Indicates whether the tire requires an
inner tube (“tube type”) or not (“tube-
less”) .
*7The word “radial”
The word “radial” is shown, if the tire has
radial structure.
*8Manufacturer or brand name
Manufacturer or brand name is shown.
Other tire-related terminology:
In addition to the many terms that are
defined throughout this section, Intended
Outboard Sidewall is (1) the sidewall
that contains a whitewall, bears white
lettering or bears manufacturer, brand
and/or model name molding that is
higher or deeper than the same molding
on the other sidewall of the tire, or (2) the
outward facing sidewall of an asymme-trical tire that has a particular side that
must always face outward when
mounted on a vehicle.
TYPES OF TIRES
WARNING
.When changing or replacing tires,
be sure all four tires are of the same
type (Example: Summer, All Season
or Snow) and construction. A
NISSAN dealer may be able to help
you with information about tire type,
size, speed rating and availability.
.Replacement tires may have a lower
speed rating than the factory
equipped tires, and may not match
the potential maximum vehicle
speed. Never exceed the maximum
speed rating of the tire.
.Replacing tires with those not ori-
ginally specified by NISSAN could
affect the proper operation of the
TPMS.
.For additional information regard-
ing tires, refer to“Important Tire
Safety Information”(US) or“Tire
Safety Information”(Canada) in the
Do-it-yourself8-35
Page 460 of 508

your vehicle may be damaged and/or vehicle
handling and performance may be adversely
affected.
Tire chains must be installed only on the
front wheels and not on the rear wheels.
Never install tire chains on a TEMPORARY USE
ONLY spare tire.
Do not use tire chains on dry roads. Driving with
tire chains in such conditions can cause damage
to the various mechanisms of the vehicle due to
some overstress.
SDI1662
CHANGING WHEELS AND TIRES
Tire rotation
NISSAN recommends rotating the tires
every 5,000 miles (8,000 km) . (See “Flat
tire” (P.6-3) for tire replacing proce-
dures.)
As soon as possible, tighten the
wheel nuts to the specified torque
with a torque wrench.
Wheel nut tightening torque:
80 ft-lb (108 N·m)The wheel nuts must be kept tigh-
tened to the specification at all
times. It is recommended that wheel
nuts be tightened to the specifica-
tion at each tire rotation interval.
WARNING
.After rotating the tires, check
and adjust the tire pressure.
.Retighten the wheel nuts
when the vehicle has been
driven for 600 miles (1,000
km) (also in cases of a flat tire,
etc.) .
.Do not include the spare tire in
the tire rotation.
.For additional information re-
garding tires, refer to“Impor-
tant Tire Safety Information”
(US) or“Tire Safety Informa-
tion”(Canada) in the Warranty
Information Booklet.
Do-it-yourself8-37