Page 106 of 558
Master warning light
When the ignition is in the ON position, the
master warning light illuminates if any of the fol-
lowing are displayed on the vehicle information
display.● No key warning
● Low fuel warning
● Low windshield-washer fluid warning
● Parking brake release
● Door open warning
● Check tire pressure warning
For additional information, refer to “Vehicle infor-
mation display” in this section.
Page 206 of 558
WARNING
●Do not adjust the heater and the air
conditioner controls or audio controls
while driving so that full attention may
be given to vehicle operation.
● Do not use this system if you notice any
abnormality, such as a frozen screen or
lack of sound. Continued use of the
system may result in accident, fire or
electric shock.
● If you notice any foreign objects enter-
ing the system hardware, spilled liquid
on the system, or notice smoke or
fumes coming out from the system, or
any other unusual operation is ob-
served, stop using the system immedi-
ately. It is recommended that you visit a
NISSAN dealer for service. Ignoring
such conditions may lead to an acci-
dent, fire or electric shock.
● Do not disassemble or modify this sys-
tem. If you do, it may lead to an acci-
dent, fire, or electric shock.
● Park the vehicle in a safe location and
apply the parking brake to view the im-
ages on the front center display screen.
Page 228 of 558
ADJUSTING THE SCREEN
To adjust the Display ON/OFF, Brightness, Tint,
Color, Contrast and Black Level of the RearView
Monitor, press the SETTING button with the
RearView Monitor on, touch the Camera or
Camera/Sonar key and then select the “Display”
key. Select one of the items and change the value
by touching the “+” or “-” key or by turning the
multi-function controller.NOTE:
Do not adjust the Brightness, Tint, Color,
Contrast and Black Level of the RearView
Monitor while the vehicle is moving. Make
sure the parking brake is firmly applied.
HOW TO TURN ON AND OFF
PREDICTED COURSE LINES
To toggle on and off the predicted course lines
while in the P (Park) position:
1. Press the SETTING button.
2. Touch the Camera or Camera/Sonar key.
3. Touch the Camera key.
4. Touch the Predicted Course Lines key to turn the feature on or off.
REARVIEW MONITOR SYSTEM
LIMITATIONS
Page 374 of 558

●Accelerating quickly, sharp steering
maneuvers or sudden braking may
cause loss of control.
● If at all possible, avoid sharp turning
maneuvers, particularly at high speeds.
Your NISSAN vehicle has a higher cen-
ter of gravity than a passenger car. The
vehicle is not designed for cornering at
the same speeds as passenger cars.
● Failure to operate this vehicle correctly
could result in loss of control and/or a
rollover accident.
● Always use tires of the same type, size,
brand, construction (bias, bias-belted,
or radial) , and tread pattern on all four
wheels. Install tire chains on the front
wheels when driving on slippery roads
and drive carefully.
● Be sure to check the brakes immedi-
ately after driving in mud or water. For
additional information, refer to “Brake
system” in this section.
● Avoid parking your vehicle on steep
hills. If you get out of the vehicle and it
rolls forward, backward or sideways,
you could be injured. ●
Whenever you drive off-road through
sand, mud or water as deep as the
wheel hub, more frequent maintenance
may be required. For additional infor-
mation, refer to “Severe driving condi-
tions” in the “Maintenance and sched-
ules” section of this manual.
Page 378 of 558

●Make sure the area around the vehicle is
clear.
● Check fluid levels such as engine oil, cool-
ant, brake fluid, and windshield-washer fluid
as frequently as possible, or at least when-
ever you refuel.
● Check that all windows and lights are clean.
● Visually inspect tires for their appearance
and condition. Also check tires for proper
inflation.
● Check that all doors are closed.
● Position seat and adjust head
restraints/headrests.
● Adjust inside and outside mirrors.
● Fasten seat belts and ask all passengers to
do likewise.
● Check the operation of warning lights when
the ignition switch is placed in the ON posi-
tion. For additional information, refer to
“Warning lights, indicator lights and audible
reminders” in the “Instruments and controls”
section of this manual. 1. Apply the parking brake.
2. Move the shift lever to P (Park) or N (Neu-
tral) . P (Park) is recommended.
The starter is designed not to operate if
the shift lever is in any of the driving
positions.
3. Push the ignition switch to the ON position. Depress the brake pedal and push the igni-
tion switch to start the engine.
To start the engine immediately, push and
release the ignition switch while depressing
the brake pedal with the ignition switch in
any position.
● If the engine is very hard to start in ex-
tremely cold weather or when restarting,
depress the accelerator pedal a little (ap-
proximately 1/3 to the floor) and while
holding, crank the engine. Release the
accelerator pedal when the engine starts.
● If the engine is very hard to start because
it is flooded, depress the accelerator
pedal all the way to the floor and hold it.
Push the ignition switch to the ON posi-
tion to start cranking the engine. After five
or six seconds, stop cranking by pushing
the ignition switch to LOCK. After crank-
ing the engine, release the accelerator
pedal. Crank the engine with your foot off the accelerator pedal by depressing the
brake pedal and pushing the push-button
ignition switch to start the engine. If the
engine starts, but fails to run, repeat the
above procedure.
Page 380 of 558
Starting the vehicle
1. After starting the engine, fully depress thefoot brake pedal before moving the shift
lever out of the P (Park) position.
This CVT is designed so that the foot
brake pedal must be depressed before
shifting from P (Park) to any driving
position while the ignition switch is in
the ON position.
The shift lever cannot be moved out of
the P (Park) position and into any of the
other positions if the ignition switch is
placed in the LOCK, OFF or ACC position
while the ready light illuminates.
2. Keep the foot brake pedal depressed andmove the shift lever to a driving position.
3. Release the parking brake and foot brake pedal and then gradually start the vehicle in
motion.
Page 381 of 558
WARNING
Apply the parking brake if the shift lever is
in any position while the engine is not
running. Failure to do so could cause the
vehicle to move unexpectedly or roll away
and result in serious personal injury or
property damage.
Page 430 of 558

WARNING
●Do not stop or park the vehicle over
flammable materials such as dry grass,
waste paper or rags. They may ignite
and cause a fire.
● Safe parking procedures require that
both the parking brake be set and the
transmission placed into P (Park) . Fail-
ure to do so could cause the vehicle to
move unexpectedly or roll away and re-
sult in an accident. Make sure the shift
lever has been pushed as far forward as
it can go and cannot be moved without
depressing the foot brake pedal. ●
Never leave the engine running while
the vehicle is unattended.
● To help avoid risk of injury or death
through unintended operation of the
vehicle and/or its systems, do not leave
children, people who require the assis-
tance of others or pets unattended in
your vehicle. Additionally, the tempera-
ture inside a closed vehicle on a warm
day can quickly become high enough to
cause a significant risk of injury or
death to people and pets. 1. Firmly apply the parking brake.
2. Move the shift lever to the P (Park) position.
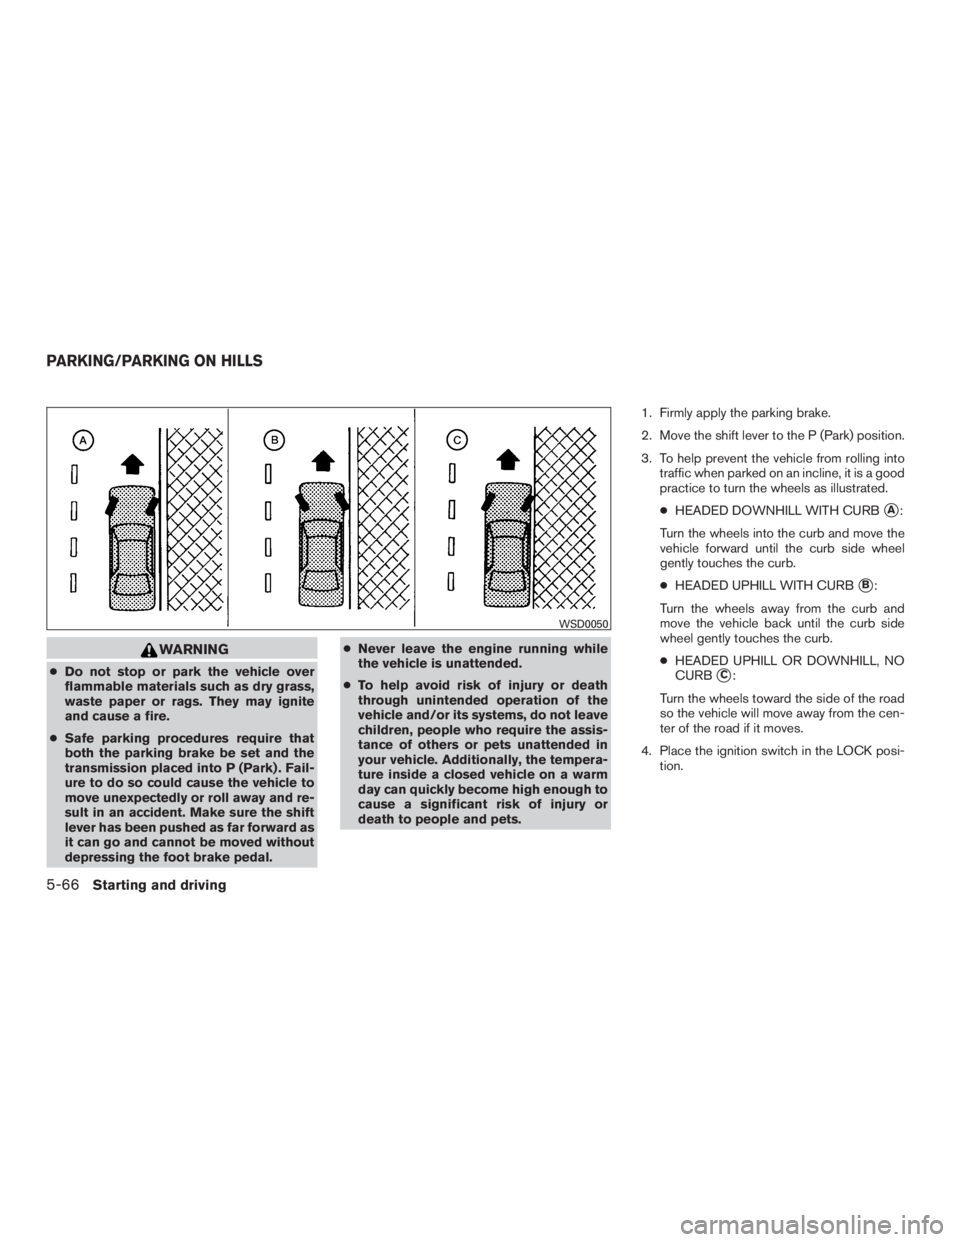
3. To help prevent the vehicle from rolling into
traffic when parked on an incline, it is a good
practice to turn the wheels as illustrated.
● HEADED DOWNHILL WITH CURB
�A:
Turn the wheels into the curb and move the
vehicle forward until the curb side wheel
gently touches the curb.
● HEADED UPHILL WITH CURB
�B:
Turn the wheels away from the curb and
move the vehicle back until the curb side
wheel gently touches the curb.
● HEADED UPHILL OR DOWNHILL, NO
CURB
�C:
Turn the wheels toward the side of the road
so the vehicle will move away from the cen-
ter of the road if it moves.
4. Place the ignition switch in the LOCK posi- tion.