Page 34 of 558
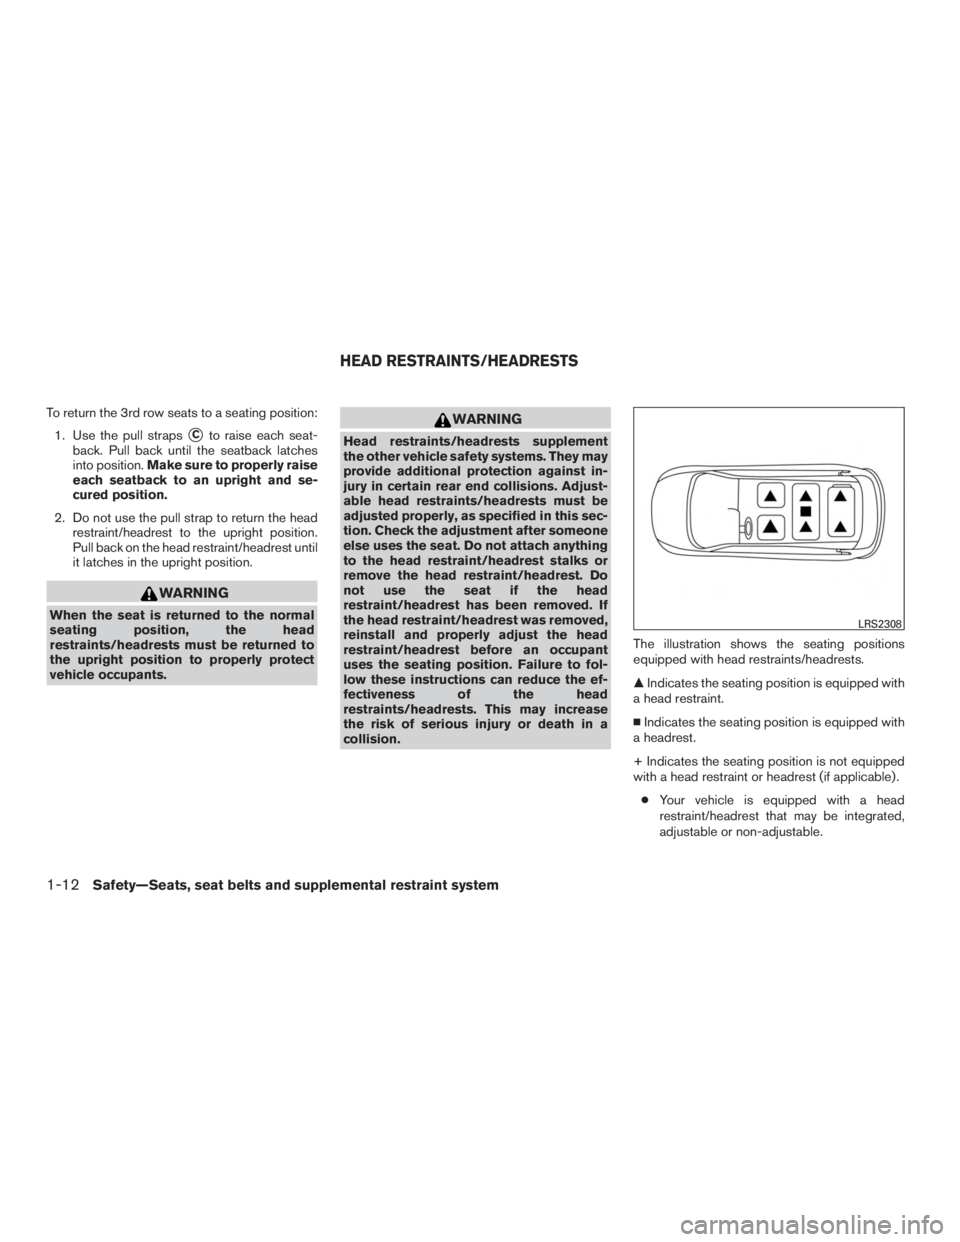
To return the 3rd row seats to a seating position:1. Use the pull straps
�Cto raise each seat-
back. Pull back until the seatback latches
into position. Make sure to properly raise
each seatback to an upright and se-
cured position.
2. Do not use the pull strap to return the head restraint/headrest to the upright position.
Pull back on the head restraint/headrest until
it latches in the upright position.
Page 36 of 558
REMOVE
Use the following procedure to remove the head
restraint/headrest:1. Pull the head restraint/headrest up to the highest position.
2. Push and hold the lock knob.
3. Remove the head restraint/headrest from the seat.
4. Store the head restraint/headrest properly in a secure place so it is not loose in the
vehicle. 5. Reinstall and properly adjust the head
restraint/headrest before an occupant uses
the seating position.
REMOVABLE (without Dual head
restraint/headrest DVD system only)
Page 39 of 558
WARNING
When the seat is returned to the normal
seating position, the head
restraint/headrest must be returned to the
upright position to properly protect ve-
hicle occupants.
PRECAUTIONS ON SEAT BELT
USAGE
If you are wearing your seat belt properly ad-
justed and you are sitting upright and well back in
your seat with both feet on the floor, your chances
of being injured or killed in a collision and/or the
severity of injury may be greatly reduced.
NISSAN strongly encourages you and all of your
passengers to buckle up every time you drive,
even if your seating position includes a supple-
mental air bag.
Most U.S. states and Canadian provinces or
territories specify that seat belts be worn at
all times when a vehicle is being driven.
Page 62 of 558

�1Top tether strap
�2Anchor point
Installing top tether strap
The child restraint top tether strap must be used
when installing the child restraint with the LATCH
lower anchor attachments.
First, secure the child restraint with the LATCH
lower anchors (2nd row bench outboard seating
positions only) .2nd row bench seat
OUTBOARD SEATING POSITIONS
1. Remove the head restraint/headrest and store it in a secure place. Be sure to reinstall
the head restraint/headrest when the child
restraint is removed. For additional informa-
tion about head restraint/headrest adjust-
ment, removal and installation, refer to
“Head restraints/headrests” in this section.
2. Position the top tether strap
�1over the
seatback.
3. Secure the tether strap to the tether anchor point
�2as shown.
4. Tighten the tether strap according to the manufacturer’s instructions to remove any
slack.
If you have any questions when installing a
top tether strap, it is recommended that
you visit a NISSAN dealer for this service.
Page 378 of 558

●Make sure the area around the vehicle is
clear.
● Check fluid levels such as engine oil, cool-
ant, brake fluid, and windshield-washer fluid
as frequently as possible, or at least when-
ever you refuel.
● Check that all windows and lights are clean.
● Visually inspect tires for their appearance
and condition. Also check tires for proper
inflation.
● Check that all doors are closed.
● Position seat and adjust head
restraints/headrests.
● Adjust inside and outside mirrors.
● Fasten seat belts and ask all passengers to
do likewise.
● Check the operation of warning lights when
the ignition switch is placed in the ON posi-
tion. For additional information, refer to
“Warning lights, indicator lights and audible
reminders” in the “Instruments and controls”
section of this manual. 1. Apply the parking brake.
2. Move the shift lever to P (Park) or N (Neu-
tral) . P (Park) is recommended.
The starter is designed not to operate if
the shift lever is in any of the driving
positions.
3. Push the ignition switch to the ON position. Depress the brake pedal and push the igni-
tion switch to start the engine.
To start the engine immediately, push and
release the ignition switch while depressing
the brake pedal with the ignition switch in
any position.
● If the engine is very hard to start in ex-
tremely cold weather or when restarting,
depress the accelerator pedal a little (ap-
proximately 1/3 to the floor) and while
holding, crank the engine. Release the
accelerator pedal when the engine starts.
● If the engine is very hard to start because
it is flooded, depress the accelerator
pedal all the way to the floor and hold it.
Push the ignition switch to the ON posi-
tion to start cranking the engine. After five
or six seconds, stop cranking by pushing
the ignition switch to LOCK. After crank-
ing the engine, release the accelerator
pedal. Crank the engine with your foot off the accelerator pedal by depressing the
brake pedal and pushing the push-button
ignition switch to start the engine. If the
engine starts, but fails to run, repeat the
above procedure.