Page 62 of 558

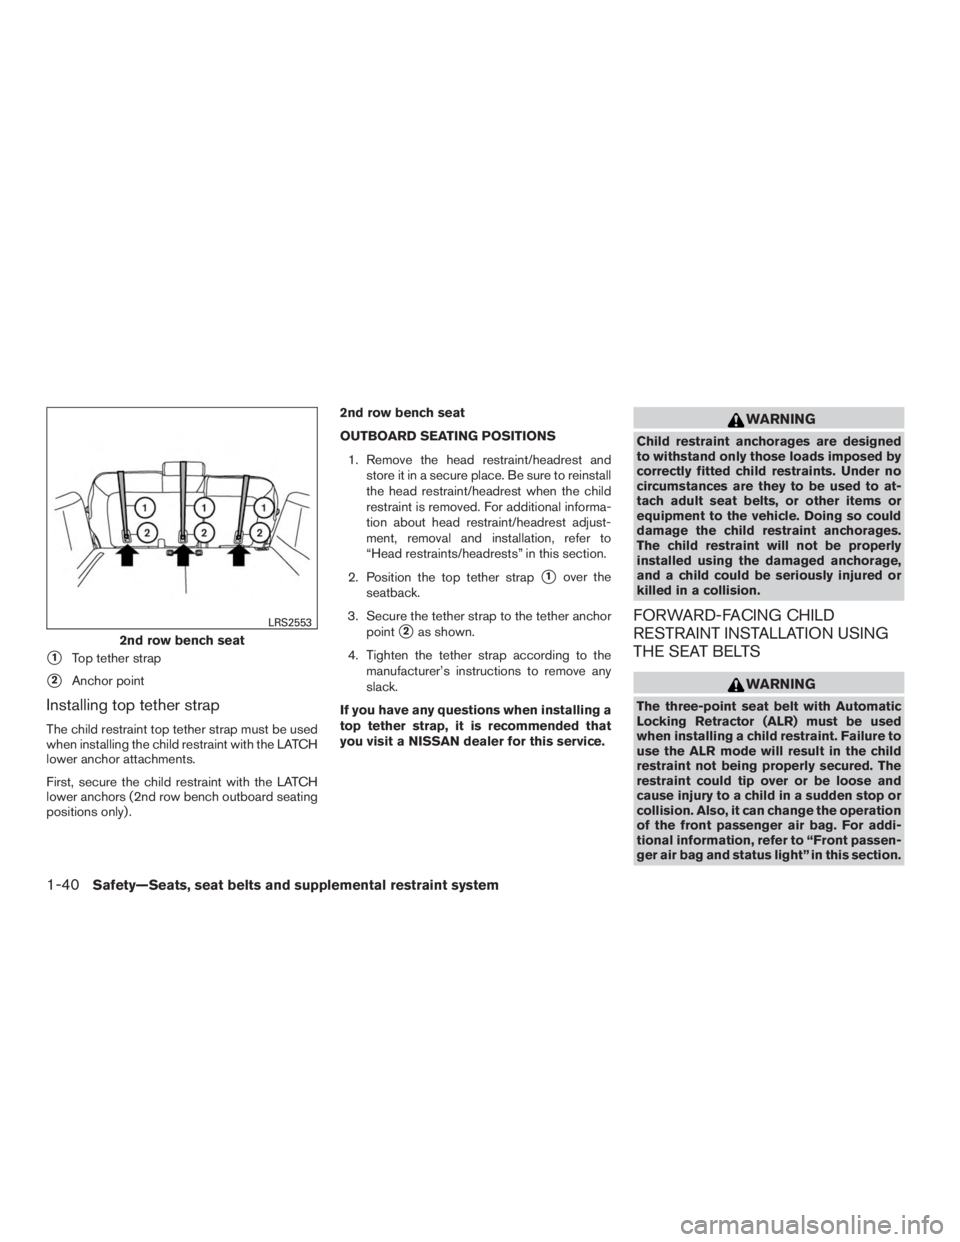
�1Top tether strap
�2Anchor point
Installing top tether strap
The child restraint top tether strap must be used
when installing the child restraint with the LATCH
lower anchor attachments.
First, secure the child restraint with the LATCH
lower anchors (2nd row bench outboard seating
positions only) .2nd row bench seat
OUTBOARD SEATING POSITIONS
1. Remove the head restraint/headrest and store it in a secure place. Be sure to reinstall
the head restraint/headrest when the child
restraint is removed. For additional informa-
tion about head restraint/headrest adjust-
ment, removal and installation, refer to
“Head restraints/headrests” in this section.
2. Position the top tether strap
�1over the
seatback.
3. Secure the tether strap to the tether anchor point
�2as shown.
4. Tighten the tether strap according to the manufacturer’s instructions to remove any
slack.
If you have any questions when installing a
top tether strap, it is recommended that
you visit a NISSAN dealer for this service.
Page 67 of 558
WARNING
Child restraint anchorages are designed
to withstand only those loads imposed by
correctly fitted child restraints. Under no
circumstances are they to be used to at-
tach adult seat belts, or other items or
equipment to the vehicle. Doing so could
damage the child restraint anchorages.
The child restraint will not be properly
installed using the damaged anchorage,
and a child could be seriously injured or
killed in a collision.
�1Top tether strap
�2Anchor point
3rd row bench seat
Page 69 of 558
●Make sure the child’s head will be properly
supported by the booster seat or vehicle
seat. The seatback must be at or above the
center of the child’s ears. For example, if a
low back booster seat is chosen, the vehicle
seatback must be at or above the center of
the child’s ears. If the seatback is lower than
the center of the child’s ears, a high back
booster seat should be used.
● If the booster seat is compatible with your
vehicle, place the child in the booster seat
and check the various adjustments to be
sure the booster seat is compatible with the
child. Always follow all recommended pro-
cedures. All U.S. states and Canadian provinces or
territories require that infants and small
children be restrained in an approved child
restraint at all times while the vehicle is
being operated.
The instructions in this section apply to booster
seat installation in the rear seats or the front
passenger seat.
Booster seat installation
Page 75 of 558
WARNING
●Even with the NISSAN Advanced Air
Bag System, never install a rear-facing
child restraint in the front seat. An in-
flating front air bag could seriously in-
jure or kill your child. For additional
information, refer to “Child restraints”
in this section.
Page 84 of 558

●An object weighing over 2.2 lbs (1 kg) hang-
ing on the seat or placed in the seatback
pocket.
● A child restraint or other object pressing
against the rear of the seatback.
● A rear passenger pushing or pulling on the
back of the front passenger seat.
● Forcing the front seat or seatback against an
object on the seat or floor behind it.
● An object placed under the front passenger
seat.
● An object placed between the seat cushion
and center console.
If the vehicle is moving, please come to a stop
when it is safe to do so. Check and correct any of
the above conditions. Restart the vehicle and
wait 1 minute.
NOTE:
A system check will be performed during
which the front passenger air bag status
light will remain lit for about 7 seconds
initially. If the light is still OFF after this, the small adult,
child or child restraint should be repositioned in
the rear seat and the vehicle should be checked
as soon as possible. It is recommended that you
visit a NISSAN dealer for this service.
3. If the light is OFF with no front passenger and no objects on the front passenger seat,
the vehicle should be checked. It is recom-
mended that you visit a NISSAN dealer as
soon as possible.
Other supplemental front-impact air bag
precautions
Page 149 of 558

●Never allow anyone to ride in the lug-
gage area. It is extremely dangerous to
ride in a cargo area inside of a vehicle.
In a collision, people riding in these
areas are more likely to be seriously
injured or killed.
● Do not allow people to ride in any area
of your vehicle that is not equipped with
seats and seat belts.
● The child restraint top tether strap may
be damaged by contact with items in
the cargo area. Secure any items in the
cargo area. Your child could be seri-
ously injured or killed in a collision if
the top tether strap is damaged.
● Be sure everyone in your vehicle is in a
seat and using a seat belt properly.
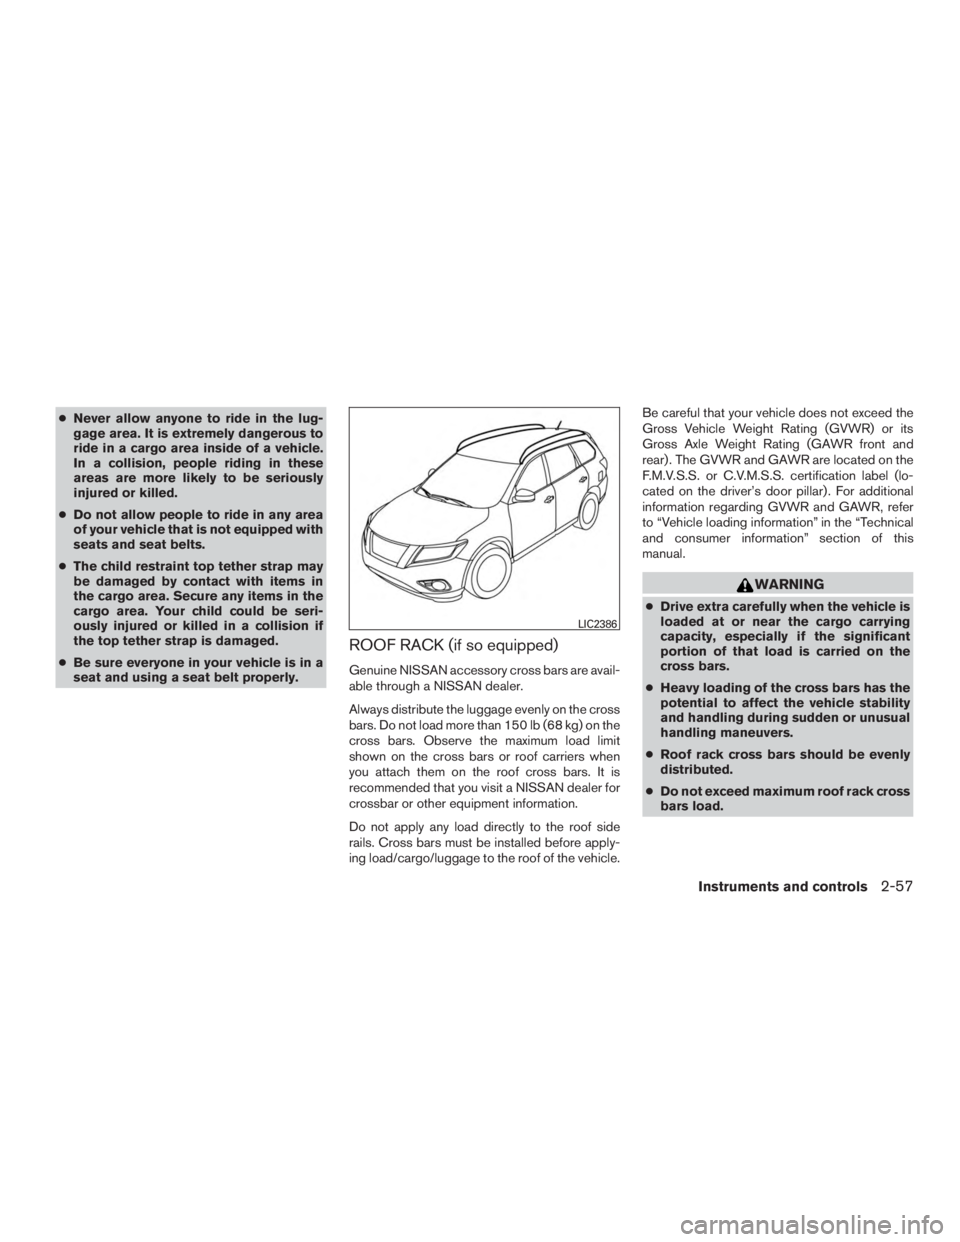
ROOF RACK (if so equipped)
Genuine NISSAN accessory cross bars are avail-
able through a NISSAN dealer.
Always distribute the luggage evenly on the cross
bars. Do not load more than 150 lb (68 kg) on the
cross bars. Observe the maximum load limit
shown on the cross bars or roof carriers when
you attach them on the roof cross bars. It is
recommended that you visit a NISSAN dealer for
crossbar or other equipment information.
Do not apply any load directly to the roof side
rails. Cross bars must be installed before apply-
ing load/cargo/luggage to the roof of the vehicle. Be careful that your vehicle does not exceed the
Gross Vehicle Weight Rating (GVWR) or its
Gross Axle Weight Rating (GAWR front and
rear) . The GVWR and GAWR are located on the
F.M.V.S.S. or C.V.M.S.S. certification label (lo-
cated on the driver’s door pillar) . For additional
information regarding GVWR and GAWR, refer
to “Vehicle loading information” in the “Technical
and consumer information” section of this
manual.
Page 532 of 558
WARNING
●Properly secure all cargo with ropes or
straps to help prevent it from sliding or
shifting. Do not place cargo higher than
the seatbacks. In a sudden stop or col-
lision, unsecured cargo could cause
personal injury.
● The child restraint top tether strap may
be damaged by contact with items in
the cargo area. Secure any items in the
cargo area. Your child could be seri-
ously injured or killed in a collision if
the top tether strap is damaged.
● Do not load your vehicle any heavier
than the GVWR or the maximum front
and rear GAWRs. If you do, parts of your
vehicle can break, tire damage could
occur, or it can change the way your
vehicle handles. This could result in loss
of control and cause personal injury.
LOADING TIPS
● The GVW must not exceed GVWR
or GAWR as specified on the
F.M.V.S.S./C.M.V.S.S. certification
label. ●
Do not load the front and rear axle to
the GAWR. Doing so will exceed the
GVWR.
Page 550 of 558

C
Capacities and recommended
fuel/lubricants ..................10-2
Cargoareastoragebin.............2-56
Cargolight....................2-64
Cargo (See vehicle loading information) . . .10-13
Car phone or CB radio .............4-112
CD care and cleaning .............4-111
CD player (See audio system) .........4-76
Check tire pressure ...............2-28
Child restraints .......1-25,1-26,1-27,1-29
LATCH (Lower Anchors and Tethers for
CHildren) System ..............1-29
Precautions on child
restraints.........1-27,1-34,1-40,1-46
Top tether strap anchor point locations . .1-32
Child restraint with top tether strap .......1-32
Child safety rear door lock ............3-7
Chimes, audible reminders ...........2-17
Cleaningexteriorandinterior........7-2,7-4
Clock set/adjustment ..............4-17
C.M.V.S.S. certification label .........10-11
Cold weather driving ...............5-74
Compact disc (CD) player ...........4-76
Compass ......................2-7
Consolebox...................2-52
Continuously Variable Transmission (CVT) . . .5-15 Continuously Variable Transmission (CVT)
fluid .......................8-9
Driving with Continuously Variable
Transmission (CVT) .............5-15
Control panel buttons ...............4-5
Backbutton..................4-6
Brightness/contrast button ..........4-6 Clockset...................4-17
Enterbutton..................4-7
Setting button
.................4-6
Controls Audio controls ................4-68
Audio controls (steering wheel) ....4-8,4-69
Heater and air conditioner controls .....4-49
Coolant Capacities and recommended
fuel/lubricants ................10-2
Changingenginecoolant...........8-5
Checking engine coolant level ........8-5
Engine coolant temperature gauge .....2-5
Corrosion protection ...............7-7
Cruisecontrol ...........5-38,5-38,5-39
Cupholders...................2-54
D
Daytime Running Light System .........2-38
Defroster switch Rear window and outside mirror defroster
switch.....................2-35
Digital Versatile Disc (DVD) player .......4-85
Dimensionsandweights ............10-9
Dimmer switch for instrument panel ......2-39
Display controls
(seecontrolpanelbuttons).........4-6,4-9
Door locks .....................3-5
Drive belt .....................8-13
Drive positioner, Automatic ........3-36,3-39
Driving Cold weather driving .............5-74
Driving with Continuously Variable
Transmission (CVT) .............5-15 Precautions when starting and driving
....5-2
Driving the vehicle ................5-15
Dual panel moonroof ..............2-61
Dual power moonroof ..............2-61
E
Economy-fuel..................5-62
Emergency engine shutoff .........5-12,6-2
Emission control information label ......10-11
Emission control system warranty .......10-30
Engine Before starting the engine ..........
5
-14
Blockheater.................5-75
Capacities and recommended
fuel/lubricants ................10-2
Changing engine coolant ...........8-5
Changingengineoil..............8-7
Changing engine oil filter ...........8-8
Checking engine coolant level ........8-5
Checking engine oil level ...........8-6
Engine compartment check locations ....8-3
Engine coolant temperature gauge .....2-5
Engine cooling system ............8-4
Engineoil ...................8-6
Engine oil and oil filter recommendation . .10-6
Engine oil viscosity ..............10-7
Engine serial number ............10-11
Engine specifications ............10-8
Starting the engine .............5-14
Engine coolant temperature gauge .......2-5
Enter button ....................4-7
Event Data recorders .............10-32
Exhaust gas (Carbon monoxide) .........5-2
Explanation of maintenance items ........9-2
11-2