Page 129 of 555

To turn the fog lights on, rotate the headlight
switch to the
position, then rotate the fog
light switch to the
position.
To turn the fog lights on with the headlight")
FOG LIGHT SWITCH (if so equipped)
To turn the fog lights on, rotate the headlight
switch to the
position, then rotate the fog
light switch to the
position.
To turn the fog lights on with the headlight switch
in the AUTO position, the headlights must be on,
then rotate the fog light switch to the
po-
sition.
To turn the fog lights off, rotate the fog light
switch to the OFF position.
The headlights must be on and the low beams
selected for the fog lights to operate. The fog
lights automatically turn off when the high beam
headlights are selected. To sound the horn, push the center pad area of
the steering wheel.
WARNING
Do not use or allow occupants to use the
climate controlled seats if you or the oc-
cupants can not monitor seat tempera-
tures or have an inability to feel pain in
those body parts in contact with the seat.
Use of the climate controlled seats by
such people could result in serious injury.
CAUTION
●
The battery could run down if the cli-
mate control seat is operated while the
engine is not running.
LIC3256LIC2227SIC4334
HORN CLIMATE CONTROLLED SEAT
SWITCHES (if so equipped)
2-40Instruments and controls
Page 137 of 555
 maximum.
The instrument panel and center console (if so
equippe")
12V OUTLETS
The power outlets are for powering electrical
accessories such as cellular telephones. They
are rated at 12 volt, 120W (10A) maximum.
The instrument panel and center console (if so
equipped) power outlets are powered only when
the ignition switch is in the ACC or ON position.
CAUTION
●The outlet and plug may be hot during
or immediately after use.
● Only certain power outlets are designed
for use with a cigarette lighter unit. Do
not use any other power outlet for an
accessory lighter. It is recommended
that you visit a NISSAN dealer for addi-
tional information.
● Do not use with accessories that exceed
a 12 volt, 120W (10A) power draw. ●
Do not use double adapters or more
than one electrical accessory.
● Use power outlets with the engine run-
ning to avoid discharging the vehicle
battery.
● Avoid using power outlets when the air
conditioner, headlights, or rear window
defroster is on.
● Before inserting or disconnecting a
plug, be sure the electrical accessory
being used is turned off.
Instrument Panel
LIC3345
Center Console (if so equipped)
LIC3461
Cargo Area
LIC2236
POWER OUTLETS
2-48Instruments and controls
Page 138 of 555
●Push the plug in as far as it will go. If
good contact is not made, the plug may
overheat or the internal temperature
fuse may open.
● When not in use, be sure to close the
cap. Do not allow water or any other
liquid to contact the outlet.
120V OUTLET (if so equipped)
CAUTION
●The outlet and plug may be hot during
or immediately after use.
● Use power outlets with the engine run-
ning to avoid discharging the vehicle
battery.
● Do not use double adaptors or more
than one electrical accessory. ●
Avoid using power outlets when the air
conditioner, headlights or rear window
defroster is on.
● Before inserting or disconnecting a
plug, be sure the electrical accessory
being used is turned off.
● Push the plug in as far as it will go. If
good contact is not made, the plug may
overheat or the internal temperature
fuse may open.
● When not in use, be sure to close the
cap. Do not allow water or any other
liquid to contact the outlet.
2nd Row
LIC2407
Instruments and controls2-49
Page 152 of 555
 , step lights (if so
equipped) , map lights and rear personal lights
will automatically turn on and stay on for a period
of time wh")
When the ON switch�1is pressed, the footwell
lights (if so equipped) , step lights (if so
equipped) , map lights and rear personal lights
will automatically turn on and stay on for a period
of time when:
● The doors are unlocked by the Intelligent
Key, a key or the request switch (if so
equipped) while all doors are closed and the
ignition switch is in the OFF position.
● When individually pushed.
When the OFF switch
�2is pushed, the interior
lights do not illuminate. NOTE:
The footwell lights and step lights illumi-
nate when the driver and passenger doors
are open regardless of the interior light
switch position. These lights will turn off
automatically after a period of time while
doors are open to prevent the battery from
becoming discharged.
CAUTION
Do not use for extended periods of time
with the engine stopped. This could result
in a discharged battery.
CONSOLE LIGHT
The console light will turn on whenever the park-
ing lights or headlights are illuminated.
The console light brightness can be adjusted
with the illumination brightness control.
LIC2302LIC2303
INTERIOR LIGHTS
Instruments and controls2-63
Page 174 of 555

The rear liftgate can be opened and closed by
performing the following:● Press the
button for longer than
0.5 seconds to open the rear liftgate.
● Pres")
Releasing the rear liftgate (if so
equipped)
The rear liftgate can be opened and closed by
performing the following:● Press the
button for longer than
0.5 seconds to open the rear liftgate.
● Press the
button again for longer than
0.5 seconds to close the rear liftgate.
When the
button is pressed during the
open or close process, the liftgate motors will
stop. When the
button is pressed again,
the liftgate will reverse direction.
Using the panic alarm
If you are near your vehicle and feel threatened,
you may activate the panic alarm to call attention
by pressing and holding the
button on the
Intelligent Key for longer than 0.5 seconds.
The panic alarm and headlights will stay on for a
period of time. The panic alarm stops when:
● It has run for a period of time, or
● Any button is pressed on the Intelligent Key.
● The request switch on the driver or passen-
ger door is pushed and the Intelligent Key is
in range of the door handle.
Linking the key fob to automatic drive
positioner memory (if so equipped)
If the vehicle is equipped with automatic drive
positioner, the key fob can be linked to a memory
setting.
For additional information, refer to “Automatic
drive positioner” in this section.
WPD0414LPD2271
Pre-driving checks and adjustments3-15
Page 192 of 555
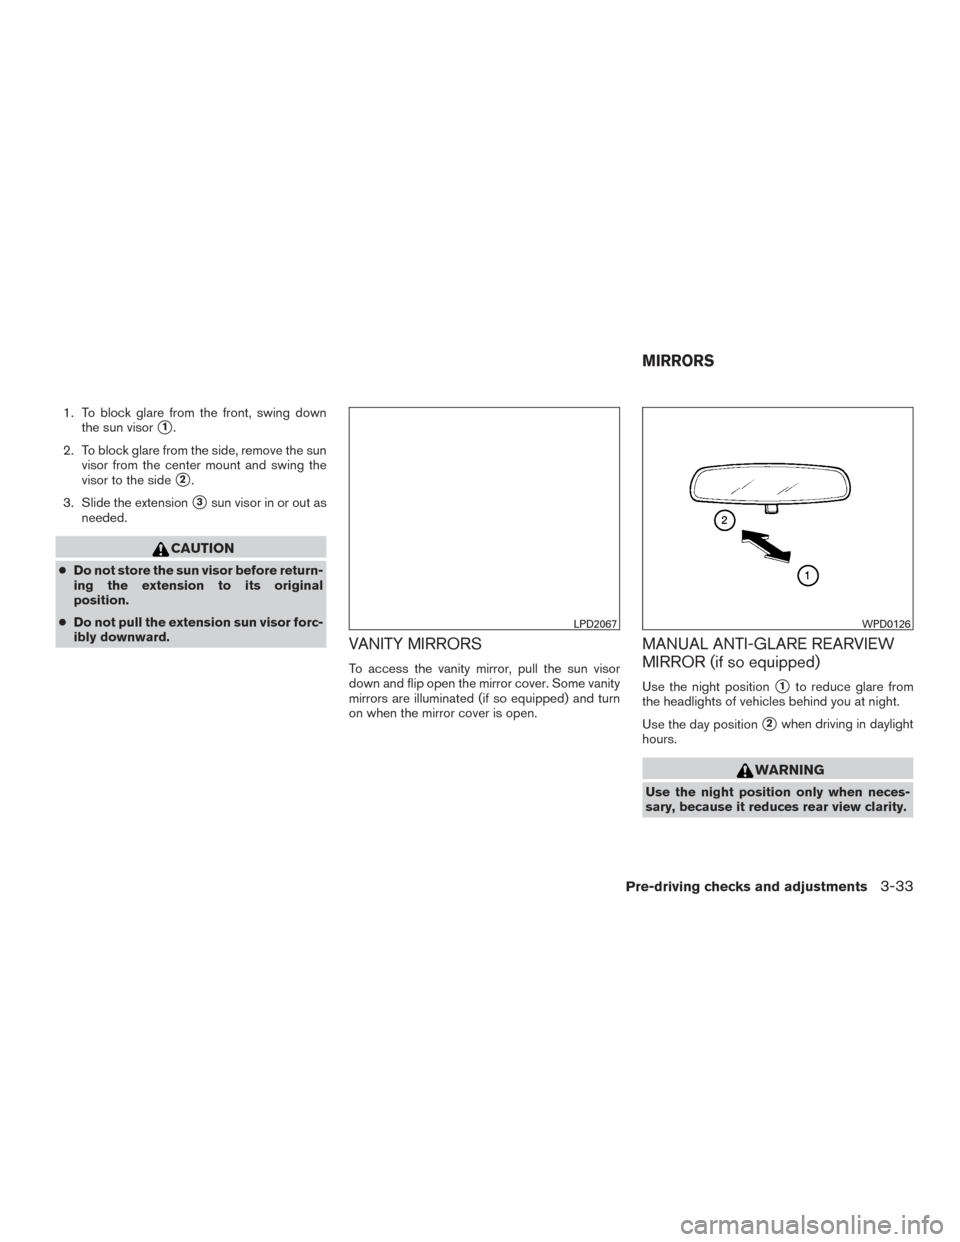
1. To block glare from the front, swing downthe sun visor
�1.
2. To block glare from the side, remove the sun visor from the center mount and swing the
visor to the side
�2.
3. Slide the extension
�3sun visor in or out as
needed.
CAUTION
● Do not store the sun visor before return-
ing the extension to its original
position.
● Do not pull the extension sun visor forc-
ibly downward.
VANITY MIRRORS
To access the vanity mirror, pull the sun visor
down and flip open the mirror cover. Some vanity
mirrors are illuminated (if so equipped) and turn
on when the mirror cover is open.
MANUAL ANTI-GLARE REARVIEW
MIRROR (if so equipped)
Use the night position�1to reduce glare from
the headlights of vehicles behind you at night.
Use the day position
�2when driving in daylight
hours.
WARNING
Use the night position only when neces-
sary, because it reduces rear view clarity.
LPD2067WPD0126
MIRRORS
Pre-driving checks and adjustments3-33
Page 193 of 555

The inside mirror is designed so that it automati-
cally dims during night time conditions and ac-
cording to the intensity of the headlights of t")
AUTOMATIC ANTI-GLARE
REARVIEW MIRROR (if so equipped)
The inside mirror is designed so that it automati-
cally dims during night time conditions and ac-
cording to the intensity of the headlights of the
vehicle following you. The automatic anti-glare
feature is activated when the ignition switch is in
the ON position.
The indicator light
�2will illuminate when the
automatic anti-glare feature is operating.
NOTE:
Do not hang any objects over the sensors
�1or apply glass cleaner to the sensors.
Doing so will reduce the sensitivity of the
sensors, resulting in improper operation.
Type A and Type B (if so equipped)
The indicator light�2will illuminate when the
automatic anti-glare feature is operating.
To turn off the automatic anti-glare feature, press:
● the O button for inside mirrors without
compass.
● the
button for inside mirrors with
compass.
The indicator light will turn off. To turn on the automatic anti-glare feature again,
press:
● the | button for inside mirrors without
compass.
● the
button for inside mirrors with
compass.
The indicator light will turn on.
For additional information on HomeLink® Univer-
sal Transceiver (if so equipped) operation, refer
to “HomeLink® Universal Transceiver” in the “In-
struments and controls” section of this manual.
Type A - Without compass (if so equipped)
LPD0469
Type B - With compass (if so equipped)
LPD2419
3-34Pre-driving checks and adjustments
Page 462 of 555

8 Do-it-yourself
Maintenance precautions...........................8-2
Engine compartment check locations ................8-3
Engine cooling system .............................8-4
Checking engine coolant level ...................8-5
Changing engine coolant ........................8-5
Engine oil .........................................8-6
Checking engine oil level ........................8-6
Changing engine oil ............................8-7
Changing engine oil filter ........................8-8
Continuously Variable Transmission (CVT) fluid .......8-9
Power steering fluid ................................8-9
Brake fluid ....................................... 8-10
Windshield-washer fluid ........................... 8-11
Windshield-washer fluid reservoir ...............8-11
Battery .......................................... 8-11
Jump starting ................................. 8-13
Drive belt ........................................ 8-13
Spark plugs ...................................... 8-14
Replacing spark plugs ......................... 8-14
Air cleaner ....................................... 8-15In-cabin microfilter
............................. 8-15
Windshield wiper blades .......................... 8-16
Cleaning ..................................... 8-16
Replacing .................................... 8-16
Brakes .......................................... 8-17
Fuses ........................................... 8-18
Engine compartment ........................... 8-18
Passenger compartment .......................8-19
Battery replacement .............................. 8-20
NISSAN Intelligent Key® .......................8-21
Lights ........................................... 8-22
Headlights .................................... 8-22
Fog lights (if so equipped) ......................8-22
Exterior and interior lights .......................8-23
Wheels and tires ................................. 8-25
Tire pressure .................................. 8-25
Tire labeling ................................... 8-28
Types of tires .................................. 8-31
Tire chains .................................... 8-32
Changing
wheels and tires ..................... 8-32