Page 121 of 466

●Pre-mix windshield-washer fluid con-
centrates with water to the manufactur-
er’s recommended levels before pour-
ing the fluid into the windshield-washer
fluid reservoir. Do not use the
windshield-washer fluid reservoir to
mix the windshield-washer fluid con-
centrate and water.
To defrost the rear window glass and outside
mirrors (if so equipped) , start the engine and
push the rear window defroster switch on. The
rear window defroster indicator light on the
switch comes on. Push the switch again to turn
the defroster off.
The rear window defroster automatically turns off
after approximately 15 minutes.
CAUTION
When cleaning the inner side of the rear
window, be careful not to scratch or dam-
age the rear window defroster. NOTE:
The top and bottom few rows of wires on
the rear window are not part of the rear
window defroster system. These wires
make up the antenna for the audio system.
LIC2923
REAR WINDOW AND OUTSIDE
MIRROR (if so equipped)
DEFROSTER SWITCH
2-32Instruments and controls
Page 156 of 466

CAUTION
Listed below are conditions or occur-
rences which will damage the Intelligent
Key:
●Do not allow the Intelligent Key, which
contains electrical components, to
come into contact with water or salt
water. This could affect the system
function.
● Do not drop the Intelligent Key.
● Do not strike the Intelligent Key sharply
against another object.
● Do not change or modify the Intelligent
Key.
● Wetting may damage the Intelligent
Key. If the Intelligent Key gets wet, im-
mediately wipe until it is completely dry.
● Do not place the Intelligent Key for an
extended period in an area where tem-
peratures exceed 140°F (60°C) .
● Do not attach the Intelligent Key with a
key holder that contains a magnet.
● Do not place the Intelligent Key near
equipment that produces a magnetic
field, such as a TV, audio equipment and
personal computers. If an Intelligent Key is lost or stolen,
NISSAN recommends erasing the ID code
of that Intelligent Key from the vehicle.
This may prevent the unauthorized use of
the Intelligent Key to operate the vehicle.
For information regarding the erasing
procedure, it is recommended that you
visit a NISSAN dealer.
Mechanical key
The Intelligent Key contains the mechanical key.
To remove the mechanical key, release the lock
knob on the back of the Intelligent Key.
To install the mechanical key, firmly insert it into
the Intelligent Key until the lock knob returns to
the lock position.
Use the mechanical key to lock or unlock the
driver’s door.
SPA1951
Pre-driving checks and adjustments3-3
Page 191 of 466

4 Display screen, heater, air conditioner,
audio and phone systems
RearView Monitor.................................4-2
RearView Monitor system operation ..............4-3
How to read the displayed lines ..................4-3
Difference between predicted and actual
distances ......................................4-4
How to park with predicted course lines ...........4-5
Adjusting the screen ............................4-7
How to turn on and off predicted course
lines (models with navigation) ....................4-7
RearView Monitor system limitations ..............4-8
System maintenance ............................4-9
Around View® Monitor (if so equipped) .............4-10
Around View® Monitor system operation .........4-11
Difference between predicted and actual
distances ..................................... 4-14
How to park with predicted course lines ..........4-16
How to switch the display ......................4-17
Adjusting the screen ........................... 4-18
Around View® Monitor system limitations ........4-18
System maintenance ........................... 4-20
Moving Object Detection (MOD) (if so equipped) ....4-21
MOD system operation ......................... 4-22
Turning MOD on and off ........................ 4-23
MOD system limitations ........................ 4-23System maintenance
........................... 4-24
Vents ........................................... 4-25
Heater and Air Conditioner (automatic) ..............4-26
Automatic operation ........................... 4-27
Manual operation .............................. 4-28
Operating tips ................................. 4-28
Servicing air conditioner ........................... 4-29
Audio system .................................... 4-29
Radio ........................................ 4-29
FM radio reception ............................ 4-30
AM radio reception ............................ 4-30
Satellite radio reception ........................ 4-30
Audio operation precautions ....................4-31
FM/AM/SAT radio with compact disc (CD)
player (if so equipped) ......................... 4-38
USB (Universal Serial Bus) Connection Port
(models without Navigation System)
(if
so equipped) ............................... 4-42
iPod®* player operation without Navigation
System (if so equipped) ........................ 4-45
Bluetooth® streaming audio without
Navigation System ............................. 4-47
CD care and cleaning .......................... 4-48
Steering wheel switch for audio control ..........4-49
Page 193 of 466
1. CAMERA button (if so equipped)WARNING
●Failure to follow the warnings and in-
structions for proper use of the Rear-
View Monitor system could result in se-
rious injury or death. ●
RearView Monitor is a convenience fea-
ture and is not a substitute for proper
backing. Always turn and look out the
windows and check mirrors to be sure
that it is safe to move before operating
the vehicle. Always back up slowly.
LHA3827
REARVIEW MONITOR
4-2Display screen, heater, air conditioner, audio and phone systems
Page 194 of 466

●The system is designed as an aid to the
driver in showing large stationary ob-
jects directly behind the vehicle, to help
avoid damaging the vehicle.
● The distance guide line and the vehicle
width line should be used as a reference
only when the vehicle is on a level
paved surface. The distance viewed on
the monitor is for reference only and
may be different than the actual dis-
tance between the vehicle and dis-
played objects.
CAUTION
Do not scratch the camera lens when
cleaning dirt or snow from the front of the
camera.
The RearView Monitor system automatically
shows a rear view of the vehicle when the shift
lever is shifted into the R (Reverse) position or
when the CAMERA button (if so equipped) is
pressed. The radio can still be heard while the
RearView Monitor is active. To display the rear view, the RearView Monitor
system uses a camera located just above the
vehicle’s license plate
�1.
REARVIEW MONITOR SYSTEM
OPERATION
With the ignition switch in the ON position, move
the shift lever to the R (Reverse) position or press
the CAMERA button (if so equipped) to operate
the RearView Monitor.
HOW TO READ THE DISPLAYED
LINES
Guiding lines which indicate the vehicle width
and distances to objects with reference to the
vehicle body line
�Aare displayed on the monitor.
Distance guide lines
Indicate distances from the vehicle body. ● Red line
�1: approx. 1.5 ft (0.5 m)
● Yellow line
�2: approx. 3 ft (1 m)
● Green line
�3: approx. 7 ft (2 m)
● Green line
�4: approx. 10 ft (3 m)
LHA3828LHA1196
Display screen, heater, air conditioner, audio and phone systems4-3
Page 195 of 466

Vehicle width guide lines�5
Indicate the vehicle width when backing up.
Predicted course lines
�6
Indicate the predicted course when backing up.
The predicted course lines will be displayed on
the monitor when the shift lever is in the R (Re-
verse) position and the steering wheel is turned.
The predicted course lines will move depending
on how much the steering wheel is turned and
will not be displayed while the steering wheel is in
the straight-ahead position.
The vehicle width guide lines and the width of the
predicted course lines are wider than the actual
width and course.
DIFFERENCE BETWEEN
PREDICTED AND ACTUAL
DISTANCES
The displayed guidelines and their locations on
the ground are for approximate reference only.
Objects on uphill or downhill surfaces or project-
ing objects will be actually located at distances
different from those displayed in the monitor rela-
tive to the guidelines (refer to illustrations) . When
in doubt, turn around and view the objects as you
are backing up, or park and exit the vehicle to
view the positioning of objects behind the ve-
hicle.
Backing up on a steep uphill
When backing up the vehicle up a hill, the dis-
tance guide lines and the vehicle width guide
lines are shown closer than the actual distance.
Note that any object on the hill is further than it
appears on the monitor.
Backing up on a steep downhill
When backing up the vehicle down a hill, the
distance guide lines and the vehicle width guide
lines are shown farther than the actual distance.
Note that any object on the hill is closer than it
appears on the monitor.
LHA4239LHA4240
4-4Display screen, heater, air conditioner, audio and phone systems
Page 196 of 466

Backing up near a projecting object
The predicted course lines�Ado not touch the
object in the display. However, the vehicle may hit
the object if it projects over the actual backing up
course.
Backing up behind a projecting object
The position�Cis shown farther than the position
�Bin the display. However, the position�Cis
actually at the same distance as the position
�A.
The vehicle may hit the object when backing up to the position
�Aif the object projects over the
actual backing up course.
HOW TO PARK WITH PREDICTED
COURSE LINES
WARNING
● If the tires are replaced with different
sized tires, the predicted course lines
may be displayed incorrectly.
● On a snow-covered or slippery road,
there may be a difference between the
predicted course line and the actual
course line.
● If the battery is disconnected or be-
comes discharged, the predicted course
lines may be displayed incorrectly. If
this occurs, please perform the follow-
ing procedures:
– Turn the steering wheel from lock to lock while the engine is running.
– Drive the vehicle on a straight road for more than 5 minutes.
● When the steering wheel is turned with
the ignition switch in the ACC position,
the predicted course lines may be dis-
played incorrectly.
LHA1201LHA3525
Display screen, heater, air conditioner, audio and phone systems4-5
Page 197 of 466
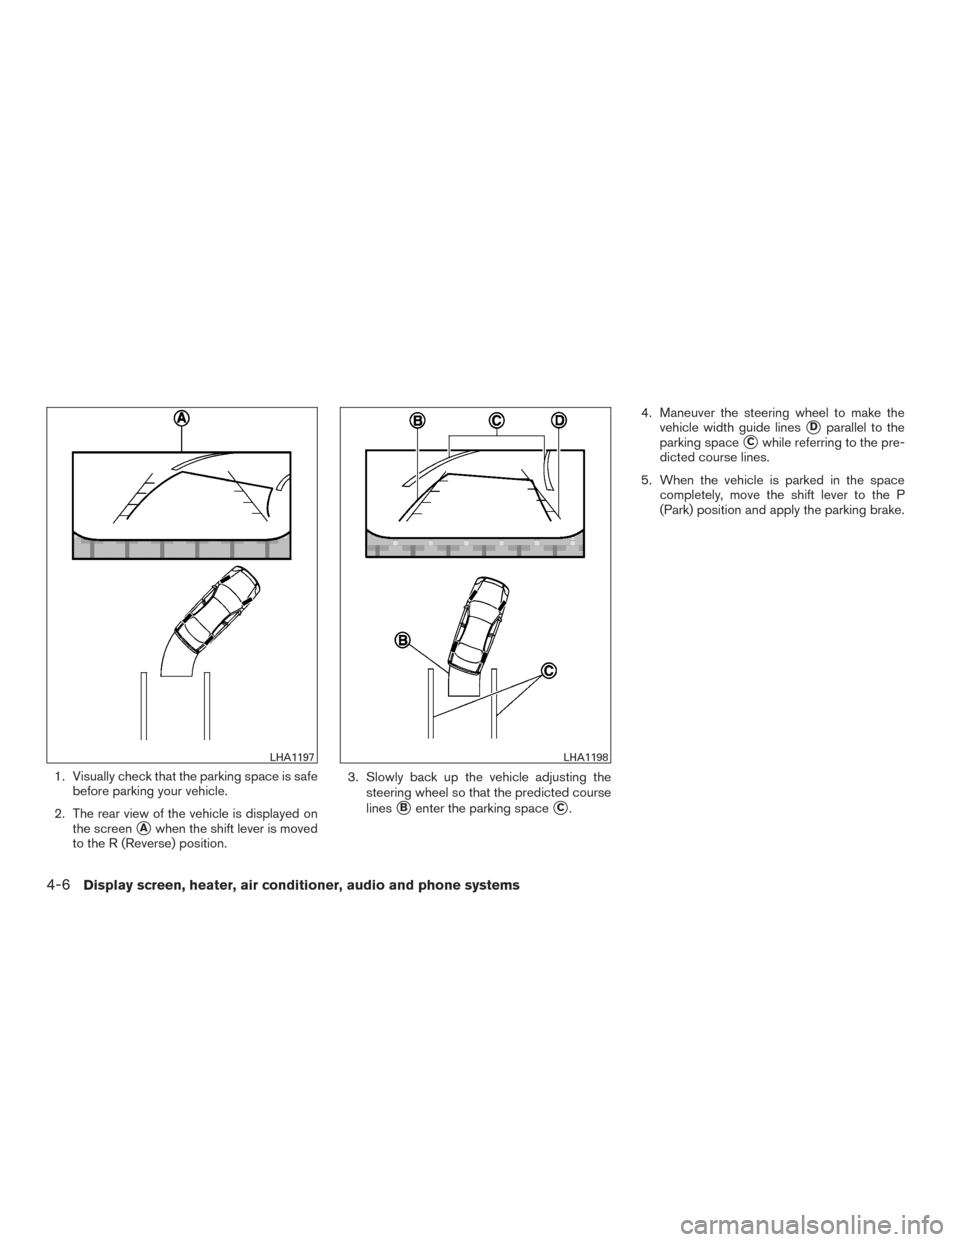
1. Visually check that the parking space is safebefore parking your vehicle.
2. The rear view of the vehicle is displayed on the screen
�Awhen the shift lever is moved
to the R (Reverse) position. 3. Slowly back up the vehicle adjusting the
steering wheel so that the predicted course
lines
�Benter the parking space�C. 4. Maneuver the steering wheel to make the
vehicle width guide lines
�Dparallel to the
parking space
�Cwhile referring to the pre-
dicted course lines.
5. When the vehicle is parked in the space completely, move the shift lever to the P
(Park) position and apply the parking brake.
LHA1197LHA1198
4-6Display screen, heater, air conditioner, audio and phone systems
WARNING
●Failure to follow the warnings and in-
structions for proper use of the Rear-
View Monitor system could result in se-
rious injury or death. ●
RearView Mo")