2017 NISSAN LEAF key
[x] Cancel search: keyPage 3 of 40
NEW SYSTEM FEATURESHow to Use Your LEAF’s Touch-screen Display ........................................2
NissanC onnectSM EV (if so equipped) ..................................................3
Approaching Vehicle Sound for Pedestrians (VSP) System............................3
Around View® Monitor (if so equipped)
................................................
4
Shif
t Control System
...................................................................5
Heated Seats
........................................................................\
...6
SiriusXM
Travel Link and SiriusXM Traffic (if so equipped) .............................
6
ESSENTIAL INFORMATIONCold Weather Range and Parking in Extremely Cold Weather.........................7
Quick Char ge in Cold Weather (if so equipped)........................................7
Li-ion Bat
tery Temperature Gauge and Li-ion Battery Gauges
........................8
P
ower Limitation Indicator Light ......................................................
8
Charge Port Lid/Charge Connector Lock Switch
......................................9
Li-ion Bat
tery Charging
...............................................................10
Tire Pressure Monitoring System (TPMS) with Easy-Fill Tire Alert
....................
12
Clock Set/A
djustment ................................................................
13
FIRST DRIVE FEATURESNissan Intelligent Key® System .......................................................15
Rear Hatch Release ...................................................................15
Seat Adjustments
.....................................................................16
Outside Mirror Control Switch
........................................................
16
Power Meter
.......................................................................\
...
17
Electric Vehicle (EV) System Warning Light
...........................................
17
Starting/Stopping the Electric Vehicle (EV) System
..................................
17
Headlight Control Switch
.............................................................
18
Wiper and Washer Switch
.............................................................19
Heater and Air Conditioner (automatic) (if so equipped)
.............................
20
FM/AM/SiriusXM® Satellite Radio with CD Player (if so equipped)
....................22
Cruise Control
........................................................................\
.23
USB (Universal Serial Bus) Connection Port/aux jack and iPod® Interface
...........24
SYSTEM GUIDETrip Computer .......................................................................\
.25
NissanC onnectSM Mobile Apps (if so equipped).......................................26
Hands-fr
ee Text Messaging Assistant ................................................27
Bluetooth® Hands-fr
ee Phone System ...............................................
28 S
ystem Operating Tips
.............................................................28
Bluetooth® S
ystem without Navigation (if so equipped) .............................
28
Bluetooth® S
ystem with Navigation (if so equipped)
................................30
Bluetooth® S
treaming Audio
..........................................................31
Na
vigation System (if so equipped)
...................................................33
HomeLink® Univ
ersal Transceiver (if so equipped)
....................................35
Please see your Owner’s Manual for important safety information and system operation limitations.
• A c ellular telephone should not be used for any purpose while driving so full attention may
be given to vehicle operation.
•
A
lways wear your seat belt.
•
Supplemental air bags do not r
eplace proper seat belt usage.
•
Childr
en 12 and under should always ride in the rear seat properly secured in child restraints
or seat belts according to their age and weight.
•
Do not drink and driv
e.
For more information, refer to the “Safety — Seats, seat belts and supplemental restraint system
(section 1)”, the “Display screen, heater, air conditioner, audio and phone systems (section 4)” and the
“Starting and driving (section 5)” of your Owner’s Manual and the “Audio system (section 4)” and the
“Hands-Free Phone (section 7)” of your Navigation System Owner’s Manual.
Additional information about your vehicle is also available in your Owner’s Manual,
Navigation System Owner’s Manual and at www.NissanUSA.com.
TABLE OF CONTENTS
Page 4 of 40
2
NEW SYSTEM FEATURES
HOW TO USE YOUR LEAF’S
TOUCH-SCREEN DISPLAY
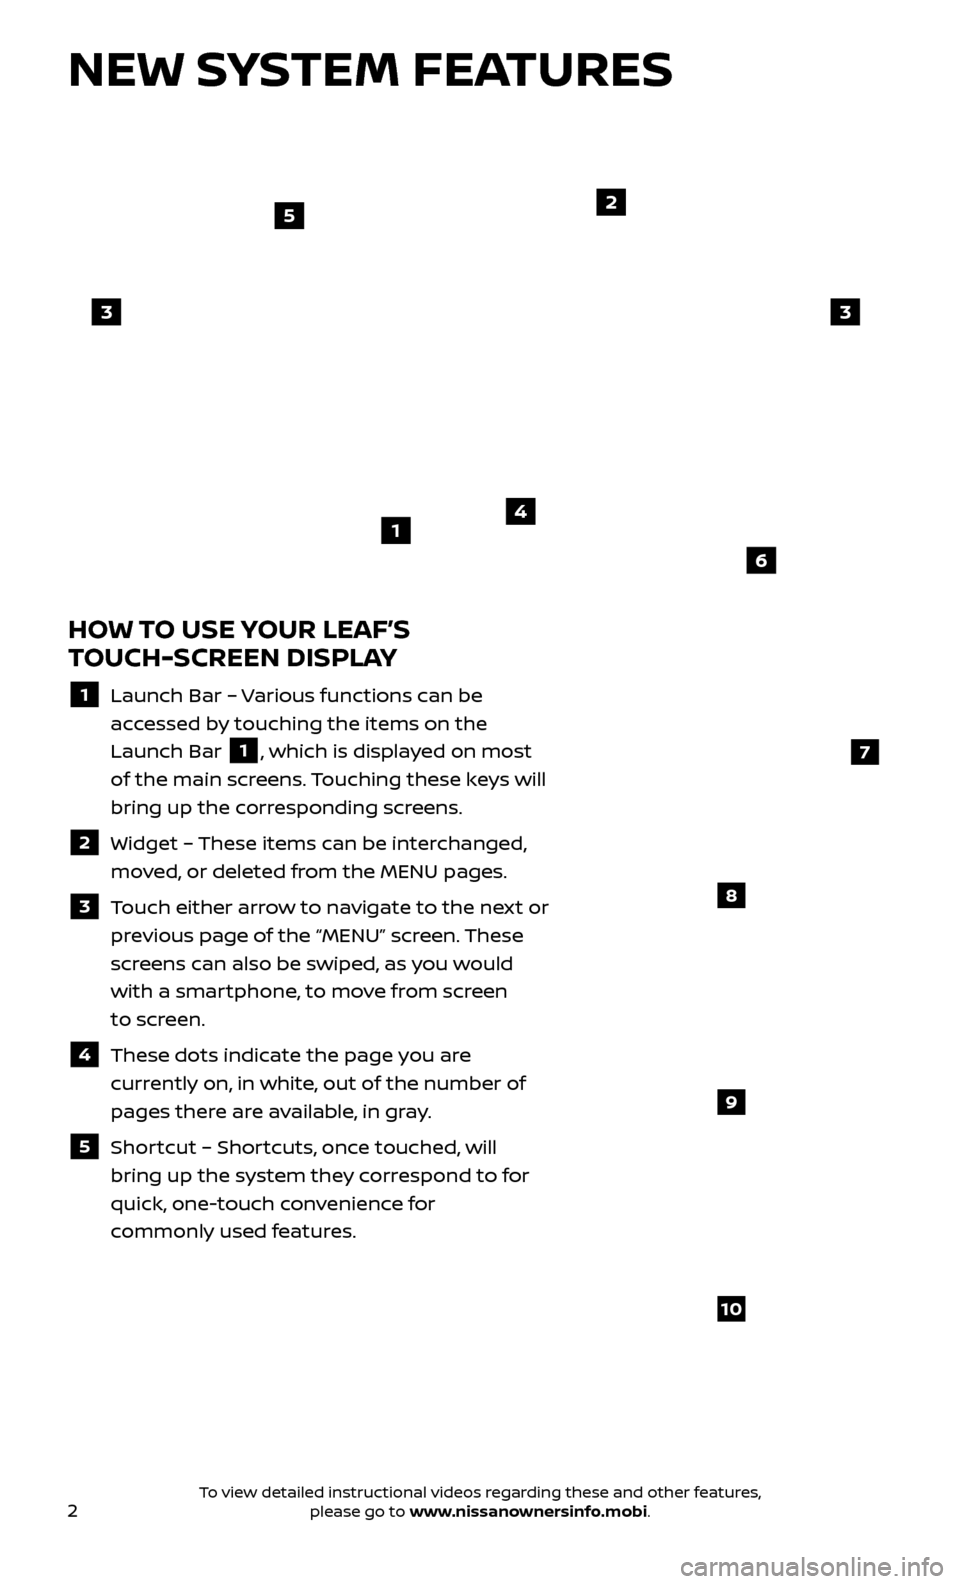
1 Launch Bar – Various functions can be
accessed by touching the items on the
Launch Bar
1, which is displayed on most
of the main screens. Touching these keys will
bring up the corresponding screens.
2 Widget – These items can be interchanged,
moved, or deleted from the MENU pages.
3 Touch either arrow to navigate to the next or previous page of the “MENU” screen. These
screens can also be swiped, as you would
with a smartphone, to move from screen
to screen.
4 These dots indic ate the page you are
currently on, in white, out of the number of
pages there are available, in gray.
5 Shortcut – Shortcuts, once touched, will
bring up the system they correspond to for
quick, one-touch convenience for
commonly used features.
4
2
33
5
7
8
9
10
1
6
To view detailed instructional videos regarding these and other features, please go to www.nissanownersinfo.mobi.
Page 5 of 40

3
NissanConnectSM EV (if so equipped)
NissanConnect EV is a collection of telematics features that add innovation to
your daily drive.
To enroll in NissanConnect EV, create an account or log into your Nissan Owner
Portal with your Vehicle Identification Number (VIN). Under the NissanConnect EV
tab, agree to the terms and conditions and obtain your PIN and Password. Enter
this PIN and Password into your navigation unit under the NissanConnect Services
button on the main menu. Next, download the NissanConnect EV companion
app and log into it using your Nissan Owner Portal ID and password.
For full details on NissanConnect EV or to enroll your vehicle, please
visit www.nissanUSA.com/connect or call 855-426-6628.
NissanConnect EV enables you to perform remote functions from a compatible
internet-enabled smartphone or personal computer such as:
Battery status check – The status of the battery can be checked even if you are not in the vehicle.
Unplugged status and char ge status – A notification e-mail can be sent if the
charging connector is disconnected or if charging is complete.
Remote charge and remote climate control – Start battery charging, or climate controls can be set.
POIs powered by Google™ – Allows you to search for locations near your vehicle’s current location, near a plotted destination, near the map’s scroll
position or near a searched city center.
Please see your Owner’s Manual for important safety information, system limitations, and additional
operating and feature information.
For more information, refer to the “Charging (section CH)” of your Owner’s Manual and the “System
overview (section IT)” and the “NissanConnect
SM EV (section 5)” of your Navigation System
Owner’s Manual.
APPROACHING VEHICLE SOUND FOR PEDESTRIANS
(VSP) SYSTEM
The VSP system helps alert pedestrians to the presence of the vehicle when it is
being driven at a low speed.
When the v ehicle starts to move, it produces a sound. The sound stops when the
vehicle speed reaches approximately 19 mph (30 km/h) while accelerating.
Please see your Owner’s Manual for important safety information, system limitations, and additional
operating and feature information.
For more information, refer to the “EV overview (section EV)” of your Owner’s Manual.
Shortcuts and Widgets can be set up through the “Edit Menu” screen which can be accessed by touching the
“Settings” key 6 followed by the “Edit Home
Menu” key
7. This will display the “Edit Menu” screen, which allows Shortcuts
and Widgets to be moved and rearranged
8, deleted 9 and created 10.
Please see your Owner’s Manual for important safety information, system limitations, and additional
operating and feature information.
For more information, refer to your Navigation System Owner’s Manual.
To view detailed instructional videos regarding these and other features, please go to www.nissanownersinfo.mobi.
Page 8 of 40

6
SiriusXM TRAVEL LINK AND SiriusXM TRAFFIC
(if so equipped)
Your vehicle’s Navigation System is equipped with SiriusXM Travel Link and SiriusXM
Traffic capabilities.
Touch the “Info”
key
to access SiriusXM
Travel Link and SiriusXM Traffic.
SiriusXM Travel Link provides access to real-
time weather information and forecasts,
nearby fuel prices, movie listings, sport scores
and stock quotes.
SiriusXM Traffic provides information that
may help to avoid delays due to traffic
incidents. Traffic jams, roadwork, road
closures around the current location, etc., are
represented graphically on the map by icons
depicting the nature of the event. Incidents
on the route are automatically displayed as they are approached.
Please see your Owner’s Manual for important safety information, system limitations, and additional
operating and feature information.
For more information, refer to the “Navigation (section 3)” and the “Viewing information (section 6)” of
your Navigation System Owner’s Manual.
NEW SYSTEM FEATURES
HEATED SEATS
The front seats and the rear outboard seats can be warmed by built-in heaters (if so equipped for rear seats).
The switches, located on the center console
1 (front seats) and on the side of the front
passenger seatback 2 (if so equipped for
rear seats), can be operated independently of
each other.
The heater is controlled by a thermostat, automatically turning the heater on and off. The indicator light will remain on as long as the switch is on.
Please see your Owner’s Manual for important safety information, system limitations, and additional
operating and feature information.
For more information, refer to the “Instruments and controls (section 2)” of your Owner’s Manual.
1
2
To view detailed instructional videos regarding these and other features, please go to www.nissanownersinfo.mobi.
Page 11 of 40
9
If the power limitation indicator light is illuminated, follow the instructions provided on the center display.
Please see your Owner’s Manual for important safety information, system limitations, and additional
operating and feature information.
For more information, refer to the “Instruments and controls (section 2)” of your Owner’s Manual.
CHARGE PORT LID/CHARGE CONNECTOR LOCK SWITCH
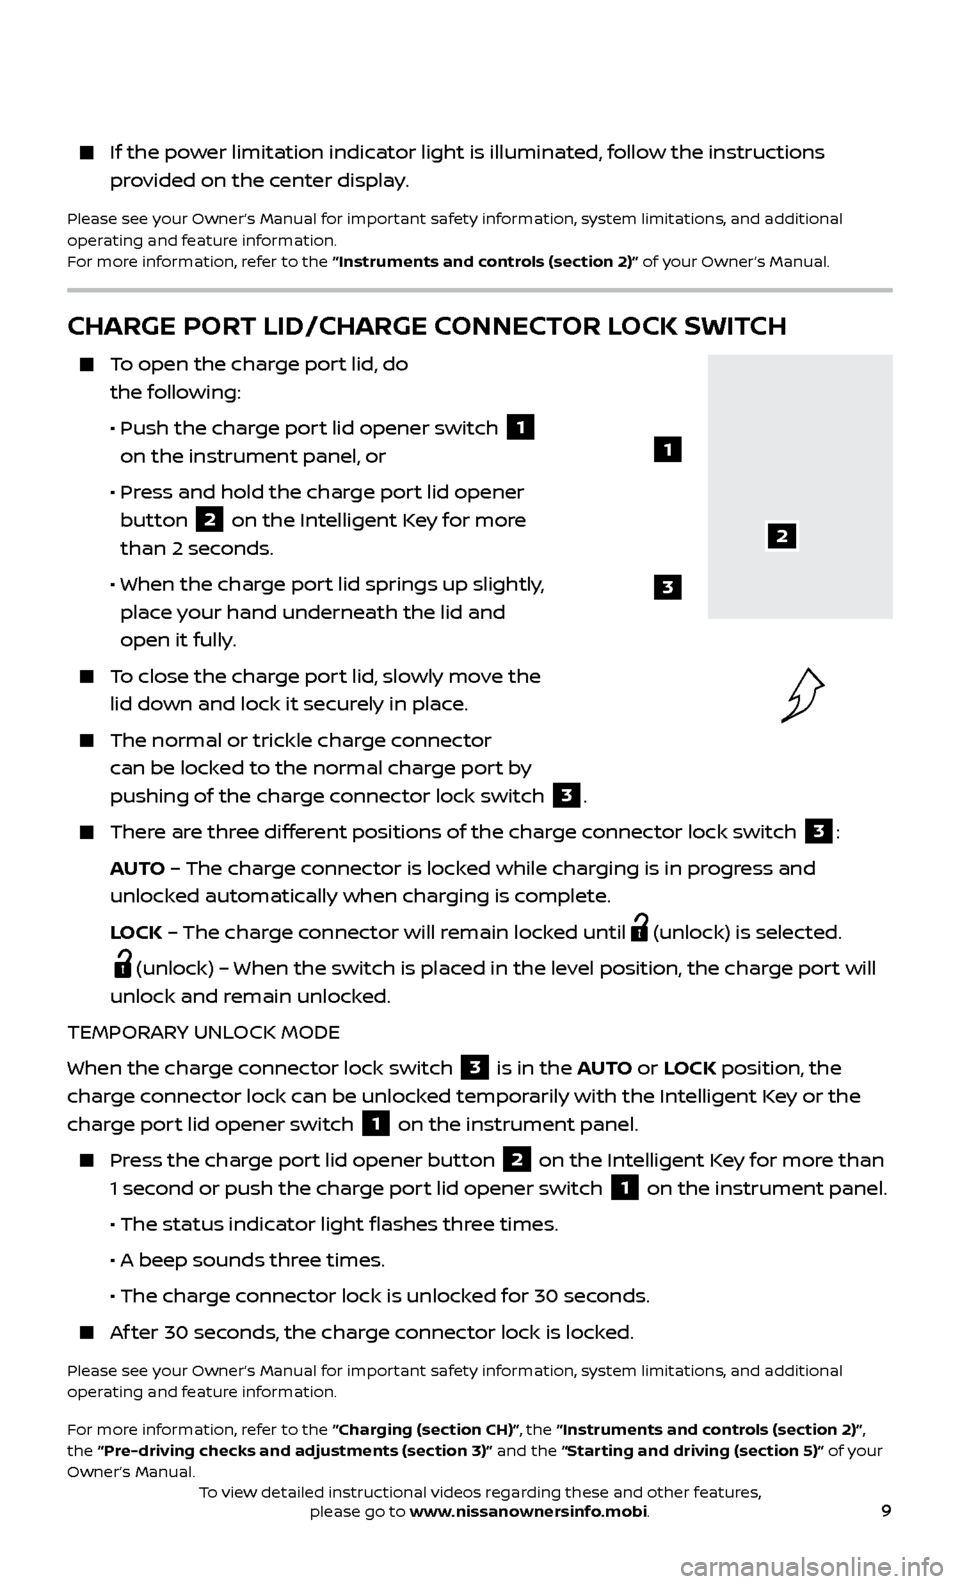
To open the charge port lid, do the following:
•
Push the char
ge port lid opener switch
1
on the instrument panel, or
•
Pr
ess and hold the charge port lid opener
button
2 on the Intelligent Key for more
than 2 seconds.
• When the char
ge port lid springs up slightly,
place your hand underneath the lid and
open it fully.
To close the charge port lid, slowly move the lid down and lock it securely in place.
The normal or trickle char ge connector
can be locked to the normal charge port by
pushing of the charge connector lock switch
3.
There are three different positions of the charge connector lock switch 3:
AUTO – The charge connector is locked while charging is in progress and
unlocked automatically when charging is complete.
L
OCK – The charge connector will remain locked until
(unlock) is selected.
(unlock) – When the switch is placed in the level position, the charge port will
unlock and remain unlocked.
TEMPORARY UNLOCK MODE
When the charge connector lock switch
3 is in the AUTO or LOCK position, the
charge connector lock can be unlocked temporarily with the Intelligent Key or the
charge port lid opener switch
1 on the instrument panel.
Press the charge port lid opener button 2 on the Intelligent Key for more than
1 second or push the charge port lid opener switch
1 on the instrument panel.
• The status indic
ator light flashes three times.
•
A beep sounds thr
ee times.
• The char
ge connector lock is unlocked for 30 seconds.
Af ter 30 seconds, the charge connector lock is locked.
Please see your Owner’s Manual for important safety information, system limitations, and additional
operating and feature information.
For more information, refer to the “Charging (section CH)”, the “Instruments and controls (section 2)”,
the “Pre-driving checks and adjustments (section 3)” and the “Starting and driving (section 5)” of your
Owner’s Manual.
2
1
3
To view detailed instructional videos regarding these and other features, please go to www.nissanownersinfo.mobi.
Page 15 of 40
13
CLOCK SET/ADJUSTMENT
VEHICLE INFORMATION DISPLAY
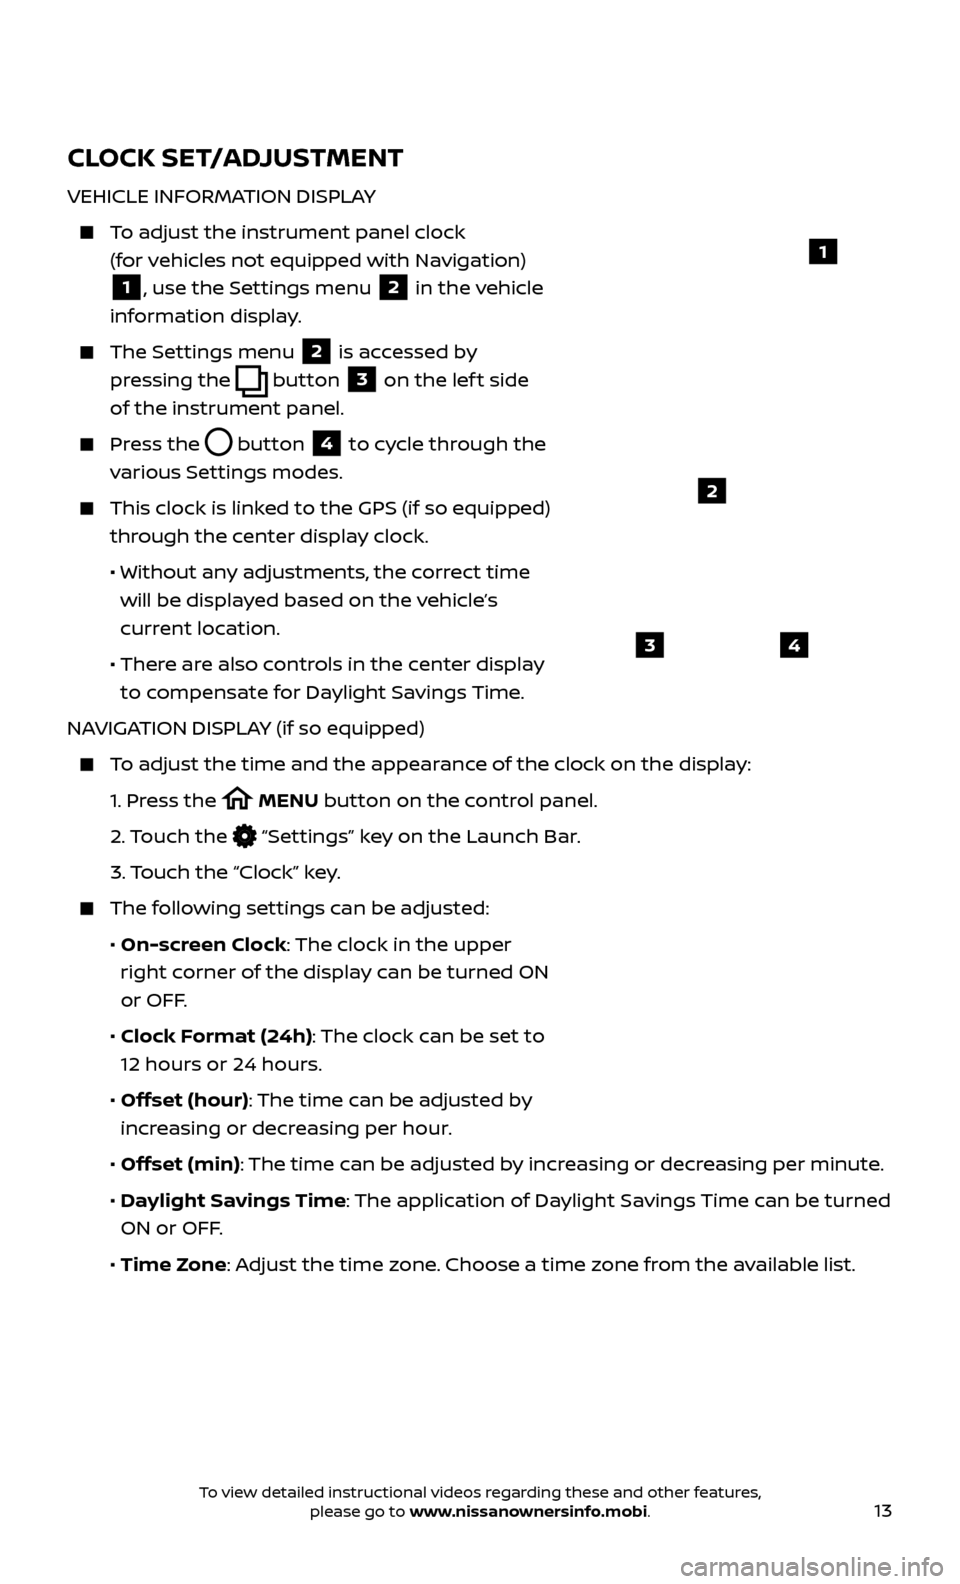
To adjust the instrument panel clock (for vehicles not equipped with Navigation)
1, use the Settings menu 2 in the vehicle
information display.
The Settings menu 2 is accessed by
pressing the
button
3 on the lef t side
of the instrument panel.
Press the button
4 to cycle through the
various Settings modes.
This clock is link ed to the GPS (if so equipped)
through the center display clock.
• Without an
y adjustments, the correct time
will be displayed based on the vehicle’s
current location.
• Ther
e are also controls in the center display
to compensate for Daylight Savings Time.
NAVIGATION DISPLAY (if so equipped)
To adjust the time and the appearance of the clock on the display:
1.
Pr
ess the
MENU button on the control panel.
2.
Touch the
“Settings” key on the Launch Bar.
3.
Touch the “Clock” key.
The following settings can be adjusted:
•
On-screen Clock: The clock in the upper
right corner of the display can be turned ON
or OFF.
•
Clock Format (24h): The clock can be set to
12 hours or 24 hours.
•
Offset (hour): The time can be adjusted by
increasing or decreasing per hour.
•
Offset (min): The time can be adjusted by increasing or decreasing per minute.
•
Daylight Savings Time: The application of Daylight Savings Time can be turned
ON or OFF.
•
Time Zone: Adjust the time zone. Choose a time zone from the available list.
1
2
43
To view detailed instructional videos regarding these and other features, please go to www.nissanownersinfo.mobi.
Page 17 of 40
15
REAR HATCH RELEASE
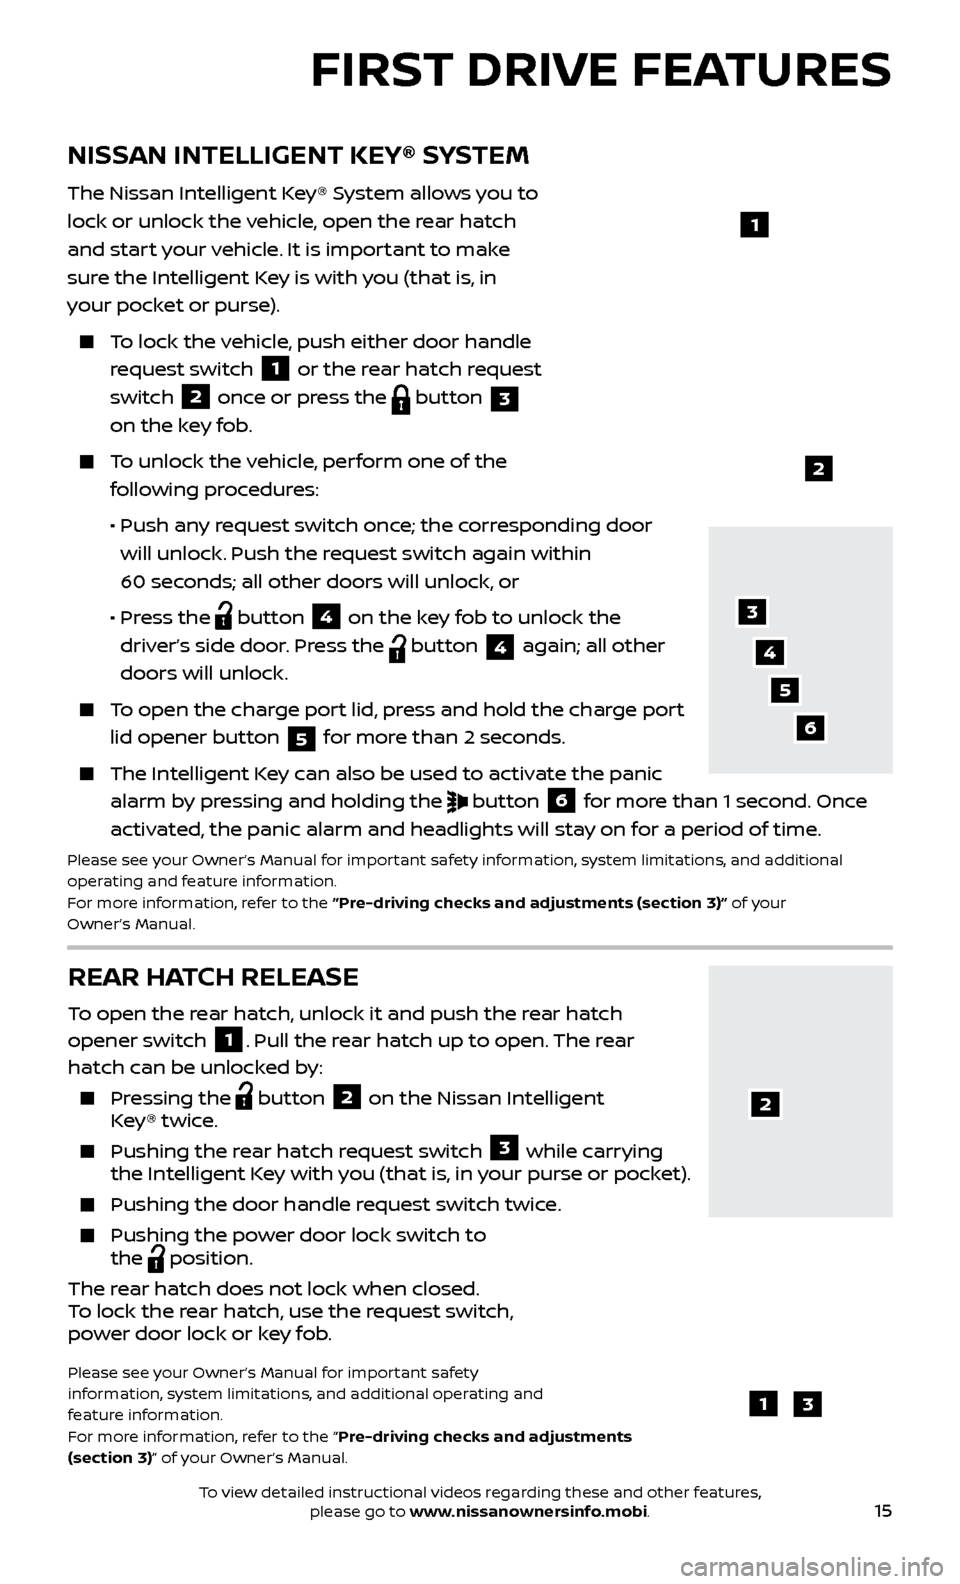
To open the rear hatch, unlock it and push the rear hatch
opener switch 1. Pull the rear hatch up to open. The rear
hatch can be unlocked by:
Pressing the button
2 on the Nissan Intelligent
Key® twice.
Pushing the r ear hatch request switch
3 while carrying
the Intelligent Key with you (that is, in your purse or pocket).
Pushing the door hand le request switch twice.
Pushing the power door lock switch to
the
position.
The rear hatch does not lock when closed.
To lock the rear hatch, use the request switch,
power door lock or key fob.
Please see your Owner’s Manual for important safety
information, system limitations, and additional operating and
feature information.
For more information, refer to the “Pre-driving checks and adjustments
(section 3)” of your Owner’s Manual.
NISSAN INTELLIGENT KEY® SYSTEM
The Nissan Intelligent Key® System allows you to
lock or unlock the vehicle, open the rear hatch
and start your vehicle. It is important to make
sure the Intelligent Key is with you (that is, in
your pocket or purse).
To lock the vehicle, push either door handle request switch
1 or the rear hatch request
switch 2 once or press the
button
3
on the key fob.
To unlock the vehicle, perform one of the
following procedures:
•
Push an
y request switch once; the corresponding door
will unlock. Push the request switch again within
60 seconds; all other doors will unlock, or
•
Pr
ess the
button
4 on the key fob to unlock the
driver’s side door. Press the button 4 again; all other
doors will unlock.
To open the charge port lid, press and hold the charge port lid opener button
5 for more than 2 seconds.
The Intel
ligent Key can also be used to activate the panic
alarm by pressing and holding the
button
6 for more than 1 second. Once
activated, the panic alarm and headlights will stay on for a period of time.
Please see your Owner’s Manual for important safety information, system limitations, and additional
operating and feature information.
For more information, refer to the “Pre-driving checks and adjustments (section 3)” of your
Owner’s Manual.
1
2
FIRST DRIVE FEATURES
3
4
6
5
13
2
To view detailed instructional videos regarding these and other features, please go to www.nissanownersinfo.mobi.
Page 19 of 40
17
POWER METER
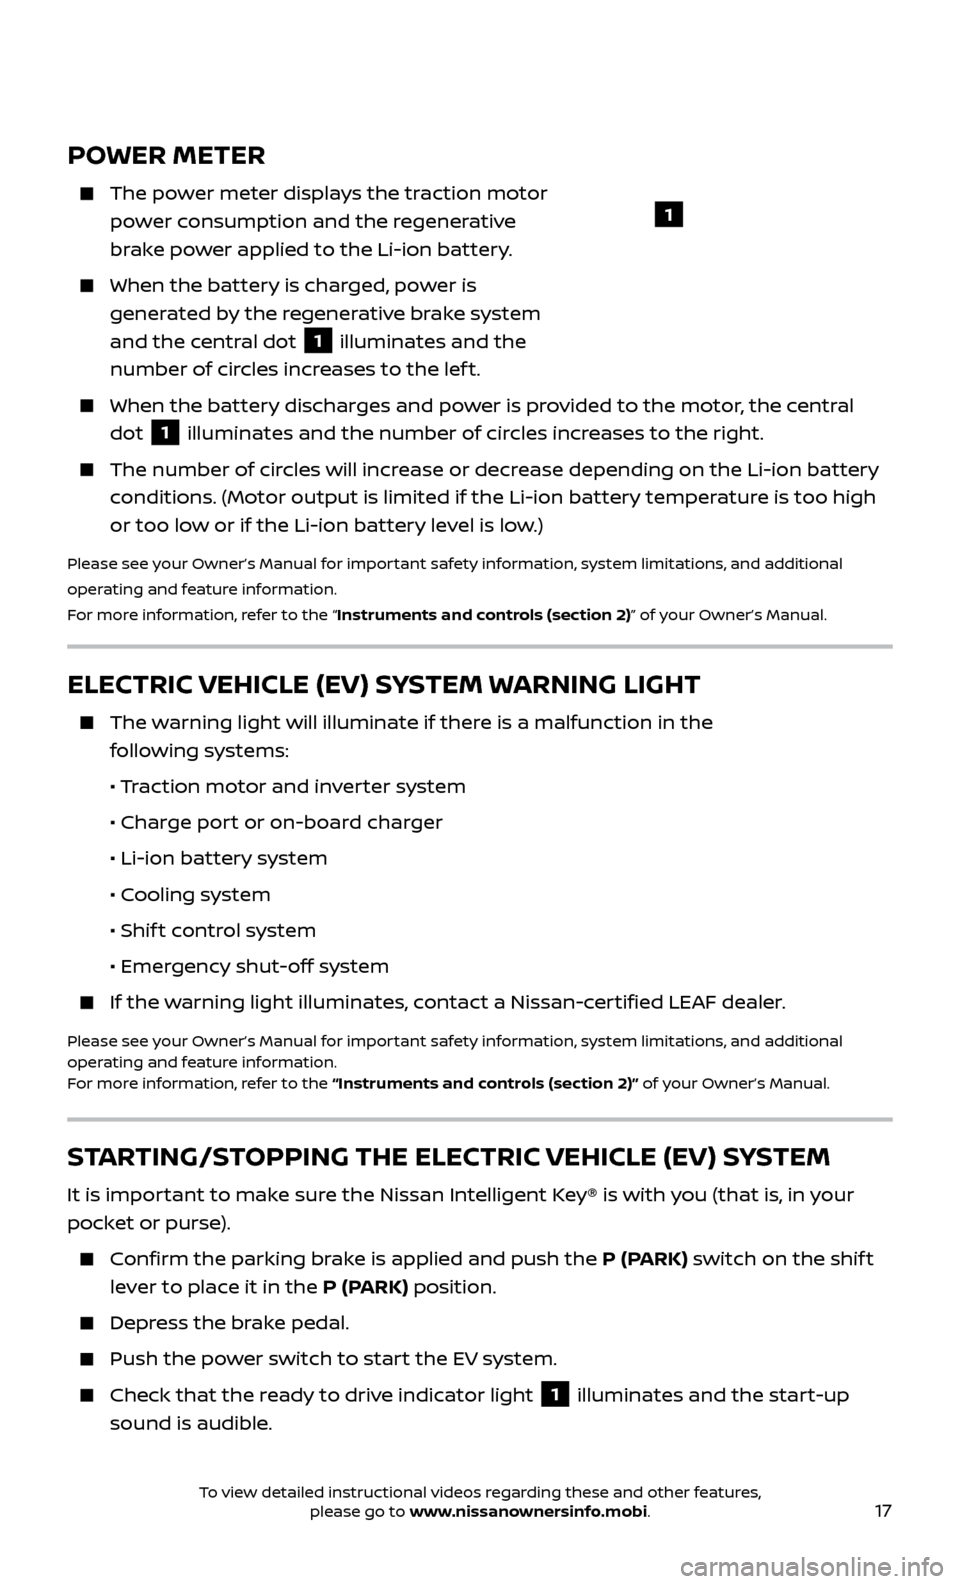
The power meter displays the traction motor power consumption and the regenerative
brake power applied to the Li-ion battery.
When the bat tery is charged, power is
generated by the regenerative brake system
and the central dot
1 illuminates and the
number of circles increases to the lef t.
When the bat tery discharges and power is provided to the motor, the central
dot
1 illuminates and the number of circles increases to the right.
The number of cir cles will increase or decrease depending on the Li-ion battery
conditions. (Motor output is limited if the Li-ion battery temperature is too high
or too low or if the Li-ion battery level is low.)
Please see your Owner’s Manual for important safety information, system limitations, and additional
operating and feature information.
For more information, refer to the “Instruments and controls (section 2)” of your Owner’s Manual.
ELECTRIC VEHICLE (EV) SYSTEM WARNING LIGHT
The warning light will illuminate if there is a malfunction in the following systems:
•
Traction motor and inverter system
• Char
ge port or on-board charger
• Li-ion bat
tery system
• C
ooling system
• Shif
t control system
• Emer
gency shut-off system
If the warning light illuminates, contact a Nissan-certified LEAF dealer.
Please see your Owner’s Manual for important safety information, system limitations, and additional
operating and feature information.
For more information, refer to the “Instruments and controls (section 2)” of your Owner’s Manual.
STARTING/STOPPING THE ELECTRIC VEHICLE (EV) SYSTEM
It is important to make sure the Nissan Intelligent Key® is with you (that is, in your
pocket or purse).
Confirm the parking brake is applied and push the P (PARK) switch on the shif t lever to place it in the P (PARK) position.
Depress the brake pedal.
Push the po wer switch to start the EV system.
Check that the r eady to drive indicator light
1 illuminates and the start-up
sound is audible.
1
To view detailed instructional videos regarding these and other features, please go to www.nissanownersinfo.mobi.