Page 167 of 424
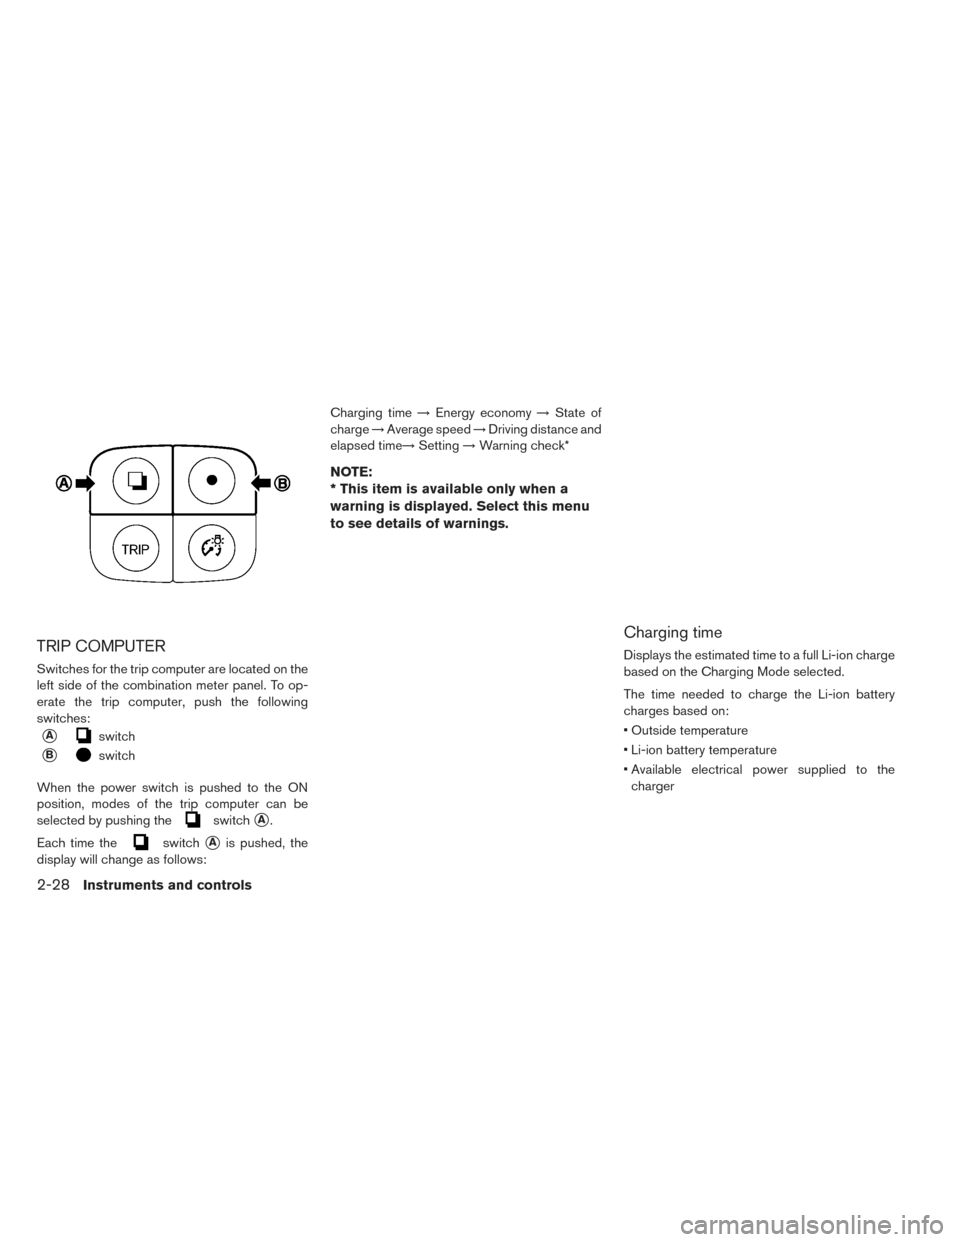
TRIP COMPUTER
Switches for the trip computer are located on the
left side of the combination meter panel. To op-
erate the trip computer, push the following
switches:
�Aswitch
�Bswitch
When the power switch is pushed to the ON
position, modes of the trip computer can be
selected by pushing the
switch�A.
Each time the
switch�Ais pushed, the
display will change as follows: Charging time
→Energy economy →State of
charge →Average speed →Driving distance and
elapsed time→ Setting→Warning check*
NOTE:
* This item is available only when a
warning is displayed. Select this menu
to see details of warnings.
Charging time
Displays the estimated time to a full Li-ion charge
based on the Charging Mode selected.
The time needed to charge the Li-ion battery
charges based on:
• Outside temperature
• Li-ion battery temperature
• Available electrical power supplied to the
charger
2-28Instruments and controls
Page 168 of 424

NOTE:
•Immediately after charging has finished,
the charge time will be displayed as “--:--”.
• The estimated charging time stops updat-
ing if the air conditioner is turned on while
the Li-ion battery is charging. The esti-
mated charging time updates approxi-
mately 15 minutes after the air condi-
tioner is turned off.
• The 6 kW and the 3 kW charging time
typically shows different times to reach a
full charge.
• However, the same charging time may be
shown for both the 6 kW and the 3 kW
based on the Li-ion battery state of charge
and battery temperature.
• The system may automatically slow the
battery charge to prevent the battery from
becoming overcharged.
• Charging may finish sooner than the dis-
played charging time.
Energy economy
Average energy economy:
The average energy economy mode shows the
average energy economy since the last reset.
Resetting the average energy economy is done
by pushing and holding the
switch�Bfor
longer than 1 second. (The average speed is also
reset at the same time.)
The display is updated every 30 seconds. At
about the first 0.3 mile (500 m) after a reset, the
display shows “----”. Instant energy economy:
The instant energy economy mode shows the
instant energy economy via a moving bar graph.
When regenerated energy is being stored in the
Li-ion battery while driving, the instant energy
economy display will show the maximum value.
Instruments and controls2-29
Page 173 of 424
NOTE:
•The low battery warning can be set to off.
Refer to LEAF Electric Vehicle Information
System Owner’s Manual.
• When the battery power level is low, the
system automatically obtains charging
station information.
Limited power warning
When the Li-ion battery power level is extremely
low or the Li-ion battery malfunctions, the power
limitation indicator
and the master warning
light (yellow)
illuminate in the meter and the
system displays a message on the navigation
system screen in order to inform the driver that
power output is restricted. 1. The notification is displayed on the upper left
side of the screen. Touch [Show] to display
the screen showing detailed information. 2. The system displays a message screen and
announces the contents of the message to
warn that power output is restricted and in-
form the driver of the reason for this occur-
rence and what action is to be taken.
2-34Instruments and controls
Page 175 of 424

INDICATOR FOR TIMER
When the power switch is turned off, this display
appears for 10 seconds. If the
switch is
pushed within 10 seconds, the display can be
selected and each setting information display
can be confirmed.
1. Timer setting status (charging and
Climate Ctrl.) and charge connector
lock setting status
The timer setting status (ON or OFF) of the
charge and the climate control and the charge
connector lock setting status (AUTO, LOCK or
UNLOCK) can be checked.
2. Charging Timer setting confirmation
The “Charging Timer” starting hours, minutes and
days for the next charge time that has been set
can be checked.
3. Charging time
Displays the estimated time to charge the Li-ion
battery to a full charge. When fully charged, the
remaining charging time is displayed as “--:--”.
NOTE:
Charging may finish sooner than the
displayed charging time.
4. Climate Ctrl. Timer setting
confirmation
The set time for ending hours and days of the
Climate Ctrl. Timer is displayed. Your vehicle has two types of security systems,
as follows:
• Vehicle security system
• NISSAN Vehicle Immobilizer System
The security status is shown by the security indi-
cator light.
SECURITY SYSTEMS
2-36Instruments and controls
Page 189 of 424
Push the VDC OFF switch again to turn on the
VDC system, or the VDC is automatically turned
back on when the power switch is placed in the
OFF position and then placed back in the READY
to drive position. For additional information, refer
to “Vehicle Dynamic Control (VDC) system” in
the “Starting and driving” section of this manual.To open the charge port lid, push the charge port
lid switch. For additional information, refer to
“Charge port lid” in the “Pre-driving checks and
adjustments” section of this manual.To lock or unlock the charge connector, push the
charge connector lock switch. For additional in-
formation, refer to “Charge connector lock
switch” in the “Charging” section of this manual.
CHARGE PORT LID SWITCH
CHARGE CONNECTOR LOCK SWITCH
2-50Instruments and controls
Page 190 of 424

To turn off the charge timer, push the charge
timer OFF switch. For additional information, re-
fer to “Charging timer” in the “Charging” section
of this manual.The power outlet is located in the instrument
panel.
CAUTION
• The outlet and plug may be hot during or immediately after use.
• Do not use with accessories that ex- ceed a 12-volt, 120W (10A) power
draw.
• Do not use double adapters or more than one electrical accessory. • Use the power outlet with the power
switch is in the ON or READY to drive
position to avoid discharging the 12-
volt battery.
• Avoid using the power outlet when the air conditioner, headlights or rear win-
dow defroster are on.
• This power outlet is not designed for use with a cigarette lighter unit.
• Push the plug in as far as it will go. If good contact is not made, the plug may
overheat or the internal temperature
fuse may open.
• Before inserting or disconnecting a plug, make sure that the electrical ac-
cessory being used is turned OFF.
• When not in use, be sure to close the cap. Do not allow water to contact the
outlet.
CHARGE TIMER OFF SWITCH POWER OUTLET
Instruments and controls2-51
Page 223 of 424
When opening the charge port lid perform one of
the following:
• Push the charge port lid opener switch locatedon the instrument panel, or
• Press and hold the charge port lid unlock button on the Intelligent Key for more than one second.
When opening the charge port lid:
1. The charging status indicator lights flash and a chime sounds three times and the charge
port lid will then spring up slightly.
2. Put your hand into the under side of the lid and open until it is in the fully open position. When closing the charge port lid:
1. Slowly move the lid down.
2. Lock it securely into place.CHARGE PORT CAP
When opening the charge port cap, press the tab
inward and the cap will spring open.
When the charge port cap is closed to its previ-
ous position, it will lock automatically.
3-20Pre-driving checks and adjustments
Page 224 of 424

CAUTION
• When charging is finished, be sure to close the charge port cap. If water or
dust gets inside the charge port, this
may cause a malfunction.
• Pay particular attention when using the normal charge port as the charge
port lid can be closed even when the
normal charge port cap is open.
• Close the quick charge (if so equipped) port cap before closing the charging
lid. The quick charge port cap can be
damaged if it is open when closing the
charge port lid.WARNING
• Do not adjust the steering wheel while driving. You could lose control of your
vehicle and cause an accident.
• Do not adjust the steering wheel any closer to you than is necessary for
proper steering operation and comfort.
The driver’s air bag inflates with great
force. If you are unrestrained, leaning
forward, sitting sideways or out of po-
sition in any way, you are at greater
risk of injury or death in a crash. You
may also receive serious or fatal inju-
ries from the air bag if you are up
against it when it inflates. Always sit
back against the seatback and as far
away as practical from the steering
wheel. Always use the seat belts.
TILT OPERATION
Push the lock lever down�1and adjust the
steering wheel up or down
�2to the desired
position.
Pull the lock lever up
�3to lock the steering
wheel in place.
STEERING WHEEL
Pre-driving checks and adjustments3-21