Page 235 of 424
Backing up on a steep downhill
When backing up the vehicle down a hill, the
distance guide lines and the vehicle width guide
lines are shown farther than the actual distance.
Note that any object on the hill is closer than it
appears on the monitor.
Backing up near a projecting object
The predicted course lines (models with naviga-
tion)
�Ado not touch the object in the display.
However, the vehicle may hit the object if it proj-
ects over the actual backing up course.
Backing up behind a projecting object
The position�Cis shown farther than the position
�Bin the display. However, the position�Cis
actually at the same distance as the position
�A.
The vehicle may hit the object when backing up to
the position
�Aif the object projects over the
actual backing up course.
4-6Display screen, heater, air conditioner, audio and phone systems
Page 236 of 424
HOW TO PARK WITH PREDICTED
COURSE LINES (MODELS WITH
NAVIGATION)
WARNING
• If the tires are replaced with different sized tires, the predicted course lines
may be displayed incorrectly.
• On a snow-covered or slippery road, there may be a difference between the
predicted course line and the actual
course line.
• If the battery is disconnected or be- comes discharged, the predicted
course lines may be displayed incor-
rectly. If this occurs, please perform
the following procedures:
- Turn the steering wheel from lock to
lock while the EV (electric vehicle) sys-
tem is running.
- Drive the vehicle on a straight road
for more than 5 minutes.
• When the steering wheel is turned with the power switch in the ACC position,
the predicted course lines may be dis-
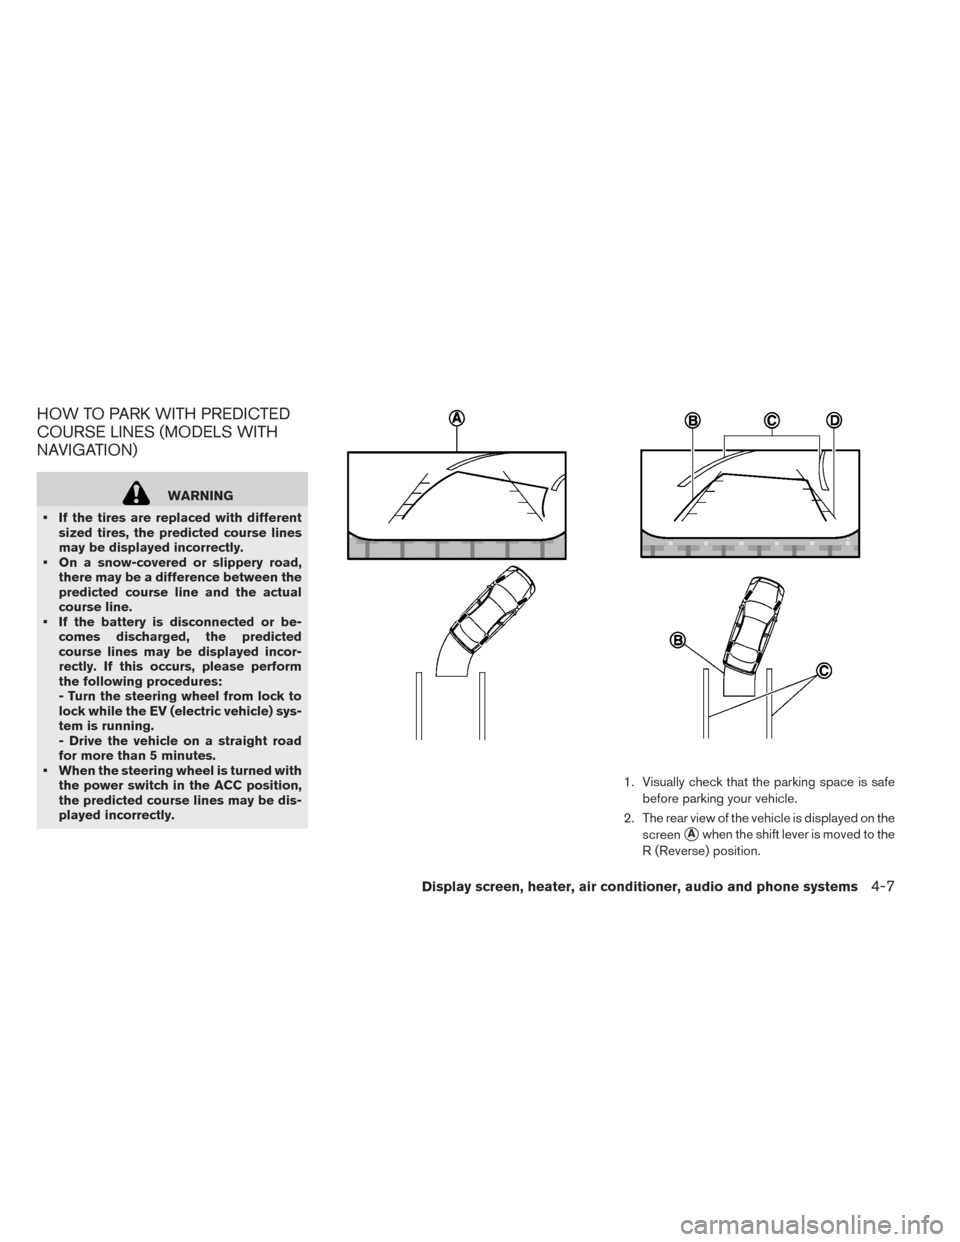
played incorrectly. 1. Visually check that the parking space is safe
before parking your vehicle.
2. The rear view of the vehicle is displayed on the screen
�Awhen the shift lever is moved to the
R (Reverse) position.
Display screen, heater, air conditioner, audio and phone systems4-7
Page 237 of 424
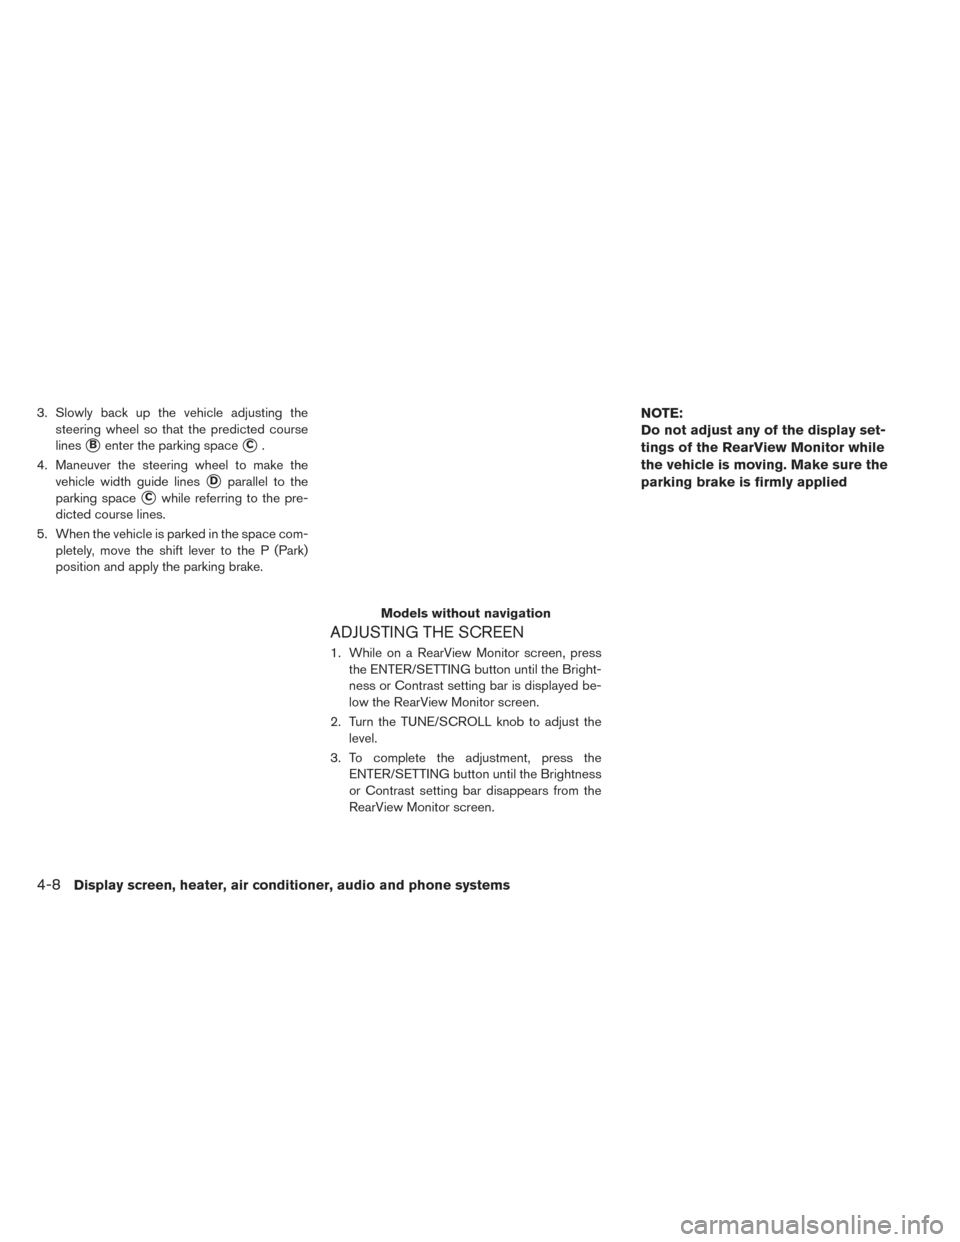
3. Slowly back up the vehicle adjusting thesteering wheel so that the predicted course
lines
�Benter the parking space�C.
4. Maneuver the steering wheel to make the vehicle width guide lines
�Dparallel to the
parking space
�Cwhile referring to the pre-
dicted course lines.
5. When the vehicle is parked in the space com- pletely, move the shift lever to the P (Park)
position and apply the parking brake.
ADJUSTING THE SCREEN
1. While on a RearView Monitor screen, pressthe ENTER/SETTING button until the Bright-
ness or Contrast setting bar is displayed be-
low the RearView Monitor screen.
2. Turn the TUNE/SCROLL knob to adjust the level.
3. To complete the adjustment, press the ENTER/SETTING button until the Brightness
or Contrast setting bar disappears from the
RearView Monitor screen.
NOTE:
Do not adjust any of the display set-
tings of the RearView Monitor while
the vehicle is moving. Make sure the
parking brake is firmly applied
Models without navigation
4-8Display screen, heater, air conditioner, audio and phone systems
Page 238 of 424
1. While on a RearView Monitor screen, touchthe touch-screen display. The Camera Set-
ting screen will come up.
2. Touch the Display Settings key.
3. Touch the “Brightness,” “Contrast,” “Tint,” “Color,” or “Black Level” key.
4. Adjust the item by touching the + or - key on the touch-screen display.
HOW TO TURN ON AND OFF
PREDICTED COURSE LINES
(MODELS WITH NAVIGATION)
To toggle ON and OFF the predicted course lines
while in the P (Park) position:
1. Touch the Settings key.
2. Touch the Camera key.
3. Touch the Predicted Course Lines key to turnthe feature ON or OFF.
To toggle ON and OFF the predicted course lines
while in the R (Reverse) position:
1. Touch the touch-screen display.
2. Touch the Predicted Course Lines key to turn the feature ON or OFF.
REARVIEW MONITOR SYSTEM
LIMITATIONS
WARNING
Listed below are the system limitations for RearView Monitor. Failure to oper-
ate the vehicle in accordance with these system limitations could result in seri- ous injury or death. • The system cannot completely elimi-
nate blind spots and may not show
every object.
• Underneath the bumper and the corner areas of the bumper cannot be viewed
on the RearView Monitor because of
its monitoring range limitation. The
system will not show small objects be-
low the bumper, and may not show
objects close to the bumper or on the
ground.
• Objects viewed in the RearView Moni- tor differ from actual distance because
a wide-angle lens is used.
• Objects in the RearView Monitor will appear visually opposite compared to
when viewed in the rearview and out-
side mirrors.
• Use the displayed lines as a reference. The lines are highly affected by the
number of occupants, fuel level, ve-
hicle position, road conditions and
road grade.
• Make sure that the rear hatch is se- curely closed when backing up.
• Do not put anything on the rearview camera. The rearview camera is in-
stalled above the license plate.
Models with navigation
Display screen, heater, air conditioner, audio and phone systems4-9
Page 239 of 424
• When washing the vehicle with highpressure water, be sure not to spray it
around the camera. Otherwise, water
may enter the camera unit causing wa-
ter condensation on the lens, a mal-
function, fire or an electric shock.
• Do not strike the camera. It is a preci- sion instrument. Otherwise, it may
malfunction or cause damage result-
ing in a fire or an electric shock.
The following are operating limitations and do not
represent a system malfunction:
• When the temperature is extremely high or low, the screen may not clearly display objects.
• When strong light directly shines on the cam- era, objects may not be displayed clearly.
• Vertical lines may be seen in objects on the screen. This is due to strong reflected light from
the bumper.
• The screen may flicker under fluorescent light.
• The colors of objects on the RearView Monitor may differ somewhat from the actual color of
objects.
• Objects on the monitor may not be clear in a dark environment. • There may be a delay when switching between
views.
• If dirt, rain or snow accumulate on the camera, RearView Monitor may not display objects
clearly. Clean the camera.
• Do not use wax on the camera lens. Wipe off any wax with a clean cloth dampened with a
diluted mild cleaning agent, then wipe with a dry
cloth.
SYSTEM MAINTENANCE
CAUTION
• Do not use alcohol, benzine or thinner to clean the camera. This will cause
discoloration.
• Do not damage the camera as the monitor screen may be adversely af-
fected.
If dirt, rain or snow accumulates on the camera
�1, the RearView Monitor may not display ob-
jects clearly. Clean the camera by wiping it with a
cloth dampened with a diluted mild cleaning
agent and the wiping it with a dry cloth.
4-10Display screen, heater, air conditioner, audio and phone systems
Page 240 of 424
1. CAMERA button
AROUND VIEW® MONITOR (IF SO
EQUIPPED)
Display screen, heater, air conditioner, audio and phone systems4-11
Page 241 of 424
WARNING
Failure to follow the warnings and in-
structions for proper use of the Around
View® Monitor system could result in
serious injury or death.
• The Around View® Monitor is a conve- nience feature and is not a substitute
for proper vehicle operation because it
has areas where objects cannot be
viewed. The four corners of the vehicle
in particular, are areas where objects
do not always appear in the bird’s-eye,
front, or rear views. Always check your
surroundings to be sure that it is safe
to move before operating the vehicle.
Always operate the vehicle slowly.
• The driver is always responsible for safety during parking and other ma-
neuvers.
CAUTION
Do not scratch the camera lens when
cleaning dirt or snow from the front of the
camera. The Around View® Monitor system is designed
as an aid to the driver in situations such as slot
parking or parallel parking. The monitor displays
various views of the position of the vehicle in a
split screen format. Not all views are available at
all times.
Available views:
• Front View
An approximately 150–degree view of the
front of the vehicle.
• Rear View An approximately 150–degree view of the rear
of the vehicle.
• Bird’s-Eye View The surrounding views of the vehicle from
above.
• Front-Side View The view around and ahead of the front pas-
senger’s side wheel. To display the multiple views, the Around View®
Monitor system uses cameras located in the front
grille, on the vehicle’s outside mirrors and one
just above the vehicle’s license plates
�1.
AROUND VIEW® MONITOR
SYSTEM OPERATION
With the power switch in the ON position, move
the shift lever to the R (Reverse) position or press
the CAMERA button to operate the Around
View® Monitor. The screen displayed on the
Around View® Monitor will automatically return
to the previous screen 3 minutes after the CAM-
ERA button has been pressed with the shift lever
in a position other than the R (Reverse) position.
4-12Display screen, heater, air conditioner, audio and phone systems
Page 242 of 424
Available views
WARNING
• The distance guide lines and the ve- hicle width lines should be used as a
reference only when the vehicle is on a
paved, level surface. The apparent dis-
tance viewed on the monitor may be
different than the actual distance be-
tween the vehicle and displayed ob-
jects.
• Use the displayed lines and the bird’s eye view as a reference. The lines and
the bird’s-eye view are greatly affected
by the number of occupants, cargo,
fuel level, vehicle position, road condi-
tion and road grade.
• If the tires are replaced with different sized tires, the predicted course lines
and the bird’s-eye view may be dis-
played incorrectly.
• When driving the vehicle up a hill, ob- jects viewed in the monitor are further
than they appear. When driving the ve-
hicle down a hill, objects viewed in the
monitor are closer than they appear. • Objects in the rear view will appear
visually opposite compared to when
viewed in the rear view and outside
mirrors.
• Use the mirrors or actually look to properly judge distances to other ob-
jects.
• On a snow-covered or slippery road, there may be a difference between the
predicted course lines and the actual
course line.
• The vehicle width and predicted course lines are wider than the actual width
and course.
• The displayed lines will appear slightly off to the right, because the rearview
camera is not installed in the rear cen-
ter of the vehicle.
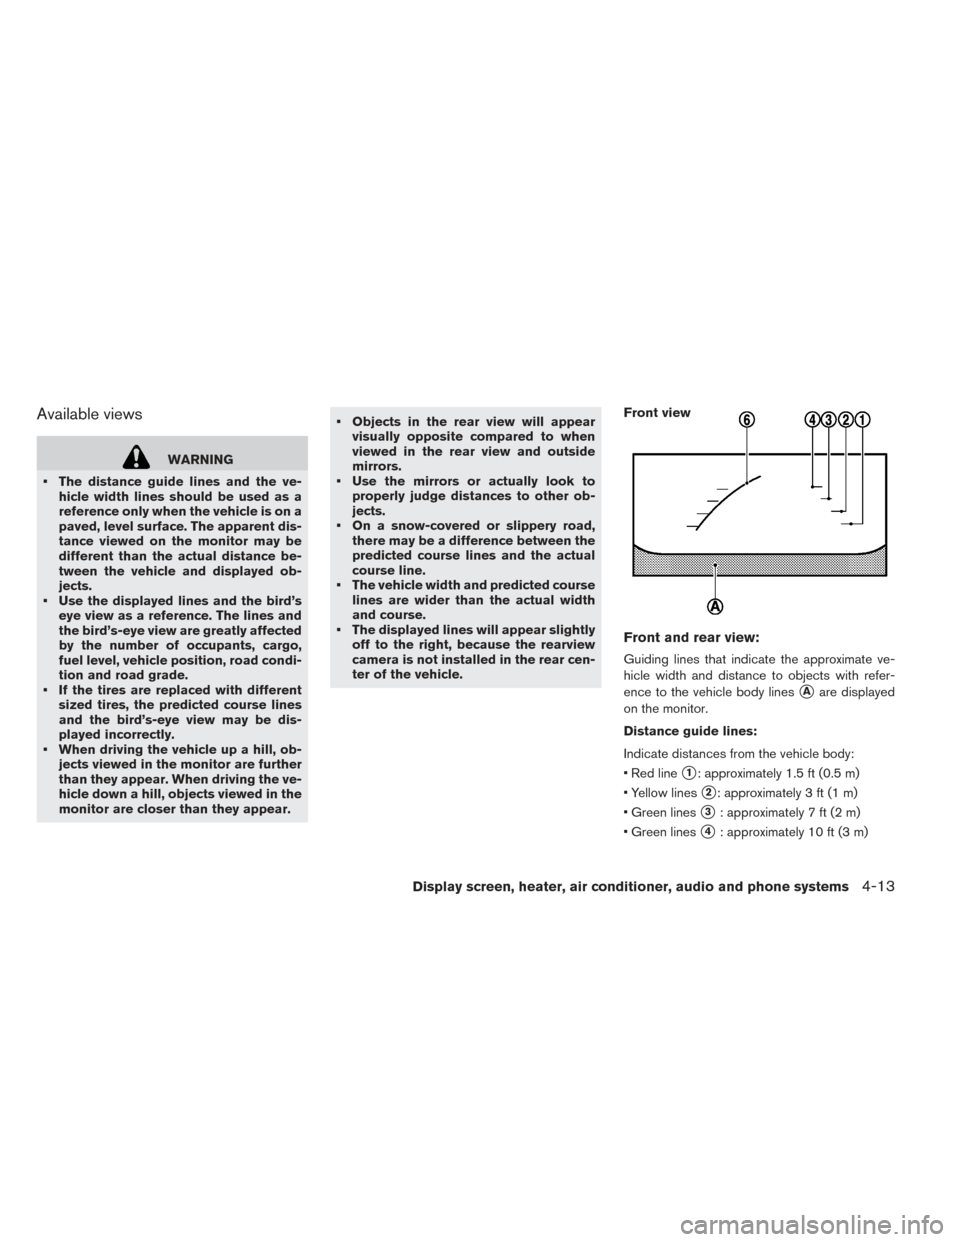
Front and rear view:
Guiding lines that indicate the approximate ve-
hicle width and distance to objects with refer-
ence to the vehicle body lines
�Aare displayed
on the monitor.
Distance guide lines:
Indicate distances from the vehicle body:
• Red line
�1: approximately 1.5 ft (0.5 m)
• Yellow lines
�2: approximately 3 ft (1 m)
• Green lines
�3: approximately 7 ft (2 m)
• Green lines
�4: approximately 10 ft (3 m)
Front view
Display screen, heater, air conditioner, audio and phone systems4-13