Page 209 of 424
Lockout protection
When the power door lock switch is moved to the
lock position while any door is open, all doors will
unlock automatically and a chime will sound after
the door is closed.
This function help to prevent the Intelligent Key
from being accidentally locked inside the vehicle.
AUTOMATIC DOOR LOCKS
• All doors lock automatically when the vehiclespeed reaches 15 mph (24 km/h) .
• All doors unlock automatically when the power switch is placed in the OFF position.
CHILD SAFETY REAR DOOR LOCK
Child safety rear door locks help prevent the rear
doors from being opened accidentally, especially
when small children are in the vehicle.
When the levers are in the lock position
�1,
the rear doors can be opened only from the
outside.
To disengage, move the levers to the unlock
position
�2.
WARNING
• Radio waves could adversely affect electric medical equipment. Those
who use a pacemaker should contact
the electric medical equipment manu-
facturer for the possible influences be-
fore use.
• The Intelligent Key transmits radio waves when the buttons are pressed.
The FAA advises that the radio waves
may affect aircraft navigation and
communication systems. Do not oper-
ate the Intelligent Key while on an air-
plane. Make sure the buttons are not
operated unintentionally when the unit
is stored during a flight.
The Intelligent Key system can operate all the
door and the rear hatch locks by using the remote
control function or pushing the request switch on
the vehicle without taking the key out from a
pocket or purse. The operating environment
and/or conditions may affect the Intelligent Key
system operation.
Be sure to read the following items before using
the Intelligent Key system.
NISSAN INTELLIGENT KEY® SYSTEM
3-6Pre-driving checks and adjustments
Page 216 of 424
HOW TO USE REMOTE KEYLESS
ENTRY FUNCTION
WARNING
• Radio waves could adversely affect electric medical equipment. Those
who use a pacemaker should contact
the electric medical equipment manu-
facturer for the possible influences be-
fore use.
• The Intelligent Key transmits radio waves when the buttons are pressed.
The FAA advises that the radio waves
may affect aircraft navigation and
communication systems. Do not oper-
ate the Intelligent Key while on an air-
plane. Make sure the buttons are not
operated unintentionally when the unit
is stored during a flight.
CAUTION
• Do not allow the Intelligent Key, which contains electrical components, to
come into contact with water or salt
water. This could affect the system
function.
• Do not drop the Intelligent Key.
• Do not strike the Intelligent Key sharply against another object.
• Do not change or modify the Intelligent Key.
• Wetting may damage the Intelligent Key. If the Intelligent Key gets wet,
immediately wipe until it is completely
dry.
• Do not place the Intelligent Key for an extended period in an area where tem-
peratures exceed 140°F (60°C) .
• Do not attach the Intelligent Key with a key holder that contains a magnet.
• Do not place the Intelligent Key near equipment that produces a magnetic
field, such as a TV, audio equipment,
personal computers or cellular phone. The remote keyless entry function can operate all
door locks using the remote keyless entry func-
tion of the Intelligent Key. The remote keyless
entry function can operate at a distance of ap-
proximately 33 ft (10 m) from the vehicle. The
operating distance depends upon the conditions
around the vehicle.
The remote keyless entry function will not oper-
ate:
• When the Intelligent Key is not within the opera-
tional range.
• When the doors are open or not closed securely.
• When the Intelligent Key battery is discharged.
CAUTION
When locking the doors using the Intelli-
gent Key, be sure not to leave the key in
the vehicle.
Pre-driving checks and adjustments3-13
Page 218 of 424
Using panic alarm
If you are near your vehicle and feel threatened,
you may activate the alarm to call attention as
follows:
1. Push the PANIC
button�4on the
Intelligent Key for more than 1 second.
2. The theft warning alarm and headlights will stay on for a period of time.
3. The panic alarm stops when: • It has run for a period of time, or
• Any of the buttons on the Intelligent Key ispushed. (Note: The PANIC button must be
pushed for more than 1 second.)
Setting hazard indicator and horn
mode
This vehicle is set in hazard indicator and horn
mode when you first receive the vehicle.
In hazard indicator and horn mode, when the
LOCK
button�1is pressed, the hazard
indicator flashes twice and the horn chirps once.
When the UNLOCK
button�2is pressed,
the hazard indicator flashes once. If horns are not necessary, the system can be
switched to the hazard indicator mode.
In hazard indicator mode, when the LOCK
button is pressed, the hazard indicator flashes
twice. When the UNLOCK
button is
pressed, neither the hazard indicator nor the horn
operates.
Pre-driving checks and adjustments3-15
Page 220 of 424
WARNING
• Make sure that the hood is completely closed and latched before driving. Fail-
ure to do so could cause the hood to
open during driving and result in an
accident.
• If steam or smoke is emitting from the motor compartment, do not open the
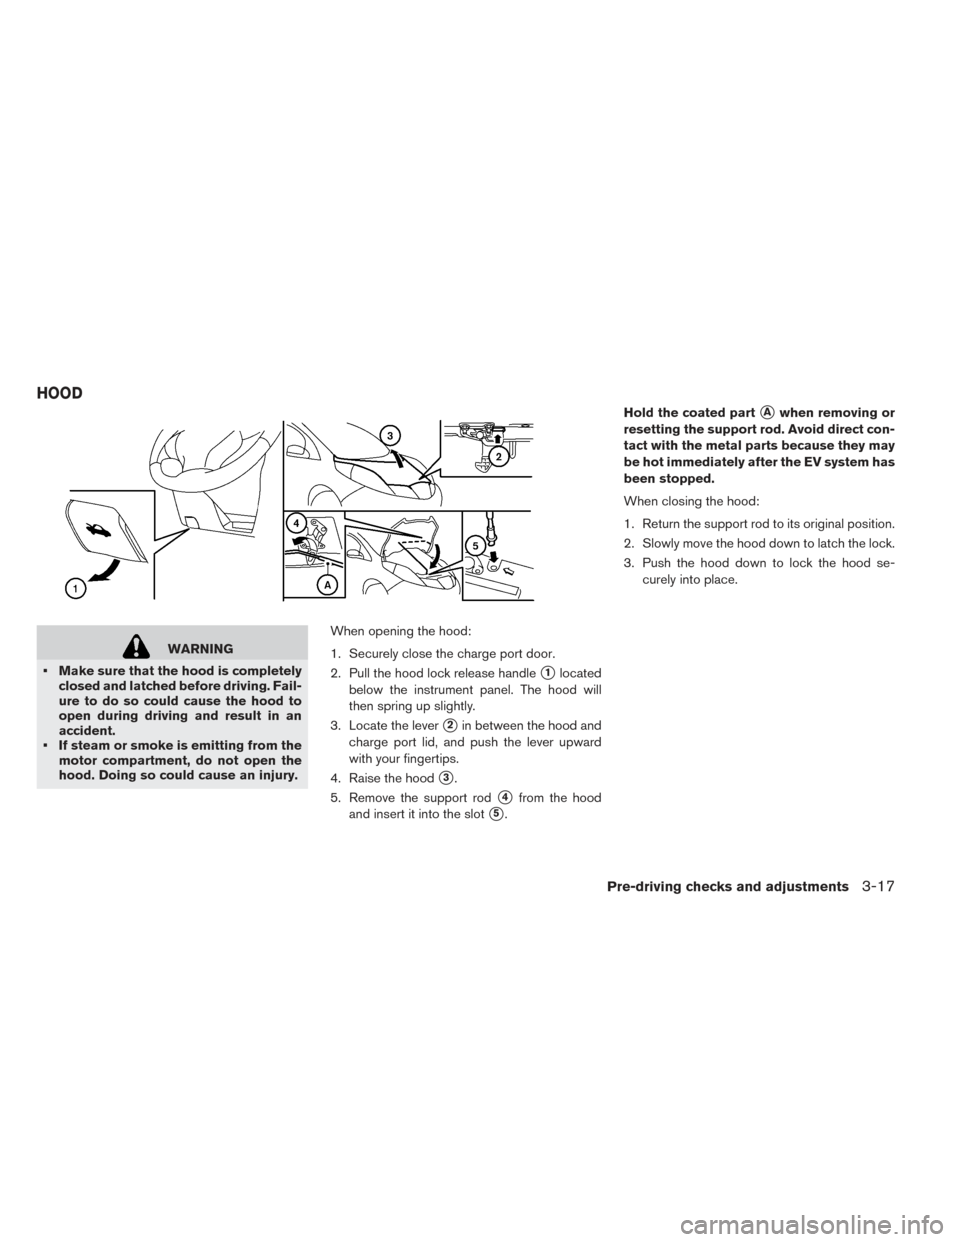
hood. Doing so could cause an injury. When opening the hood:
1. Securely close the charge port door.
2. Pull the hood lock release handle
�1located
below the instrument panel. The hood will
then spring up slightly.
3. Locate the lever
�2in between the hood and
charge port lid, and push the lever upward
with your fingertips.
4. Raise the hood
�3.
5. Remove the support rod
�4from the hood
and insert it into the slot
�5. Hold the coated part
�Awhen removing or
resetting the support rod. Avoid direct con-
tact with the metal parts because they may
be hot immediately after the EV system has
been stopped.
When closing the hood:
1. Return the support rod to its original position.
2. Slowly move the hood down to latch the lock.
3. Push the hood down to lock the hood se- curely into place.
HOOD
Pre-driving checks and adjustments3-17
Page 223 of 424
When opening the charge port lid perform one of
the following:
• Push the charge port lid opener switch locatedon the instrument panel, or
• Press and hold the charge port lid unlock button on the Intelligent Key for more than one second.
When opening the charge port lid:
1. The charging status indicator lights flash and a chime sounds three times and the charge
port lid will then spring up slightly.
2. Put your hand into the under side of the lid and open until it is in the fully open position. When closing the charge port lid:
1. Slowly move the lid down.
2. Lock it securely into place.CHARGE PORT CAP
When opening the charge port cap, press the tab
inward and the cap will spring open.
When the charge port cap is closed to its previ-
ous position, it will lock automatically.
3-20Pre-driving checks and adjustments
Page 226 of 424
CARD HOLDER (DRIVER’S SIDE
ONLY)
To access the card holder, slide card in the card
holder. Do not view information while operating
the vehicle.
INSIDE REARVIEW MIRROR
Adjust the angle of the inside rearview mirror to
the preferred position.
MANUAL ANTI-GLARE REARVIEW
MIRROR (IF SO EQUIPPED)
The night position�1reduces glare from the
headlights of vehicles behind you at night.
Use the day position
�2when driving in daylight
hours.
WARNING
Use the night position only when neces-
sary, because it reduces rearview clarity.
MIRRORS
Pre-driving checks and adjustments3-23
Page 227 of 424
AUTOMATIC ANTI-GLARE TYPE (IF
SO EQUIPPED)
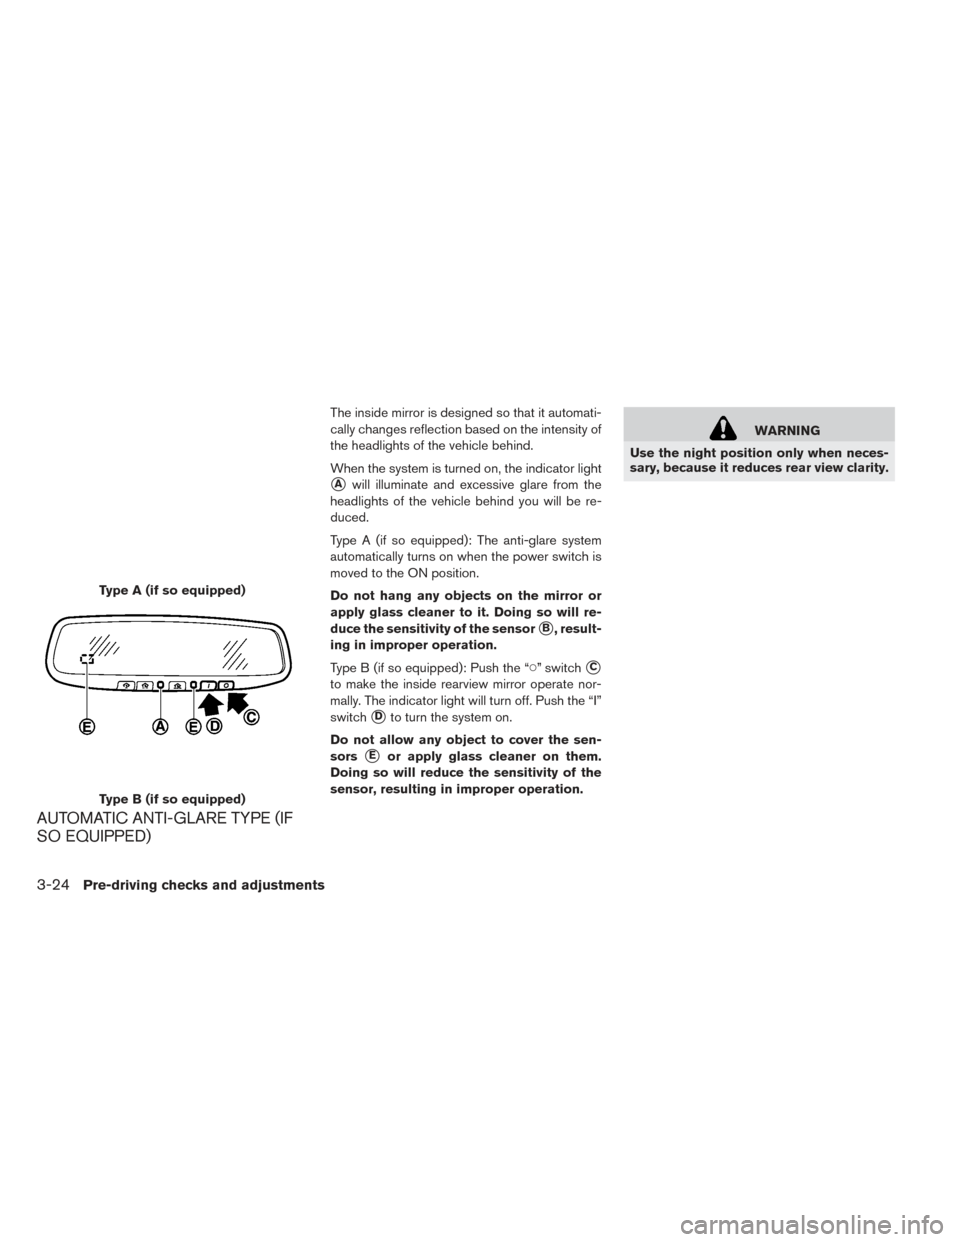
The inside mirror is designed so that it automati-
cally changes reflection based on the intensity of
the headlights of the vehicle behind.
When the system is turned on, the indicator light
�Awill illuminate and excessive glare from the
headlights of the vehicle behind you will be re-
duced.
Type A (if so equipped): The anti-glare system
automatically turns on when the power switch is
moved to the ON position.
Do not hang any objects on the mirror or
apply glass cleaner to it. Doing so will re-
duce the sensitivity of the sensor
�B, result-
ing in improper operation.
Type B (if so equipped): Push the “�” switch
�C
to make the inside rearview mirror operate nor-
mally. The indicator light will turn off. Push the “I”
switch
�Dto turn the system on.
Do not allow any object to cover the sen-
sors
�Eor apply glass cleaner on them.
Doing so will reduce the sensitivity of the
sensor, resulting in improper operation.
WARNING
Use the night position only when neces-
sary, because it reduces rear view clarity.
Type A (if so equipped)
Type B (if so equipped)
3-24Pre-driving checks and adjustments
Page 239 of 424
• When washing the vehicle with highpressure water, be sure not to spray it
around the camera. Otherwise, water
may enter the camera unit causing wa-
ter condensation on the lens, a mal-
function, fire or an electric shock.
• Do not strike the camera. It is a preci- sion instrument. Otherwise, it may
malfunction or cause damage result-
ing in a fire or an electric shock.
The following are operating limitations and do not
represent a system malfunction:
• When the temperature is extremely high or low, the screen may not clearly display objects.
• When strong light directly shines on the cam- era, objects may not be displayed clearly.
• Vertical lines may be seen in objects on the screen. This is due to strong reflected light from
the bumper.
• The screen may flicker under fluorescent light.
• The colors of objects on the RearView Monitor may differ somewhat from the actual color of
objects.
• Objects on the monitor may not be clear in a dark environment. • There may be a delay when switching between
views.
• If dirt, rain or snow accumulate on the camera, RearView Monitor may not display objects
clearly. Clean the camera.
• Do not use wax on the camera lens. Wipe off any wax with a clean cloth dampened with a
diluted mild cleaning agent, then wipe with a dry
cloth.
SYSTEM MAINTENANCE
CAUTION
• Do not use alcohol, benzine or thinner to clean the camera. This will cause
discoloration.
• Do not damage the camera as the monitor screen may be adversely af-
fected.
If dirt, rain or snow accumulates on the camera
�1, the RearView Monitor may not display ob-
jects clearly. Clean the camera by wiping it with a
cloth dampened with a diluted mild cleaning
agent and the wiping it with a dry cloth.
4-10Display screen, heater, air conditioner, audio and phone systems