2017 NISSAN JUKE wheel
[x] Cancel search: wheelPage 123 of 416
2-44Instruments and controls
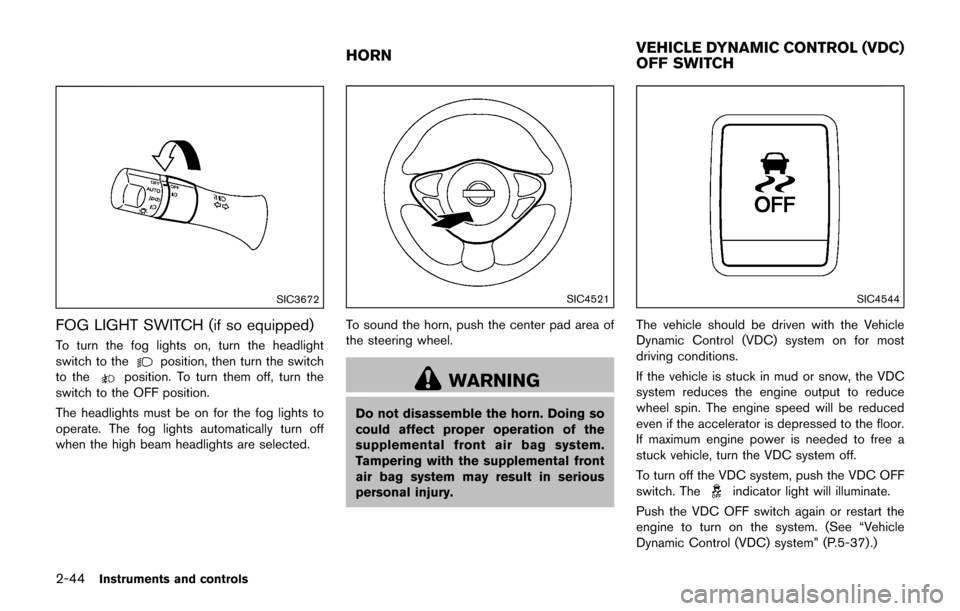
SIC3672
FOG LIGHT SWITCH (if so equipped)
To turn the fog lights on, turn the headlight
switch to theposition, then turn the switch
to theposition. To turn them off, turn the
switch to the OFF position.
The headlights must be on for the fog lights to
operate. The fog lights automatically turn off
when the high beam headlights are selected.
SIC4521
To sound the horn, push the center pad area of
the steering wheel.
WARNING
Do not disassemble the horn. Doing so
could affect proper operation of the
supplemental front air bag system.
Tampering with the supplemental front
air bag system may result in serious
personal injury.
SIC4544
The vehicle should be driven with the Vehicle
Dynamic Control (VDC) system on for most
driving conditions.
If the vehicle is stuck in mud or snow, the VDC
system reduces the engine output to reduce
wheel spin. The engine speed will be reduced
even if the accelerator is depressed to the floor.
If maximum engine power is needed to free a
stuck vehicle, turn the VDC system off.
To turn off the VDC system, push the VDC OFF
switch. The
indicator light will illuminate.
Push the VDC OFF switch again or restart the
engine to turn on the system. (See “Vehicle
Dynamic Control (VDC) system” (P.5-37) .)
HORN VEHICLE DYNAMIC CONTROL (VDC)
OFF SWITCH
Page 155 of 416
3-20Pre-driving checks and adjustments
fuel cap.
WARNING
Do not adjust the steering wheel while
driving. You could lose control of your
vehicle and cause an accident.
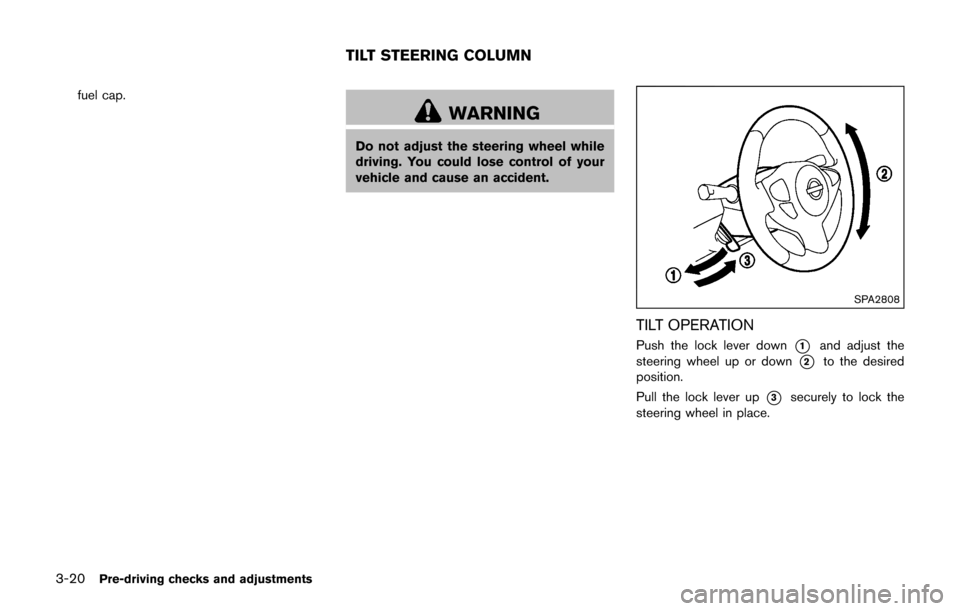
SPA2808
TILT OPERATION
Push the lock lever down*1and adjust the
steering wheel up or down
*2to the desired
position.
Pull the lock lever up
*3securely to lock the
steering wheel in place.
TILT STEERING COLUMN
Page 161 of 416

CD/USB memory care and cleaning .......................... 4-73
Steering wheel switch for audio control .................... 4-73
Antenna ........................................................................\
....... 4-75
NissanConnect
SMApp smartphone integration ............. 4-75
Registering with NissanConnectSMApp .................... 4-75
Connect phone ................................................................. 4-76
Application download ...................................................... 4-76
Siri
�ŠEyes Free ....................................................................... 4-76
General Information ......................................................... 4-76
Requirements .................................................................... 4-77
Siri
�ŠEyes Free Activation .............................................. 4-77
Operating Siri�ŠEyes Free ............................................. 4-77
Changing Siri�ŠEyes Free Settings (models without
navigation system) ........................................................... 4-78
Troubleshooting guide ..................................................... 4-79
Car phone or CB radio ........................................................ 4-80
Bluetooth
�ŠHands-Free Phone System (models without
navigation system) ................................................................. 4-80
Regulatory information .................................................... 4-81
Using the system .............................................................. 4-82
Bluetooth
�ŠHands-Free Phone System (models with
navigation system) ................................................................. 4-89
Regulatory information .................................................... 4-91 Voice command .............................................................. 4-91
Connecting procedure .................................................. 4-92
Vehicle phonebook ........................................................ 4-92
Making a call ................................................................... 4-92
Receiving a call .............................................................. 4-92
During a call .................................................................... 4-93
Ending a call ................................................................... 4-93
Text messaging ............................................................... 4-93
Bluetooth
�Šsettings ....................................................... 4-94
Phone settings ................................................................ 4-96
NISSAN Voice Recognition System (models with
navigation system) ................................................................ 4-96 Using the system ........................................................... 4-97
System features .............................................................. 4-98
Bluetooth
�ŠHands-Free Phone System
voice commands ............................................................ 4-98
Navigation system voice commands ......................... 4-99
Audio system voice commands ............................... 4-100
Information voice commands ................................... 4-100
My APPS voice commands ...................................... 4-100
Help voice commands ............................................... 4-100
Troubleshooting guide ............................................... 4-100
Page 173 of 416
4-14Heater, air conditioner, audio and phone systems
objects cannot be viewed. The four
corners of the vehicle in particular,
are areas where objects do not
always appear in the bird’s-eye,
front, or rear views. Always check
your surroundings to be sure that it
is safe to move before operating the
vehicle. Always operate the vehicle
slowly. Always look out the win-
dows and check mirrors to be sure
that it is safe to move.
. The driver is always responsible for
safety during parking and other
maneuvers.
CAUTION
Do not scratch the lens when cleaning
dirt or snow from the front of the
camera.
The Around View
�ŠMonitor system is designed
as an aid to the driver in situations such as slot
parking or parallel parking.
The monitor displays various views of the
position of the vehicle in a split screen format.
All views are not available at all times. Available views:
.
Bird’s-eye view
The surrounding view of the vehicle.
. Front-side view
The view around and ahead of the front
passenger’s side wheel.
. Front view
The view to the front of the vehicle.
. Rear view
The view to the rear of the vehicle.
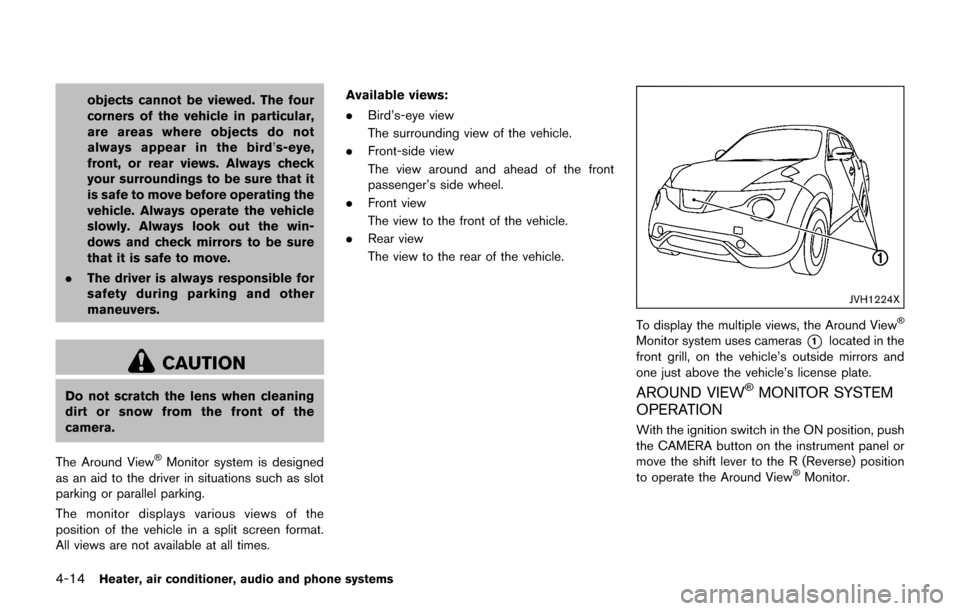
JVH1224X
To display the multiple views, the Around View�Š
Monitor system uses cameras*1located in the
front grill, on the vehicle’s outside mirrors and
one just above the vehicle’s license plate.
AROUND VIEW�ŠMONITOR SYSTEM
OPERATION
With the ignition switch in the ON position, push
the CAMERA button on the instrument panel or
move the shift lever to the R (Reverse) position
to operate the Around View
�ŠMonitor.
Page 175 of 416

4-16Heater, air conditioner, audio and phone systems
Front and rear view:
Guiding lines, which indicate the vehicle width
and distances to objects with reference to the
vehicle body line
*A, are displayed on the
monitor.
Distance guide lines:
Indicate distances from the vehicle body.
. Red line
*1: approx. 1.5 ft (0.5 m)
. Yellow line
*2: approx. 3 ft (1 m)
. Green line
*3: approx. 7 ft (2 m)
. Green line
*4: approx. 10 ft (3 m)
Vehicle width guide lines
*5:
Indicate the vehicle width when backing up.
Predictive course lines
*6:
Indicate the predictive course when operating
the vehicle. The predictive course lines will be
displayed on the monitor when the steering
wheel is turned. The predictive course lines will
move depending on how much the steering
wheel is turned and will not be displayed while
the steering wheel is in the straight ahead
position.
The front view will not be displayed when the
vehicle speed is above 6 MPH (10 km/h) .
NOTE:
. When the monitor displays the front
view and the steering wheel turns about 90 degrees or less from the
straight ahead position, both the right
and left predictive course lines
*6are
displayed. When the steering wheel
turns about 90 degrees or more, the
predictive course line is displayed only
on the opposite side of the turn.
JVH1037X
Bird’s-eye view:
The bird’s-eye view shows the overhead view of
the vehicle which helps confirm the vehicle
position and the predicted course to a parking
space.
The vehicle icon
*1shows the position of the
vehicle. Note that the distance between objects
viewed in the bird’s-eye view differs from the
actual distance.
The areas that the cameras cannot cover
*2are
indicated in black.
After the ignition switch is placed in the ON
position, the non-viewable area
*2is high-
lighted in yellow for 3 seconds after the bird’s-
Page 178 of 416
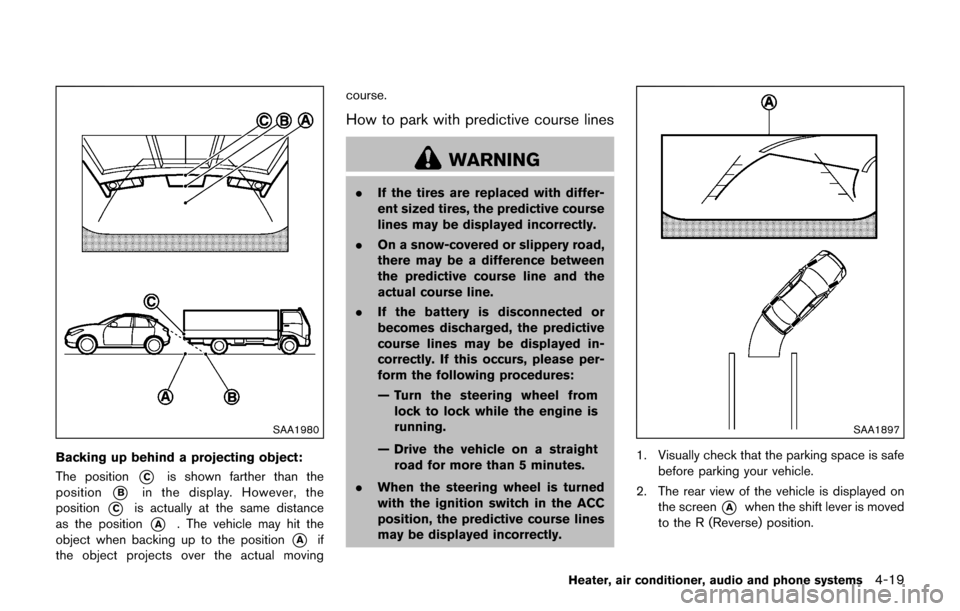
SAA1980
Backing up behind a projecting object:
The position
*Cis shown farther than the
position
*Bin the display. However, the
position
*Cis actually at the same distance
as the position
*A. The vehicle may hit the
object when backing up to the position
*Aif
the object projects over the actual moving course.
How to park with predictive course lines
WARNING
.
If the tires are replaced with differ-
ent sized tires, the predictive course
lines may be displayed incorrectly.
. On a snow-covered or slippery road,
there may be a difference between
the predictive course line and the
actual course line.
. If the battery is disconnected or
becomes discharged, the predictive
course lines may be displayed in-
correctly. If this occurs, please per-
form the following procedures:
— Turn the steering wheel from
lock to lock while the engine is
running.
— Drive the vehicle on a straight road for more than 5 minutes.
. When the steering wheel is turned
with the ignition switch in the ACC
position, the predictive course lines
may be displayed incorrectly.
SAA1897
1. Visually check that the parking space is safe
before parking your vehicle.
2. The rear view of the vehicle is displayed on the screen
*Awhen the shift lever is moved
to the R (Reverse) position.
Heater, air conditioner, audio and phone systems4-19
Page 179 of 416
4-20Heater, air conditioner, audio and phone systems
SAA1898
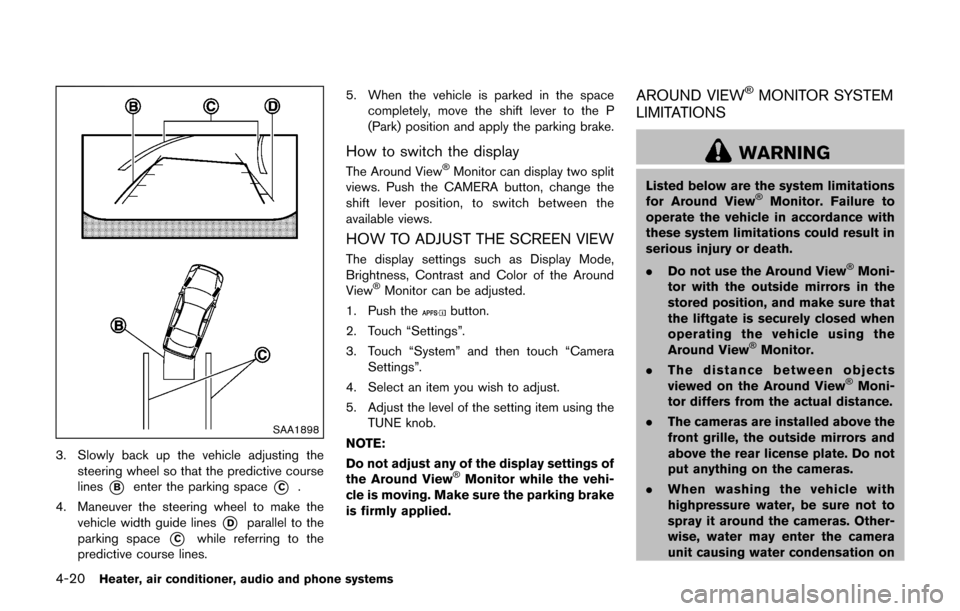
3. Slowly back up the vehicle adjusting thesteering wheel so that the predictive course
lines
*Benter the parking space*C.
4. Maneuver the steering wheel to make the vehicle width guide lines
*Dparallel to the
parking space
*Cwhile referring to the
predictive course lines. 5. When the vehicle is parked in the space
completely, move the shift lever to the P
(Park) position and apply the parking brake.
How to switch the display
The Around View�ŠMonitor can display two split
views. Push the CAMERA button, change the
shift lever position, to switch between the
available views.
HOW TO ADJUST THE SCREEN VIEW
The display settings such as Display Mode,
Brightness, Contrast and Color of the Around
View
�ŠMonitor can be adjusted.
1. Push the
button.
2. Touch “Settings”.
3. Touch “System” and then touch “Camera Settings”.
4. Select an item you wish to adjust.
5. Adjust the level of the setting item using the TUNE knob.
NOTE:
Do not adjust any of the display settings of
the Around View
�ŠMonitor while the vehi-
cle is moving. Make sure the parking brake
is firmly applied.
AROUND VIEW�ŠMONITOR SYSTEM
LIMITATIONS
WARNING
Listed below are the system limitations
for Around View�ŠMonitor. Failure to
operate the vehicle in accordance with
these system limitations could result in
serious injury or death.
. Do not use the Around View
�ŠMoni-
tor with the outside mirrors in the
stored position, and make sure that
the liftgate is securely closed when
operating the vehicle using the
Around View
�ŠMonitor.
. The distance between objects
viewed on the Around View
�ŠMoni-
tor differs from the actual distance.
. The cameras are installed above the
front grille, the outside mirrors and
above the rear license plate. Do not
put anything on the cameras.
. When washing the vehicle with
highpressure water, be sure not to
spray it around the cameras. Other-
wise, water may enter the camera
unit causing water condensation on
Page 232 of 416

SAA0451
CD/USB MEMORY CARE AND
CLEANING
CD
.Handle a CD by its edges. Never touch the
surface of the disc. Do not bend the disc.
. Always place the discs in the storage case
when they are not being used.
. To clean a disc, wipe the surface from the
center to the outer edge using a clean, soft
cloth. Do not wipe the disc using a circular
motion.
Do not use a conventional record cleaner or
alcohol intended for industrial use. .
A new disc may be rough on the inner and
outer edges. Remove the rough edges by
rubbing the inner and outer edges with the
side of a pen or pencil as illustrated.
USB memory
.Do not touch the terminal portion of the USB
memory.
. Do not place heavy objects on the USB
memory.
. Do not store the USB memory in very humid
locations.
. Do not expose the USB memory to direct
sunlight.
. Do not spill any liquids on the USB memory.
Refer to the USB memory Owner’s Manual for
the details.
SAA3383
1. SOURCE select switch
2. Tuning switch
3. VOLUME control switch
STEERING WHEEL SWITCH FOR
AUDIO CONTROL
The audio system can be operated using the
controls on the steering wheel.
SOURCE select switch
Push the SOURCE select switch to change the
mode to available audio source.
Heater, air conditioner, audio and phone systems4-73