Page 109 of 248
SAFETY INFORMATION
The navigation system is primarily designed to
help you reach your destination. However, you,
the driver, must use the system safely and
properly. Information concerning road condi-
tions, traffic signs and the availability of services
may not always be up to date. The system is not a
substitute for safe, proper, and legal driving.
WARNING
.Do not rely on route guidance alone.
Always be sure that all driving man-
euvers are legal and safe in order to
avoid accidents.
MAP OPERATION
DISPLAYING CURRENT VEHICLE
LOCATION
Push
Page 110 of 248

6. Navigation
2D map
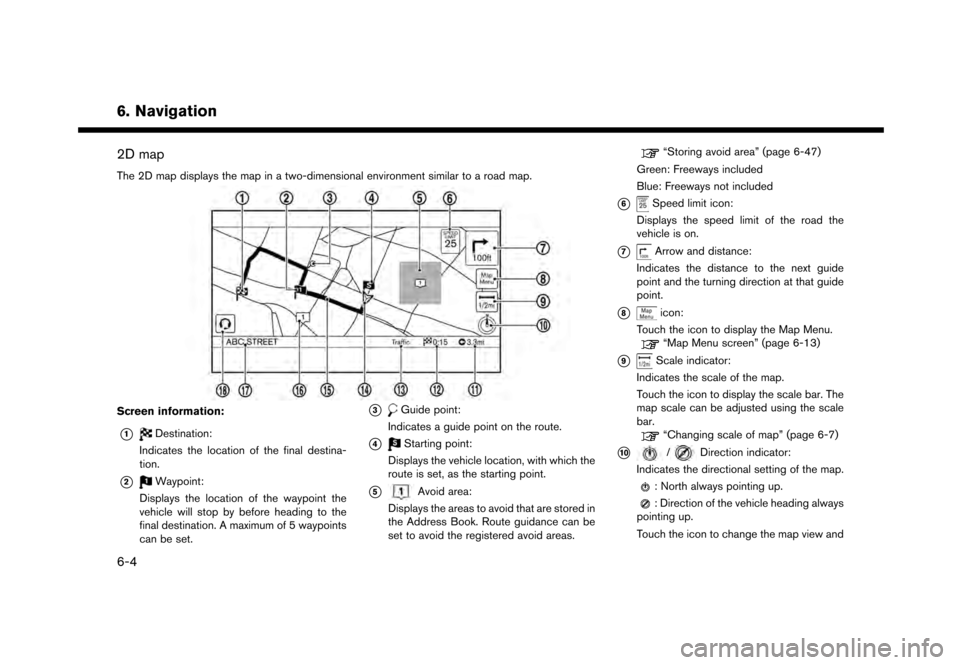
The 2D map displays the map in a two-dimensional environment similar to a road map.
Screen information:
*1Destination:
Indicates the location of the final destina-
tion.
*2Waypoint:
Displays the location of the waypoint the
vehicle will stop by before heading to the
final destination. A maximum of 5 waypoints
can be set.
*3Guide point:
Indicates a guide point on the route.
*4Starting point:
Displays the vehicle location, with which the
route is set, as the starting point.
*5Avoid area:
Displays the areas to avoid that are stored in
the Address Book. Route guidance can be
set to avoid the registered avoid areas.
“Storing avoid area” (page 6-47)
Green: Freeways included
Blue: Freeways not included
*6Speed limit icon:
Displays the speed limit of the road the
vehicle is on.
*7Arrow and distance:
Indicates the distance to the next guide
point and the turning direction at that guide
point.
*8icon:
Touch the icon to display the Map Menu.
“Map Menu screen” (page 6-13)
*9Scale indicator:
Indicates the scale of the map.
Touch the icon to display the scale bar. The
map scale can be adjusted using the scale
bar.
“Changing scale of map” (page 6-7)
*10/Direction indicator:
Indicates the directional setting of the map.
: North always pointing up.
: Direction of the vehicle heading always
pointing up.
Touch the icon to change the map view and
6-4
Page 111 of 248

the map orientation.“Changing map view and map orienta-
tion” (page 6-8)
*11Remaining distance to the destination:
Indicates the approximate remaining dis-
tance to the destination or waypoint. This
indicator will appear when a destination or
waypoint is set and route guidance is
started.
The arrow displayed here indicates the
direction of the destination. It can be
displayed only when the map scale is in
the range of 1/64 miles (25 m) - 1/8 miles
(200 m) .
*12Estimated time to the destination:
Indicates the estimated time to the destina-
tion or waypoint. This indicator will appear
when a destination or waypoint is set and
route guidance is started.
“Guidance settings” (page 6-40)
*13Traffic indicator:
Indicates the reception condition of the
traffic information transmitted from the
provider.
Green: Reception condition is good.
Gray: Reception condition is not good.
The indicator does not appear without aSiriusXM Traffic subscription.
*14Vehicle icon:
Indicates the current vehicle location and
the direction the vehicle is heading.
*15Suggested route:
Appears in bold blue during route guidance.
*16Stored location (yellow):
Displays the locations that are stored in the
Address Book.
“Storing location” (page 6-46)
The icons can be changed according to
your preferences.
*17Street name:
Displays the name of the street that the
vehicle is currently driving on.
*18Voice Menu button (if so equipped):
Touch the icon to connect to the Nissan-
Connect
SMServices Voice Menu.“Connecting to Interactive Voice
Menu” (page 5-14)
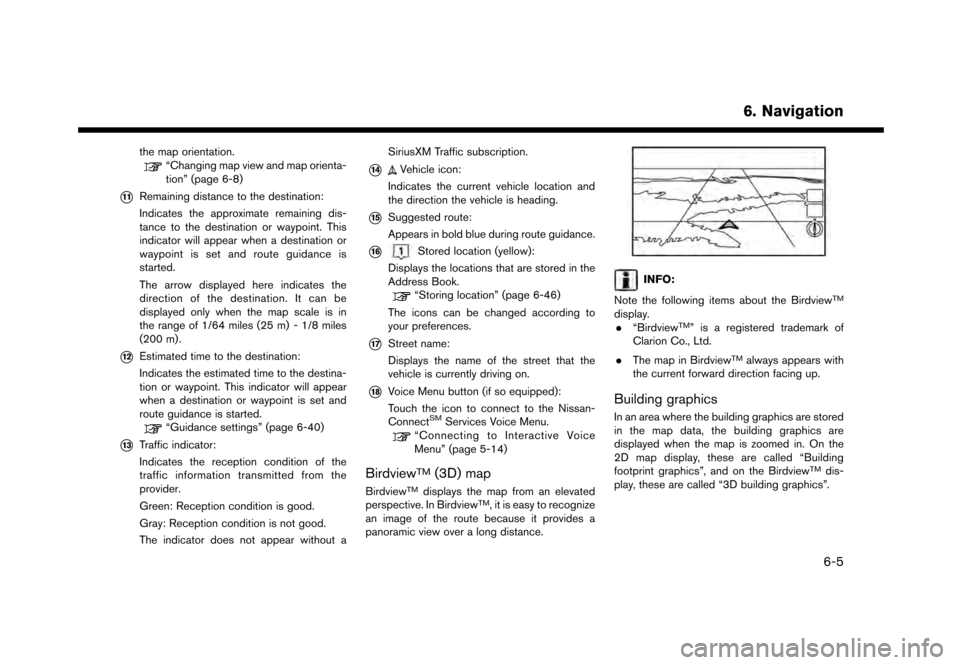
BirdviewTM(3D) map
BirdviewTMdisplays the map from an elevated
perspective. In BirdviewTM, it is easy to recognize
an image of the route because it provides a
panoramic view over a long distance.
INFO:
Note the following items about the Birdview
TM
display. . “BirdviewTM” is a registered trademark of
Clarion Co., Ltd.
. The map in Birdview
TMalways appears with
the current forward direction facing up.
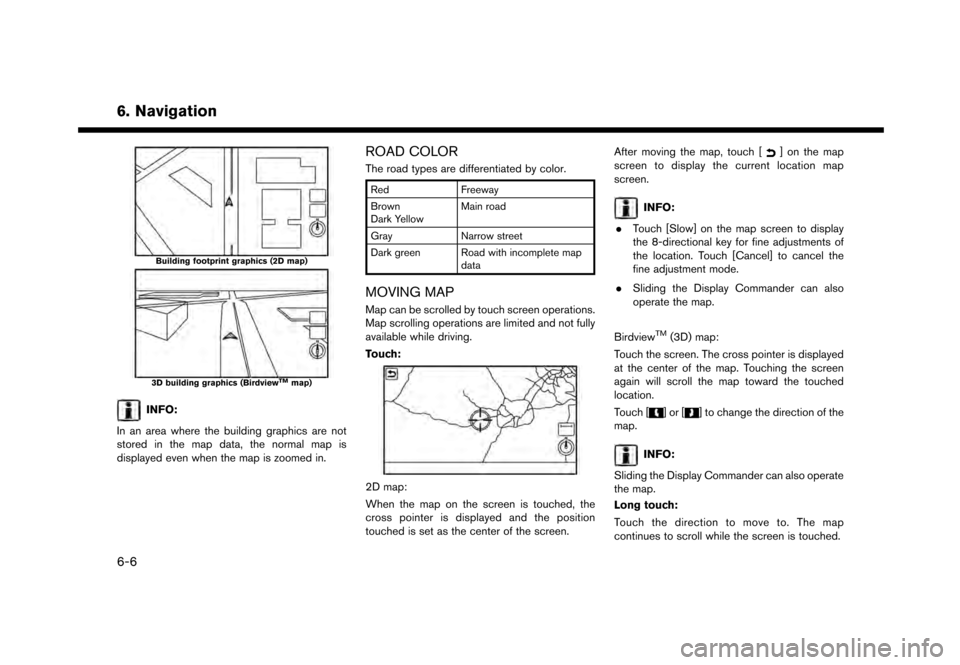
Building graphics
In an area where the building graphics are stored
in the map data, the building graphics are
displayed when the map is zoomed in. On the
2D map display, these are called “Building
footprint graphics”, and on the Birdview
TMdis-
play, these are called “3D building graphics”.
6. Navigation
6-5
Page 112 of 248

6. Navigation
Building footprint graphics (2D map)
3D building graphics (BirdviewTMmap)
INFO:
In an area where the building graphics are not
stored in the map data, the normal map is
displayed even when the map is zoomed in.
ROAD COLOR
The road types are differentiated by color.
Red Freeway
Brown
Dark Yellow Main road
Gray Narrow street
Dark green Road with incomplete map data
MOVING MAP
Map can be scrolled by touch screen operations.
Map scrolling operations are limited and not fully
available while driving.
Touch:
2D map:
When the map on the screen is touched, the
cross pointer is displayed and the position
touched is set as the center of the screen. After moving the map, touch [
] on the map
screen to display the current location map
screen.
INFO:
. Touch [Slow] on the map screen to display
the 8-directional key for fine adjustments of
the location. Touch [Cancel] to cancel the
fine adjustment mode.
. Sliding the Display Commander can also
operate the map.
Birdview
TM(3D) map:
Touch the screen. The cross pointer is displayed
at the center of the map. Touching the screen
again will scroll the map toward the touched
location.
Touch [
]or[] to change the direction of the
map.
INFO:
Sliding the Display Commander can also operate
the map.
Long touch:
Touch the direction to move to. The map
continues to scroll while the screen is touched.
6-6
Page 113 of 248
Drag:
Drags the map while the screen is touched.
Swipe/flick:
Swipe or flick the screen to scroll the map screen
quickly.
CHANGING SCALE OF MAP
1. Touch [].
The scale bar is displayed.
2. Touch [ZOOM IN] or [ZOOM OUT] to change the scale. Pinch-in
To view a wider area, pinch-in the map screen.
Pinch-out
To view the map in detail, pinch-out the map
screen.
INFO:
. While driving, pinch-in and pinch-out opera-
tions are disabled.
. Map scale can also be changed by rotating
the center dial on the Display Commander.
. Free Zoom:
Depending on the setting, using the center
dial on the Display Commander to change
the map scale may adjust the scale normally,
or it may engage the free zoom (finer scale
adjustment in smaller steps) .
“Navigation settings” (page 6-54)
Map scale
Map scale (map coverage) between 320 miles
(640 km) and 1/64 mile (25 m) can be selected.
6. Navigation
6-7
Page 114 of 248

6. Navigation
US UnitsMetric Units
320 mi 640 km
80 mi 160 km
32 mi 64 km
8mi 16km
5mi 10km
2mi 4km
1mi 2km
1/2 mi 1 km
1/4 mi 500 m
1/8 mi 200 m
1/16 mi 100 m
1/32 mi 50 m
1/64 mi 25 m
INFO:
. There may be unavailable map scales de-
pending on the location in the map data.
. Depending on the map scale, traffic informa-
tion icons cannot be displayed on the map
screen.
“Traffic information on map”
(page 6-44)
CHANGING MAP
Changing map view and map orienta-
tion
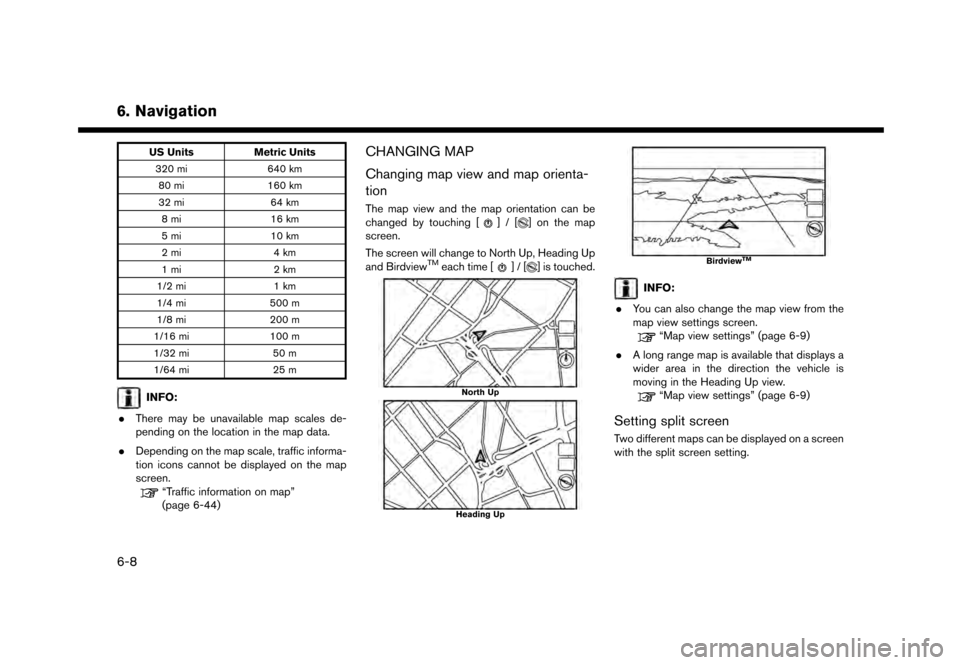
The map view and the map orientation can be
changed by touching []/[] on the map
screen.
The screen will change to North Up, Heading Up
and Birdview
TMeach time []/[] is touched.
North Up
Heading Up
BirdviewTM
INFO:
. You can also change the map view from the
map view settings screen.
“Map view settings” (page 6-9)
. A long range map is available that displays a
wider area in the direction the vehicle is
moving in the Heading Up view.
“Map view settings” (page 6-9)
Setting split screen
Two different maps can be displayed on a screen
with the split screen setting.
6-8
Page 115 of 248
1. Touch [] on the map screen.
2. Touch [Map View].
3. Touch [Change View].
4. Select [Split: 2D Map] or [Split: Birdview Map].
INFO:
The settings on the left split map can be changed
from map view settings menu.
“Map view settings” (page 6-9)
MAP VIEW SETTINGS
The setup for the map view is performed from the
Settings menu on the touch screen display.
1. Touch [
] on the map screen.
2. Touch [Map View].
INFO:
[Map View] can also be accessed from [Settings]
on the Launch Bar.
“Navigation settings” (page 6-54)
6. Navigation
6-9
Page 116 of 248
![NISSAN GT-R 2017 R35 Multi Function Display Owners Manual 6. Navigation
The following settings are available.
Menu itemAction
[Change View] [2D Map] Display 2D map.
[Split: 2D Map] Display 2D map on both left and right side of the split screen.
[Birdview (3D NISSAN GT-R 2017 R35 Multi Function Display Owners Manual 6. Navigation
The following settings are available.
Menu itemAction
[Change View] [2D Map] Display 2D map.
[Split: 2D Map] Display 2D map on both left and right side of the split screen.
[Birdview (3D](/manual-img/5/524/w960_524-115.png)
6. Navigation
The following settings are available.
Menu itemAction
[Change View] [2D Map] Display 2D map.
[Split: 2D Map] Display 2D map on both left and right side of the split screen.
[Birdview (3D)] Display 3D map.
[Split: Birdview Map] Display 2D map on the left side and 3D map on the right side of the screen.
[View Settings] [Intersection] Display the enlarged view of intersection on the left side of the screen during
route guidance.
“Route guidance screens” (page 6-31)
[Turn List] Display the turn list on the left screen when a route is set.
“Route guidance screens” (page 6-31)
[Drive Report] Display your ECO driving performance score on the left side of the screen.
Touch [Log] to view the Drive Report history. Touch [Reset] to clear the past
records.
Push