2017 NISSAN ARMADA child lock
[x] Cancel search: child lockPage 148 of 614
WARNING
.Never install the rear bumper cover
while the engine is running. The
exhaust gas could heat the rear
bumper cover and this may cause a
fire.
. Never drive with the rear bumper
cover left in place. There is a risk
that the liftgate will not close cor-
rectly, and that carbon monoxide
may enter the cabin causing serious
injury or death.
CAUTION
.Failure to follow the instructions
below could result in damage to
the rear bumper cover.
— Do not close the liftgate with the
rear bumper cover installed.
— Do not strike or apply excessive force to the rear bumper cover.
— Keep the rear bumper cover away from heat or fire. — To clean the rear bumper cover,
use a soft cloth, dampened with
a mild solution of neutral deter-
gent. Never use benzine, thinner
or any similar chemical.
— Remove any solvent such as oil or gasoline spilled on the sur-
face of the rear bumper cover as
soon as possible.
POWER WINDOWS
WARNING
. Make sure that all passengers have
their hands, etc. inside the vehicle
while it is in motion and before
closing the windows. Use the win-
dow lock switch to prevent unex-
pected use of the power windows.
. To help avoid risk of injury or death
through unintended operation of
the vehicle and or its systems,
including entrapment in windows
or inadvertent door lock activation,
do not leave children, people who
require the assistance of others or
pets unattended in your vehicle.
Additionally, the temperature inside
a closed vehicle on a warm day can
quickly become high enough to
cause a significant risk of injury or
death to people and pets.
The power windows operate when the ignition
switch is in the ON position or for about 45
seconds after the ignition switch is pushed to
the OFF position. If the driver’s or front
passenger’s door is opened during this period
Instruments and controls2-59
WINDOWS
Page 162 of 614
3 Pre-driving checks and adjustments
Keys ........................................................................\
...................... 3-2Intelligent Key ....................................................................... 3-2
Valet hand-off ....................................................................... 3-4
Doors ........................................................................\
.................... 3-4 Locking with mechanical key ............................................ 3-4
Opening and closing windows with the
mechanical key ..................................................................... 3-5
Locking with inside lock knob .......................................... 3-5
Locking with power door lock switch ............................ 3-5
Automatic door locks ......................................................... 3-6
Child safety rear door lock .............................................. 3-6
Intelligent Key system .............................................................. 3-7 Intelligent Key operating range ........................................ 3-9
Door locks/unlocks precaution ........................................ 3-9
Intelligent Key operation ................................................. 3-10
Battery saver system ....................................................... 3-12
Warning signals ................................................................ 3-12
Troubleshooting guide ..................................................... 3-13
Remote keyless entry system ............................................. 3-15 How to use remote keyless entry system .................. 3-16
Remote engine start (if so equipped) .............................. 3-19 Remote engine start operating range ......................... 3-19
Remote starting the engine ........................................... 3-19
Extending engine run time ............................................. 3-20 Canceling a remote start ............................................. 3-20
Conditions the remote engine start will
not work ........................................................................\
.... 3-20
Hood ........................................................................\
................. 3-21
Liftgate ........................................................................\
............. 3-22 Operating manual liftgate ............................................. 3-22
Operating power liftgate (if so equipped) ............... 3-22
Auto closure ................................................................... 3-25
Liftgate release lever ..................................................... 3-26
Fuel-filler door ........................................................................\
3-26
Opening the fuel-filler door ......................................... 3-26
Fuel-filler cap .................................................................. 3-27
Tilt/telescopic steering ......................................................... 3-29
Electric operation ........................................................... 3-29
Sun visors ........................................................................\
........ 3-29
Mirrors ........................................................................\
.............. 3-30
Inside mirror ..................................................................... 3-30
Outside mirrors ............................................................... 3-31
Vanity mirror ..................................................................... 3-33
Automatic drive positioner (if so equipped) ................... 3-33
Entry/exit function .......................................................... 3-33
Memory storage .............................................................. 3-34
Setting memory function .............................................. 3-35
System operation ........................................................... 3-35
Page 165 of 614
3-4Pre-driving checks and adjustments
CAUTION
Always carry the mechanical key in-
stalled in the Intelligent Key.
VALET HAND-OFF
When you have to leave a key with a valet, give
them the Intelligent Key itself and keep the
mechanical key with you to protect your
belongings.
To prevent the glove box from being opened
during valet hand-off, follow the procedures
below.
1. Remove the mechanical key from the In-telligent Key.
2. Lock the glove box with the mechanical key.
3. Hand the Intelligent Key to the valet, keeping the mechanical key in your pocket or bag for
insertion into the Intelligent Key when you
retrieve your vehicle.
See “Storage” (P.2-50) .
WARNING
. Always have the doors locked while
driving. Along with the use of seat
belts, this provides greater safety in
the event of an accident by helping
to prevent persons from being
thrown from the vehicle. This also
helps keep children and others from
unintentionally opening the doors,
and will help keep out intruders.
. Before opening any door, always
look for and avoid oncoming traffic.
. To help avoid risk of injury or death
through unintended operation of
the vehicle and or its systems,
including entrapment in windows
or inadvertent door lock activation,
do not leave children, people who
require the assistance of others or
pets unattended in your vehicle.
Additionally, the temperature inside
a closed vehicle on a warm day can
quickly become high enough to
cause a significant risk of injury or
death to people and pets.
SPA2457B
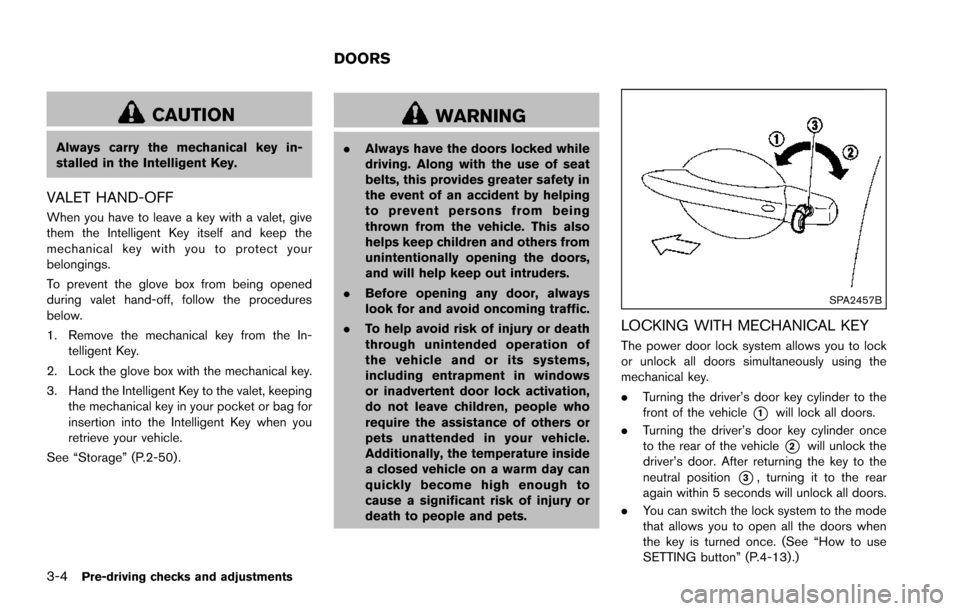
LOCKING WITH MECHANICAL KEY
The power door lock system allows you to lock
or unlock all doors simultaneously using the
mechanical key.
.Turning the driver’s door key cylinder to the
front of the vehicle
*1will lock all doors.
. Turning the driver’s door key cylinder once
to the rear of the vehicle
*2will unlock the
driver’s door. After returning the key to the
neutral position
*3, turning it to the rear
again within 5 seconds will unlock all doors.
. You can switch the lock system to the mode
that allows you to open all the doors when
the key is turned once. (See “How to use
SETTING button” (P.4-13).)
DOORS
Page 167 of 614
3-6Pre-driving checks and adjustments
Lockout protection
When the power door lock switch (driver or front
passenger) is moved to the lock position with
any door open, all doors will lock and unlock
automatically. With the Intelligent Key left in the
vehicle and any door open, all doors will unlock
automatically and a chime will sound after the
door is closed.
These functions help to prevent the Intelligent
Key from being accidentally locked inside the
vehicle.
AUTOMATIC DOOR LOCKS
.All doors lock automatically when the vehicle
speed reaches 15 MPH (24 km/h) .
. All doors unlock automatically when the
ignition switch is placed in the OFF position.
The automatic unlock function can be
deactivated or activated. To deactivate or
activate the automatic door unlock system,
perform the following procedure:
1. Close all doors.
2. Place the ignition switch in the ON position.
3. Within 20 seconds of performing Step 2, push and hold the power door lock switch to
the
position (UNLOCK) for more than 5
seconds. 4. When activated, the hazard indicator will
flash twice. When deactivated, the hazard
indicator will flash once.
5. The ignition switch must be placed in the OFF and ON position again between each
setting change.
When the automatic door unlock system is
deactivated, the doors do not unlock when the
ignition switch is placed in the OFF position. To
unlock the door manually, use the inside lock
knob or the power door lock switch (driver’s or
front passenger’s side) .
SPA2745
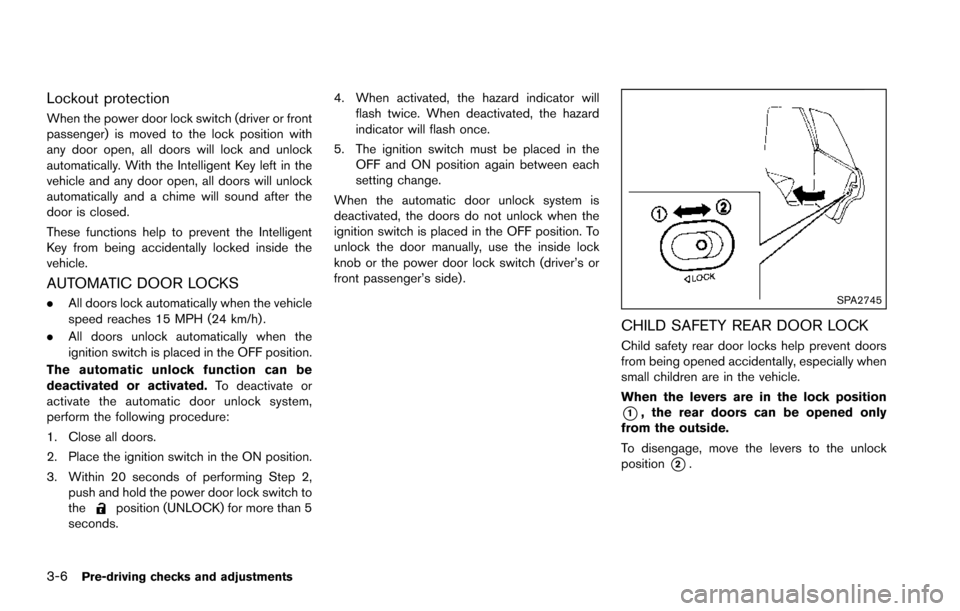
CHILD SAFETY REAR DOOR LOCK
Child safety rear door locks help prevent doors
from being opened accidentally, especially when
small children are in the vehicle.
When the levers are in the lock position
*1, the rear doors can be opened only
from the outside.
To disengage, move the levers to the unlock
position
*2.
Page 183 of 614
3-22Pre-driving checks and adjustments
WARNING
.Always be sure the liftgate has been
closed securely to prevent it from
opening while driving.
. Do not drive with the liftgate open.
This could allow dangerous exhaust
gases to be drawn into the vehicle.
See “Exhaust gas (carbon monox-
ide)” (P.5-4) .
. Do not leave children unattended
inside the vehicle. They could un-
knowingly activate switches or con-
trols. Unattended children could
become involved in serious acci-
dents.
. Always be sure that hands and feet
are clear of the door frame to avoid
injury while closing the liftgate.
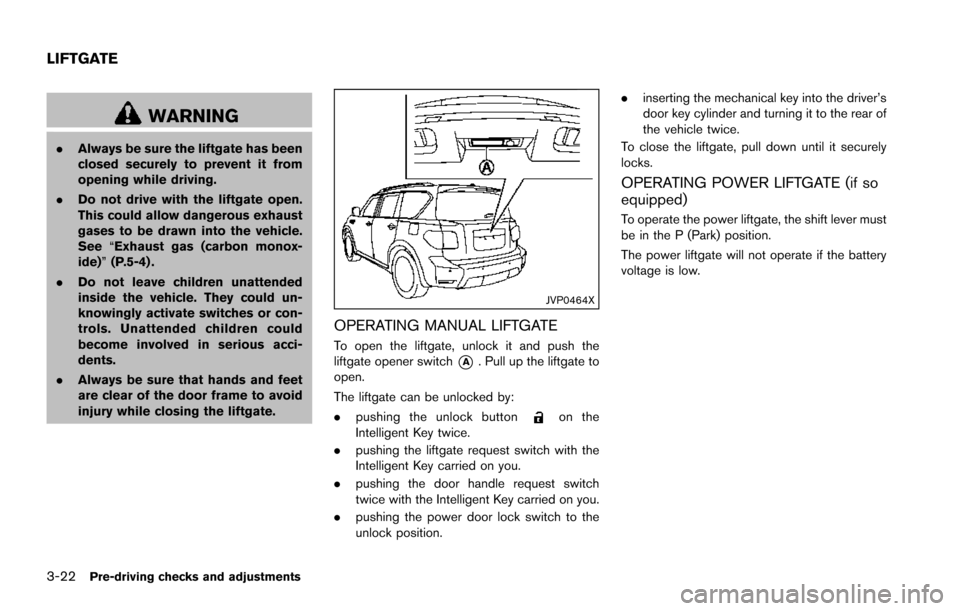
JVP0464X
OPERATING MANUAL LIFTGATE
To open the liftgate, unlock it and push the
liftgate opener switch
*A. Pull up the liftgate to
open.
The liftgate can be unlocked by:
. pushing the unlock button
on the
Intelligent Key twice.
. pushing the liftgate request switch with the
Intelligent Key carried on you.
. pushing the door handle request switch
twice with the Intelligent Key carried on you.
. pushing the power door lock switch to the
unlock position. .
inserting the mechanical key into the driver’s
door key cylinder and turning it to the rear of
the vehicle twice.
To close the liftgate, pull down until it securely
locks.
OPERATING POWER LIFTGATE (if so
equipped)
To operate the power liftgate, the shift lever must
be in the P (Park) position.
The power liftgate will not operate if the battery
voltage is low.
LIFTGATE
Page 363 of 614
5-22Starting and driving
4. Push down the shift lock*Bas illustrated.
5. Push the shift lever button
*Cand move the
shift lever to N (Neutral) position
*Dwhile
holding down the shift lock.
The vehicle may be moved to the desired
location.
If the lever cannot be moved out of P (Park) ,
have the automatic transmission system
checked as soon as possible. It is recom-
mended you visit a NISSAN dealer for this
service.WARNING
. Be sure the parking brake is fully
released before driving. Failure to
do so can cause brake failure and
lead to an accident.
. Do not release the parking brake
from outside the vehicle.
. Do not use the gear shift in place of
the parking brake. When parking, be
sure the parking brake is fully
engaged.
. To help avoid risk of injury or death
through unintended operation of
the vehicle and/or its systems, do
not leave children, people who re-
quire the assistance of others or
pets unattended in your vehicle.
Additionally, the temperature inside
a closed vehicle on a warm day can
quickly become high enough to
cause a significant risk of injury or
death to people and pets.
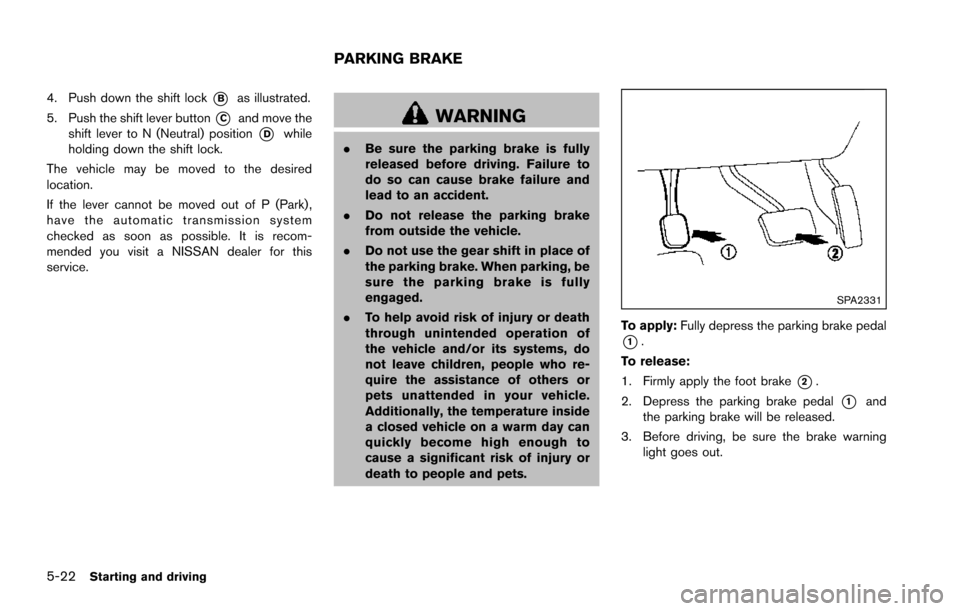
SPA2331
To apply: Fully depress the parking brake pedal
*1.
To release:
1. Firmly apply the foot brake
*2.
2. Depress the parking brake pedal
*1and
the parking brake will be released.
3. Before driving, be sure the brake warning light goes out.
PARKING BRAKE
Page 525 of 614
8-10Do-it-yourself
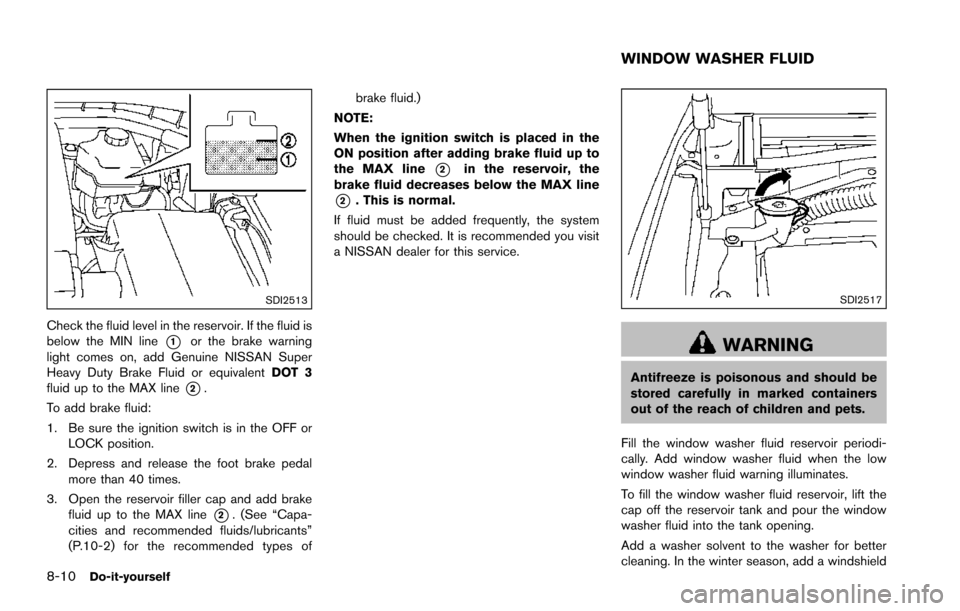
SDI2513
Check the fluid level in the reservoir. If the fluid is
below the MIN line
*1or the brake warning
light comes on, add Genuine NISSAN Super
Heavy Duty Brake Fluid or equivalent DOT 3
fluid up to the MAX line
*2.
To add brake fluid:
1. Be sure the ignition switch is in the OFF or LOCK position.
2. Depress and release the foot brake pedal more than 40 times.
3. Open the reservoir filler cap and add brake fluid up to the MAX line
*2. (See “Capa-
cities and recommended fluids/lubricants”
(P.10-2) for the recommended types of brake fluid.)
NOTE:
When the ignition switch is placed in the
ON position after adding brake fluid up to
the MAX line
*2in the reservoir, the
brake fluid decreases below the MAX line
*2. This is normal.
If fluid must be added frequently, the system
should be checked. It is recommended you visit
a NISSAN dealer for this service.
SDI2517
WARNING
Antifreeze is poisonous and should be
stored carefully in marked containers
out of the reach of children and pets.
Fill the window washer fluid reservoir periodi-
cally. Add window washer fluid when the low
window washer fluid warning illuminates.
To fill the window washer fluid reservoir, lift the
cap off the reservoir tank and pour the window
washer fluid into the tank opening.
Add a washer solvent to the washer for better
cleaning. In the winter season, add a windshield
WINDOW WASHER FLUID
Page 536 of 614
SDI2704
Extended storage fuse switch (if so
equipped)
To reduce battery drain, the extended storage
fuse switch comes from the factory switched off.
Prior to delivery of your vehicle, the switch is
pushed in (switched on) and should always
remain on.
If the extended storage fuse switch is not
pushed in (switched on), the “SHIPPING MODE
ON, PUSH STORAGE FUSE” warning may
appear on the vehicle information display (if so
equipped) . See “Vehicle information display”
(P.2-20) .
If any electrical equipment does not operate,remove the extended storage fuse switch and
check for an open fuse.
NOTE:
If the extended storage fuse switch mal-
functions or if the fuse is open, it is not
necessary to replace the switch. In this
case, remove the extended storage fuse
switch and replace it with a new fuse of the
same rating.
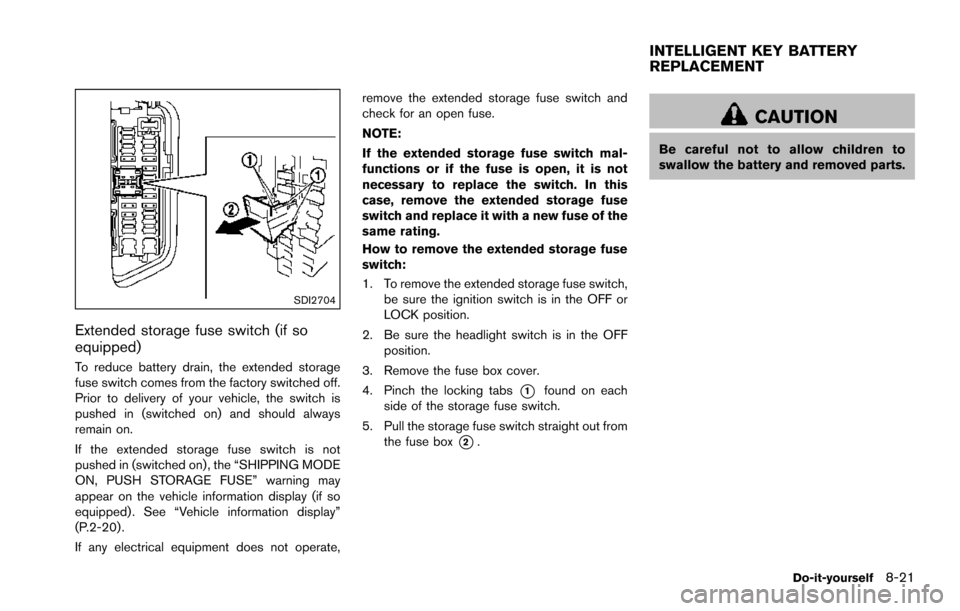
How to remove the extended storage fuse
switch:
1. To remove the extended storage fuse switch,
be sure the ignition switch is in the OFF or
LOCK position.
2. Be sure the headlight switch is in the OFF position.
3. Remove the fuse box cover.
4. Pinch the locking tabs
*1found on each
side of the storage fuse switch.
5. Pull the storage fuse switch straight out from the fuse box
*2.
CAUTION
Be careful not to allow children to
swallow the battery and removed parts.
Do-it-yourself8-21
INTELLIGENT KEY BATTERY
REPLACEMENT