2017 NISSAN ARMADA wheel
[x] Cancel search: wheelPage 587 of 614
10-16Technical and consumer information
cargo higher than the seatbacks. In
a sudden stop or collision, unse-
cured cargo could cause personal
injury.
. The child restraint top tether strap
may be damaged by contact with
items in the cargo area. Secure any
items in the cargo area. Your child
could be seriously injured or killed
in a collision if the top tether strap is
damaged.
. Do not load your vehicle any heavier
than the GVWR or the maximum
front and rear GAWRs. If you do,
parts of your vehicle can break, tire
damage could occur, or it can
change the way your vehicle han-
dles. This could result in loss of
control and cause personal injury.
LOADING TIPS
.The GVW must not exceed GVWR or
GAWR as specified on the F.M.V.S.
S./C.M.V.S.S. certification label.
.Do not load the front and rear axle to
the GAWR. Doing so will exceed the
GVWR.
WARNING
.Properly secure all cargo to
help prevent it from sliding or
shifting. Do not place cargo
higher than the seatbacks. In a
sudden stop or collision, un-
secured cargo could cause
personal injury.
. Do not load your vehicle any
heavier than the GVWR or the
maximum front and rear
GAWRs. If you do, parts of
your vehicle can break, tire
damage could occur, or it can
change the way your vehicle
handles. This could result in
loss of control and cause per-
sonal injury.
. Overloading not only can
shorten the life of your vehicle
and the tire, but can cause
unsafe vehicle handling and
long braking distance. This may cause a premature tire
failure, which could result in a
serious accident and personal
injury. Failures caused by
overloading are not covered
by the vehicle’s warranty.
MEASUREMENT OF WEIGHTS
Secure loose items to prevent weight
shifts that could affect the balance of
your vehicle. When the vehicle is loaded,
drive to a scale and weigh the front and
the rear wheels separately to determine
axle loads. Individual axle loads should
not exceed either of the gross axle
weight ratings (GAWR) . The total of the
axle loads should not exceed the gross
vehicle weight rating (GVWR) . These
ratings are given on the vehicle certifica-
tion label. If weight ratings are exceeded,
move or remove items to bring all
weights below the ratings.
Page 592 of 614
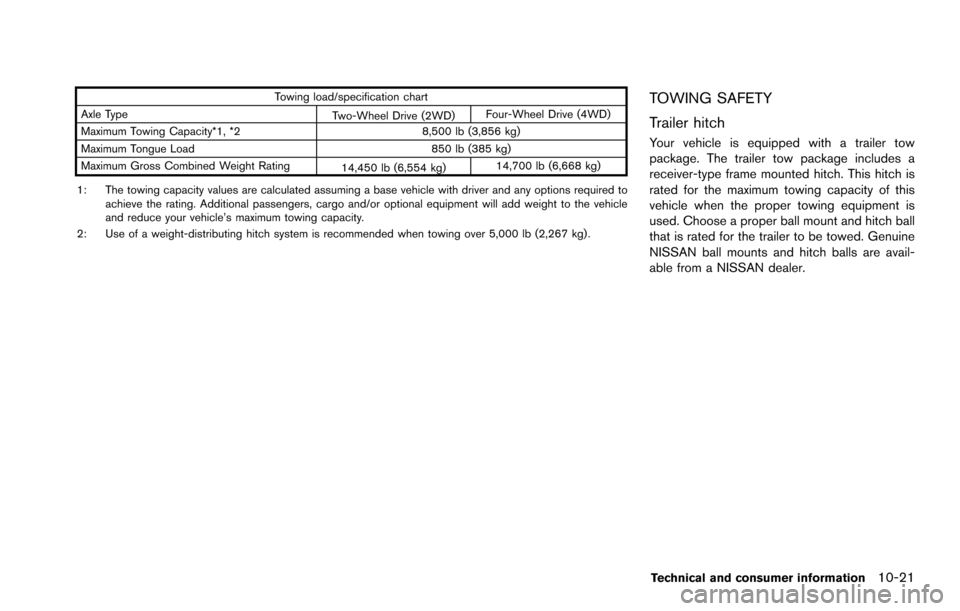
Towing load/specification chart
Axle Type Two-Wheel Drive (2WD)Four-Wheel Drive (4WD)
Maximum Towing Capacity*1, *2 8,500 lb (3,856 kg)
Maximum Tongue Load 850 lb (385 kg)
Maximum Gross Combined Weight Rating 14,450 lb (6,554 kg)14,700 lb (6,668 kg)
1: The towing capacity values are calculated assuming a base vehicle with driver and any options required to achieve the rating. Additional passengers, cargo and/or optional equipment will add weight to the vehicle
and reduce your vehicle’s maximum towing capacity.
2: Use of a weight-distributing hitch system is recommended when towing over 5,000 lb (2,267 kg) .TOWING SAFETY
Trailer hitch
Your vehicle is equipped with a trailer tow
package. The trailer tow package includes a
receiver-type frame mounted hitch. This hitch is
rated for the maximum towing capacity of this
vehicle when the proper towing equipment is
used. Choose a proper ball mount and hitch ball
that is rated for the trailer to be towed. Genuine
NISSAN ball mounts and hitch balls are avail-
able from a NISSAN dealer.
Technical and consumer information10-21
Page 594 of 614
the weight rating of the hitch compo-
nents. Never exceed the weight rating
of the hitch components. Doing so can
cause serious personal injury or prop-
erty damage.
Hitch ball
Choose a hitch ball of the proper size and
weight rating for your trailer:
.The required hitch ball size is stamped on
most trailer couplers. Most hitch balls also
have the size printed on top of the ball.
. Choose the proper class hitch ball based on
the trailer weight.
. The diameter of the threaded shank of the
hitch ball must be matched to the ball mount
hole diameter. The hitch ball shank should
be no more than 1/16´´ smaller than the hole
in the ball mount.
. The threaded shank of the hitch ball must be
long enough to be properly secured to the
ball mount. There should be at least 2
threads showing beyond the lock washer
and nut.
Ball mount
The hitch ball is attached to the ball mount and
the ball mount is inserted into the hitch receiver.
Choose a proper class ball mount based on the
trailer weight. Additionally, the ball mount should
be chosen to keep the trailer tongue level with
the ground.
Weight carrying hitches
A weight carrying or “dead weight” ball mount is
one that is designed to carry the whole amount
of tongue weight and gross weight directly on
the ball mount and on the receiver.
Weight distribution hitch
This type of hitch is also called a “load-leveling”
or “equalizing” hitch. A set of bars attach to the
ball mount and to the trailer to distribute the
tongue weight (hitch weight) of your trailer.
Many vehicles cannot carry the full tongue
weight of a given trailer, and need some of the
tongue weight transferred through the frame and
pushing down on the front wheels. This gives
stability to the tow vehicle.
A weight-distributing hitch system (Class IV) is
recommended if you plan to tow trailers with a
maximum weight over 5,000 lbs (2,267 kg) .
Check with the trailer and towing equipment
manufacturers to determine if they recommend
the use of a weight-distributing hitch system. NOTE:
A weight-distributing hitch system may
affect the operation of trailer surge brakes.
If you are considering use of a weight-
distributing hitch system with a surge
brake-equipped trailer, check with the
surge brake, hitch or trailer manufacturer
to determine if and how this can be done.
Follow the instructions provided by the manu-
facturer for installing and using the weight-
distributing hitch system.
General set-up instructions are as follows:
1. Park unloaded vehicle on a level surface.
With the ignition switch in the ON position
and the doors closed, allow the vehicle to
stand for several minutes so that it can level.
2. Measure the height of a reference point on the front and rear bumpers at the center of
the vehicle.
3. Attach the trailer to the vehicle and adjust the hitch equalizers so that the front bumper
height is within 0 - .5 inches (0 - 13 mm) of
the reference height measured in step 2.
The rear bumper should be no higher than
the reference height measured in step 2.
Technical and consumer information10-23
Page 597 of 614
10-26Technical and consumer information
Several types of braking systems are available.
Surge Brakes -The surge brake actuator is
mounted on the trailer tongue with a hydraulic
line running to each trailer wheel. Surge brakes
are activated by the trailer pushing against the
hitch ball when the tow vehicle is braking.
Hydraulic surge brakes are common on rental
trailers and some boat trailers. In this type of
system, there is no hydraulic or electric connec-
tion for brake operation between the tow vehicle
and the trailer.
Electric Trailer Brakes - Electric braking
systems are activated by an electronic signal
sent from a trailer brake controller (special brake
sensing module) .
Have a professional supplier of towing equip-
ment make sure the trailer brakes are properly
installed and demonstrate proper brake function
testing.
WARNING
Never connect a trailer brake system
directly to the vehicle brake system.
Pre-towing tips
. Be certain your vehicle maintains a level
position when a loaded or unloaded trailer is
hitched. Do not drive the vehicle if it has an
abnormal nose-up or nose-down condition;
check for improper tongue load, overload,
worn suspension or other possible causes
of either condition.
. Always secure items in the trailer to prevent
load shift while driving.
. Keep the cargo load as low as possible in
the trailer to keep the trailer center of gravity
low.
. Load the trailer so approximately 60% of the
trailer load is in the front half and 40% is in
the back half. Also make sure the load is
balanced side to side.
. Check your hitch, trailer tire pressure,
vehicle tire pressure, trailer light operation,
and trailer wheel lug nuts every time you
attach a trailer to the vehicle.
. Be certain your rearview mirrors conform to
all federal, state or local regulations. If not,
install any mirrors required for towing before
driving the vehicle.
. Determine the overall height of the vehicle
and trailer so the required clearance is
known.
Trailer towing tips
In order to gain skill and an understanding of the
vehicle’s behavior, you should practice turning,
stopping and backing up in an area which is free
from traffic. Steering stability, and braking
performance will be somewhat different than
under normal driving conditions.
.Always secure items in the trailer to prevent
load shift while driving.
. Lock the trailer hitch coupler with a pin or
lock to prevent the coupler from inadver-
tently becoming unlatched.
. Avoid abrupt starts, acceleration or stops.
. Avoid sharp turns or lane changes.
. Always drive your vehicle at a moderate
speed. Some states or provinces have
specific speed limits for vehicles that are
towing trailers. Obey the local speed limits.
. When backing up, hold the bottom of the
steering wheel with one hand. Move your
hand in the direction in which you want the
trailer to go. Make small corrections and
back up slowly. If possible, have someone
guide you when you are backing up.
Always block the wheels on both vehicle and
trailer when parking. Parking on a slope is not
recommended; however, if you must do so:
Page 598 of 614
CAUTION
If you move the shift lever to the P
(Park) position before blocking the
wheels and applying the parking brake,
transmission damage could occur.
1. Apply and hold the brake pedal.
2. Have someone place blocks on the downhill side of the vehicle and trailer wheels.
3. After the wheel blocks are in place, slowly release the brake pedal until the blocks
absorb the vehicle load.
4. Apply the parking brake.
5. Shift the transmission into P (Park) .
6. Four-Wheel Drive (4WD) models:
Make sure that the 4WD shift switch is
engaged in the AUTO, 4HI or 4LO position
and the Automatic Transmission (AT) park
warning light is turned off.
7. Turn off the engine.
To drive away:
1. Apply and hold the brake pedal.
2. Start the engine.
3. Shift the transmission into gear. 4. Release the parking brake.
5. Drive slowly until the vehicle and trailer are
clear from the blocks.
6. Apply and hold the brake pedal.
7. Have someone retrieve and store the blocks.
. While going downhill, the weight of the
trailer pushing on the tow vehicle may
decrease overall stability. Therefore, to
maintain adequate control, reduce your
speed and shift to a lower gear. Avoid long
or repeated use of the brakes when
descending a hill, as this reduces their
effectiveness and could cause overheating.
Shifting to a lower gear instead provides
“engine braking” and reduces the need to
brake as frequently.
. If the engine coolant temperature rises to a
high temperature, see “If your vehicle over-
heats” (P.6-14) .
. Trailer towing requires more fuel than normal
circumstances.
. Avoid towing a trailer for your vehicle’s first
500 miles (800 km).
. Have your vehicle serviced more often than
at intervals specified in the recommended
maintenance schedule shown in the "9.
Maintenance and schedules" section. .
When making a turn, your trailer wheels will
be closer to the inside of the turn than your
vehicle wheels. To compensate for this,
make a larger than normal turning radius
during the turn.
. Crosswinds and rough roads will adversely
affect vehicle/trailer handling, possibly caus-
ing vehicle sway. When being passed by
larger vehicles, be prepared for possible
changes in crosswinds that could affect
vehicle handling.
Do the following if the trailer begins to sway:
1. Take your foot off the accelerator pedal to allow the vehicle to coast and steer as
straight ahead as the road conditions allow.
This combination will help stabilize the
vehicle.
.Do not correct trailer sway by steering orapplying the brakes.
2. When the trailer sway stops, gently apply the brakes and pull to the side of the road in
a safe area.
3. Try to rearrange the trailer load so it is balanced as described earlier in this section.
. Be careful when passing other vehicles.
Passing while towing a trailer requires
considerably more distance than normal
passing. Remember the length of the trailer
must also pass the other vehicle before you
Technical and consumer information10-27
Page 599 of 614
10-28Technical and consumer information
can safely change lanes.
. Use the Tow mode or downshift the
transmission to a lower gear for engine
braking when driving down steep or long
hills. This will help slow the vehicle without
applying the brakes.
. Avoid holding the brake pedal down too
long or too frequently. This could cause the
brakes to overheat, resulting in reduced
braking efficiency.
. Increase your following distance to allow for
greater stopping distances while towing a
trailer. Anticipate stops and brake gradually.
. NISSAN recommends that the cruise con-
trol not be used while towing a trailer.
. While towing a trailer, do not use the
following systems (if so equipped):
— the Lane Departure Warning (LDW)
system
— the Lane Departure Prevention (LDP) system
— the Blind Spot Warning (BSW) system
— the Blind Spot Intervention
�Š(BSI) sys-
tem
— the Back-up Collision Intervention (BCI) system
— the Intelligent Cruise Control (ICC) system — the Distance Control Assist (DCA) sys-
tem
— the Forward Emergency Braking (FEB) system
— the Predictive Forward Collision Warning (PFCW) system
. Some states or provinces have specific
regulations and speed limits for vehicles
that are towing trailers. Obey the local
speed limits.
. Check your hitch, trailer wiring harness
connections, and trailer wheel lug nuts after
50 miles (80 km) of travel and at every
break.
. When launching a boat, do not allow the
water level to go over the exhaust tail pipe or
rear bumper.
. Make sure you disconnect the trailer lights (if
so equipped) before backing the trailer into
the water or the trailer lights may burn out.
When towing a trailer, the transmission
fluid should be changed more frequently.
For additional information, see the "9.
Maintenance and schedules" section.
TOW mode
Using TOW mode is recommended when pull-
ing a heavy trailer or hauling a heavy load. Push
the TOW MODE switch to activate tow mode.
The TOW MODE indicator light in the meter
illuminates when TOW mode is selected. Push
the TOW MODE switch again to turn TOW
mode off. TOW mode is automatically cancelled
when the ignition switch is placed in the OFF
position.
TOW mode includes the following features:
. Grade logic — Adjusts transmission shifts
when pulling a trailer or hauling a load up a
grade.
. Downhill Speed Control (DSC) — automa-
tically downshifts when driving down a
grade with a trailer or heavy load to help
control vehicle speed.
Driving the vehicle in the TOW mode with no
trailer/load or light trailer/light load will not cause
any damage. However, fuel economy may be
reduced and the transmission/engine driving
characteristics may feel unusual.
When towing a trailer, the transmission
fluid should be changed more frequently.
For additional information, see the "9.
Maintenance and schedules" section.
Page 600 of 614
FLAT TOWING
Towing your vehicle with all four wheels on the
ground is sometimes called flat towing. This
method is sometimes used when towing a
vehicle behind a recreational vehicle, such as a
motor home.
CAUTION
.Failure to follow these guidelines
can result in severe transmission
damage.
. Whenever flat towing your vehicle,
always tow forward, never back-
ward.
. DO NOT tow any automatic trans-
mission vehicle with all four wheels
on the ground (flat towing) . Doing
so WILL DAMAGE internal transmis-
sion parts due to lack of transmis-
sion lubrication.
. DO NOT tow a Four-Wheel Drive
(4WD) vehicle with any of the
wheels on the ground. Doing so
may cause serious and expensive
damage to the powertrain.
. For emergency towing procedures
refer to “Towing recommended by NISSAN” (P.6-17) .
Automatic Transmission
Four-Wheel Drive (4WD) models:
Do not tow a 4WD vehicle with any of the
wheels on the ground.
Two-Wheel Drive (2WD) models:
To tow a vehicle equipped with an automatic
transmission, an appropriate vehicle dolly
MUST
be placed under the towed vehicle’s drive
wheels. Always follow the dolly manufacturer’s
recommendations when using their product. DOT (Department Of Transportation) Quality
Grades: All passenger car tires must conform to
federal safety requirements in addition to these
grades.
Quality grades can be found where applicable
on the tire sidewall between tread shoulder and
maximum section width. For example:
Treadwear 200 Traction AA Temperature A
TREADWEAR
The treadwear grade is a comparative rating
based on the wear rate of the tire when tested
under controlled conditions on a specified
government test course. For example, a tire
graded 150 would wear one and one-half (1
1/2) times as well on the government course as
a tire graded 100. The relative performance of
tires depends upon actual conditions of their
use, however, and may depart significantly from
the norm due to variations in driving habits,
service practices and differences in road char-
acteristics and climate.
TRACTION AA, A, B AND C
The traction grades, from highest to lowest, are
AA, A, B and C. Those grades represent the
tire’s ability to stop on wet pavement as
measured under controlled conditions on spe-
cified government test surfaces of asphalt and
concrete. A tire marked C may have poor
traction performance.
Technical and consumer information10-29
UNIFORM TIRE QUALITY GRADING
Page 601 of 614
10-30Technical and consumer information
WARNING
The traction grade assigned to this tire
is based on straight-ahead braking
traction tests, and does not include
acceleration, cornering, hydroplaning,
or peak traction characteristics.
TEMPERATURE A, B AND C
The temperature grades A (the highest) , B, and
C, representing the tire’s resistance to the
generation of heat and its ability to dissipate
heat when tested under controlled conditions on
a specified indoor laboratory test wheel. Sus-
tained high temperature can cause the material
of the tire to degenerate and reduce tire life, and
excessive temperature can lead to sudden tire
failure. The grade C corresponds to a level of
performance which all passenger car tires must
meet under the Federal Motor Vehicle Safety
Standard No. 109. Grades B and A represent
higher levels of performance on the laboratory
test wheel than the minimum required by law.
WARNING
The temperature grade for this tire is
established for a tire that is properly
inflated and not overloaded. Excessive
speed, under-inflation, or excessive
loading, either separately or in combi-
nation, can cause heat build-up and
possible tire failure.Your NISSAN is covered by the following
emission warranties.
For USA:
.
Emission Defects Warranty
. Emissions Performance Warranty
Details of these warranties may be found with
other vehicle warranties in your Warranty In-
formation Booklet that comes with your
NISSAN. If you did not receive a Warranty
Information Booklet, or it has become lost, you
may obtain a replacement by writing to:
. NISSAN Division
Nissan North America, Inc.
Consumer Affairs Department
P.O. Box 685003
Franklin, TN 37068-5003
EMISSION CONTROL SYSTEM
WARRANTY