2017 NISSAN ARMADA Camera
[x] Cancel search: CameraPage 10 of 614
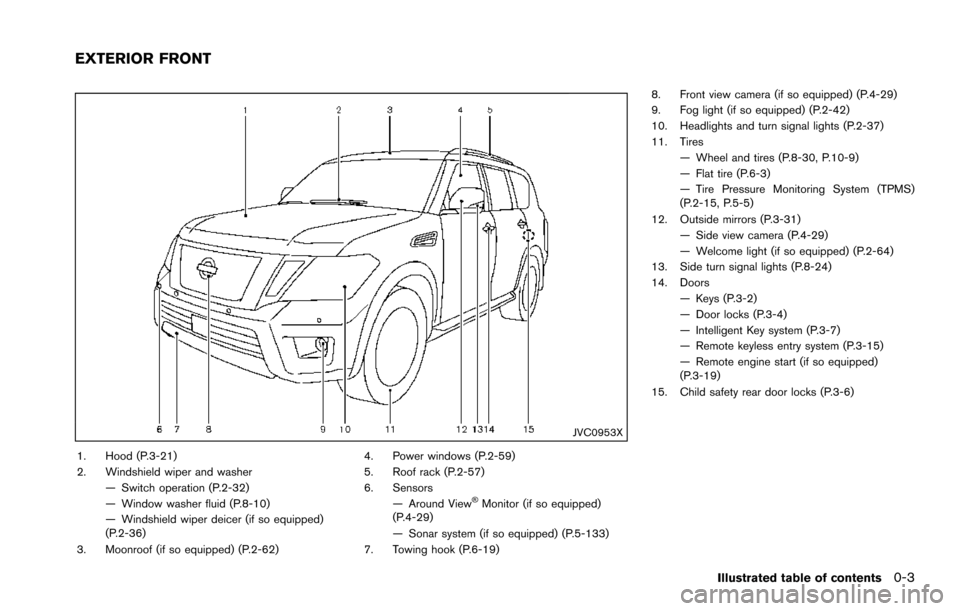
JVC0953X
1. Hood (P.3-21)
2. Windshield wiper and washer— Switch operation (P.2-32)
— Window washer fluid (P.8-10)
— Windshield wiper deicer (if so equipped)
(P.2-36)
3. Moonroof (if so equipped) (P.2-62) 4. Power windows (P.2-59)
5. Roof rack (P.2-57)
6. Sensors
— Around View
�ŠMonitor (if so equipped)
(P.4-29)
— Sonar system (if so equipped) (P.5-133)
7. Towing hook (P.6-19) 8. Front view camera (if so equipped) (P.4-29)
9. Fog light (if so equipped) (P.2-42)
10. Headlights and turn signal lights (P.2-37)
11. Tires
— Wheel and tires (P.8-30, P.10-9)
— Flat tire (P.6-3)
— Tire Pressure Monitoring System (TPMS)
(P.2-15, P.5-5)
12. Outside mirrors (P.3-31) — Side view camera (P.4-29)
— Welcome light (if so equipped) (P.2-64)
13. Side turn signal lights (P.8-24)
14. Doors
— Keys (P.3-2)
— Door locks (P.3-4)
— Intelligent Key system (P.3-7)
— Remote keyless entry system (P.3-15)
— Remote engine start (if so equipped)
(P.3-19)
15. Child safety rear door locks (P.3-6)
Illustrated table of contents0-3
EXTERIOR FRONT
Page 11 of 614
0-4Illustrated table of contents
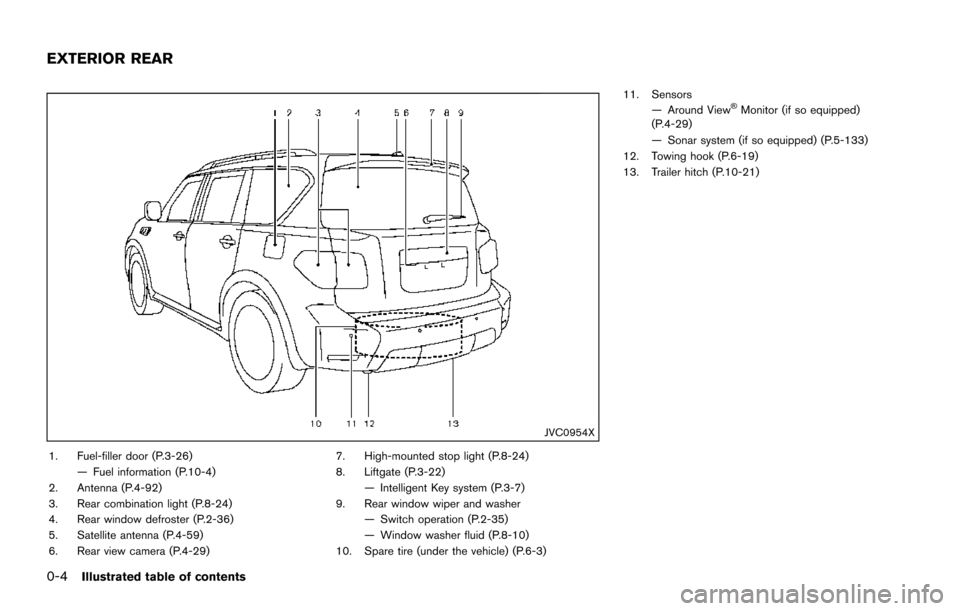
JVC0954X
1. Fuel-filler door (P.3-26)— Fuel information (P.10-4)
2. Antenna (P.4-92)
3. Rear combination light (P.8-24)
4. Rear window defroster (P.2-36)
5. Satellite antenna (P.4-59)
6. Rear view camera (P.4-29) 7. High-mounted stop light (P.8-24)
8. Liftgate (P.3-22)
— Intelligent Key system (P.3-7)
9. Rear window wiper and washer — Switch operation (P.2-35)
— Window washer fluid (P.8-10)
10. Spare tire (under the vehicle) (P.6-3) 11. Sensors
— Around View
�ŠMonitor (if so equipped)
(P.4-29)
— Sonar system (if so equipped) (P.5-133)
12. Towing hook (P.6-19)
13. Trailer hitch (P.10-21)
EXTERIOR REAR
Page 198 of 614
4 Monitor, heater, air conditioner, audio, phoneand voice recognition systems
Safety note ........................................................................\
.......... 4-3
Center multi-function control panel ...................................... 4-4
How to use multi-function controller .............................. 4-5
How to use touch screen ................................................. 4-5
Menu options ........................................................................\
4-7
How to select menus on the screen .............................. 4-8
Vehicle information and settings ........................................... 4-8 How to use STATUS button ............................................. 4-8
How to use brightness control and display
ON/OFF button ................................................................... 4-8
How to use CAMERA button (if so equipped) ........... 4-8
How to use DISP button (if so equipped) ................... 4-8
How to use INFO button .................................................. 4-9
How to use SETTING button ....................................... 4-13
RearView Monitor (if so equipped) ................................... 4-21 RearView Monitor system operation ........................... 4-22
How to read the displayed lines .................................. 4-22
How to park with predictive course lines .................. 4-23
Adjusting the screen ....................................................... 4-25
Predictive course line settings ...................................... 4-26
RearView Monitor system limitations .......................... 4-26
Sonar settings ................................................................... 4-27
Sonar indicator .................................................................. 4-27
System maintenance ....................................................... 4-28 Around View�ŠMonitor (if so equipped) .......................... 4-29
Around View�ŠMonitor system operation ................. 4-30
How to adjust the screen view ................................... 4-37
Around View
�ŠMonitor settings .................................. 4-38
Around View�ŠMonitor system limitations ................ 4-38
System maintenance ..................................................... 4-41
Camera aiding sonar function (models with Around
View
�ŠMonitor) ....................................................................... 4-42
Sonar system operation ............................................... 4-43
Turning on and off the sonar function ...................... 4-43
Sonar system limitations .............................................. 4-45
System temporarily unavailable .................................. 4-45
System maintenance ..................................................... 4-45
Moving Object Detection (MOD) ..................................... 4-46 MOD system operation ................................................ 4-47
Turning on and off the MOD system ........................ 4-48
MOD system limitations ............................................... 4-49
System maintenance ..................................................... 4-50
Ventilators ........................................................................\
........ 4-51
Center ventilators ........................................................... 4-51
Side ventilators ............................................................... 4-51
Rear ventilators ............................................................... 4-52
Heater and air conditioner .................................................. 4-52
Automatic air conditioner ............................................. 4-54
Operating tips ................................................................. 4-58
Page 201 of 614
4-4Monitor, heater, air conditioner, audio, phone and voice recognition systems
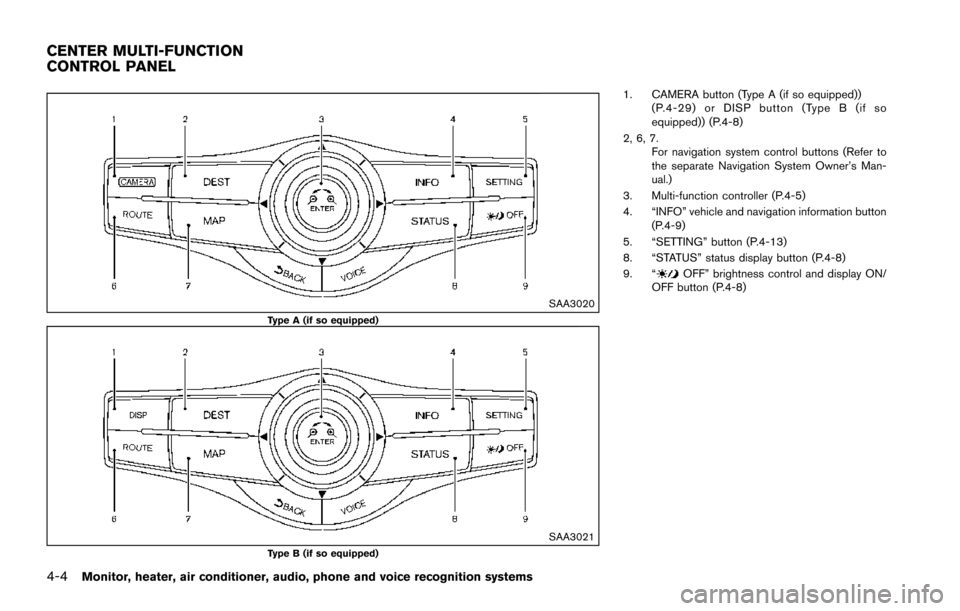
SAA3020Type A (if so equipped)
SAA3021Type B (if so equipped)
1. CAMERA button (Type A (if so equipped))(P.4-29) or DISP button (Type B (if so
equipped)) (P.4-8)
2, 6, 7. For navigation system control buttons (Refer to
the separate Navigation System Owner’s Man-
ual.)
3. Multi-function controller (P.4-5)
4. “INFO” vehicle and navigation information button (P.4-9)
5. “SETTING” button (P.4-13)
8. “STATUS” status display button (P.4-8)
9. “
OFF” brightness control and display ON/
OFF button (P.4-8)
CENTER MULTI-FUNCTION
CONTROL PANEL
Page 205 of 614
4-8Monitor, heater, air conditioner, audio, phone and voice recognition systems
SAA2477
HOW TO SELECT MENUS ON THE
SCREEN
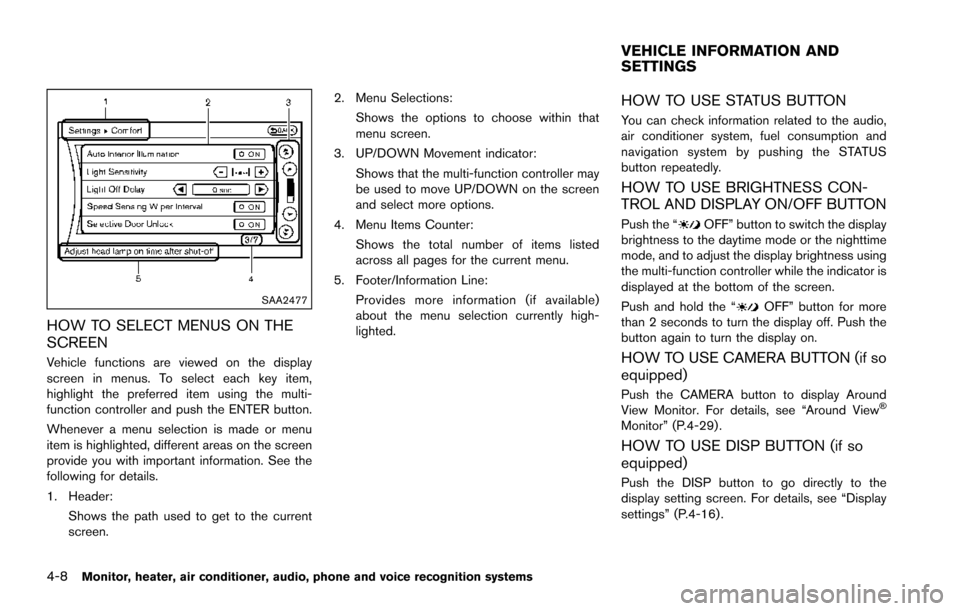
Vehicle functions are viewed on the display
screen in menus. To select each key item,
highlight the preferred item using the multi-
function controller and push the ENTER button.
Whenever a menu selection is made or menu
item is highlighted, different areas on the screen
provide you with important information. See the
following for details.
1. Header:Shows the path used to get to the current
screen. 2. Menu Selections:
Shows the options to choose within that
menu screen.
3. UP/DOWN Movement indicator: Shows that the multi-function controller may
be used to move UP/DOWN on the screen
and select more options.
4. Menu Items Counter: Shows the total number of items listed
across all pages for the current menu.
5. Footer/Information Line: Provides more information (if available)
about the menu selection currently high-
lighted.
HOW TO USE STATUS BUTTON
You can check information related to the audio,
air conditioner system, fuel consumption and
navigation system by pushing the STATUS
button repeatedly.
HOW TO USE BRIGHTNESS CON-
TROL AND DISPLAY ON/OFF BUTTON
Push the “OFF” button to switch the display
brightness to the daytime mode or the nighttime
mode, and to adjust the display brightness using
the multi-function controller while the indicator is
displayed at the bottom of the screen.
Push and hold the “
OFF” button for more
than 2 seconds to turn the display off. Push the
button again to turn the display on.
HOW TO USE CAMERA BUTTON (if so
equipped)
Push the CAMERA button to display Around
View Monitor. For details, see “Around View�Š
Monitor” (P.4-29) .
HOW TO USE DISP BUTTON (if so
equipped)
Push the DISP button to go directly to the
display setting screen. For details, see “Display
settings” (P.4-16) .
VEHICLE INFORMATION AND
SETTINGS
Page 213 of 614
4-16Monitor, heater, air conditioner, audio, phone and voice recognition systems
SAA3008
Others settings
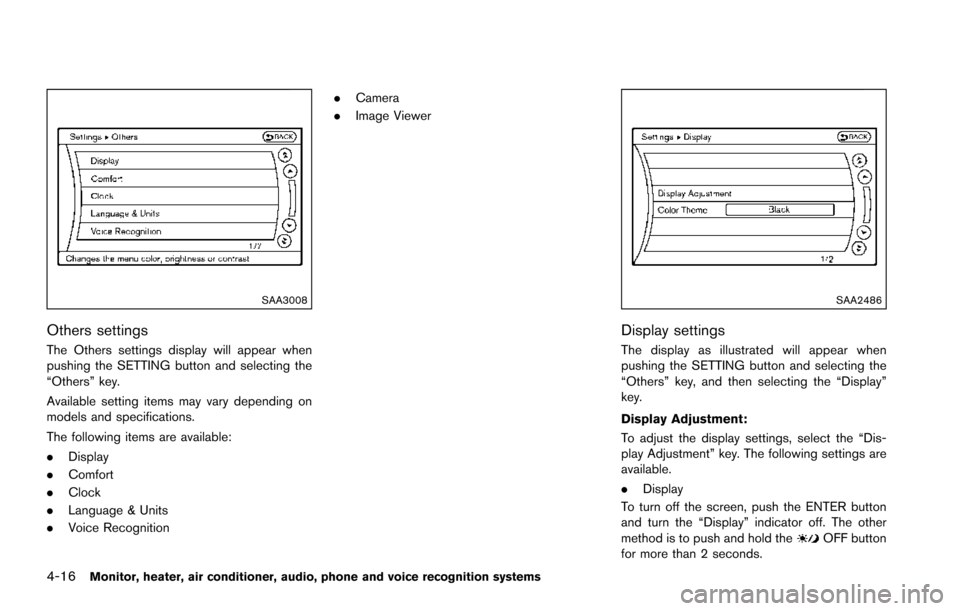
The Others settings display will appear when
pushing the SETTING button and selecting the
“Others” key.
Available setting items may vary depending on
models and specifications.
The following items are available:
.Display
. Comfort
. Clock
. Language & Units
. Voice Recognition .
Camera
. Image Viewer
SAA2486
Display settings
The display as illustrated will appear when
pushing the SETTING button and selecting the
“Others” key, and then selecting the “Display”
key.
Display Adjustment:
To adjust the display settings, select the “Dis-
play Adjustment” key. The following settings are
available.
.Display
To turn off the screen, push the ENTER button
and turn the “Display” indicator off. The other
method is to push and hold the
OFF button
for more than 2 seconds.
Page 216 of 614
SAA3007
Language & Units settings
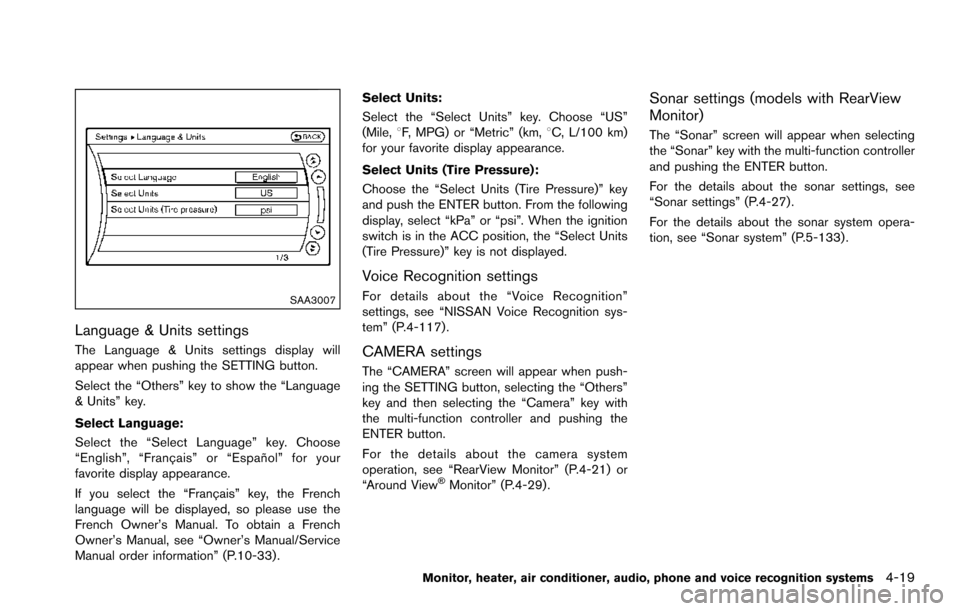
The Language & Units settings display will
appear when pushing the SETTING button.
Select the “Others” key to show the “Language
& Units” key.
Select Language:
Select the “Select Language” key. Choose
“English”, “Franc¸ ais” or “Espan˜
ol” for your
favorite display appearance.
If you select the “Franc¸ ais” key, the French
language will be displayed, so please use the
French Owner’s Manual. To obtain a French
Owner’s Manual, see “Owner’s Manual/Service
Manual order information” (P.10-33) . Select Units:
Select the “Select Units” key. Choose “US”
(Mile,
8F, MPG) or “Metric” (km, 8C, L/100 km)
for your favorite display appearance.
Select Units (Tire Pressure):
Choose the “Select Units (Tire Pressure)” key
and push the ENTER button. From the following
display, select “kPa” or “psi”. When the ignition
switch is in the ACC position, the “Select Units
(Tire Pressure)” key is not displayed.
Voice Recognition settings
For details about the “Voice Recognition”
settings, see “NISSAN Voice Recognition sys-
tem” (P.4-117).
CAMERA settings
The “CAMERA” screen will appear when push-
ing the SETTING button, selecting the “Others”
key and then selecting the “Camera” key with
the multi-function controller and pushing the
ENTER button.
For the details about the camera system
operation, see “RearView Monitor” (P.4-21) or
“Around View
�ŠMonitor” (P.4-29).
Sonar settings (models with RearView
Monitor)
The “Sonar” screen will appear when selecting
the “Sonar” key with the multi-function controller
and pushing the ENTER button.
For the details about the sonar settings, see
“Sonar settings” (P.4-27).
For the details about the sonar system opera-
tion, see “Sonar system” (P.5-133) .
Monitor, heater, air conditioner, audio, phone and voice recognition systems4-19
Page 218 of 614
.(Previous)
Select the “
” key to display the previous
file.
Setting the Image Viewer:
The Image Viewer setting display will appear
when selecting the “Settings” key on the full
screen display. The following settings are
available for the full screen display.
. Slideshow Speed
Select the “Slideshow Speed” key. From the
following display, select the changing time
from 5, 10, 30, 60 seconds or “No Auto
Change”.
. Slideshow Order
Select the “Slideshow Order” key. From the
following display, select “Random” or “Order
List”. For “Order List”, the image order is the
order of the files as stored on the USB
memory.
Operating tips:
. Only files that meet the following conditions
will be displayed.
— Image type: JPEG
— File Extensions: *.jpg, *jpeg
— Maximum Resolution: 2048 61536
pixels — Maximum Size: 2 MB
— Colors: 32768 (15 bit)
— Maximum File Name lengths: 253 Bytes
— Maximum Folders: 500
— Maximum Images per Folder: 1024
. If an electronic device (such as a digital
camera) is directly connected to the vehicle
using a USB cable, no image will be
displayed on the screen.
. If the file name is too long, some file names
may not be entirely displayed.
. When the total number of characters in the
file name exceeds 100 or if 1 file name in a
directory exceeds 100 characters, all files
will show a shortened 8-character version.
The image will still be displayed when
selected.WARNING
Failure to follow the warnings and
instructions for proper use of the Rear-
View Monitor system could result in
serious injury or death.
.The RearView Monitor is a conve-
nience but it is not a substitute for
proper backing. Always turn and
look out the windows, and check
mirrors to be sure that it is safe to
move before operating the vehicle.
Always back up slowly.
. The system is designed as an aid to
the driver in showing large station-
ary objects directly behind the vehi-
cle, to help avoid damaging the
vehicle.
. The distance guide line and the
vehicle width line should be used
as a reference only when the vehicle
is on a level paved surface. The
distance viewed on the monitor is
for reference only and may be
different than the actual distance
between the vehicle and displayed
objects.
Monitor, heater, air conditioner, audio, phone and voice recognition systems4-21
REARVIEW MONITOR (if so
equipped)