2017 NISSAN ALTIMA SEDAN air condition
[x] Cancel search: air conditionPage 203 of 497
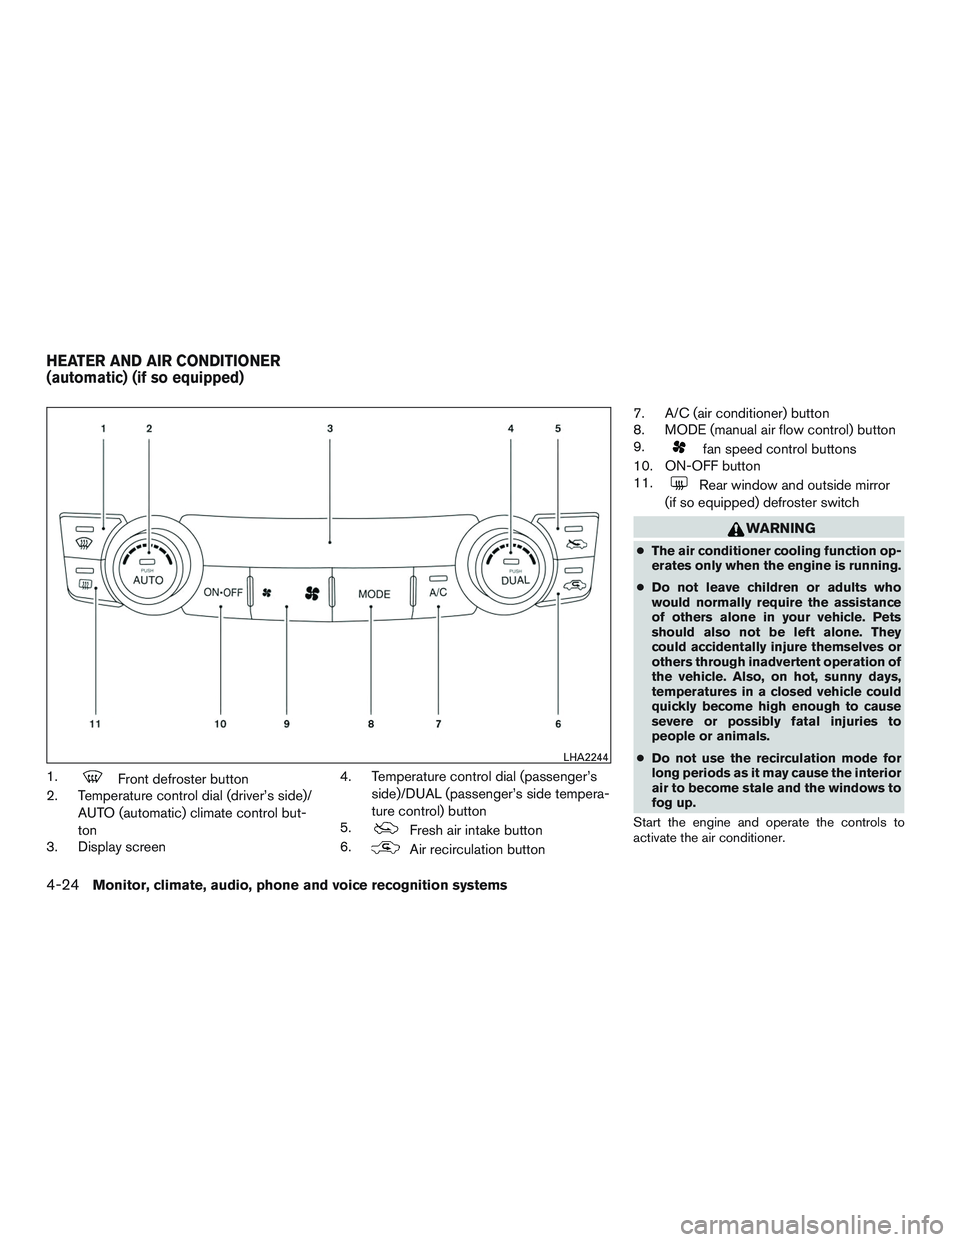
1.Front defroster button
2. Temperature control dial (driver’s side)/
AUTO (automatic) climate control but-
ton
3. Display screen 4. Temperature control dial (passenger’s
side)/DUAL (passenger’s side tempera-
ture control) button
5.
Fresh air intake button
6.
Air recirculation button 7. A/C (air conditioner) button
8. MODE (manual air flow control) button
9.
fan speed control buttons
10. ON-OFF button
11.
Rear window and outside mirror
(if so equipped) defroster switch
WARNING
● The air conditioner cooling function op-
erates only when the engine is running.
● Do not leave children or adults who
would normally require the assistance
of others alone in your vehicle. Pets
should also not be left alone. They
could accidentally injure themselves or
others through inadvertent operation of
the vehicle. Also, on hot, sunny days,
temperatures in a closed vehicle could
quickly become high enough to cause
severe or possibly fatal injuries to
people or animals.
● Do not use the recirculation mode for
long periods as it may cause the interior
air to become stale and the windows to
fog up.
Start the engine and operate the controls to
activate the air conditioner.
LHA2244
HEATER AND AIR CONDITIONER
(automatic) (if so equipped)
4-24Monitor, climate, audio, phone and voice recognition systems
Page 204 of 497
NOTE:● Odors from inside and outside the vehicle
can build up in the air conditioner unit. Odor
can enter the passenger compartment
through the vents.
● When parking, set the heater and air condi-
tioner controls to turn off air recirculation to
allow fresh air into the passenger compart-
ment. This should help reduce odors inside
the vehicle.
AUTOMATIC OPERATION
Cooling and/or dehumidified heating
(AUTO)
This mode may be used all year round as the
system automatically works to keep a constant
temperature. Air flow distribution, air intake control,
and fan speed are also controlled automatically.
1. Press the AUTO button on.
2. Turn the temperature control dial to the left or right to set the desired temperature.
● Adjust the temperature display to about
75°F (24°C) for normal operation.
● The temperature of the passenger compart-
ment will be maintained automatically. Air
flow distribution, air intake control and fan
speed are also controlled automatically. ●
A visible mist may be seen coming from the
vents in hot, humid conditions as the air is
cooled rapidly. This does not indicate a mal-
function.
3. You can individually set driver’s and front passenger’s side temperature using each
temperature control dial. To turn off the pas-
senger’s side temperature control, press the
DUAL button.
Heating (A/C OFF)
The air conditioner does not activate. When you
need to heat only, use this mode.
1. Press the AUTO button.
2. Turn the temperature control dial to set the desired temperature.
● The temperature of the passenger compart-
ment will be maintained automatically. Air
flow distribution and fan speed are also con-
trolled automatically.
● Do not set the temperature lower than the
outside air temperature. Otherwise, the sys-
tem may not work properly.
● Not recommended if windows fog up.
Dehumidified defrosting or defogging
1. Press thefront defroster button on. 2. Turn the temperature control dial to set the
desired temperature.
● To quickly remove ice from the outside of the
windows, use the
fan speed control
buttons to set the fan speed to maximum.
● As soon as possible after the windshield is
clean, press the AUTO button to return to
the automatic mode.
● When the
front defroster button is
pressed, the air conditioner will automati-
cally be turned on at outside temperatures
above 36°F (2°C) . The air recirculate mode
automatically turns off, allowing outside air
to be drawn into the passenger compart-
ment to further improve the defogging per-
formance.
Rear window and outside mirror (if so
equipped) defroster switch
For additional information, refer to “Rear window
and outside mirror (if so equipped) defroster
switch” in the “Instruments and controls” section
of this manual.
Remote engine start logic (if so
equipped)
Vehicles equipped with automatic climate con-
trols and remote start function may go into auto-
matic heating or cooling mode when remote start
Monitor, climate, audio, phone and voice recognition systems4-25
Page 205 of 497
is activated depending on outside and cabin tem-
peratures. During this period, the climate control
display and buttons will be inoperable until the
ignition switch is turned on. In remote start de-
frosting mode, the rear defroster and heated
steering wheel (if so equipped) may be activated
automatically.
MANUAL OPERATION
Fan speed control
Press thefan speed control buttons to
manually control the fan speed.
Press the AUTO button to return to automatic
control of the fan speed.
Air recirculation
Press theair recirculation button to recir-
culate interior air inside the vehicle.
The air recirculation cannot be activated when
the air conditioner is in the
front defogging
mode.
Fresh air intake
Press thefresh air intake button to draw
outside air into the passenger compartment.
A/C (air conditioner) button
Start the engine, press thefan speed con-
trol buttons to the desired position and press the
button to turn on the air conditioner. To
turn off the air conditioner, press the
but-
ton again.
The air conditioner cooling function oper-
ates only when the engine is running.
Air flow control
Pressing the MODE button manually controls air
flow and selects the air outlet:
— Air flows from center and side
vents.
— Air flows from center and sidevents and foot outlets.
— Air flows mainly from foot outlets.
— Air flows from defroster and footoutlets.
To turn system off
Press the ON-OFF button.
OPERATING TIPS
●When the engine coolant temperature and
outside air temperature are low, the air flow
from the foot outlets may not operate for a
maximum of 150 seconds. However, this is
not a malfunction. After the coolant tempera-
ture warms up, air flow from the foot outlets
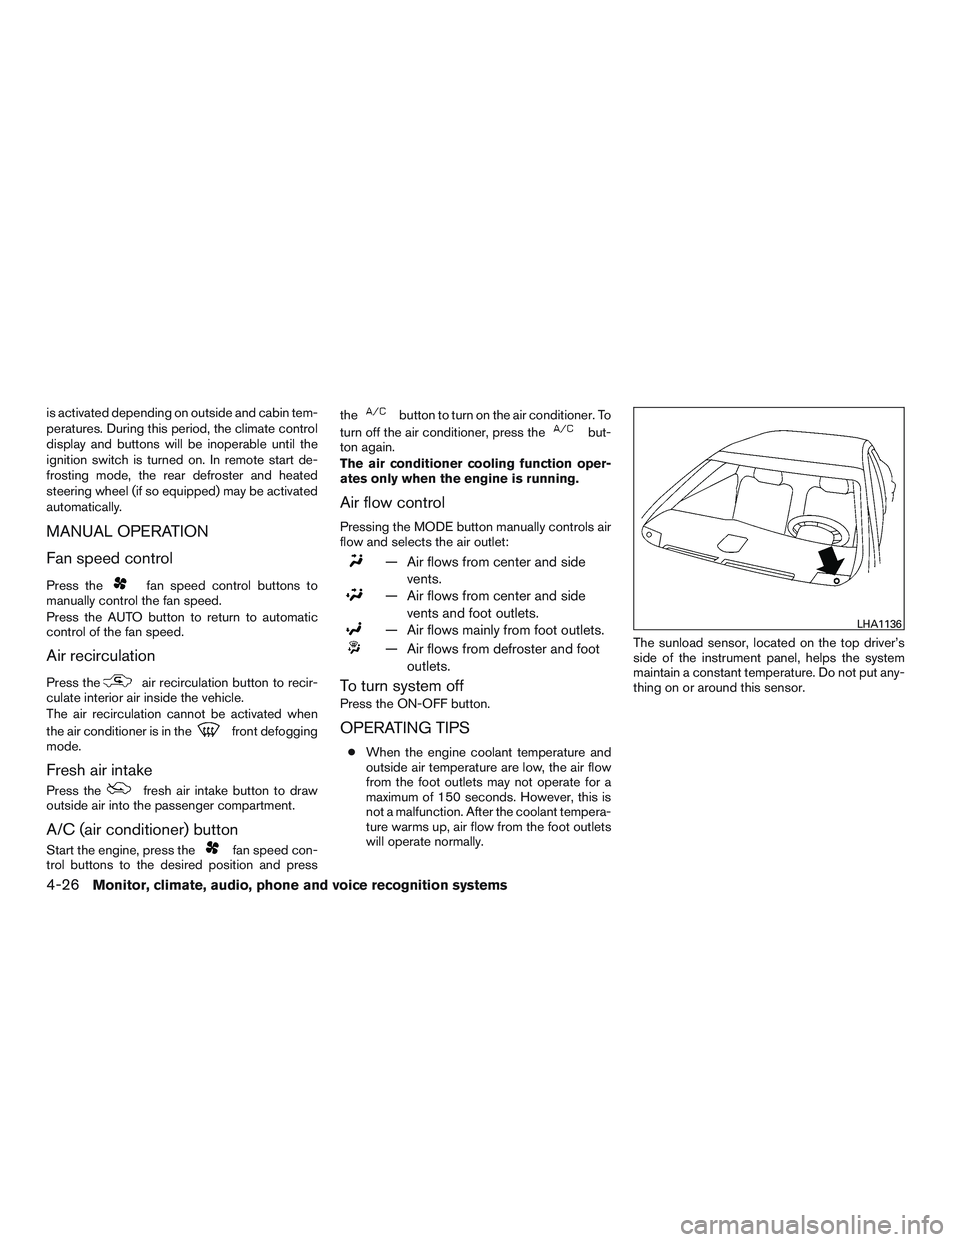
will operate normally. The sunload sensor, located on the top driver’s
side of the instrument panel, helps the system
maintain a constant temperature. Do not put any-
thing on or around this sensor.
LHA1136
4-26Monitor, climate, audio, phone and voice recognition systems
Page 206 of 497
The air conditioner system in your NISSAN ve-
hicle is charged with a refrigerant designed with
the environment in mind.
This refrigerant does not harm the earth’s
ozone layer.
Special charging equipment and lubricant is re-
quired when servicing your NISSAN air condi-
tioner. Using improper refrigerants or lubricants
will cause severe damage to your air conditioner
system. For additional information, refer to “Air
conditioner system refrigerant and oil recommen-
dations” in the “Technical and consumer informa-
tion” section of this manual.
It is recommended that you visit a NISSAN dealer
to service your “environmentally friendly” air con-
ditioner system.
WARNING
The air conditioner system contains refrig-
erant under high pressure. To avoid per-
sonal injury, any air conditioner service
should be done only by an experienced
technician with proper equipment.
RADIO
With the ignition placed in the ACC or ON posi-
tion, press the
POWER button to turn the
radio on. If you listen to the radio with the engine
not running, the ignition should be placed in the
ACC position.
Radio reception is affected by station signal
strength, distance from radio transmitter, build-
ings, bridges, mountains and other external influ-
ences. Intermittent changes in reception quality
normally are caused by these external influences.
Using a cellular phone in or near the vehicle
may influence radio reception quality.
Radio reception
Your NISSAN radio system is equipped with
state-of-the-art electronic circuits to enhance ra-
dio reception. These circuits are designed to
extend reception range, and to enhance the qual-
ity of that reception.
However, there are some general characteristics
of both FM and AM radio signals that can affect
radio reception quality in a moving vehicle, even
when the finest equipment is used. These char-
acteristics are completely normal in a given re-
ception area and do not indicate any malfunction
in your NISSAN radio system. Reception conditions will constantly change be-
cause of vehicle movement. Buildings, terrain,
signal distance and interference from other ve-
hicles can work against ideal reception. De-
scribed below are some of the factors that can
affect your radio reception.
Some cellular phones or other devices may
cause interference or a buzzing noise to come
from the audio system speakers. Storing the de-
vice in a different location may reduce or elimi-
nate the noise.
FM RADIO RECEPTION
Range: FM range is normally limited to 25 – 30 mi
(40 – 48 km) , with monaural (single channel) FM
having slightly more range than stereo FM. Exter-
nal influences may sometimes interfere with FM
station reception even if the FM station is within
25 mi (40 km) . The strength of the FM signal is
directly related to the distance between the
transmitter and receiver. FM signals follow a line-
of-sight path, exhibiting many of the same char-
acteristics as light. For example, they will reflect
off objects.
Fade and drift: As your vehicle moves away from
a station transmitter, the signals will tend to fade
and/or drift.
SERVICING AIR CONDITIONER AUDIO SYSTEM
Monitor, climate, audio, phone and voice recognition systems4-27
Page 301 of 497
NOTE:
Changes or modification not expressly ap-
proved by the party responsible for compli-
ance could void the user’s authority to op-
erate the equipment.
For Canada:
This device complies with Industry Canada
licence-exempt RSS standard(s) . Opera-
tion is subject to the following two condi-
tions: (1) this device may not cause inter-
ference, and (2) this device must accept any
interference, including interference that
may cause undesired operation of the de-
vice.
TPMS with Easy-Fill Tire Alert
When adding air to an under-inflated tire, the
TPMS with Easy-Fill Tire Alert provides visual and
audible signals outside the vehicle to help you
inflate the tires to the recommended COLD tire
pressure.
Vehicle set-up1. Park the vehicle in a safe and level place.
2. Apply the parking brake and place the shift lever to the P (Park) position.
3. Place the ignition switch to the ON position. Do not start the engine. Operation
1. Add air to the tire.
2. After a few seconds, the hazard indicators will start flashing.
3. When the designated pressure is reached, the horn beeps once and the hazard indica-
tors stop flashing.
4. Perform the above steps for each tire. ●If the tire is over-inflated more than ap-
proximately 4 psi (30 kPa) , the horn
beeps and the hazard indicators flash
three times. To correct the pressure, push
the core of the valve stem on the tire
briefly to release pressure. When the
pressure reaches the designated pres-
sure, the horn beeps once.
● If the hazard indicator does not flash
within approximately 15 seconds after
starting to inflate the tire, it indicates that
the Easy-Fill Tire Alert is not operating.
● The TPMS will not activate the Easy-Fill
Tire Alert under the following conditions:
– If there is interference from an external device or transmitter.
– The air pressure from the inflation device is not sufficient to inflate the tire. – There is a malfunction in the TPMS sys-
tem.
– There is a malfunction in the horn or haz- ard indicators.
– The identification code of the tires pres- sure sensor is not registered to the sys-
tem.
– The battery of the tire pressure sensor is low.
● If the Easy-Fill Tire Alert does not operate
due to TPMS interference, move the ve-
hicle about 3 ft (1 m) backward or forward
and try again.
If the Easy-Fill Tire Alert is not working, use a tire
pressure gauge.AVOIDING COLLISION AND
ROLLOVER
WARNING
Failure to operate this vehicle in a safe
and prudent manner may result in loss of
control or an accident.
Be alert and drive defensively at all times. Obey
all traffic regulations. Avoid excessive speed,
high speed cornering, or sudden steering ma-
5-6Starting and driving
Page 302 of 497
neuvers, because these driving practices could
cause you to lose control of your vehicle.
As with any vehicle, loss of control could
result in a collision with other vehicles or
objects or cause the vehicle to roll over,
particularly if the loss of control causes the
vehicle to slide sideways.
Be attentive at all times, and avoid driving when
tired. Never drive when under the influence of
alcohol or drugs (including prescription or over-
the-counter drugs which may cause drowsi-
ness) . Always wear your seat belt as outlined in
the “Safety – Seats, seat belts and supplemental
restraint system” section of this manual, and also
instruct your passengers to do so.
Seat belts help reduce the risk of injury in colli-
sions and rollovers.In a rollover crash, an
unbelted or improperly belted person is
significantly more likely to be injured or
killed than a person properly wearing a
seat belt.
OFF-ROAD RECOVERY
While driving, the right side or left side wheels
may unintentionally leave the road surface. If this
occurs, maintain control of the vehicle by follow-
ing the procedure below. Please note that this
procedure is only a general guide. The vehicle must be driven as appropriate based on the con-
ditions of the vehicle, road and traffic.
1. Remain calm and do not overreact.
2. Do not apply the brakes.
3. Maintain a firm grip on the steering wheel with both hands and try to hold a straight
course.
4. When appropriate, slowly release the accel- erator pedal to gradually slow the vehicle.
5. If there is nothing in the way, steer the ve- hicle to follow the road while vehicle speed
is reduced. Do not attempt to drive the ve-
hicle back onto the road surface until vehicle
speed is reduced.
6. When it is safe to do so, gradually turn the steering wheel until both tires return to the
road surface. When all tires are on the road
surface, steer the vehicle to stay in the ap-
propriate driving lane.
● If you decide that it is not safe to return the
vehicle to the road surface based on ve-
hicle, road or traffic conditions, gradually
slow the vehicle to a stop in a safe place
off the road.
RAPID AIR PRESSURE LOSS
Rapid air pressure loss or a “blow-out” can occur
if the tire is punctured or is damaged due to
hitting a curb or pothole. Rapid air pressure loss
can also be caused by driving on under-inflated
tires.
Rapid air pressure loss can affect the handling
and stability of the vehicle, especially at highway
speeds.
Help prevent rapid air pressure loss by maintain-
ing the correct air pressure and visually inspect
the tires for wear and damage. For additional
information, refer to “Wheels and tires” in the
“Do-it-yourself” section of this manual. If a tire
rapidly loses air pressure or “blows-out” while
driving, maintain control of the vehicle by follow-
ing the procedure below. Please note that this
procedure is only a general guide. The vehicle
must be driven as appropriate based on the con-
ditions of the vehicle, road and traffic.
WARNING
The following actions can increase the
chance of losing control of the vehicle if
there is a sudden loss of tire air pressure.
Losing control of the vehicle may cause a
collision and result in personal injury.
Starting and driving5-7
Page 303 of 497
●The vehicle generally moves or pulls in
the direction of the flat tire.
● Do not rapidly apply the brakes.
● Do not rapidly release the accelerator
pedal.
● Do not rapidly turn the steering wheel.
1. Remain calm and do not overreact.
2. Maintain a firm grip on the steering wheel with both hands and try to hold a straight
course.
3. When appropriate, slowly release the accel- erator pedal to gradually slow the vehicle.
4. Gradually steer the vehicle to a safe location off the road and away from traffic if possible.
5. Lightly apply the brake pedal to gradually stop the vehicle.
6. Turn on the hazard warning flashers and contact a roadside emergency service to
change the tire. For additional information,
refer to “Changing a flat tire” in the “In case
of emergency” section of this manual.DRINKING ALCOHOL/DRUGS AND
DRIVING
WARNING
Never drive under the influence of alcohol
or drugs. Alcohol in the bloodstream re-
duces coordination, delays reaction time
and impairs judgement. Driving after
drinking alcohol increases the likelihood
of being involved in an accident injuring
yourself and others. Additionally, if you
are injured in an accident, alcohol can
increase the severity of the injury.
NISSAN is committed to safe driving. However,
you must choose not to drive under the influence
of alcohol. Every year thousands of people are
injured or killed in alcohol-related collisions. Al-
though the local laws vary on what is considered
to be legally intoxicated, the fact is that alcohol
affects all people differently and most people
underestimate the effects of alcohol.
Remember, drinking and driving don’t mix! That is
true for drugs (over-the-counter, prescription)
and illegal drugs, too. Don’t drive if your ability to
operate your vehicle is impaired by alcohol,
drugs, or some other physical condition.
WARNING
Do not operate the push-button ignition
switch while driving the vehicle except in
an emergency. (The engine will stop when
the ignition switch is pushed three con-
secutive times in quick succession or the
ignition switch is pushed and held for
more than 2 seconds.) If the engine stops
while the vehicle is being driven, this
could lead to a crash and serious injury.
PUSH-BUTTON IGNITION SWITCH
5-8Starting and driving
Page 314 of 497
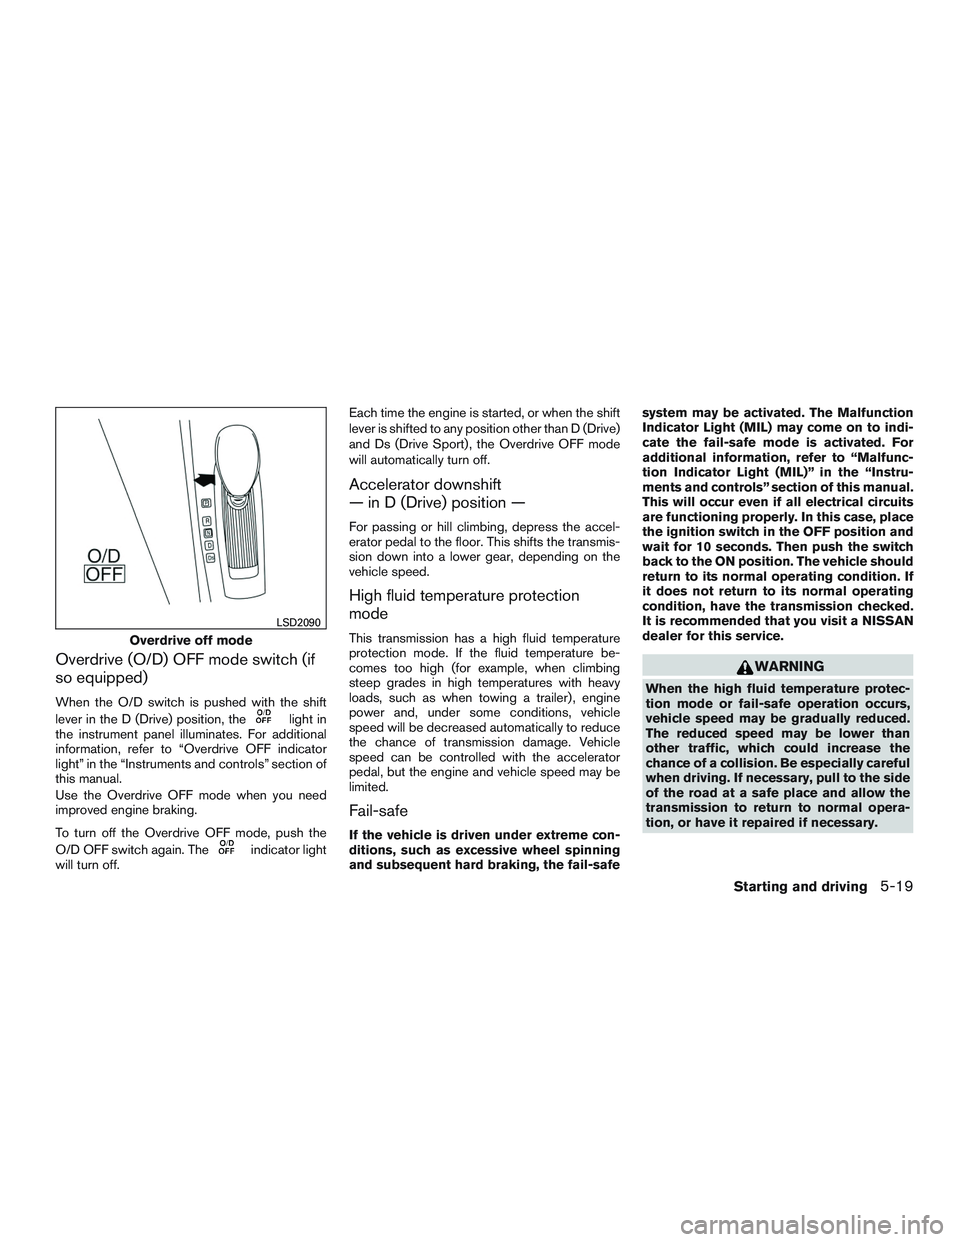
Overdrive (O/D) OFF mode switch (if
so equipped)
When the O/D switch is pushed with the shift
lever in the D (Drive) position, the
light in
the instrument panel illuminates. For additional
information, refer to “Overdrive OFF indicator
light” in the “Instruments and controls” section of
this manual.
Use the Overdrive OFF mode when you need
improved engine braking.
To turn off the Overdrive OFF mode, push the
O/D OFF switch again. The
indicator light
will turn off. Each time the engine is started, or when the shift
lever is shifted to any position other than D (Drive)
and Ds (Drive Sport) , the Overdrive OFF mode
will automatically turn off.
Accelerator downshift
— in D (Drive) position —
For passing or hill climbing, depress the accel-
erator pedal to the floor. This shifts the transmis-
sion down into a lower gear, depending on the
vehicle speed.
High fluid temperature protection
mode
This transmission has a high fluid temperature
protection mode. If the fluid temperature be-
comes too high (for example, when climbing
steep grades in high temperatures with heavy
loads, such as when towing a trailer) , engine
power and, under some conditions, vehicle
speed will be decreased automatically to reduce
the chance of transmission damage. Vehicle
speed can be controlled with the accelerator
pedal, but the engine and vehicle speed may be
limited.
Fail-safe
If the vehicle is driven under extreme con-
ditions, such as excessive wheel spinning
and subsequent hard braking, the fail-safesystem may be activated. The Malfunction
Indicator Light (MIL) may come on to indi-
cate the fail-safe mode is activated. For
additional information, refer to “Malfunc-
tion Indicator Light (MIL)” in the “Instru-
ments and controls” section of this manual.
This will occur even if all electrical circuits
are functioning properly. In this case, place
the ignition switch in the OFF position and
wait for 10 seconds. Then push the switch
back to the ON position. The vehicle should
return to its normal operating condition. If
it does not return to its normal operating
condition, have the transmission checked.
It is recommended that you visit a NISSAN
dealer for this service.
WARNING
When the high fluid temperature protec-
tion mode or fail-safe operation occurs,
vehicle speed may be gradually reduced.
The reduced speed may be lower than
other traffic, which could increase the
chance of a collision. Be especially careful
when driving. If necessary, pull to the side
of the road at a safe place and allow the
transmission to return to normal opera-
tion, or have it repaired if necessary.
Overdrive off mode
LSD2090
Starting and driving5-19