2017 NISSAN ALTIMA change wheel
[x] Cancel search: change wheelPage 10 of 36
8
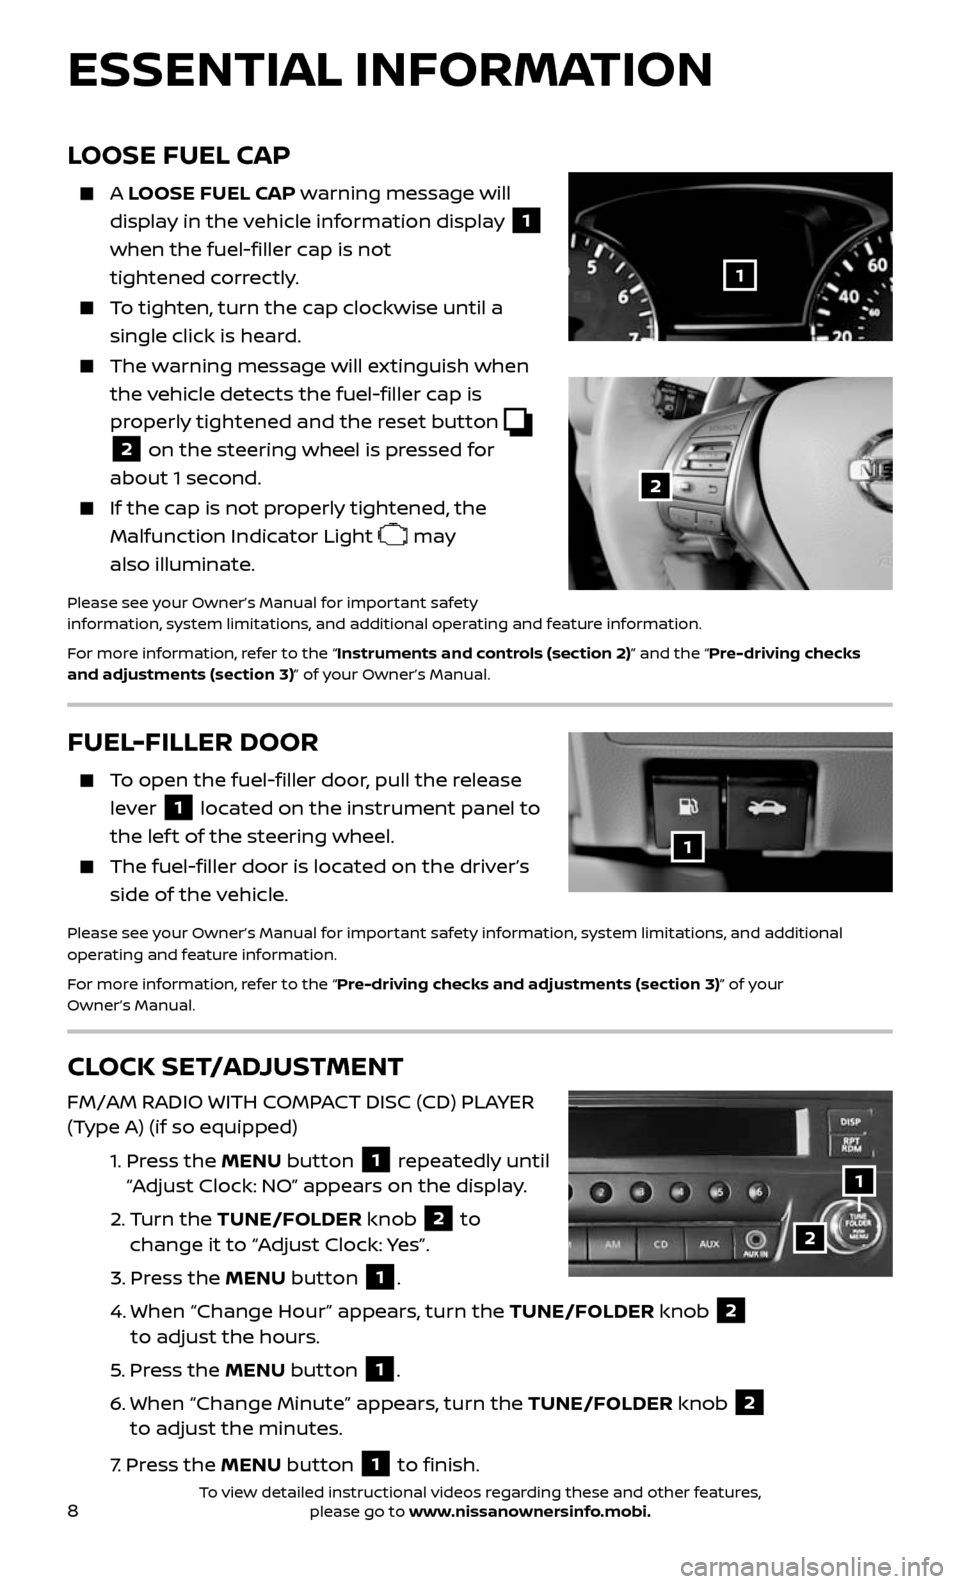
LOOSE FUEL CAP
A LOOSE FUEL CAP warning message will
display in the vehicle information display
1
when the fuel-filler cap is not
tightened correctly.
To tighten, turn the cap clockwise until a
single click is heard.
The warning message will extinguish when
the vehicle detects the fuel-filler cap is
properly tightened and the reset button
2 on the steering wheel is pressed for
about 1 second.
If the cap is not properly tightened, the
Malfunction Indicator Light may
also illuminate.
Please see your Owner’s Manual for important safety
information, system limitations, and additional operating and feature information.
For more information, refer to the “Instruments and controls (section 2)” and the “Pre-driving checks
and adjustments (section 3)” of your Owner’s Manual.
2
1
FUEL-FILLER DOOR
To open the fuel-filler door, pull the release
lever 1 located on the instrument panel to
the lef t of the steering wheel.
The fuel-filler door is located on the driver’s
side of the vehicle.
Please see your Owner’s Manual for important safety information, system limitations, and additional
operating and feature information.
For more information, refer to the “Pre-driving checks and adjustments (section 3)” of your
Owner’s Manual.
1
CLOCK SET/ADJUSTMENT
FM/AM RADIO WITH COMPACT DISC (CD) PLAYER
(Type A) (if so equipped)
1. Press the MENU button 1 repeatedly until
“Adjust Clock: NO” appears on the display.
2. Turn the TUNE/FOLDER knob 2 to
change it to “Adjust Clock: Yes”.
3. Press the MENU button 1.
4. When “Change Hour ” appears, turn the TUNE/FOLDER knob 2
to adjust the hours.
5. Press the MENU button 1.
6. When “Change Minute” appe ars, turn the TUNE/FOLDER knob 2
to adjust the minutes.
7. Press the MENU button 1 to finish.
ESSENTIAL INFORMATION
2
1
To view detailed instructional videos regarding these and other features, please go to www.nissanownersinfo.mobi.
Page 17 of 36
15
Move the lever up or down until the turn signal begins to flash but the lever
does not latch and release the lever. The turn signal will automatically flash
three times.
Choose the appropriate method to signal a lane change based on the road and
traffic conditions.
Please see your Owner’s Manual for important safety information, system limitations, and additional
operating and feature information.
For more information, refer to the “Instruments and controls (section 2)” of your Owner’s Manual.
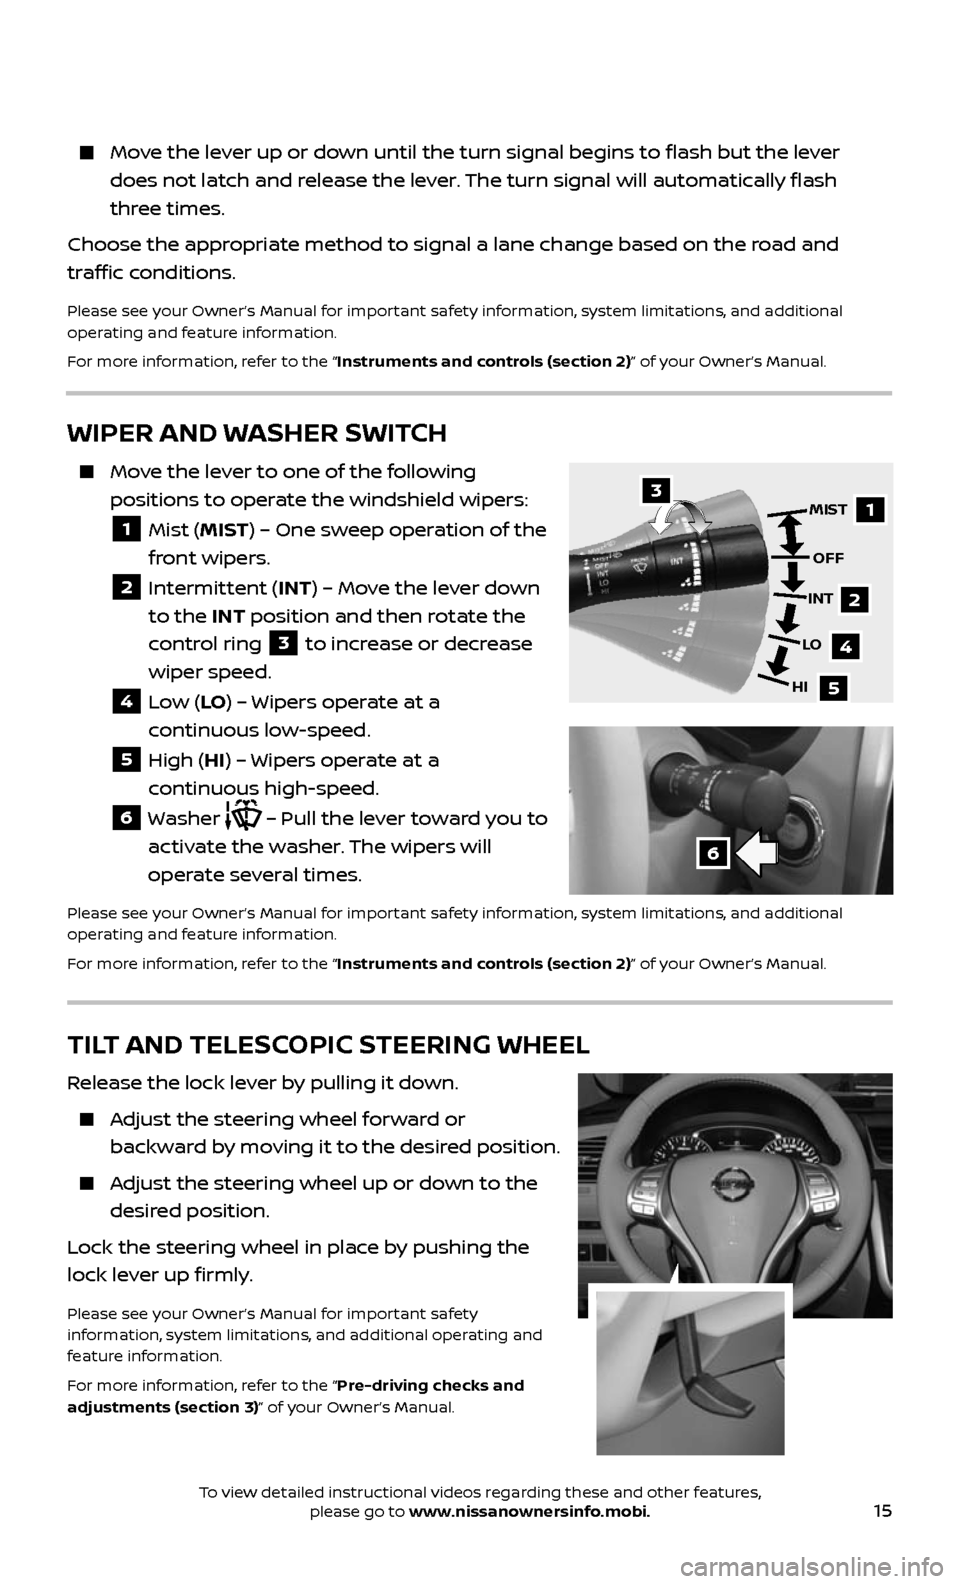
WIPER AND WASHER SWITCH
Move the lever to one of the following
positions to operate the windshield wipers:
1 Mist (MIST) – One sweep operation of the
front wipers.
2 Intermittent (INT) – Move the lever down
to the INT position and then rotate the
control ring
3 to increase or decrease
wiper speed.
4 Low (LO ) – Wipers operate at a
continuous low-speed.
5 High (HI) – Wipers operate at a
continuous high-speed.
6 Washer – Pull the lever toward you to
activate the washer. The wipers will
operate several times.
Please see your Owner’s Manual for important safety information, system limitations, and additional
operating and feature information.
For more information, refer to the “Instruments and controls (section 2)” of your Owner’s Manual.
1
2
4
5
MIST
OFF
INT
LO
HI3
6
TILT AND TELESCOPIC STEERING WHEEL
Release the lock lever by pulling it down.
Adjust the steering wheel forward or
backward by moving it to the desired position.
Adjust the steering wheel up or down to the
desired position.
Lock the steering wheel in place by pushing the
lock lever up firmly.
Please see your Owner’s Manual for important safety
information, system limitations, and additional operating and
feature information.
For more information, refer to the “Pre-driving checks and
adjustments (section 3)” of your Owner’s Manual.
To view detailed instructional videos regarding these and other features, please go to www.nissanownersinfo.mobi.
Page 22 of 36
20
INTELLIGENT CRUISE CONTROL (ICC) (if so equipped)
VEHICLE-TO-VEHICLE DISTANCE CONTROL MODE
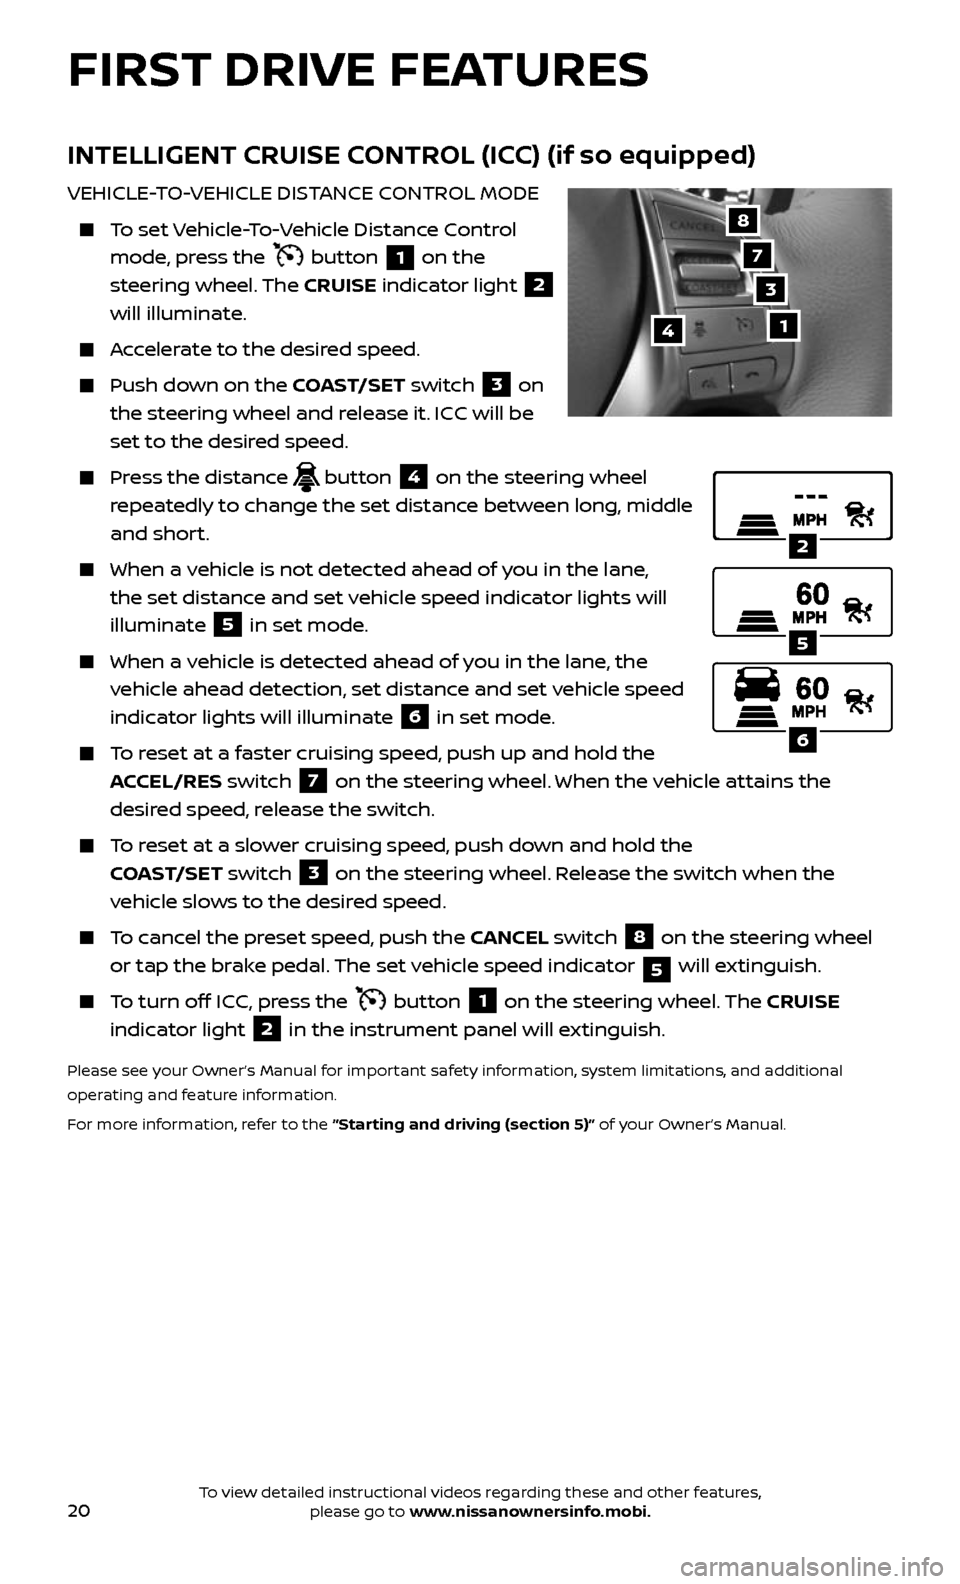
To set Vehicle-To-Vehicle Distance Control
mode, press the button 1 on the
steering wheel. The CRUISE indicator light 2
will illuminate.
Accelerate to the desired speed.
Push down on the COAST/SET switch 3 on
the steering wheel and release it. ICC will be
set to the desired speed.
Press the distance button 4 on the steering wheel
repeatedly to change the set distance between long, middle
and short.
When a v ehicle is not detected ahead of you in the lane,
the set distance and set vehicle speed indicator lights will
illuminate
5 in set mode.
When a vehicle is detected ahead of you in the lane, the
vehicle ahead detection, set distance and set vehicle speed
indicator lights will illuminate
6 in set mode.
To reset at a faster cruising speed, push up and hold the
ACCEL/RES switch
7 on the steering wheel. When the vehicle attains the
desired speed, release the switch.
To reset at a slower cruising speed, push down and hold the
COAST/SET switch
3 on the steering wheel. Release the switch when the
vehicle slows to the desired speed.
To cancel the preset speed, push the CANCEL switch 8 on the steering wheel
or tap the brake pedal. The set vehicle speed indicator
5 will extinguish.
To turn off ICC, press the button 1 on the steering wheel. The CRUISE
indicator light 2 in the instrument panel will extinguish.
Please see your Owner’s Manual for important safety information, system limitations, and additional
operating and feature information.
For more information, refer to the “Starting and driving (section 5)” of your Owner’s Manual.
2
5
6
14
8
7
3
FIRST DRIVE FEATURES
To view detailed instructional videos regarding these and other features, please go to www.nissanownersinfo.mobi.
Page 23 of 36
21
VEHICLE INFORMATION DISPLAY
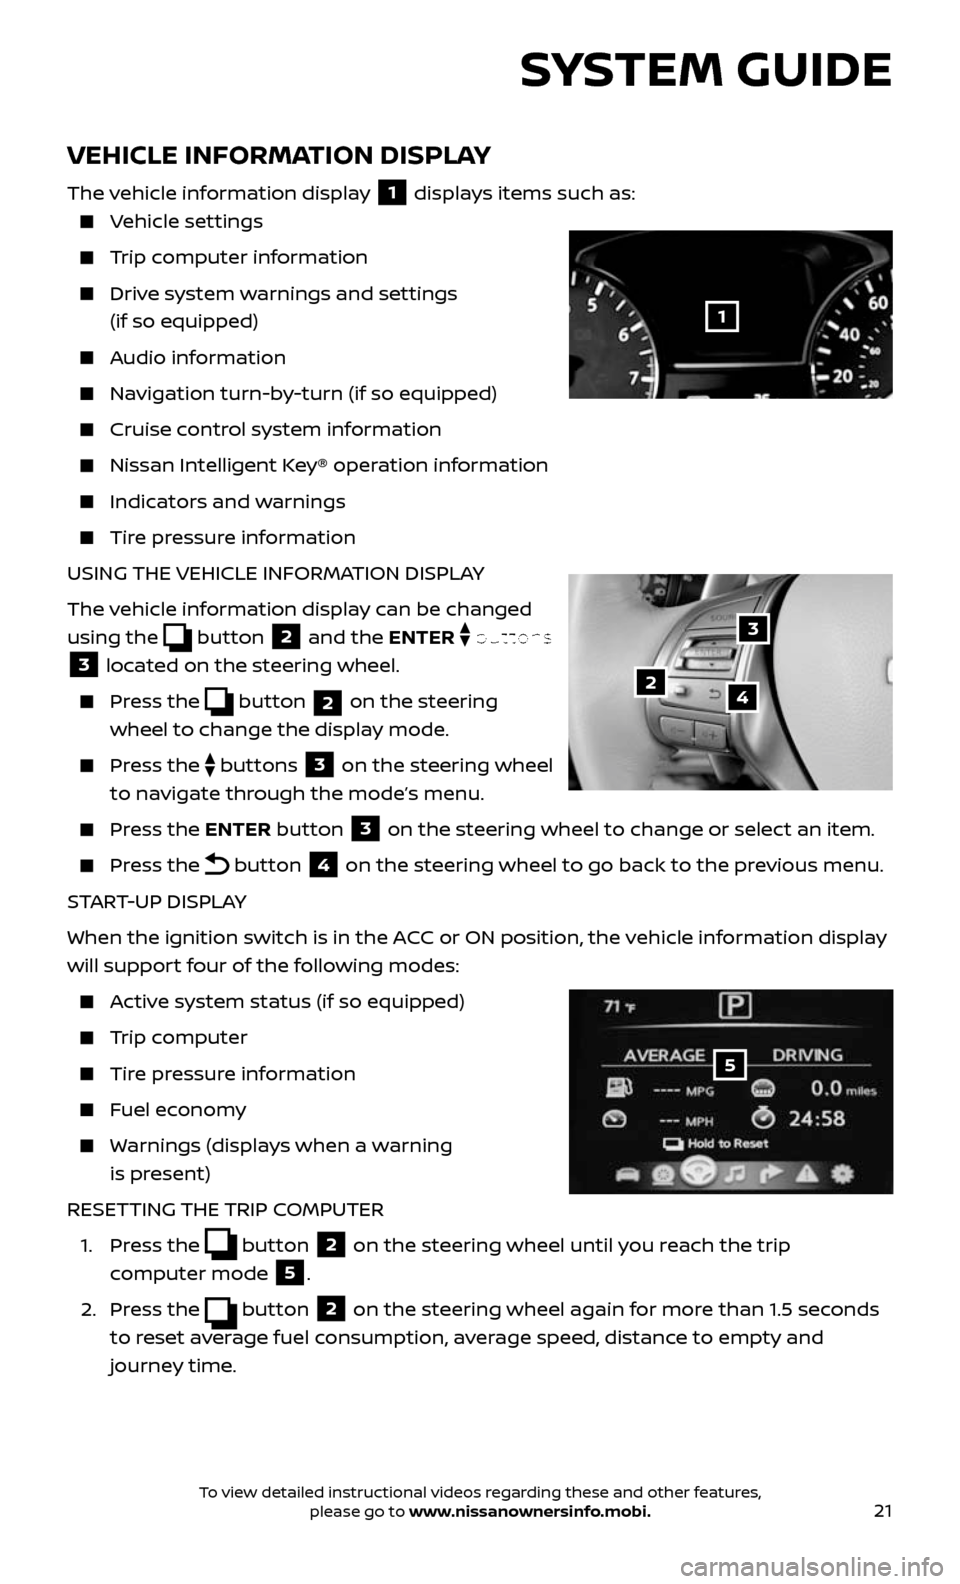
The vehicle information display 1 displays items such as:
Vehicle settings
Trip computer information
Drive system warnings and settings
(if so equipped)
Audio information
Navigation turn-by-turn (if so equipped)
Cruise control system information
Nissan Intel ligent Key® operation information
Indicators and warnings
Tire pressure information
USING THE VEHICLE INFORMATION DISPLAY
The vehicle information display can be changed
using the
button 2 and the ENTER buttons
3 located on the steering wheel.
Press the button 2 on the steering
wheel to change the display mode.
Press the buttons 3 on the steering wheel
to navigate through the mode’s menu.
Press the ENTER button 3 on the steering wheel to change or select an item.
Press the button 4 on the steering wheel to go back to the previous menu.
START-UP DISPLAY
When the ignition switch is in the ACC or ON position, the vehicle information display
will support four of the following modes:
Active system status (if so equipped)
Trip computer
Tire pressure information
Fuel economy
Warnings (displays when a warning
is present)
RESETTING THE TRIP COMPUTER
1. Press the button 2 on the steering wheel until you reach the trip
computer mode
5.
2. Press the button 2 on the steering wheel again for more than 1.5 seconds
to reset average fuel consumption, average speed, distance to empty and
journey time.
3
42
5
SYSTEM GUIDE
1
To view detailed instructional videos regarding these and other features, please go to www.nissanownersinfo.mobi.
Page 27 of 36
25
PHONEBOOK SETUP
Depending on your cellular phone, the system may automatically download
your cellular phone’s entire phonebook to the vehicle’s Bluetooth® system.
If the phonebook does not do wnload automatically, follow this procedure to
manually download entries:
1. Using the SETTING button and TUNE/SCROLL knob on the control panel,
change the “Phonebook Download” setting to OFF.
2. Press the button on the steering wheel.
3. Af ter the tone, say “Phonebook”.
4. Af ter the next tone, say “Transfer Entry”. The system acknowledges the
command and asks you to initiate the transfer from the cellular phone
handset. The new contact phone number will be transferred from the
cellular phone to the vehicle.
MAKING A CALL FROM THE PHONEBOOK
1. Press the button on the steering wheel.
2. Af ter the tone, say “Call
stored in your phonebook.
3. The system wil l confirm the name. If correct, say “ Yes”. Otherwise, say “No”.
• Please note that some cellular phones require the name to be spoken in a
MAKING A CALL BY PHONE NUMBER
1. Press the button on the steering wheel.
2. Af ter the tone, say “Call
3. The system will confirm the command. Af ter the tone, say “Phone Number”.
4. The system will prompt you to speak the phone number. Say the 7-10 digit
phone number.
5. The system wil l confirm the phone number. If correct, say “Dial”.
Otherwise, say “Correction”.
RECEIVING/ENDING A CALL
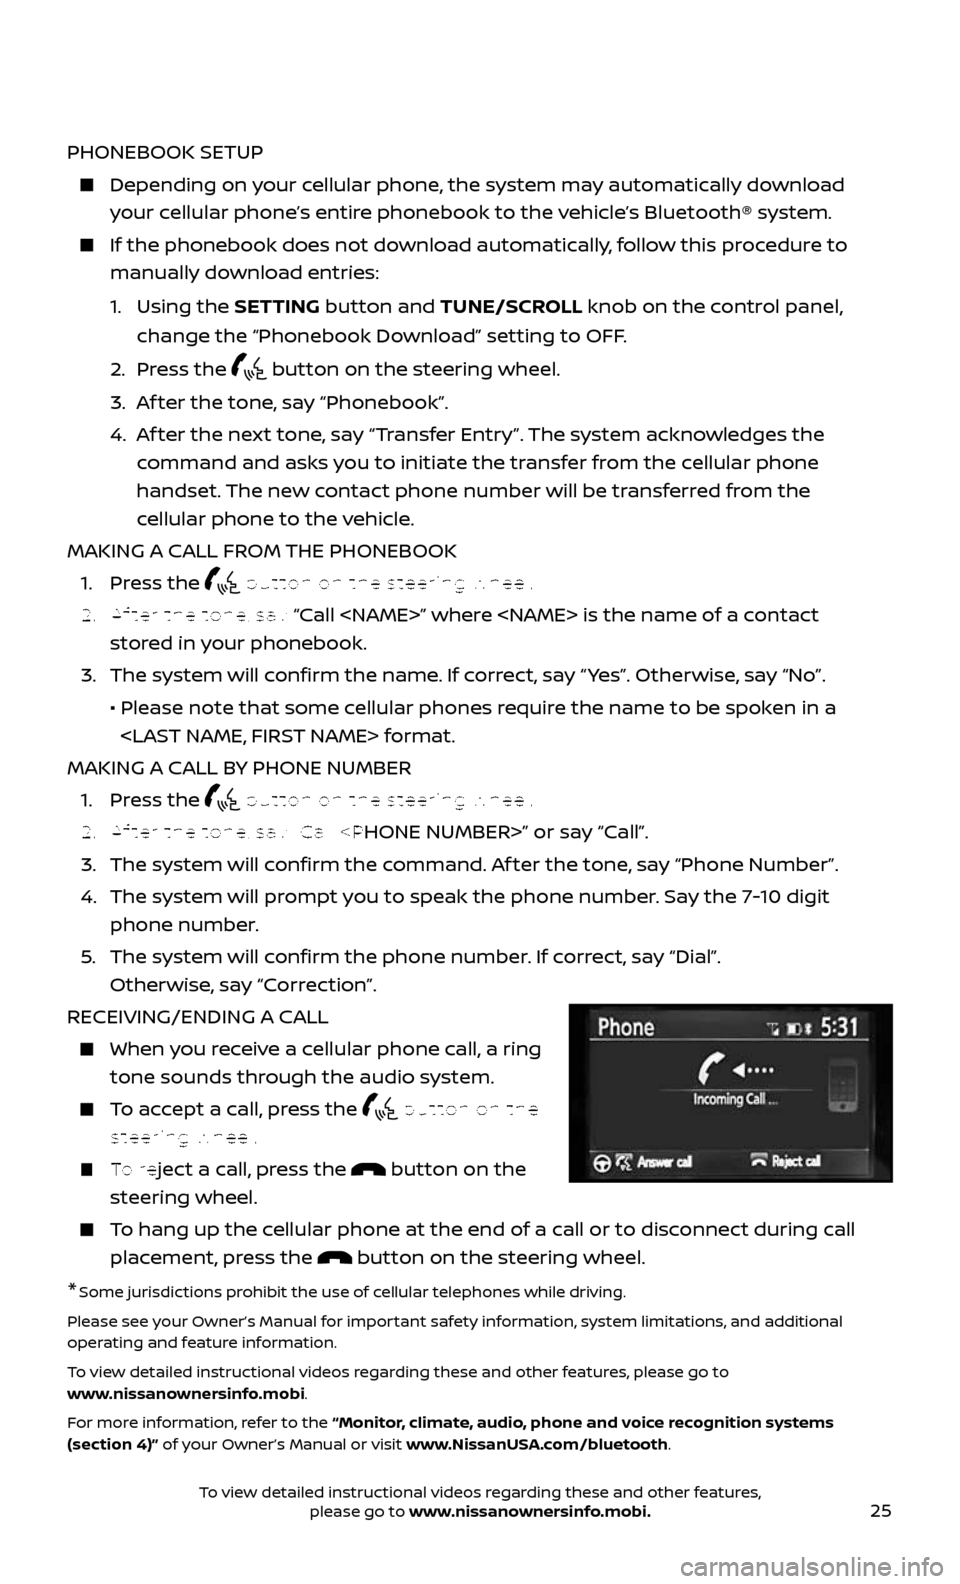
When you receive a cellular phone call, a ring
tone sounds through the audio system.
To accept a call, press the button on the
steering wheel.
To reject a call, press the button on the
steering wheel.
To hang up the cellular phone at the end of a call or to disconnect during call
placement, press the button on the steering wheel.
*Some jurisdictions prohibit the use of cellular telephones while driving.
Please see your Owner’s Manual for important safety information, system limitations, and additional
operating and feature information.
To view detailed instructional videos regarding these and other features, please go to
www.nissanownersinfo.mobi.
For more information, refer to the “Monitor, climate, audio, phone and voice recognition systems
(section 4)” of your Owner’s Manual or visit www.NissanUSA.com/bluetooth.
To view detailed instructional videos regarding these and other features, please go to www.nissanownersinfo.mobi.