Page 408 of 497

8 Do-it-yourself
Maintenance precautions...........................8-2
Engine compartment check locations ................8-3
Engine cooling system .............................8-5
Checking engine coolant level ...................8-6
Changing engine coolant ........................8-6
Engine oil .........................................8-7
Checking engine oil level ........................8-7
Changing engine oil ............................8-8
Changing engine oil filter .......................8-10
Continuously Variable Transmission (CVT) fluid ......8-11
Power steering fluid ............................... 8-11
Brake fluid ....................................... 8-12
Windshield-washer fluid ........................... 8-12
Windshield-washer fluid reservoir ...............8-12
Battery .......................................... 8-13
Jump starting ................................. 8-15
Variable voltage control system .....................8-15
Drive belt ........................................ 8-16
Spark plugs ...................................... 8-17
Replacing spark plugs ......................... 8-17
Air cleaner ....................................... 8-18In-cabin microfilter (if so equipped)
..............8-18
Windshield wiper blades .......................... 8-19
Cleaning ..................................... 8-19
Replacing .................................... 8-19
Brakes .......................................... 8-20
Fuses ........................................... 8-21
Engine compartment ........................... 8-21
Passenger compartment .......................8-22
Battery replacement .............................. 8-23
NISSAN Intelligent Key® .......................8-24
Lights ........................................... 8-25
Headlights .................................... 8-25
Fog lights (if so equipped) ......................8-25
Exterior and interior lights .......................8-27
Wheels and tires ................................. 8-30
Tire pressure .................................. 8-30
Tire
labeling ................................... 8-33
Types of tires .................................. 8-36
Tire chains .................................... 8-37
Changing wheels and tires .....................8-38
Page 417 of 497

CHANGING ENGINE OIL FILTER
1. Park the vehicle on a level surface and applythe parking brake.
2. Turn the engine off.
3. Place a large drain pan under the oil filter
�B. 4. Remove pins
�Afrom the right engine pro-
tector located inside right wheel well, re-
move protector. Remove oil filter
�Bwith an
oil filter wrench by turning it counterclock-
wise. Then remove the oil filter by turning it
by hand.
CAUTION
Be careful not to burn yourself. The engine
oil may be hot.
5. Wipe the engine oil filter sealing surface with a clean rag.
CAUTION
●Be sure to remove any old gasket
material remaining on the sealing
surface of the engine. Failure to do
so could lead to an oil leak and en-
gine damage.
● The dipstick must be inserted in
place to prevent oil spillage from the
dipstick hole when filling the engine
with oil.
6. Coat the gasket on the new filter with clean engine oil.
7. Screw on the oil filter until a slight resistance is felt, then tighten an additional 2/3 turn. 8. Start the engine and check for leakage
around the oil filter. Correct as required.
9. Turn the engine off and wait more than 10 minutes. Check the oil level. Add engine
oil if necessary.
LDI2806
8-10Do-it-yourself
Page 419 of 497

For additional information on brake fluid specifi-
cation, refer to “Recommended fluids/lubricants
and capacities” in the “Technical and consumer
information” section of this manual.
WARNING
●Use only new fluid from a sealed con-
tainer. Old, inferior or contaminated
fluid may damage the brake system.
The use of improper fluids can damage
the brake system and affect the vehi-
cle’s stopping ability.
● Clean the filler cap before removing. ●
Brake fluid is poisonous and should be
stored carefully in marked containers
out of reach of children.
CAUTION
Do not spill the fluid on any painted sur-
faces. This will damage the paint. If fluid is
spilled, immediately wash the surface with
water.
Check the fluid level in the reservoir. If the brake
fluid is below the MIN line
�B, the brake warning
light will illuminate. Add brake fluid up to the MAX
line
�A. For additional information on recom-
mended type of brake fluid, refer to “Recom-
mended fluids/lubricants and capacities� in the “
Technical and consumer information” section of
this manual.
If the brake fluid must be added frequently, the
brake system should be thoroughly checked. It is
recommended that you visit a NISSAN dealer for
this service.
WINDSHIELD-WASHER FLUID
RESERVOIR
Fill the windshield-washer fluid reservoir periodi-
cally. Add windshield-washer fluid when the low
windshield-washer fluid warning light comes on.
To fill the windshield-washer fluid reservoir, lift
the cap off the reservoir and pour the windshield-
washer fluid into the reservoir opening.
Add a washer solvent to the washer for better
cleaning. In the winter season, add a windshield
washer antifreeze. Follow the manufacturer’s in-
structions for the mixture ratio.
LDI2753LDI2754
BRAKE FLUID WINDSHIELD-WASHER FLUID
8-12Do-it-yourself
Page 427 of 497

If you wax the surface of the hood, be careful not
to let wax get into the washer nozzle
�D. This may
cause clogging or improper windshield-washer
operation. If wax gets into the nozzle, remove it
with a needle or small pin
�C. If the brakes do not operate properly, have the
brakes checked. It is recommended that you visit
a NISSAN dealer for this service.
Self-adjusting brakes
Your vehicle is equipped with self-adjusting
brakes.
The front and rear disc-type brakes self-adjust
every time the brake pedal is applied.
WARNING
Have your brake system checked if the
brake pedal height does not return to nor-
mal. It is recommended that you visit a
NISSAN dealer for this service.
Brake pad wear indicators
The disc brake pads on your vehicle have audible
wear indicators. When a brake pad requires re-
placement, a high pitched scraping or screech-
ing sound will be heard when the vehicle is in
motion. The noise will be heard whether or not the
brake pedal is depressed. Have the brakes
checked as soon as possible if the wear indicator
sound is heard.
Under some driving or climate conditions, occa-
sional brake squeak, squeal or other noise may
be heard. Occasional brake noise during light to
moderate stops is normal and does not affect the
function or performance of the brake system.
Proper brake inspection intervals should
be followed.
For additional information regard-
ing brake inspections, refer to the appropriate
maintenance schedule information in the �Main-
tenance and Schedules� section of this manual.
LDI2731
BRAKES
8-20Do-it-yourself
Page 428 of 497
If any electrical equipment does not operate,
check for an open fuse.
Fuses are used in the passenger and engine
compartment. Spare fuses are provided and can
be found in the passenger compartment fuse
box.
When installing a fuse make sure the fuse is
installed in the fuse box securely.ENGINE COMPARTMENT
WARNING
Never use a fuse of a higher or lower
amperage rating than specified on the
fuse box cover. This could damage the
electrical system or cause a fire.
If any electrical equipment does not come on,
check for an open fuse. 1. Be sure the ignition switch and the headlight switch are OFF.
2. Open the engine hood. 3. Remove the fuse box cover by pushing the
tab and lifting the cover up.
4. Remove the fuse with the fuse puller. The fuse puller is located in the center of the fuse
block in the passenger compartment.
LDI2385LDI2133
FUSES
Do-it-yourself8-21
Page 429 of 497
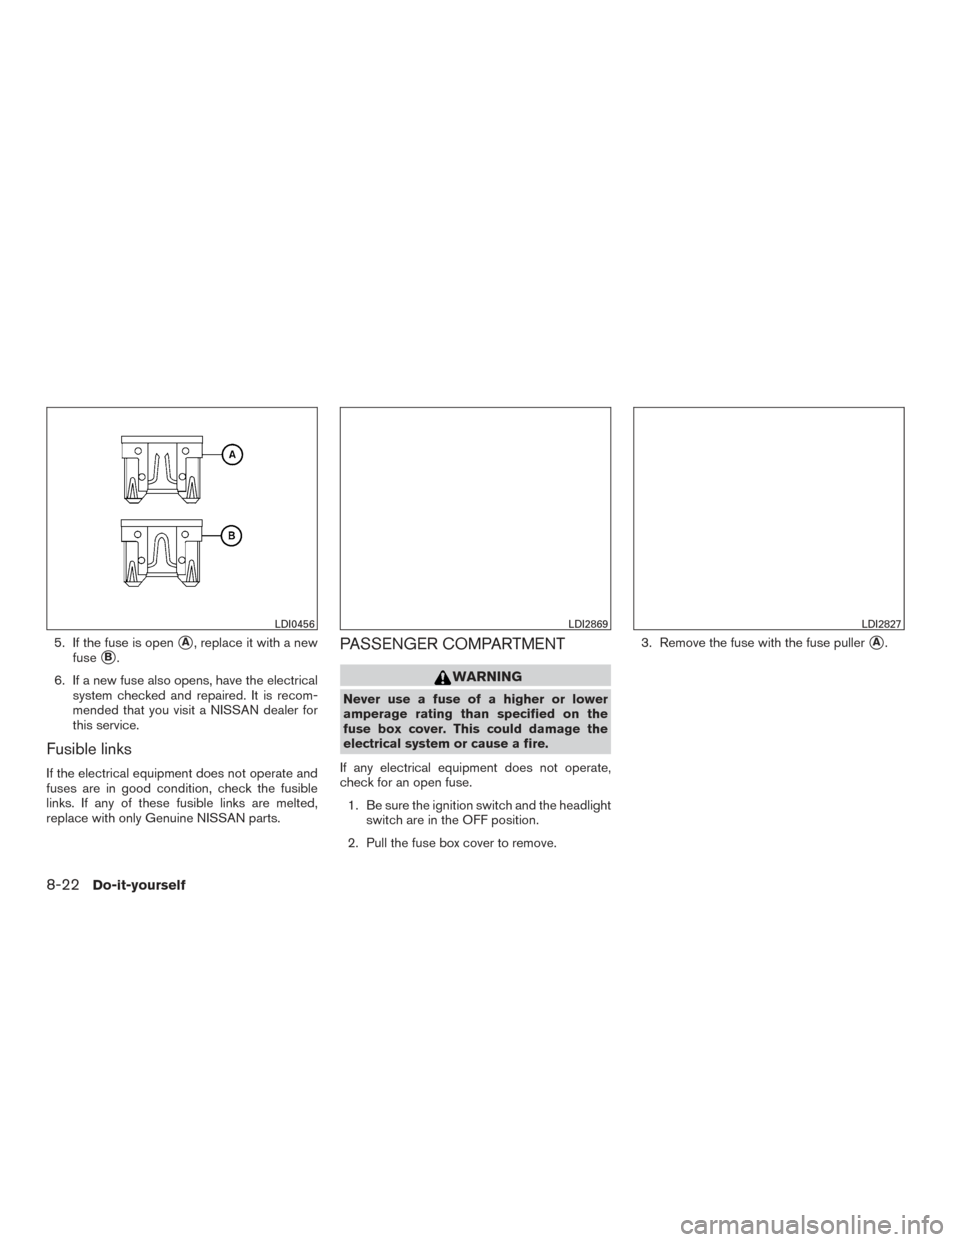
5. If the fuse is open�A, replace it with a new
fuse
�B.
6. If a new fuse also opens, have the electrical system checked and repaired. It is recom-
mended that you visit a NISSAN dealer for
this service.
Fusible links
If the electrical equipment does not operate and
fuses are in good condition, check the fusible
links. If any of these fusible links are melted,
replace with only Genuine NISSAN parts.
PASSENGER COMPARTMENT
WARNING
Never use a fuse of a higher or lower
amperage rating than specified on the
fuse box cover. This could damage the
electrical system or cause a fire.
If any electrical equipment does not operate,
check for an open fuse. 1. Be sure the ignition switch and the headlight switch are in the OFF position.
2. Pull the fuse box cover to remove. 3. Remove the fuse with the fuse puller
�A.
LDI0456LDI2869LDI2827
8-22Do-it-yourself
Page 432 of 497

The headlight is a semi")
HEADLIGHTS
For additional information on headlight bulb re-
placement, refer to the instructions outlined in
this section.
Replacing the halogen headlight bulb
(if so equipped)
The headlight is a semi-sealed beam type which
uses a replaceable headlight (halogen) bulb.
They can be replaced from inside the engine
compartment without removing the headlight as-
sembly.
If headlight bulb replacement is required, it is
recommended that you visit a NISSAN dealer for
this service.
CAUTION
●Aiming is not necessary after replacing
the bulb. When aiming adjustment is
necessary, it is recommended that you
visit a NISSAN dealer for this service.
● Do not leave the headlight assembly
open without a bulb installed for a long
period of time. Dust, moisture, smoke,
etc. entering the headlight body may
affect bulb performance. Remove the
bulb from the headlight assembly just
before a replacement bulb is installed. ●
Only touch the base when handling the
bulb. Never touch the glass envelope.
Touching the glass could significantly
affect bulb life and/or headlight
performance.
● High pressure halogen gas is sealed
inside the halogen bulb. The bulb may
break if the glass envelope is scratched
or the bulb is dropped.
● Use the same number and wattage as
shown in the chart.
Fog may temporarily form inside the lens of the
exterior lights in the rain or in a car wash. A
temperature difference between the inside and
the outside of the lens causes the fog. This is not
a malfunction. If large drops of water collect
inside the lens, it is recommended that you visit a
NISSAN dealer for this service.
Replacing the LED headlight bulb (if
so equipped)
If LED headlight bulb replacement is required, it is
recommended that you visit a NISSAN dealer for
this service.
FOG LIGHTS (if so equipped)
For additional information on fog light bulb re-
placement, refer to the instructions outlined in
this section.
LIGHTS
Do-it-yourself8-25
Page 433 of 497
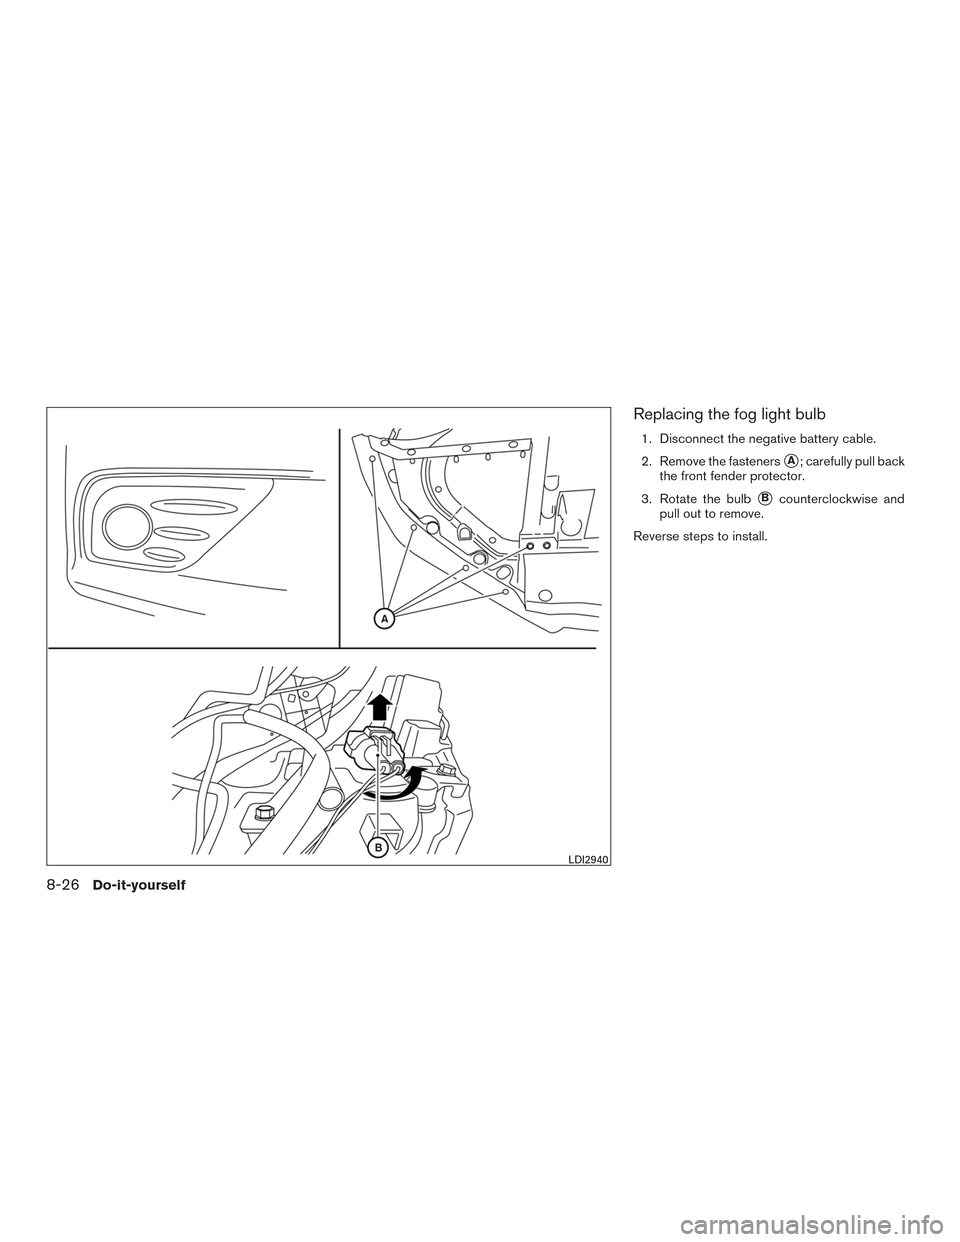
Replacing the fog light bulb
1. Disconnect the negative battery cable.
2. Remove the fasteners
�A; carefully pull back
the front fender protector.
3. Rotate the bulb
�Bcounterclockwise and
pull out to remove.
Reverse steps to install.
LDI2940
8-26Do-it-yourself