2017 NISSAN 370Z ROADSTER light
[x] Cancel search: lightPage 2 of 28
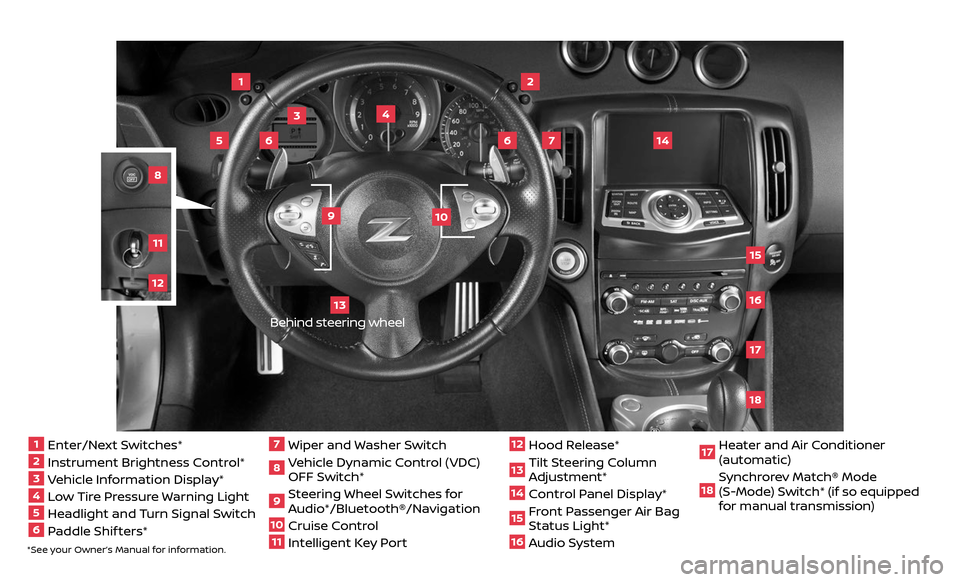
*See your Owner’s Manual for information.1 Enter/Next Switches*2 Instrument Brightness Control*3 Vehicle Information Display*4 Low Tire Pressure Warning Light5 Headlight and Turn Signal Switch6 Paddle Shif ters*
7 Wiper and Washer Switch8 Vehicle Dynamic Control (VDC)
OFF Switch*
9 Steering Wheel Switches for
Audio*/Bluetooth®/Navigation
10 Cruise Control
11 Intelligent Key Port
12 Hood Release*
13 Tilt Steering Column
Adjustment*
14 Control Panel Display* 15 Front Passenger Air Bag
Status Light*
16 Audio System2
3
1
4
6
6
15
5
13
16
14
9
7
10
1718
81211
Behind steering wheel
17 Heater and Air Conditioner (automatic)
18 Synchrorev Match® Mode
(S-Mode) Switch* (if so equipped
for manual transmission)
Page 3 of 28
NEW SYSTEM FEATURES
RearView Monitor (if so equipped).....................................................2
Opening the Sof t Top (Roadster models)
..............................................2
USB (Universal Serial Bus) Connection Port/AUX Jack and iPod® Interface
...........2
NavTraffic and NavWeather (if so equipped)
...........................................3
ESSENTIAL INFORMATION
Tire Pressure Monitoring System (TPMS) ..............................................4
Loose Fuel Cap
........................................................................\
.5
Fuel-filler Door
.......................................................................\
..5
Clock Set/Adjustment
.................................................................6
Engine Oil Temperature Gauge
........................................................7
Automatic Power Windows . . . . . . . . . . . . . . . . . . . . . . . . . . . . . . . . . . . .\
. . . . . . . . . . . . . . . . . . . . . . . . 7
FIRST DRIVE FEATURES
Nissan Intelligent Key® System ........................................................8
Rear Hatch/Trunk Lid Release
.........................................................9
Sof t Top Operation (Roadster models)
................................................9
Power Seat Adjustments (if so equipped)
.............................................9
Manual Seat Adjustments (if so equipped)
...........................................10
Power Outside Mirror Control Switch
.................................................10
Starting/Stopping the Engine
.........................................................11
Headlight Control Switch
..............................................................11
Wiper and Washer Switch
.............................................................12
Heater and Air Conditioner (automatic)
..............................................13
FM/AM/SiriusXM® Satellite Radio with CD/DVD Player (if so equipped)
..............14
Cruise Control
........................................................................\
.15
SYSTEM GUIDE
Trip Computer .......................................................................\
.16
Bluetooth® Hands-free Phone System
...............................................17
• System Operating Tips ...........................................................17
Bluetooth® System without Navigation (if so equipped)
.............................18
Bluetooth® System with Navigation (if so equipped)
.................................19
Bluetooth® Streaming Audio with Navigation (if so equipped)
.......................21
Navigation System (if so equipped)
...................................................22
HomeLink® Universal Transceiver (if so equipped)
....................................23
TABLE OF CONTENTS
Please see your Owner’s Manual for important safety information and system
operation limitations.
• A cellular telephone should not be used for any purpose while driving so full attention may be given to vehicle operation.
• Always wear your seat belt.
• Supplemental air bags do not replace proper seat belt usage.
• Children 12 and under should always ride in the rear seat properly secured in child restraints or seat belts according to their age and weight.
• Do not drink and drive.
For more information, refer to the “Safety — Seats, seat belts and supplemental restraint system
(section 1)”, the “Center display, heater, air conditioner, audio, phone and voice recognition systems
(section 4)” and the “Starting and driving (section 5)” of your Owner’s Manual.
Additional information about your vehicle is also available in your Owner’s Manual,
Navigation System Owner’s Manual and at www.NissanUSA.com.
Page 6 of 28
4
TIRE PRESSURE MONITORING SYSTEM (TPMS)
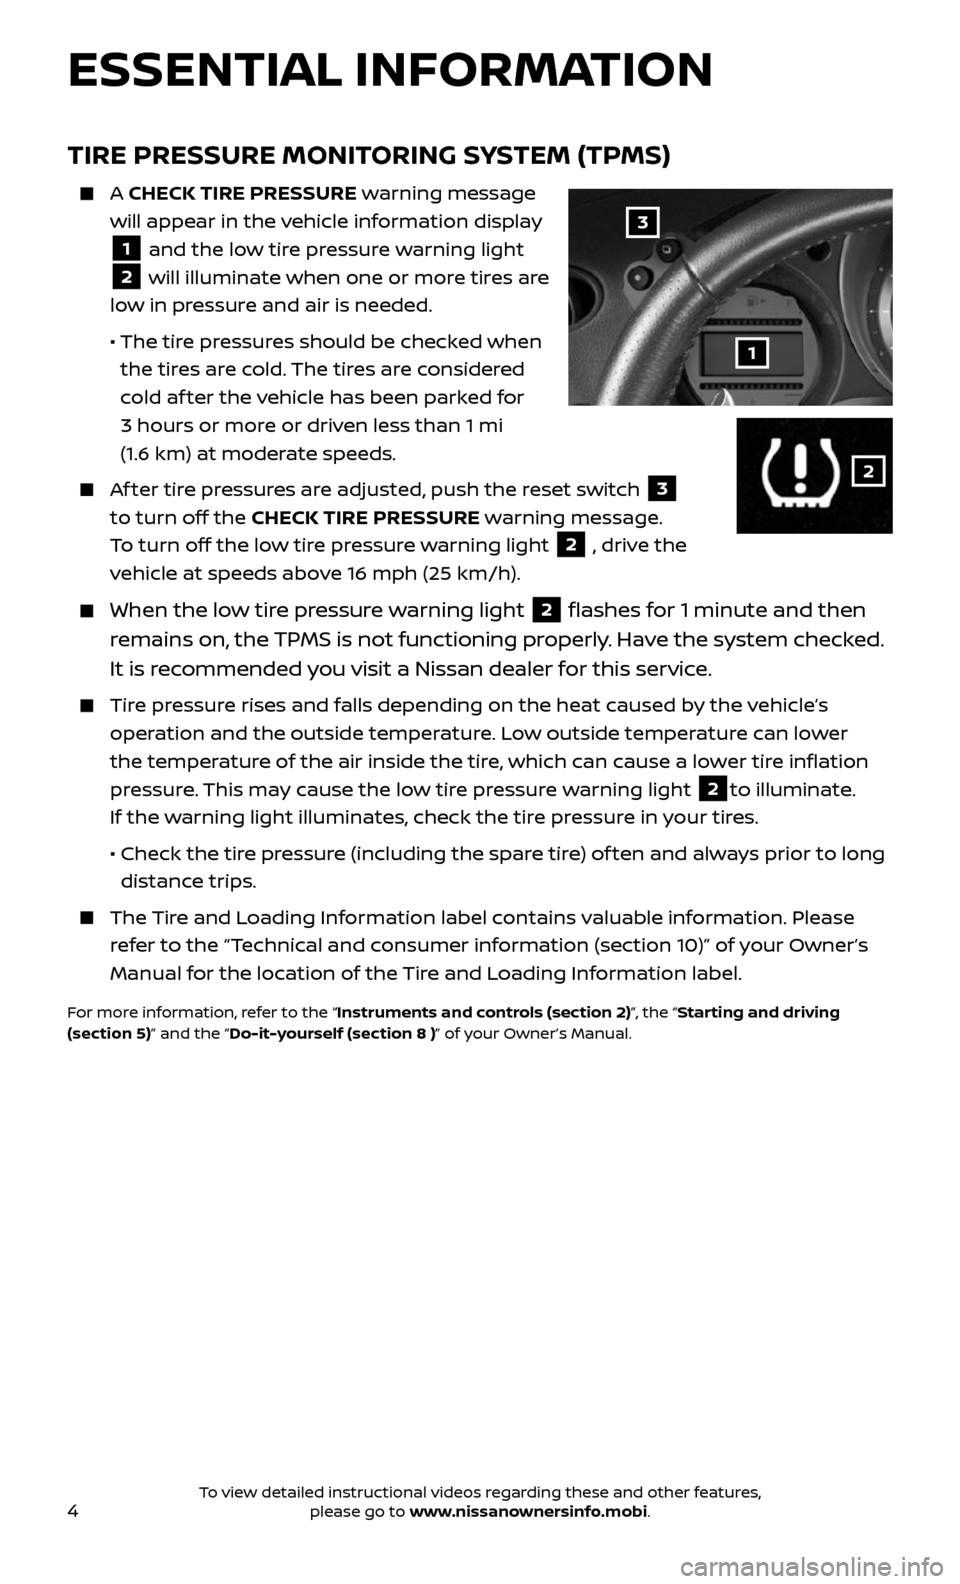
A CHECK TIRE PRESSURE warning message
will appear in the vehicle information display
1 and the low tire pressure warning light
2 will illuminate when one or more tires are
low in pressure and air is needed.
• The tir e pressures should be checked when
the tires are cold. The tires are considered
cold af ter the vehicle has been parked for
3 hours or more or driven less than 1 mi
(1.6 km) at moderate speeds.
Af ter tire pressures are adjusted, push the reset switch 3
to turn off the CHECK TIRE PRESSURE warning message.
To turn off the low tire pressure warning light
2 , drive the
vehicle at speeds above 16 mph (25 km/h).
When the lo w tire pressure warning light 2 flashes for 1 minute and then
remains on, the TPMS is not functioning properly. Have the system checked.
It is recommended you visit a Nissan dealer for this service.
Tire pressure rises and falls depending on the heat caused by the vehicle’s
operation and the outside temperature. Low outside temperature can lower
the temperature of the air inside the tire, which can cause a lower tire inflation
pressure. This may cause the low tire pressure warning light
2to illuminate.
If the warning light illuminates, check the tire pressure in your tires.
• Check the tir e pressure (including the spare tire) of ten and always prior to long
distance trips.
The Tire and Loading Information label contains valuable information. Please
refer to the “Technical and consumer information (section 10)” of your Owner’s
Manual for the location of the Tire and Loading Information label.
For more information, refer to the “Instruments and controls (section 2)”, the “Starting and driving
(section 5)” and the “Do-it-yourself (section 8 )” of your Owner’s Manual.
3
1
2
ESSENTIAL INFORMATION
To view detailed instructional videos regarding these and other features, please go to www.nissanownersinfo.mobi.
Page 7 of 28
5
FUEL-FILLER DOOR
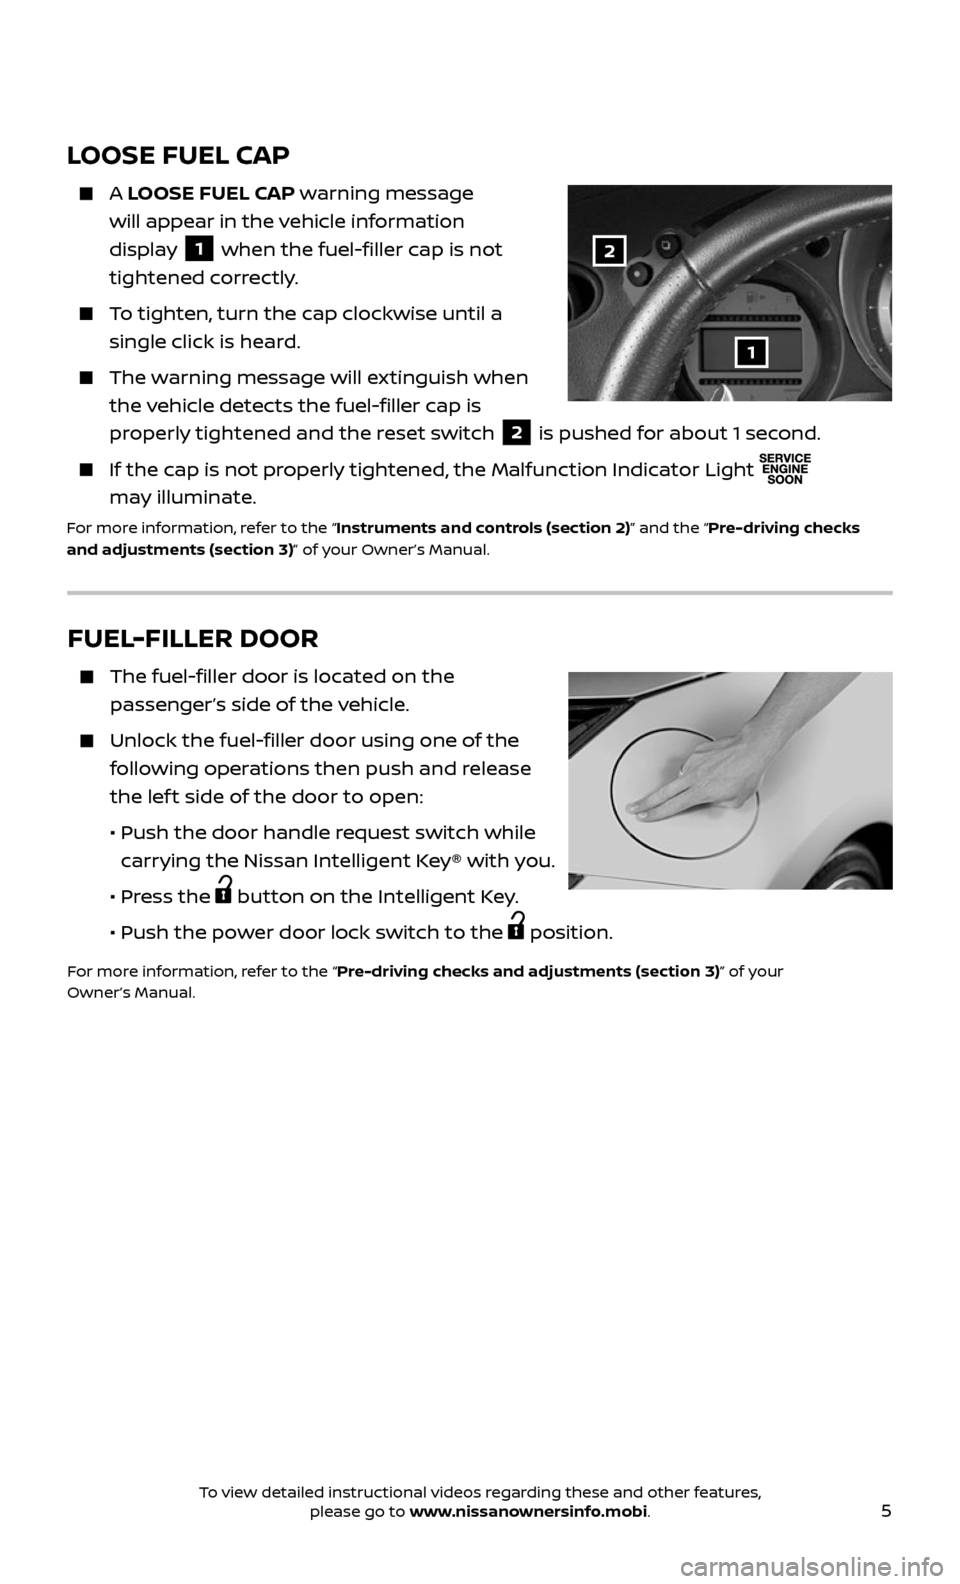
The fuel-filler door is located on the
passenger’s side of the vehicle.
Unlock the fuel-filler door using one of the
following operations then push and release
the lef t side of the door to open:
• Push the door hand le request switch while
carrying the Nissan Intelligent Key® with you.
• Press the button on the Intelligent Key.
• Push the po wer door lock switch to the position.
For more information, refer to the “Pre-driving checks and adjustments (section 3)” of your
Owner’s Manual.
LOOSE FUEL CAP
A LOOSE FUEL CAP warning message
will appear in the vehicle information
display
1 when the fuel-filler cap is not
tightened correctly.
To tighten, turn the cap clockwise until a
single click is heard.
The warning message will extinguish when
the vehicle detects the fuel-filler cap is
properly tightened and the reset switch
2 is pushed for about 1 second.
If the cap is not properly tightened, the Malfunction Indicator Light
may illuminate.
For more information, refer to the “Instruments and controls (section 2)” and the “Pre-driving checks
and adjustments (section 3)” of your Owner’s Manual.
2
1
To view detailed instructional videos regarding these and other features, please go to www.nissanownersinfo.mobi.
Page 8 of 28
6
ESSENTIAL INFORMATION
54
CLOCK SET/ADJUSTMENT
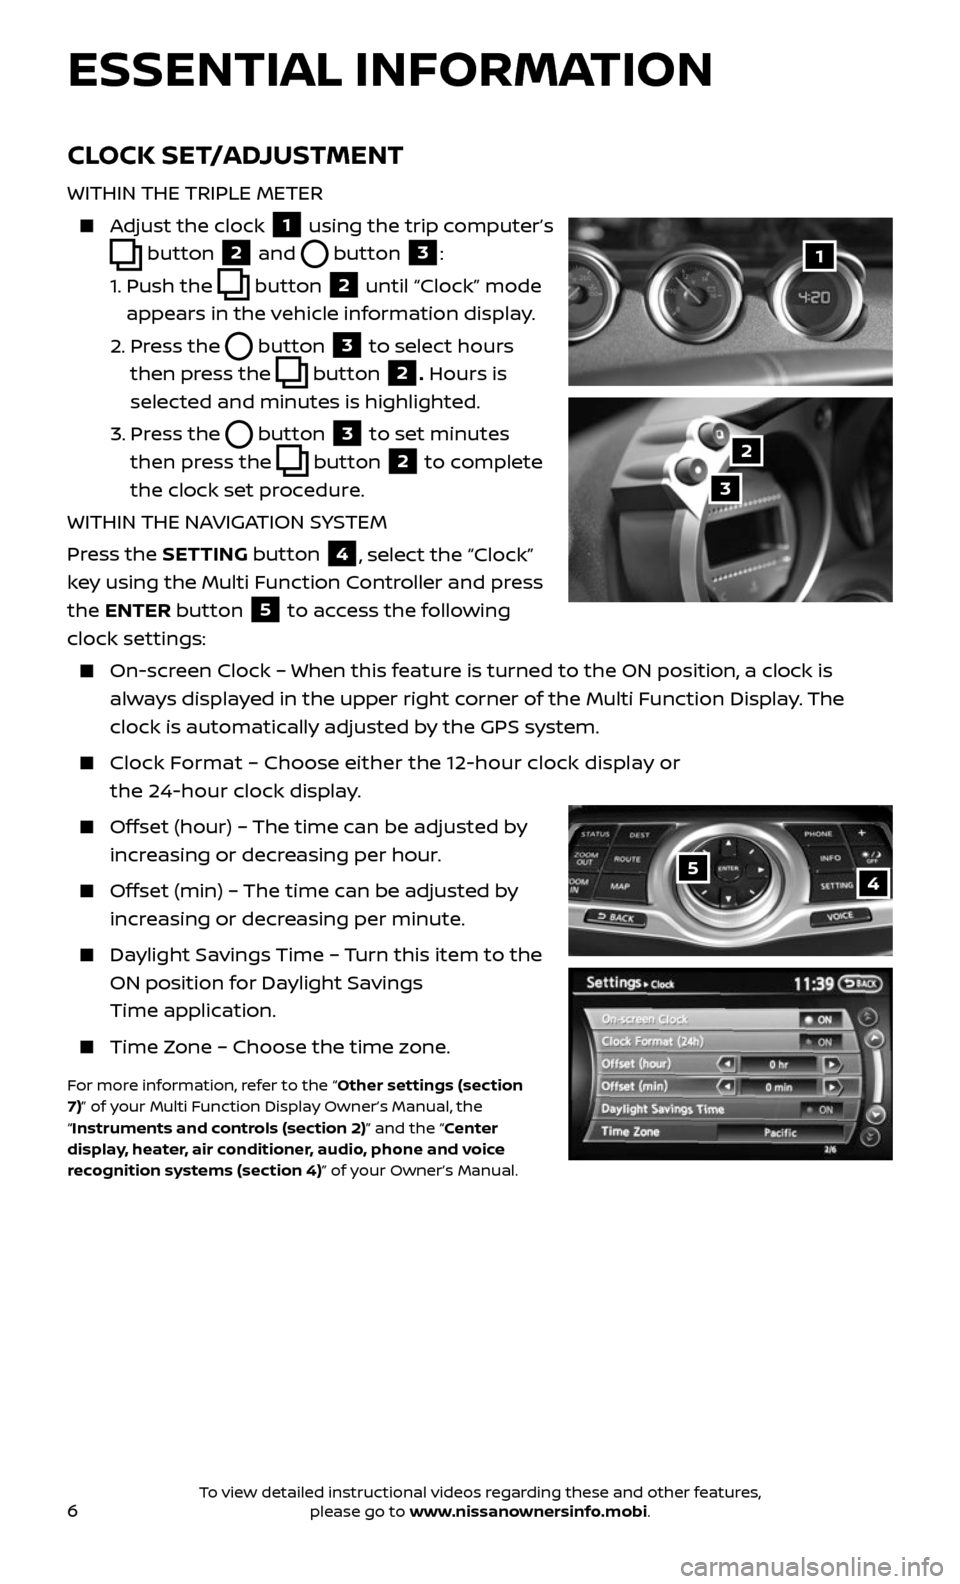
WITHIN THE TRIPLE METER
Adjust the clock 1 using the trip computer’s
button 2 and button 3:
1. Push the button 2 until “Clock” mode
appears in the vehicle information display.
2. Press the button 3 to select hours
then press the
button 2. Hours is
selected and minutes is highlighted.
3. Press the button 3 to set minutes
then press the
button 2 to complete
the clock set procedure.
WITHIN THE NAVIGATION SYSTEM
Press the SETTING button
4, select the “Clock”
key using the Multi Function Controller and press
the ENTER button
5 to access the following
clock settings:
On-screen Clock – When this feature is turned to the ON position, a clock is
always displayed in the upper right corner of the Multi Function Display. The
clock is automatically adjusted by the GPS system.
Clock Format – Choose either the 12-hour clock display or
the 24-hour clock display.
Offset (hour) – The time can be adjusted by
increasing or decreasing per hour.
Offset (min) – The time can be adjusted by
increasing or decreasing per minute.
Daylight Savings Time – Turn this item to the
ON position for Daylight Savings
Time application.
Time Zone – Choose the time zone.
For more information, refer to the “Other settings (section
7)” of your Multi Function Display Owner’s Manual, the
“Instruments and controls (section 2)” and the “Center
display, heater, air conditioner, audio, phone and voice
recognition systems (section 4)” of your Owner’s Manual.
1
2
3
To view detailed instructional videos regarding these and other features, please go to www.nissanownersinfo.mobi.
Page 9 of 28
7
ENGINE OIL TEMPERATURE GAUGE
Performance driving patterns or extended
driving at elevated ambient temperatures
may result in increased engine oil
temperature during operation.
During normal v ehicle operation, oil
temperatures will be below 280°F (138°C).
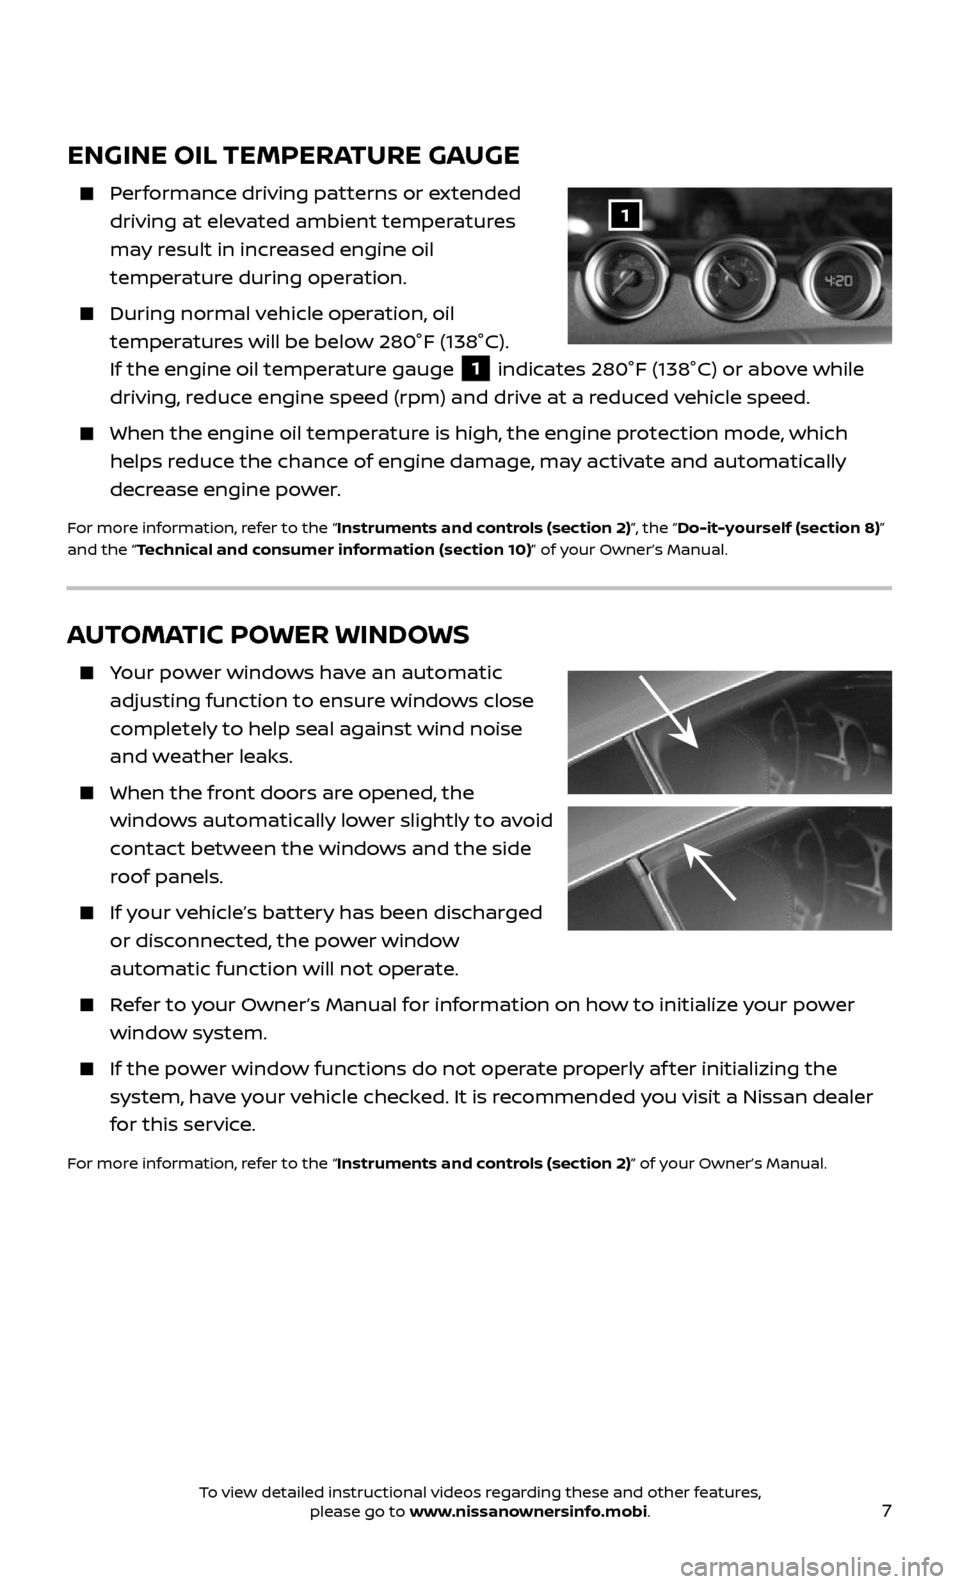
If the engine oil temperature gauge
1 indicates 280°F (138°C) or above while
driving, reduce engine speed (rpm) and drive at a reduced vehicle speed.
When the engine oil temper ature is high, the engine protection mode, which
helps reduce the chance of engine damage, may activate and automatically
decrease engine power.
For more information, refer to the “Instruments and controls (section 2)”, the “Do-it-yourself (section 8)”
and the “Technical and consumer information (section 10)” of your Owner’s Manual.
1
AUTOMATIC POWER WINDOWS
Your power windows have an automatic
adjusting function to ensure windows close
completely to help seal against wind noise
and weather leaks.
When the front doors are opened, the
windows automatically lower slightly to avoid
contact between the windows and the side
roof panels.
If your vehicle’s battery has been discharged
or disconnected, the power window
automatic function will not operate.
Refer to your Owner’s Manual for information on how to initialize your power
window system.
If the power window functions do not operate properly af ter initializing the
system, have your vehicle checked. It is recommended you visit a Nissan dealer
for this service.
For more information, refer to the “Instruments and controls (section 2)” of your Owner’s Manual.
To view detailed instructional videos regarding these and other features, please go to www.nissanownersinfo.mobi.
Page 10 of 28
8
FIRST DRIVE FEATURES
NISSAN INTELLIGENT KEY® SYSTEM
The Nissan Intelligent Key® system allows you to
lock or unlock your vehicle, open your rear hatch/
trunk lid and start the engine. It is important to
make sure the Intelligent Key is with you (that is,
in your pocket or purse).
The operating range of the Intelligent Key is
within 31.5 in (80 cm) from each request switch.
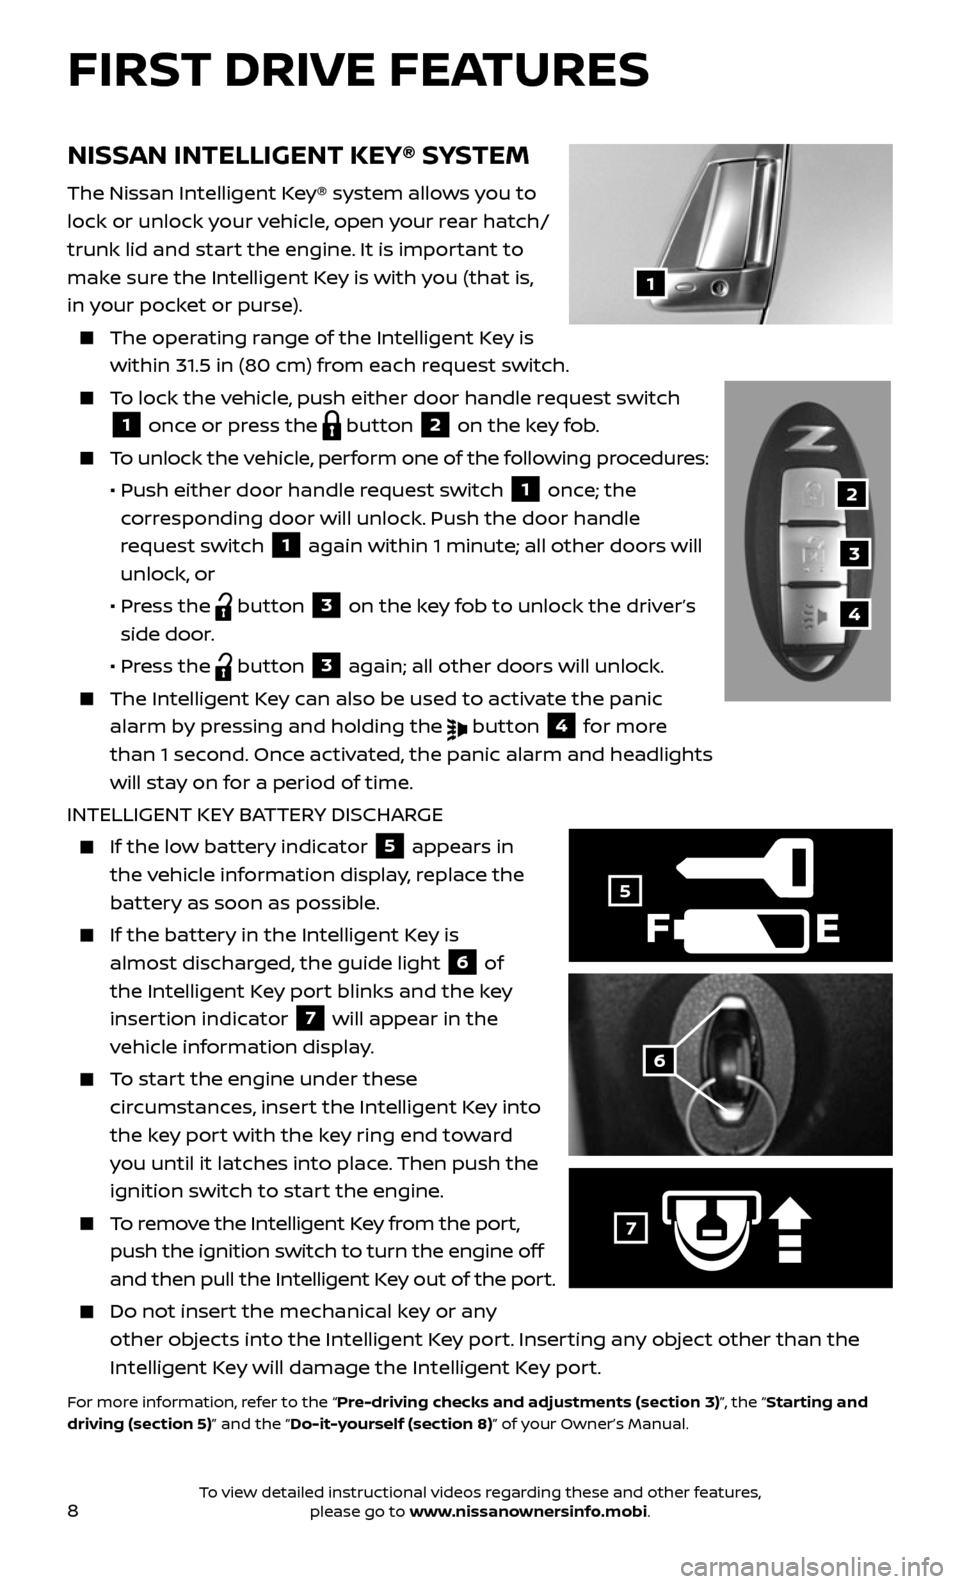
To lock the vehicle, push either door handle request switch
1 once or press the button 2 on the key fob.
To unlock the vehicle, perform one of the following procedures:
• Push either door hand le request switch 1 once; the
corresponding door will unlock. Push the door handle
request switch
1 again within 1 minute; all other doors will
unlock, or
• Press the button 3 on the key fob to unlock the driver’s
side door.
• Press the button 3 again; all other doors will unlock.
The Intel ligent Key can also be used to activate the panic
alarm by pressing and holding the button 4 for more
than 1 second. Once activated, the panic alarm and headlights
will stay on for a period of time.
INTELLIGENT KEY BATTERY DISCHARGE
If the low battery indicator 5 appears in
the vehicle information display, replace the
battery as soon as possible.
If the bat tery in the Intelligent Key is
almost discharged, the guide light 6 of
the Intelligent Key port blinks and the key
insertion indicator
7 will appear in the
vehicle information display.
To start the engine under these
circumstances, insert the Intelligent Key into
the key port with the key ring end toward
you until it latches into place. Then push the
ignition switch to start the engine.
To remove the Intelligent Key from the port,
push the ignition switch to turn the engine off
and then pull the Intelligent Key out of the port.
Do not inser t the mechanical key or any
other objects into the Intelligent Key port. Inserting any object other than the
Intelligent Key will damage the Intelligent Key port.
For more information, refer to the “Pre-driving checks and adjustments (section 3)”, the “Starting and
driving (section 5)” and the “Do-it-yourself (section 8)” of your Owner’s Manual.
F
5
7
2
3
4
1
6
To view detailed instructional videos regarding these and other features, please go to www.nissanownersinfo.mobi.
Page 13 of 28
11
3
1
2
HEADLIGHT CONTROL SWITCH
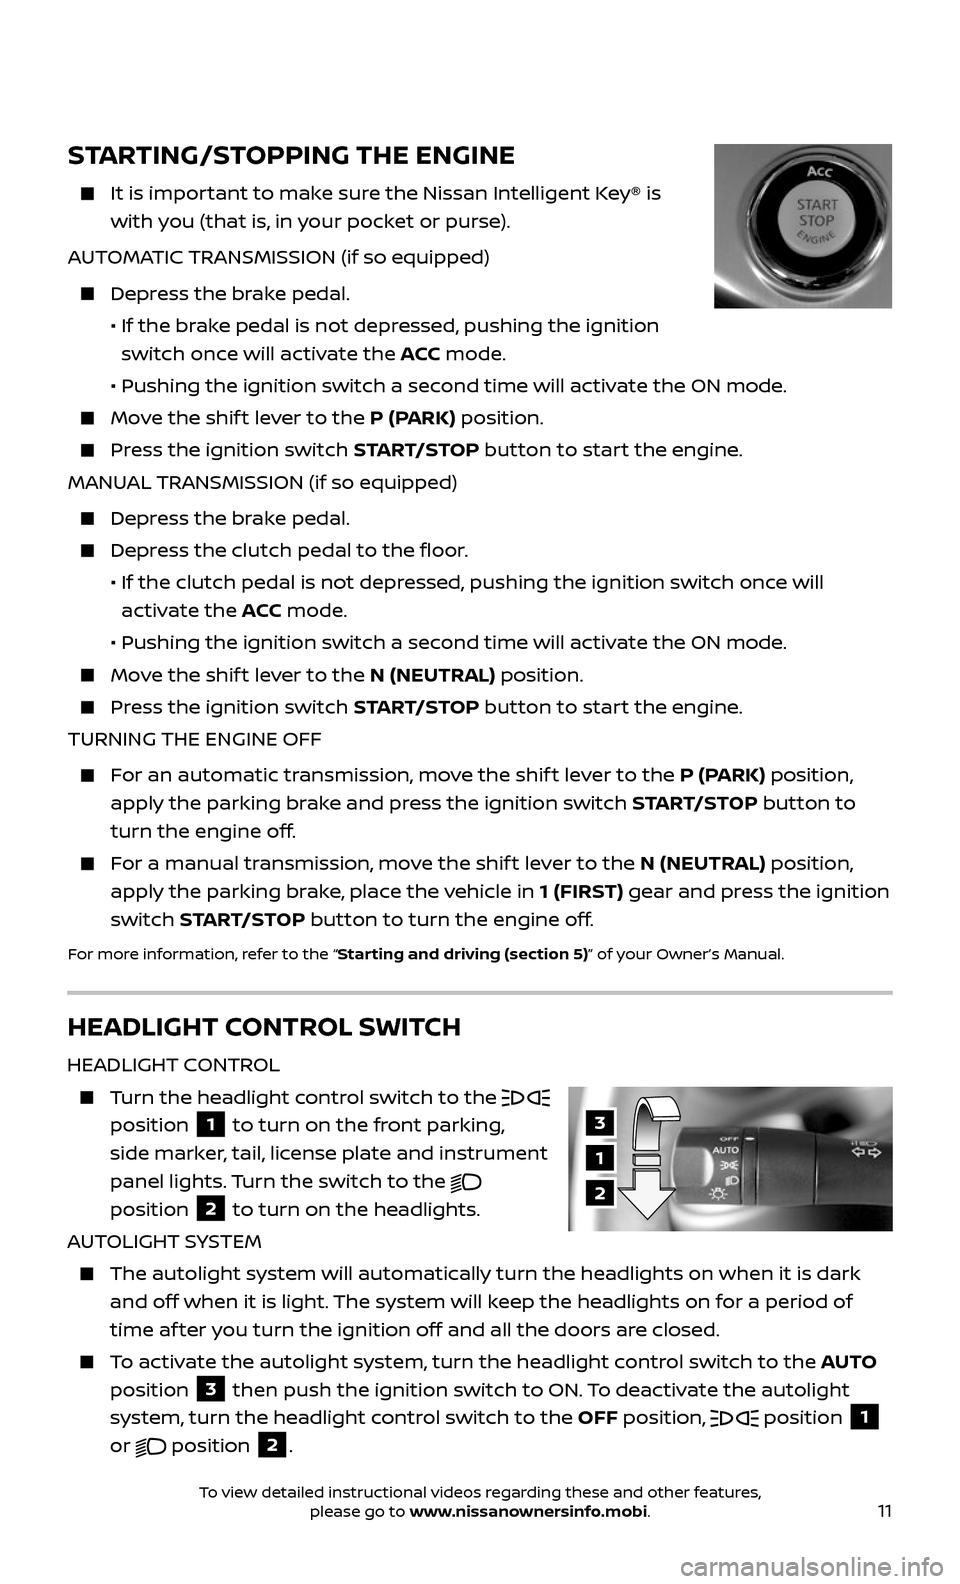
HEADLIGHT CONTROL
Turn the headlight control switch to the
position 1 to turn on the front parking,
side marker, tail, license plate and instrument
panel lights. Turn the switch to the
position 2 to turn on the headlights.
AUTOLIGHT SYSTEM
The autolight system wil l automatically turn the headlights on when it is dark
and off when it is light. The system will keep the headlights on for a period of
time af ter you turn the ignition off and all the doors are closed.
To activate the autolight system, turn the headlight control switch to the AUTO
position
3 then push the ignition switch to ON. To deactivate the autolight
system, turn the headlight control switch to the OFF position,
position 1
or
position 2.
STARTING/STOPPING THE ENGINE
It is impor tant to make sure the Nissan Intelligent Key® is
with you (that is, in your pocket or purse).
AUTOMATIC TRANSMISSION (if so equipped)
Depress the brake pedal.
• If the br ake pedal is not depressed, pushing the ignition
switch once will activate the ACC mode.
• Pushing the ignition switch a sec ond time will activate the ON mode.
Move the shif t lever to the P (PARK) position.
Press the ignition switch START/STOP button to start the engine.
MANUAL TRANSMISSION (if so equipped)
Depress the brake pedal.
Depress the clutch pedal to the floor.
• If the clutch pedal is not depr essed, pushing the ignition switch once will
activate the ACC mode.
• Pushing the ignition switch a sec ond time will activate the ON mode.
Move the shif t lever to the N (NEUTRAL) position.
Press the ignition switch START/STOP button to start the engine.
TURNING THE ENGINE OFF
For an automatic transmission, move the shif t lever to the P (PARK) position,
apply the parking brake and press the ignition switch START/STOP button to
turn the engine off.
For a manual transmission, move the shif t lever to the N (NEUTRAL) position,
apply the parking brake, place the vehicle in 1 (FIRST) gear and press the ignition
switch START/STOP button to turn the engine off.
For more information, refer to the “Starting and driving (section 5)” of your Owner’s Manual.
To view detailed instructional videos regarding these and other features, please go to www.nissanownersinfo.mobi.