2017 NISSAN 370Z COUPE light
[x] Cancel search: lightPage 14 of 28

12
HIGH BEAM SELECT
With the headlights ON (either in the AUTO
or ON position), push the headlight control
switch forward
4 to select the high beam
function. The blue indicator light
will
illuminate in the instrument panel. Pull the
headlight switch back to the original position
to select the low beam. The blue indicator light will extinguish.
Pull and release the headlight control switch 5 to flash the headlight high
beams on and off.
LANE CHANGE SIGNAL
Move the lever up or down until the turn signal begins to flash but the
lever does not latch to signal a lane change. Hold the lever until the lane
change is completed.
Move the lever up or down until the turn signal begins to flash but the lever does
not latch and release the lever. The turn signal will automatically flash 3 times.
Choose the appropriate method to signal a lane change based on road and
traffic conditions.
For more information, refer to the “Instruments and controls (section 2)” of your Owner’s Manual.
WIPER AND WASHER SWITCH
Move the lever to one of the following
positions to operate the windshield wipers:
1 Mist (MIST) - One sweep operation of the
front wipers.
2 Speed Sensing Intermit tent (INT) - Move
the lever down to the INT position
and then rotate the control ring
3 to
increase or decrease wiper speed.
4 Low (LO ) - Front wipers operate at a
continuous low-speed.
5 High (HI) - Front wipers operate at a
continuous high-speed.
6 Washer - Pull the lever toward you
to activate the washer. The wipers will
operate several times.
WIPER DRIP
Once the wiper spray cycle is finished, there will be a short delay. Then the
wipers will sweep one more time to clear off any remaining drips from
the windshield.
For more information, refer to the “Instruments and controls (section 2)” of your Owner’s Manual.
31
2
4
5
MIST
OFF
INT
LO
HI
6
45
FIRST DRIVE FEATURES
To view detailed instructional videos regarding these and other features, please go to www.nissanownersinfo.mobi.
Page 15 of 28

13
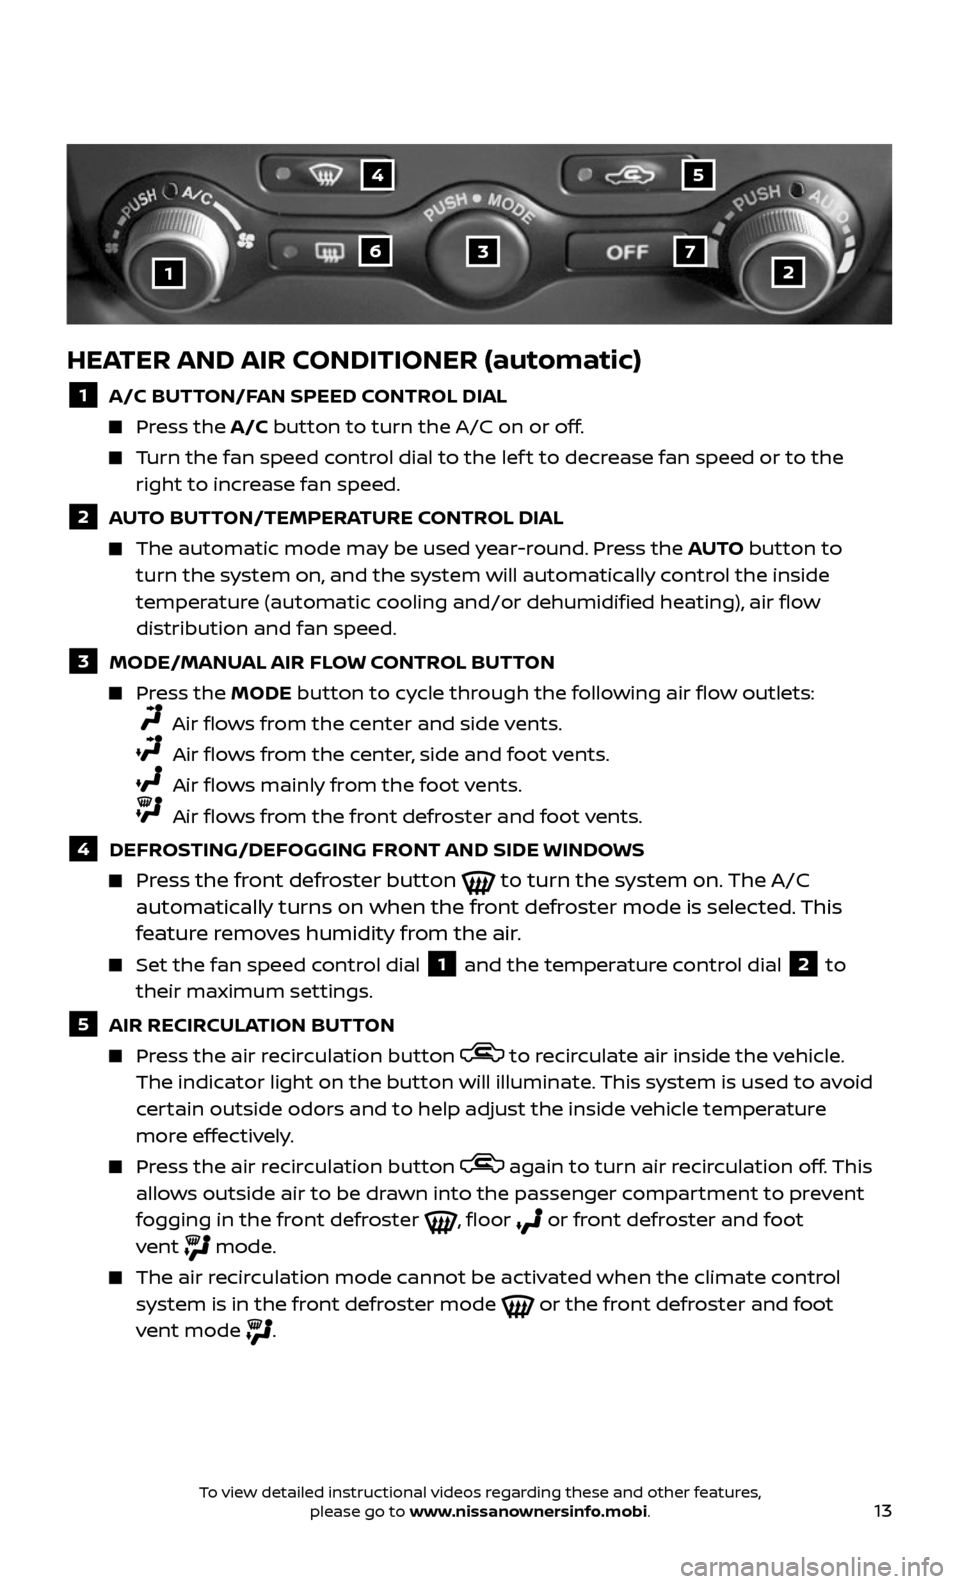
HEATER AND AIR CONDITIONER (automatic)
1 A/C BUTTON/FAN SPEED CONTROL DIAL
Press the A/C button to turn the A/C on or off.
Turn the fan speed control dial to the lef t to decrease fan speed or to the right to increase fan speed.
2 AUTO BUTTON/TEMPERATURE CONTROL DIAL
The automatic mode may be used year-round. Press the AUTO button to
turn the system on, and the system will automatically control the inside
temperature (automatic cooling and/or dehumidified heating), air flow
distribution and fan speed.
3 MODE/MANUAL AIR FLOW CONTROL BUTTON
Press the MODE button to cycle through the following air flow outlets:
Air flows from the center and side vents.
Air flows from the center, side and foot vents.
Air flows mainly from the foot vents.
Air flows from the front defroster and foot vents.
4 DEFROSTING/DEFOGGING FRONT AND SIDE WINDOWS
Press the front defroster button to turn the system on. The A/C
automatically turns on when the front defroster mode is selected. This
feature removes humidity from the air.
Set the fan speed c ontrol dial 1 and the temperature control dial 2 to
their maximum settings.
5 AIR RECIRCULATION BUTTON
Press the air recirculation button to recirculate air inside the vehicle. The indicator light on the button will illuminate. This system is used to avoid
certain outside odors and to help adjust the inside vehicle temperature
more effectively.
Press the air recirculation button again to turn air recirculation off. This allows outside air to be drawn into the passenger compartment to prevent
fogging in the front defroster , floor or front defroster and foot
vent mode.
The air recirculation mode cannot be activated when the climate control system is in the front defroster mode or the front defroster and foot
vent mode .
1
4
637
5
2
To view detailed instructional videos regarding these and other features, please go to www.nissanownersinfo.mobi.
Page 17 of 28

15
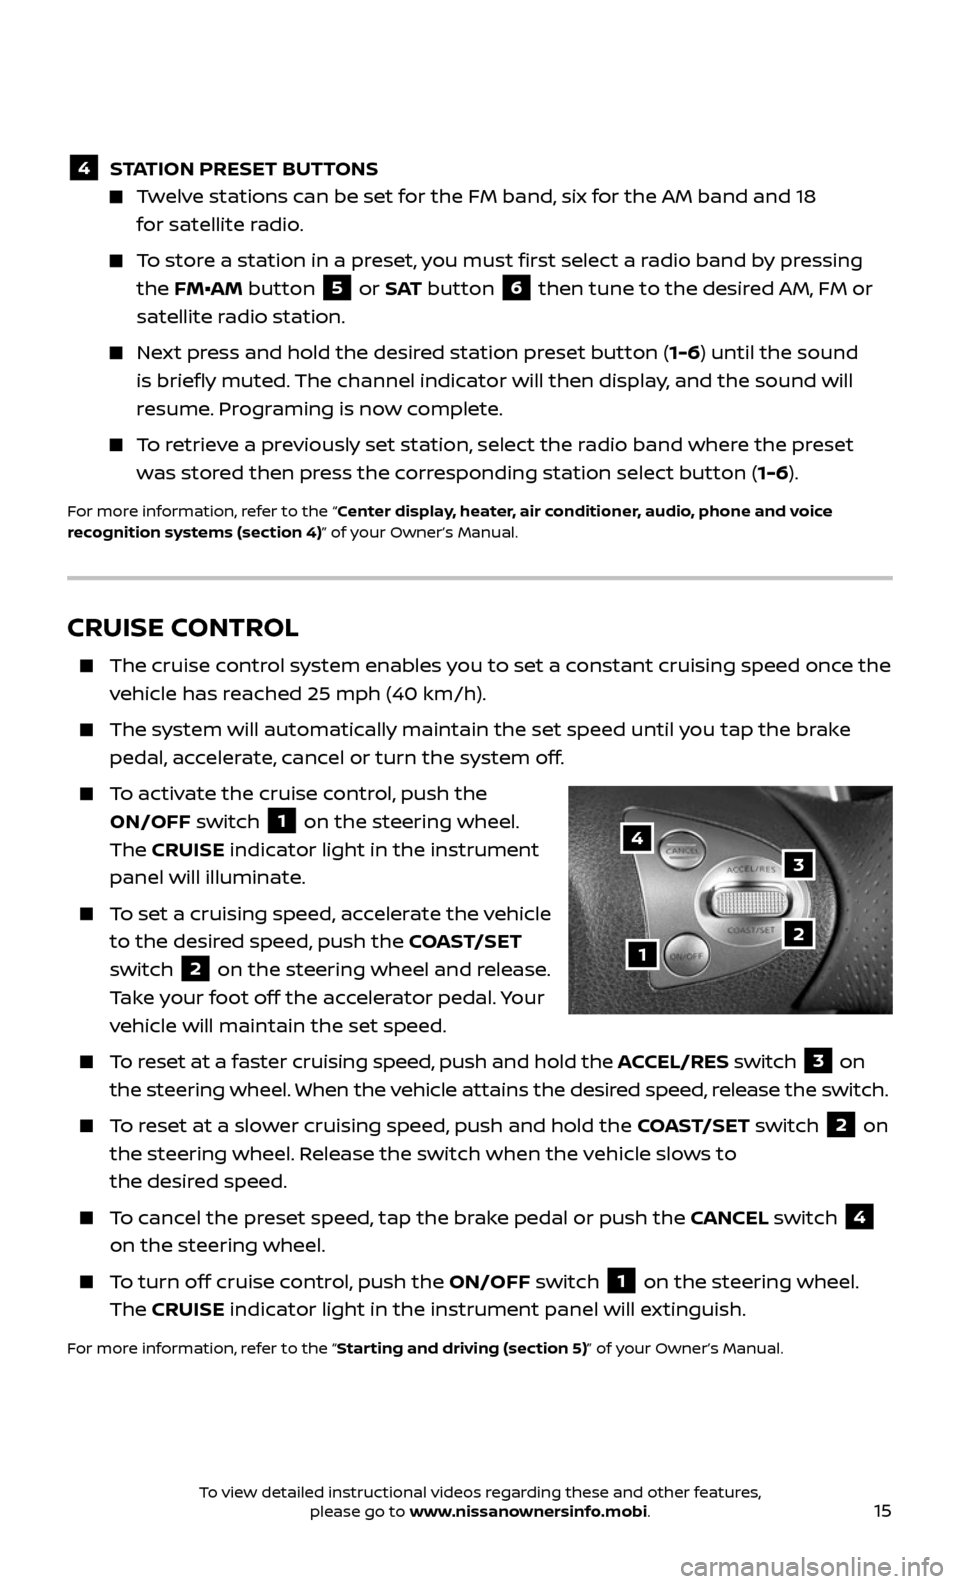
CRUISE CONTROL
The cruise control system enables you to set a constant cruising speed once the
vehicle has reached 25 mph (40 km/h).
The system wil l automatically maintain the set speed until you tap the brake
pedal, accelerate, cancel or turn the system off.
To activate the cruise control, push the
ON/OFF switch
1 on the steering wheel.
The CRUISE indicator light in the instrument
panel will illuminate.
To set a cruising speed, accelerate the vehicle
to the desired speed, push the COAST/SET
switch
2 on the steering wheel and release.
Take your foot off the accelerator pedal. Your
vehicle will maintain the set speed.
To reset at a faster cruising speed, push and hold the ACCEL/RES switch 3 on
the steering wheel. When the vehicle attains the desired speed, release the switch.
To reset at a slower cruising speed, push and hold the COAST/SET switch 2 on
the steering wheel. Release the switch when the vehicle slows to
the desired speed.
To cancel the preset speed, tap the brake pedal or push the CANCEL switch 4
on the steering wheel.
To turn off cruise control, push the ON/OFF switch 1 on the steering wheel.
The CRUISE indicator light in the instrument panel will extinguish.
For more information, refer to the “Starting and driving (section 5)” of your Owner’s Manual.
1
3
2
4
4 STATION PRESET BUTTONS
Twelve stations can be set for the FM band, six for the AM band and 18
for satellite radio.
To store a station in a preset, you must first select a radio band by pressing
the FM•AM button 5 or S AT button 6 then tune to the desired AM, FM or
satellite radio station.
Next press and hold the desired station preset button (1-6) until the sound
is briefly muted. The channel indicator will then display, and the sound will
resume. Programing is now complete.
To retrieve a previously set station, select the radio band where the preset
was stored then press the corresponding station select button ( 1-6).
For more information, refer to the “Center display, heater, air conditioner, audio, phone and voice
recognition systems (section 4)” of your Owner’s Manual.
To view detailed instructional videos regarding these and other features, please go to www.nissanownersinfo.mobi.
Page 24 of 28

22
1
23
4567
891011
1213
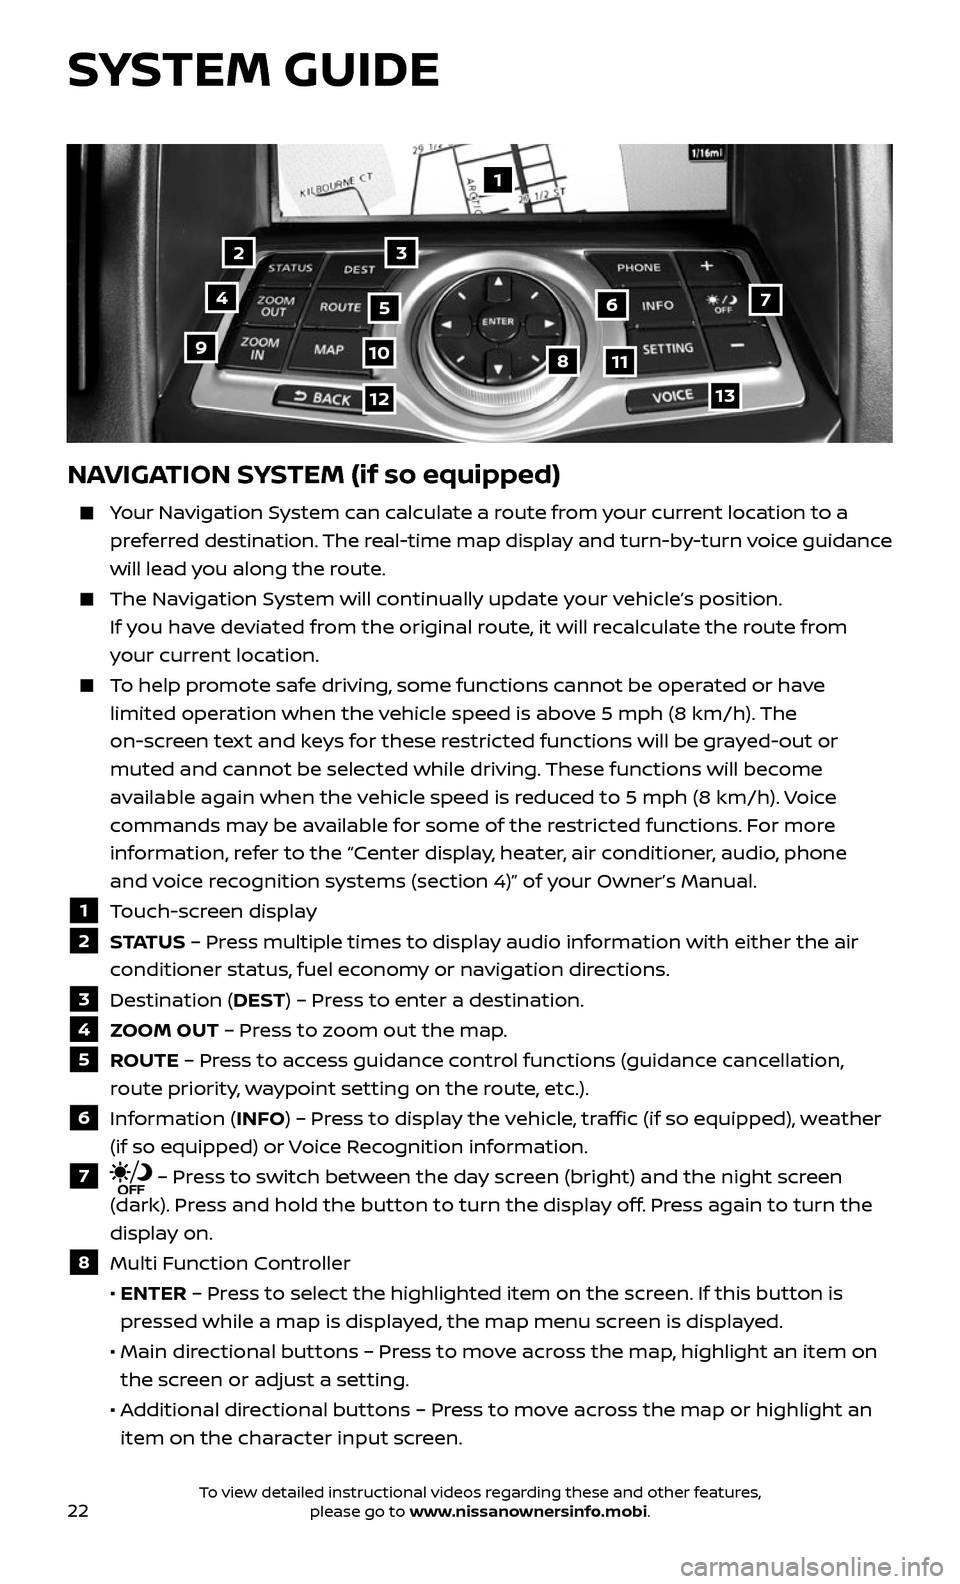
NAVIGATION SYSTEM (if so equipped)
Your Navigation System can calculate a route from your current location to a
preferred destination. The real-time map display and turn-by-turn voice guidance
will lead you along the route.
The Navigation System will continually update your vehicle’s position.
If you have deviated from the original route, it will recalculate the route from
your current location.
To help promote safe driving, some functions cannot be operated or have
limited operation when the vehicle speed is above 5 mph (8 km/h). The
on-screen text and keys for these restricted functions will be grayed-out or
muted and cannot be selected while driving. These functions will become
available again when the vehicle speed is reduced to 5 mph (8 km/h). Voice
commands may be available for some of the restricted functions. For more
information, refer to the “Center display, heater, air conditioner, audio, phone
and voice recognition systems (section 4)” of your Owner’s Manual.
1 Touch-screen display
2 S TAT U S – Press multiple times to display audio information with either the air
conditioner status, fuel economy or navigation directions.
3 Destination (DEST) – Press to enter a destination.
4 ZOOM OUT – Press to zoom out the map.
5 ROUTE – Press to access guidance control functions (guidance cancellation,
route priority, waypoint setting on the route, etc.).
6 Information (INFO) – Press to display the vehicle, traffic (if so equipped), weather
(if so equipped) or Voice Recognition information.
7 – Press to switch between the day screen (bright) and the night screen
(dark). Press and hold the button to turn the display off. Press again to turn the
display on.
8 Multi Function Controller
• ENTER – Press to select the highlighted item on the screen. If this button is
pressed while a map is displayed, the map menu screen is displayed.
• Main dir ectional buttons – Press to move across the map, highlight an item on
the screen or adjust a setting.
• Additional directional buttons – Press to move across the map or highlight an
item on the character input screen.
SYSTEM GUIDE
To view detailed instructional videos regarding these and other features, please go to www.nissanownersinfo.mobi.
Page 25 of 28

23
• Center dial – Turn the dial to highlight an item on the screen, adjust a setting or
adjust the map scale.
9 ZOOM IN – Press to zoom in the map.
10 MAP – Press to display the map. While following a programed route, press
multiple times to change the type of route information.
11 SETTING – Press to access the system settings.
12 BACK – Press to return to the previous screen. In a settings screen, this
button can also be used to apply the setting. In a character input screen, this
button can also delete the characters that have been entered.
13 VOICE – Press to hear the current voice guidance for a programed route.
For more information, refer to the “Navigation (section 2)” of your Multi Function Display Owner’s Manual.
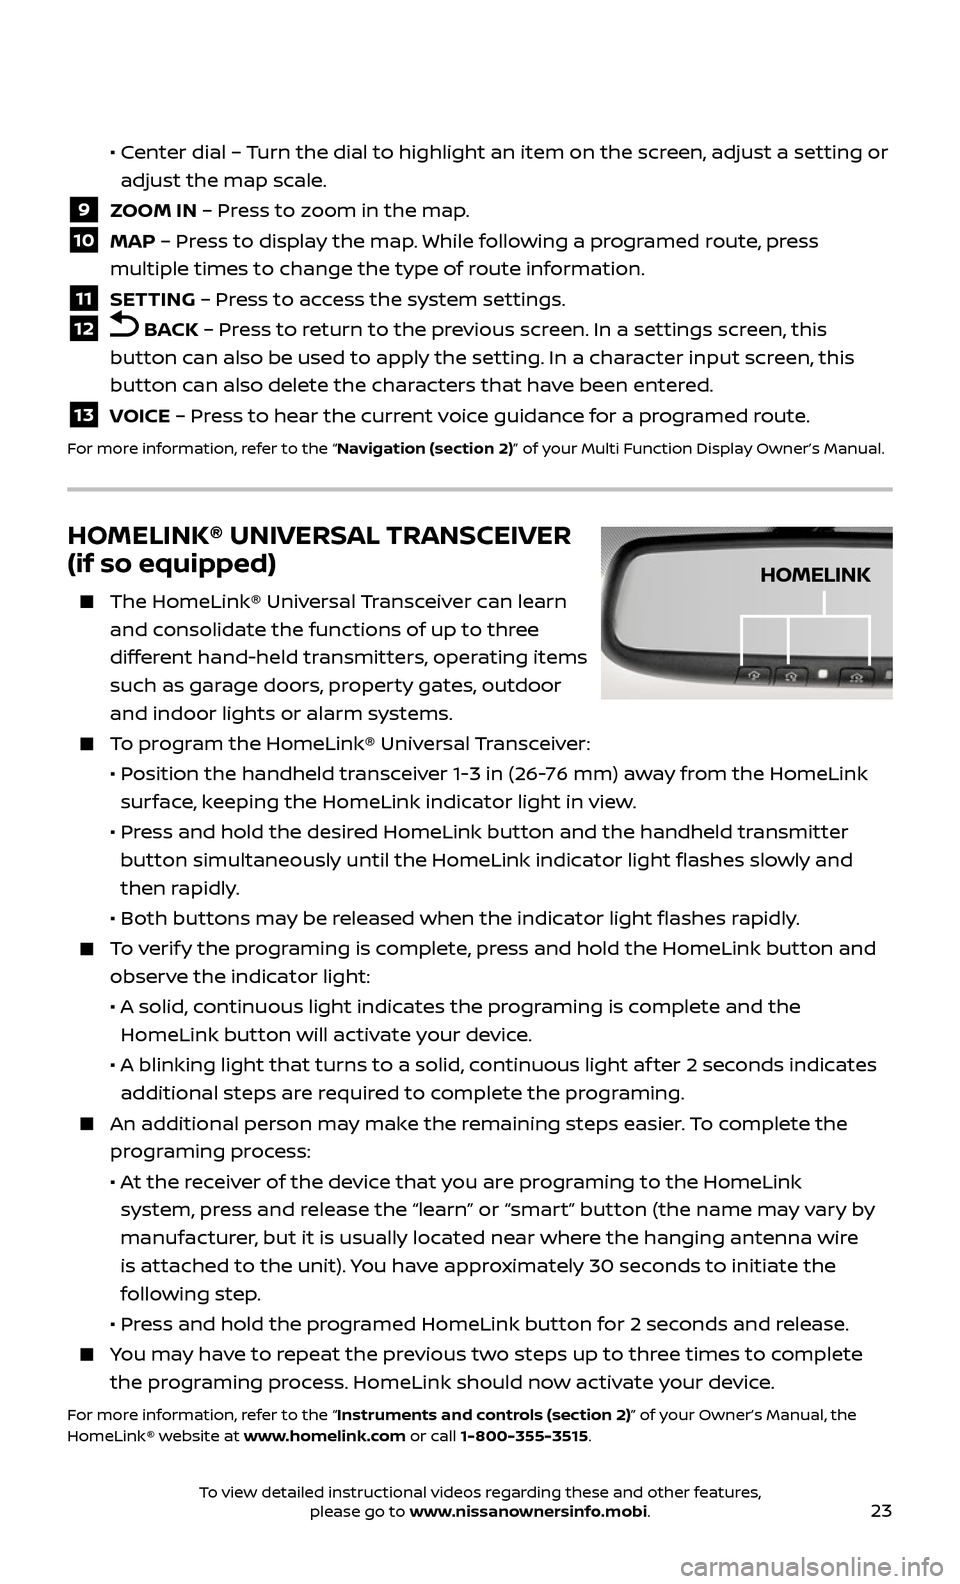
HOMELINK® UNIVERSAL TRANSCEIVER
(if so equipped)
The HomeLink® Univ ersal Transceiver can learn
and consolidate the functions of up to three
different hand-held transmitters, operating items
such as garage doors, property gates, outdoor
and indoor lights or alarm systems.
To program the HomeLink® Universal Transceiver:
• Position the handheld transceiver 1-3 in (26-76 mm) away from the HomeLink
surface, keeping the HomeLink indicator light in view.
• Press and hold the desired HomeLink button and the handheld transmitter
button simultaneously until the HomeLink indicator light flashes slowly and
then rapidly.
• Both but tons may be released when the indicator light flashes rapidly.
To verify the programing is complete, press and hold the HomeLink button and
observe the indicator light:
• A solid , continuous light indicates the programing is complete and the
HomeLink button will activate your device.
• A blinking light that turns to a solid , continuous light af ter 2 seconds indicates
additional steps are required to complete the programing.
An additional person may make the remaining steps easier. To complete the
programing process:
• At the receiver of the device that you are programing to the HomeLink
system, press and release the “learn” or “smart” button (the name may vary by
manufacturer, but it is usually located near where the hanging antenna wire
is attached to the unit). You have approximately 30 seconds to initiate the
following step.
• Press and hold the programed HomeLink button for 2 seconds and release.
You may have to repeat the previous two steps up to three times to complete
the programing process. HomeLink should now activate your device.
For more information, refer to the “Instruments and controls (section 2)” of your Owner’s Manual, the
HomeLink® website at www.homelink.com or call 1-800-355-3515.
HOMELINK
To view detailed instructional videos regarding these and other features, please go to www.nissanownersinfo.mobi.