2017 MITSUBISHI OUTLANDER SPORT mirror
[x] Cancel search: mirrorPage 227 of 399
12 V power outlets 5-164 Features and controls
5
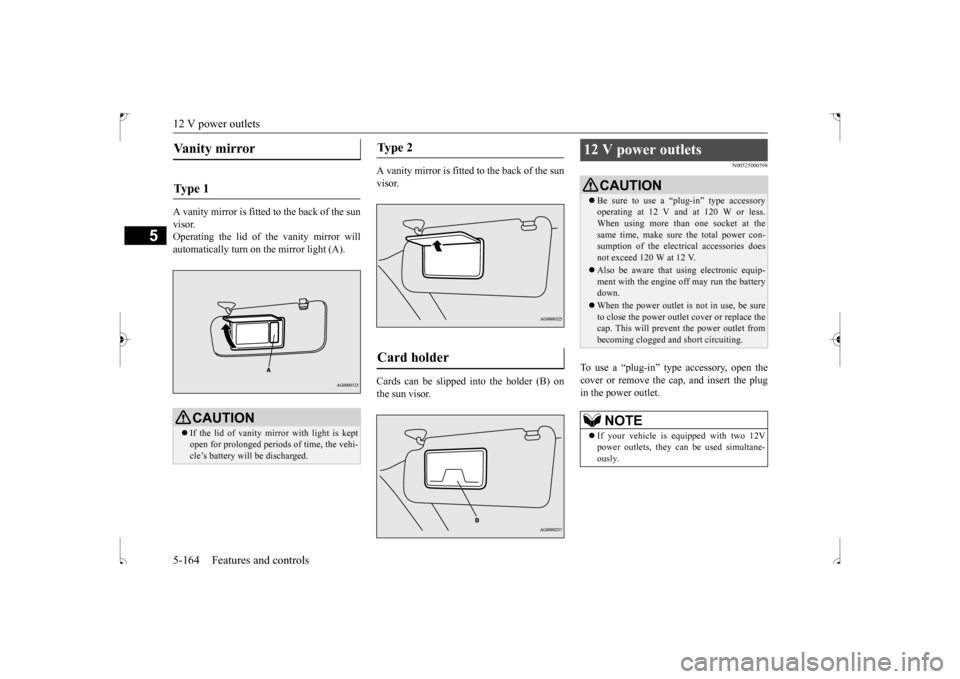
A vanity mirror is fitted to the back of the sun visor. Operating the lid of the vanity mirror willautomatically turn on the mirror light (A).
A vanity mirror is fitted to the back of the sun visor. Cards can be slipped into the holder (B) on the sun visor.
N00525000598
To use a “plug-in” type accessory, open thecover or remove the cap, and insert the plug in the power outlet.
Vanity mirror Ty p e 1
CAUTION If the lid of vanity mirror with light is kept open for prolonged periods of time, the vehi-cle’s battery will be discharged.
Ty p e 2 Card holder
12 V power outlets
CAUTION Be sure to use a “plug-in” type accessory operating at 12 V and at 120 W or less. When using more than one socket at the same time, make sure the total power con-sumption of the electrical accessories does not exceed 120 W at 12 V. Also be aware that using electronic equip- ment with the engine off may run the battery down. When the power outlet is not in use, be sure to close the power outlet cover or replace thecap. This will prevent the power outlet from becoming clogged and short circuiting.NOTE
If your vehicle is equipped with two 12V power outlets, they can be used simultane- ously.
BK0239500US.book
164 ページ 2016年5月13日 金曜日 午前8時53分
Page 363 of 399
Fuses 9-26 Vehicle care and maintenance
9
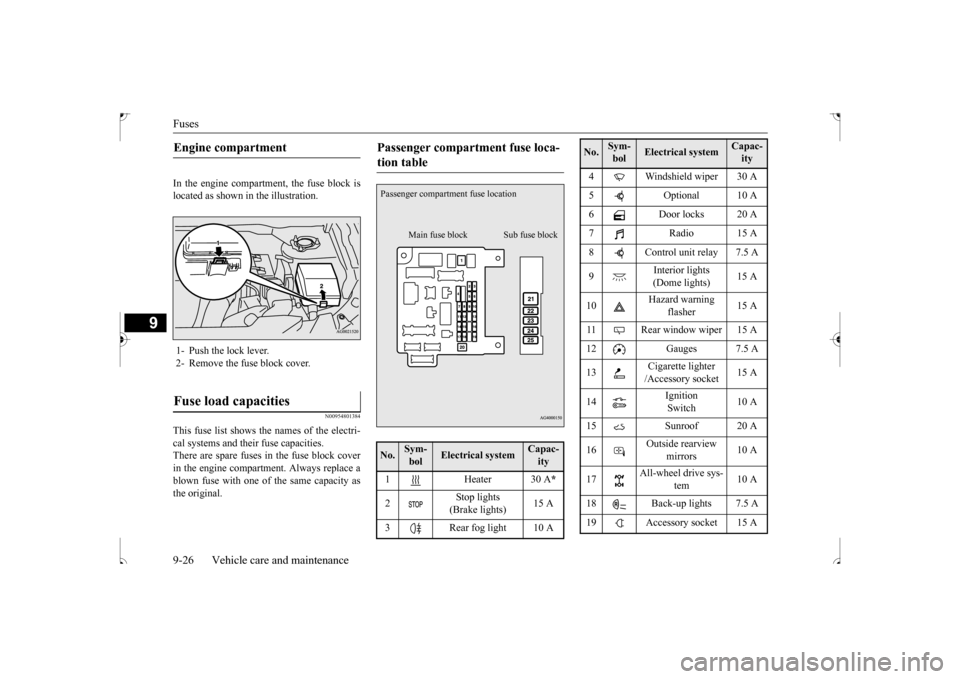
In the engine compartment, the fuse block is located as shown in the illustration.
N00954801384
This fuse list shows the names of the electri-cal systems and their fuse capacities. There are spare fuses in the fuse block cover in the engine compartment. Always replace ablown fuse with one of the same capacity as the original.Engine compartment 1- Push the lock lever. 2- Remove the fuse block cover.Fuse load capacities
Passenger compartment fuse loca- tion table No.
Sym- bol
Electrical system
Capac-ity
1 Heater 30 A
*
2
Stop lights (Brake lights)
15 A
3 Rear fog light 10 APassenger compartment fuse location
Main fuse block Sub fuse block
4 Windshield wiper 30 A 5 Optional 10 A 6 Door locks 20 A 7 Radio 15 A8 Control unit relay 7.5 A 9
Interior lights (Dome lights)
15 A
10
Hazard warning
flasher
15 A
11 Rear window wiper 15 A 12 Gauges 7.5 A 13
Cigarette lighter /Accessory socket
15 A
14
Ignition Switch
10 A
15 Sunroof 20 A16
Outside rearview
mirrors
10 A
17
All-wheel drive sys-
tem
10 A
18 Back-up lights 7.5 A 19 Accessory socket 15 ANo.
Sym- bol
Electrical system
Capac-ity
BK0239500US.bo
ok 26 ページ 2016年5月13日 金曜日 午前8時53分
Page 364 of 399
Fuses
Vehicle care and maintenance 9-27
9
* : Fusible link Some fuses may not be installed on your vehicle, depending on the vehicle model or specifications. The table above shows the main equip- ment corresponding to each fuse. 20
Power window con-
trol
30 A
*
21 Defogger 30 A
*
22 Heated door mirror 7.5 A 23
Passenger’s power
seat
25 (20) A
24 Driver’s power seat
25 (20) A
25 Heated seats 30 ANo.
Sym- bol
Electrical system
Capac-ity
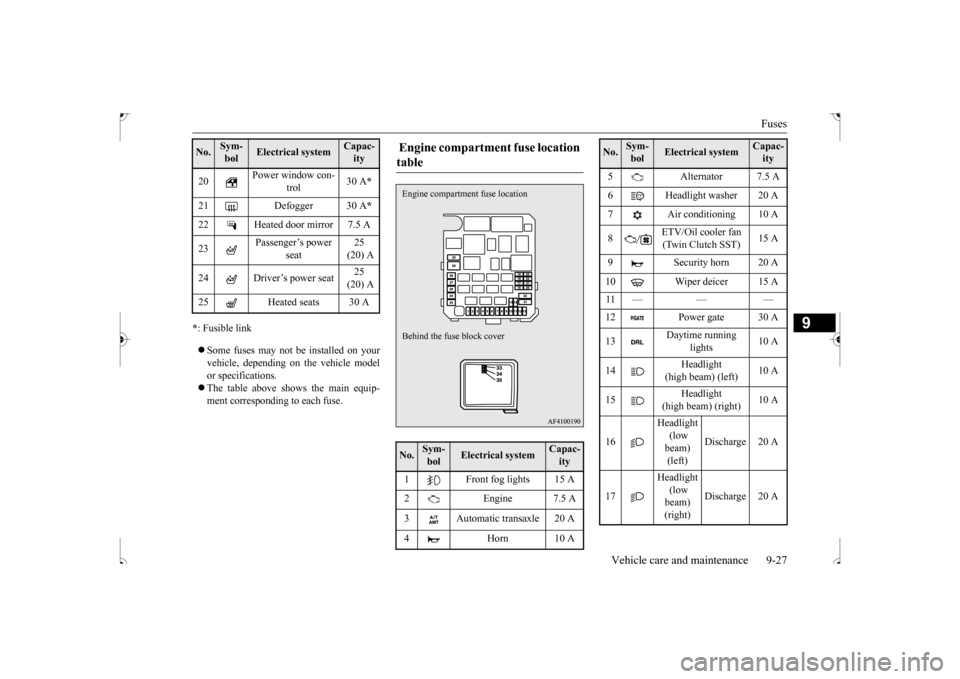
Engine compartment fuse location table No.
Sym- bol
Electrical system
Capac-ity
1 Front fog lights 15 A 2 Engine 7.5 A 3 Automatic transaxle 20 A 4 Horn 10 AEngine compartment
fuse location
Behind the fuse block cover
5 Alternator 7.5 A 6 Headlight washer 20 A 7 Air conditioning 10 A 8
ETV/Oil cooler fan (Twin Clutch SST)
15 A
9 Security horn 20 A 10 Wiper deicer 15 A 11 — — — 12 Power gate 30 A 13
Daytime running
lights
10 A
14
Headlight
(high beam) (left)
10 A
15
Headlight
(high beam) (right)
10 A
16
Headlight (low beam) (left)
Discharge 20 A
17
Headlight (low beam) (right)
Discharge 20 A
No.
Sym- bol
Electrical system
Capac-ity
BK0239500US.bo
ok 27 ページ 2016年5月13日 金曜日 午前8時53分
Page 367 of 399
Replacement of light bulbs 9-30 Vehicle care and maintenance
9
N00943000132
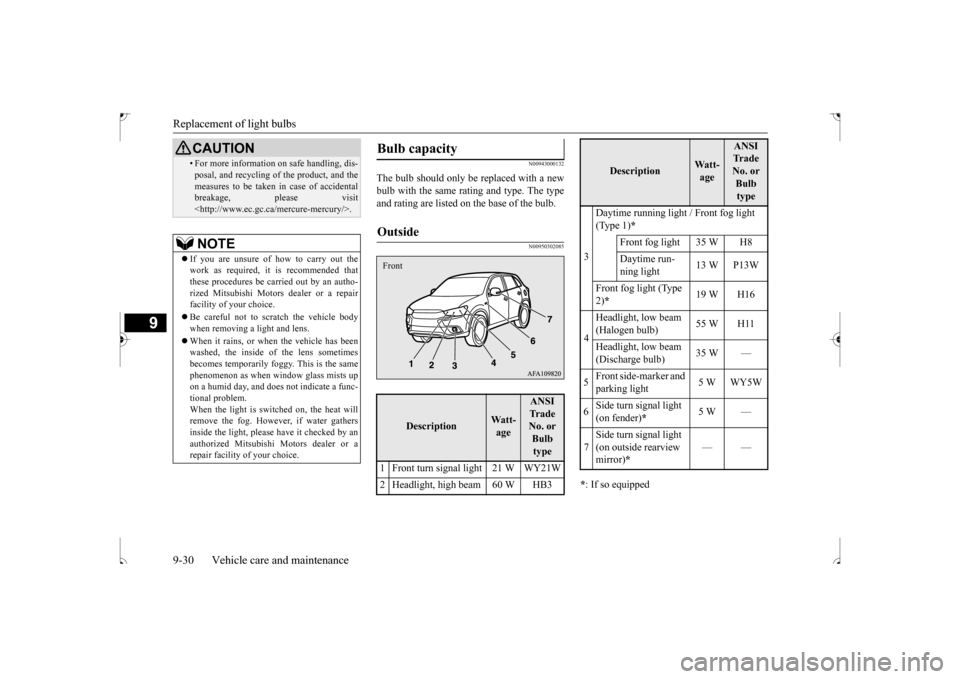
The bulb should only be replaced with a new bulb with the same ra
ting and type. The type
and rating are listed on the base of the bulb.
N00950302085
* : If so equipped
• For more information on safe handling, dis- posal, and recycling of the product, and the measures to be taken in case of accidental breakage, please visit
If you are unsure of how to carry out the work as required, it is recommended that these procedures be carried out by an autho- rized Mitsubishi Motors dealer or a repairfacility of your choice. Be careful not to scratch the vehicle body when removing a light and lens. When it rains, or when the vehicle has been washed, the inside of the lens sometimes becomes temporarily foggy. This is the same phenomenon as when window glass mists upon a humid day, and does not indicate a func- tional problem. When the light is switched on, the heat willremove the fog. However, if water gathers inside the light, please have it checked by an authorized Mitsubishi Motors dealer or a repair facility of your choice.CAUTION
Bulb capacity Outside
Description
Watt- age
ANSI Tr a d e No. or Bulb type
1 Front turn signal light 21 W WY21W2 Headlight, high beam 60 W HB3Front
3
Daytime running light / Front fog light (Type 1)
* Front fog light 35 W H8Daytime run- ning light
13 W P13W
Front fog light (Type 2) *
19 W H16
4
Headlight, low beam (Halogen bulb)
55 W H11
Headlight, low beam (Discharge bulb)
35 W —
5
Front side-marker and parking light
5W WY5W
6
Side turn signal light (on fender)
*
5W —
7
Side turn signal light (on outside rearview mirror)
*
——
Description
Watt- age
ANSI Tr a d e No. or Bulb type
BK0239500US.bo
ok 30 ページ 2016年5月13日 金曜日 午前8時53分
Page 368 of 399
Replacement of light bulbs
Vehicle care and maintenance 9-31
9
WA R N I N G Check with an authorized Mitsubishi Motors dealer or a repair facility of your choice when it is necessary to repair a high intensity discharge headlight or to replace the bulb.The power circuit, bulb and electrodes generate high voltages that may cause a severe shock.NOTE
It is not possible to re
pair or replace only the
bulb for the side turn signal light. Check with an authorized Mitsubishi Motorsdealer or a repair
facility of your choice
when the light needs to be repaired or replaced. The side turn signal light (on outside rear- view mirror) use an LED instead of the bulb. Check with an authorized Mitsubishi Motors dealer or repair facility of your choice when either light needs to be repaired or replaced.
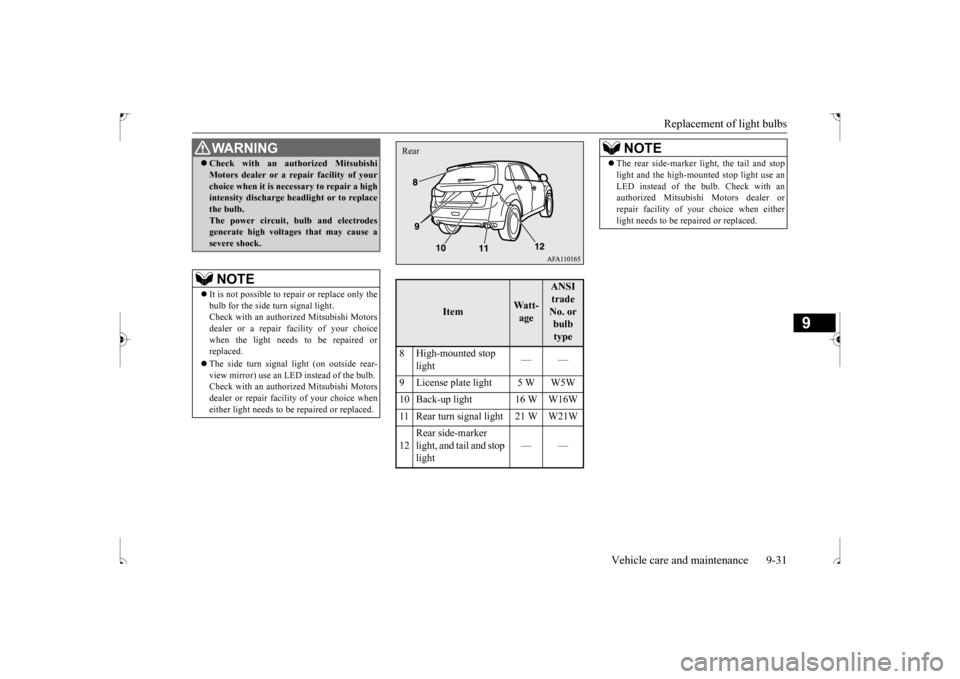
Item
Wa t t - age
ANSI trade No. or bulb type
8 High-mounted stop
light
——
9 License plate light 5 W W5W 10 Back-up light 16 W W16W11 Rear turn signal light 21 W W21W 12
Rear side-marker light, and tail and stop light
——
Rear
NOTE
The rear side-marker light, the tail and stop light and the high-mounted stop light use an LED instead of the bulb. Check with an authorized Mitsubishi Motors dealer or repair facility of your
choice when either
light needs to be repaired or replaced.
BK0239500US.bo
ok 31 ページ 2016年5月13日 金曜日 午前8時53分
Page 369 of 399
Replacement of light bulbs 9-32 Vehicle care and maintenance
9
N00950401744
* : If so equipped
N00901801144
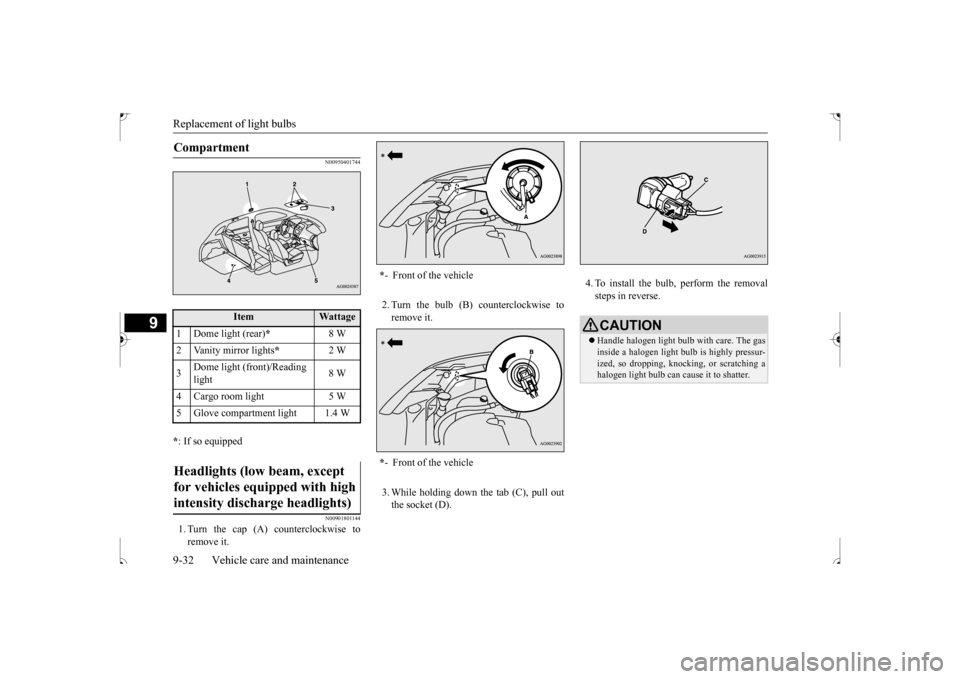
1. Turn the cap (A) counterclockwise to remove it.
2. Turn the bulb (B) counterclockwise to remove it. 3. While holding down the tab (C), pull out the socket (D).
4. To install the bulb, perform the removal steps in reverse.
Compartment
Item
Wattage
1 Dome light (rear)
*
8 W
2 Vanity mirror lights
*
2 W
3
Dome light (front)/Reading light
8 W
4 Cargo room light 5 W 5 Glove compartment light 1.4 WHeadlights (low beam, except for vehicles equipped with high intensity discharge headlights)
* - Front of the vehicle * - Front of the vehicle
CAUTIONHandle halogen light bulb with care. The gas inside a halogen light bulb is highly pressur- ized, so dropping, knocking, or scratching a halogen light bulb can cause it to shatter.
BK0239500US.bo
ok 32 ページ 2016年5月13日 金曜日 午前8時53分
Page 372 of 399
Replacement of light bulbs
Vehicle care and maintenance 9-35
9
N00943401452
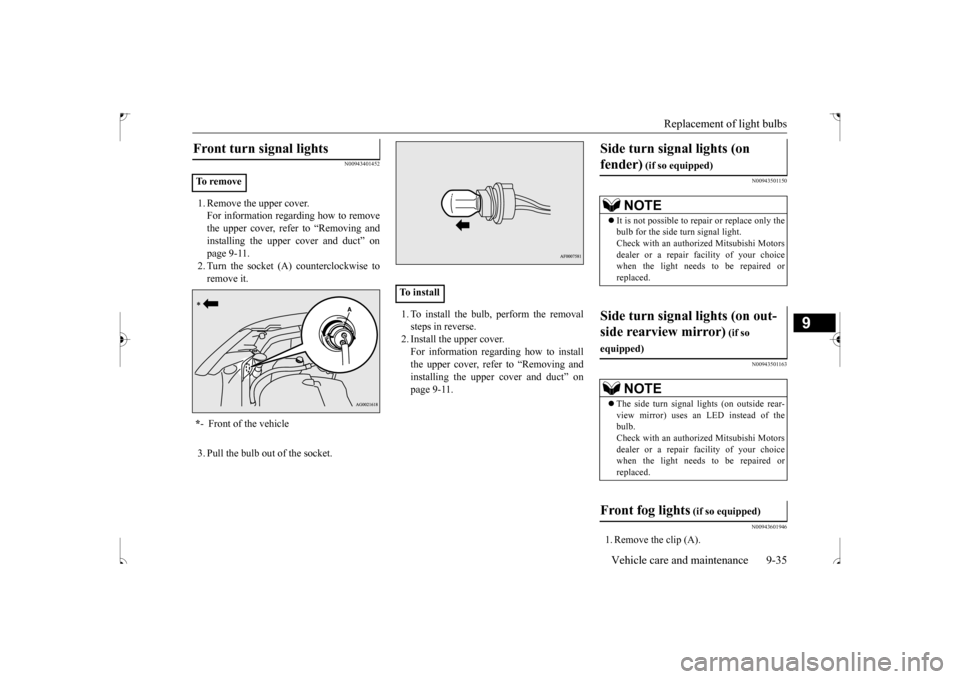
1. Remove the upper cover. For information regarding how to remove the upper cover, refer to “Removing andinstalling the upper cover and duct” on page 9-11. 2. Turn the socket (A) counterclockwise toremove it. 3. Pull the bulb out of the socket.
1. To install the bulb, perform the removal steps in reverse.2. Install the upper cover. For information regarding how to install the upper cover, refer to “Removing andinstalling the upper cover and duct” onpage 9-11.
N00943501150 N00943501163 N00943601946
1. Remove the clip (A).
Front turn signal lights To r e m o v e * - Front of the vehicle
To install
Side turn signal lights (on fender)
(if so equipped)
NOTE
It is not possible to re
pair or replace only the
bulb for the side turn signal light. Check with an authorized Mitsubishi Motorsdealer or a repair facility of your choice when the light needs to be repaired or replaced.
Side turn signal lights (on out- side rearview mirror)
(if so
equipped)
NOTE
The side turn signal lights (on outside rear- view mirror) uses an LED instead of the bulb.Check with an authorized Mitsubishi Motors dealer or a repair facility of your choice when the light needs to be repaired or replaced.
Front fog lights
(if so equipped)
BK0239500US.bo
ok 35 ページ 2016年5月13日 金曜日 午前8時53分
Page 379 of 399
Cleaning the outside of your vehicle 9-42 Vehicle care and maintenance
9
N00945800033
Industrial pollution, road tar, bird droppings, tree sap, insect remains, sea water and otherforeign matters can damage the finish on your vehicle. Generally, the longer any foreign materialstays on the finish, the worse the damage. Wash your vehicle as soon as possible when- ever the finish gets soiled.
N00945901682
Chemicals contained in the dirt and dust picked up from air, rain, snow, or road sur- faces can damage the paint and body of yourvehicle if left on. Frequent washing and waxing is the best way to protect your vehicle from this damage.Do not wash the vehicle in direct sunlight. Park the vehicle in the shade and spray it with water to remove dust. Next, using plenty ofclean water and a car washing mitt or sponge, wash the vehicle from top to bottom. Use a mild car washing soap if necessary.Rinse thoroughly and wipe dry with a cham- ois or soft cloth. After washing the vehicle, carefully clean the joints and flanges of thedoors, hood, etc., where dirt is likely to remain.
Salt and other chemicals spread on winter roads in some geographical areas can have adetrimental effect on the vehicle underbody. You should flush the underbody with a high pressure hose every time you wash the out-side of your vehicle. Take special care to remove mud or other debris which could trap and hold salt andmoisture. After washing your vehicle, wipe off all waterdrops from the rubber parts around thedoors to prevent the doors from freezing.
Foreign material Wa s h i n g
CAUTION When washing the underside of your vehicle or the wheels, wear a pair of gloves to pro- tect your hands. If your vehicle has rain sensor wipers, place the wiper switch lever in the “OFF” position to deactivate the rain sensor before washing the vehicle. Otherwise, the wipers will oper-ate in the presence of water spray on the windshield and may get damaged as a result. Never spray or splash water on the electrical parts in the engine compartment. This may damage them. Be careful also when washingthe underbody to ensure that water does not enter the engine compartment. Avoid automatic car washers that use rotat- ing brushes. These brushes may scratch the paint surface and make it dull.Scratches are more noticeable on darker col- ored vehicles. Some hot water washing equipment uses high pressure and heat to clean your vehicle. Because hot water can damage plastics partsand seep inside your vehicle, make sure you do the following when using such equip- ment:• Keep the washing nozzle at least 28 inches(70 cm) away from the vehicle body.• When washing around the door glass, holdthe nozzle at a distance of more than 28 inches (70 cm) and at a right angle to the glass surface.
Make sure to do the following when using an automatic car wash, with help from either this manual or the car wash operator, to avoid damaging your vehicle:• Fold the outside rearview mirrors.• Tape the wiper arm assembly.• If your vehicle is equipped with a rear spoiler or roof rails, check with the carwash operator before using the car wash.• If your vehicle is equipped with the rainsensor wipers, place the wiper switch lever in the “OFF” position to deactivate the rain sensor.
During cold weather
CAUTION
BK0239500US.bo
ok 42 ページ 2016年5月13日 金曜日 午前8時53分