2017 MITSUBISHI OUTLANDER SPORT change wheel
[x] Cancel search: change wheelPage 148 of 399
Multi-information display
Features and controls 5-85
5
N00555000265
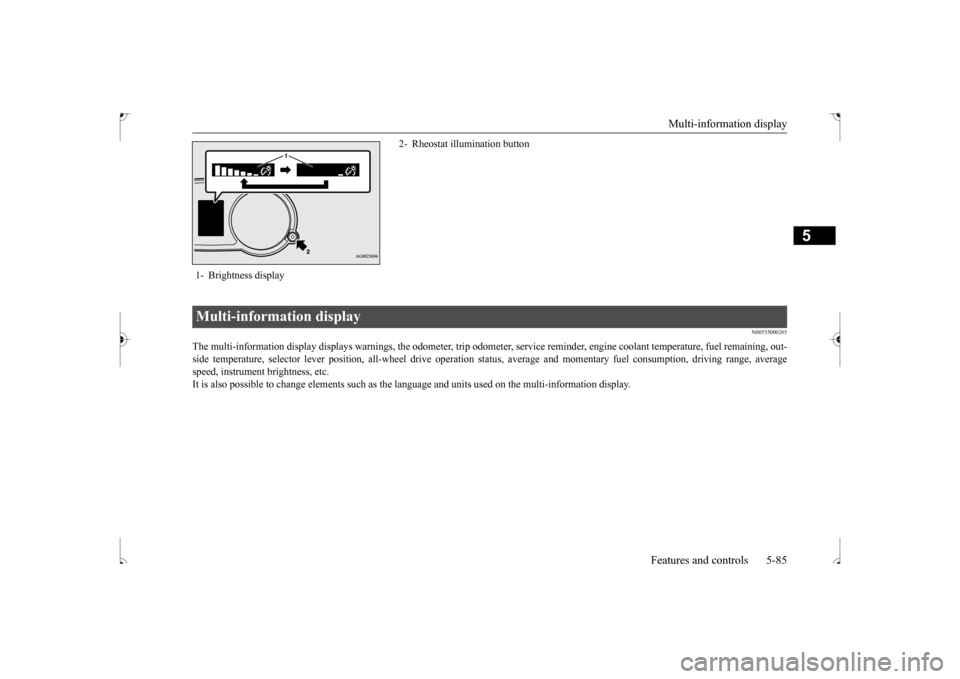
The multi-information display displays warnings, the odometer, tr
ip odometer, service reminder, engine coolant temperature, fue
l remaining, out-
side temperature, selector lever position, all-wheel drive opera
tion status, average and momentar
y fuel consumption, driving ra
nge, average
speed, instrument brightness, etc.It is also possible to change elements such as the
language and units used on the multi-information display.
1- Brightness display
2- Rheostat illumination button
Multi-information display
BK0239500US.bo
ok 85 ページ 2016年5月13日 金曜日 午前8時53分
Page 192 of 399
Headlight leveling switch (if so equipped)
Features and controls 5-129
5
N00537100105
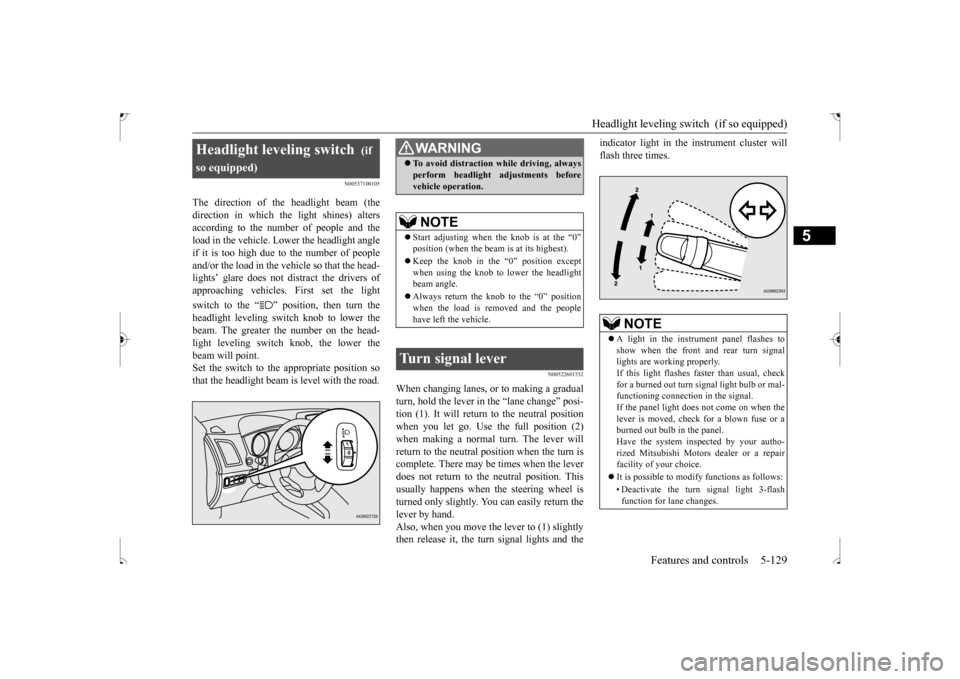
The direction of the headlight beam (the direction in which the light shines) alters according to the number of people and the load in the vehicle. Lower the headlight angleif it is too high due to the number of people and/or the load in the vehicle so that the head- lights’ glare does not distract the drivers ofapproaching vehicles. First set the light switch to the “ ” position, then turn the headlight leveling switch knob to lower the beam. The greater the number on the head- light leveling switch knob, the lower thebeam will point. Set the switch to the appropriate position so that the headlight beam is level with the road.
N00522601532
When changing lanes, or to making a gradual turn, hold the lever in
the “lane change” posi-
tion (1). It will return to the neutral positionwhen you let go. Use the full position (2) when making a normal turn. The lever will return to the neutral position when the turn iscomplete. There may be times when the lever does not return to the neutral position. This usually happens when the steering wheel isturned only slightly. You can easily return the lever by hand. Also, when you move the lever to (1) slightlythen release it, the turn signal lights and the
indicator light in the instrument cluster will flash three times.
Headlight leveling switch
(if
so equipped)
WA R N I N G To avoid distraction while driving, always perform headlight adjustments before vehicle operation.NOTE
Start adjusting when
the knob is at the “0”
position (when the beam is at its highest). Keep the knob in the “0” position except when using the knob to lower the headlightbeam angle. Always return the knob to the “0” position when the load is removed and the people have left the vehicle.
Turn signal lever
NOTE
A light in the instrument panel flashes to show when the front and rear turn signal lights are working properly. If this light flashes faster than usual, checkfor a burned out turn signal light bulb or mal- functioning connection in the signal. If the panel light does not come on when thelever is moved, check for a blown fuse or a burned out bulb in the panel. Have the system inspected by your autho-rized Mitsubishi Motors dealer or a repair facility of your choice. It is possible to modify functions as follows: • Deactivate the turn signal light 3-flash function for lane changes.
BK0239500US.book
129 ページ 2016年5月13日 金曜日 午前8時53分
Page 215 of 399

Bluetooth® 2.0 interface (if so equipped) 5-152 Features and controls
5
5. If only 1 telephone number is registered under the name you just said, the voice guide will proceed to Step 6. If 2 or more telephone numbers are regis-tered that match the name you just said, the voice guide will say “Would you like to call
6. The voice guide will say “Calling
You can redial the last number called, based on the history of dialed calls in the paired cel- lular phone.Use the following procedure to redial. 1. Press the SPEECH button (except for vehicles with Mitsubishi Multi-Commu- nication System) or PICK-UP button (forvehicles with Mitsubishi Multi-Commu- nication System). 2. Say “Redial.”
N00565700018
During a call, press the SPEECH button toenter voice recognition mode, then say
“
N00565801058
If an incoming phone call is received whilethe ignition switch is in the “ACC” or “ON”position, the audio system will be automati- cally turned on and switched to the incoming call, even when the audio system was origi-nally off. The voice guide announcement for the incoming call will be emitted from the frontpassenger’s seat speaker. If the CD player or radio was playing when the incoming call was received, the audio sys-tem will mute the sound from the CD player or radio and emit only the incoming call. To receive the call, press the PICK-UP buttonon the steering wheel control switch. When the call is over,
the audio system will
return to its previous state.
NOTE
If the name you selected has matching data in the vehicle phonebook but no telephone number is registered under the selected loca-tion, the voice guide will say “{home/work/mobile/other} not found for
NOTE
When the confirmation function is on, the system will check if the name and location of the receiver are correct. If the name is cor-rect, answer “Yes.” To change the name or location to call, answer “No.” The system will return to Step3.
RedialingSend function
Receiving calls
BK0239500US.book
152 ページ 2016年5月13日 金曜日 午前8時53分
Page 327 of 399
How to change a tire 8-6 For emergencies
8
N00836901832
Before changing a tire, first stop your vehicle in a safe, flat location. 1. Park the vehicle on level and stable ground. 2. Set the parking brake firmly.3. On vehicles equipped with manual trans- axle, stop the engine and move the gear- shift lever to the “R” (Reverse) position.On vehicles equipped with continuously variable transmission (CVT), move the selector lever to the “P” (PARK) position,and stop the engine. 4. Turn on the hazard flashers and set up a warning triangle, flashing signal light,etc., at an adequate distance from the vehicle, and have all your passengers leave the vehicle.
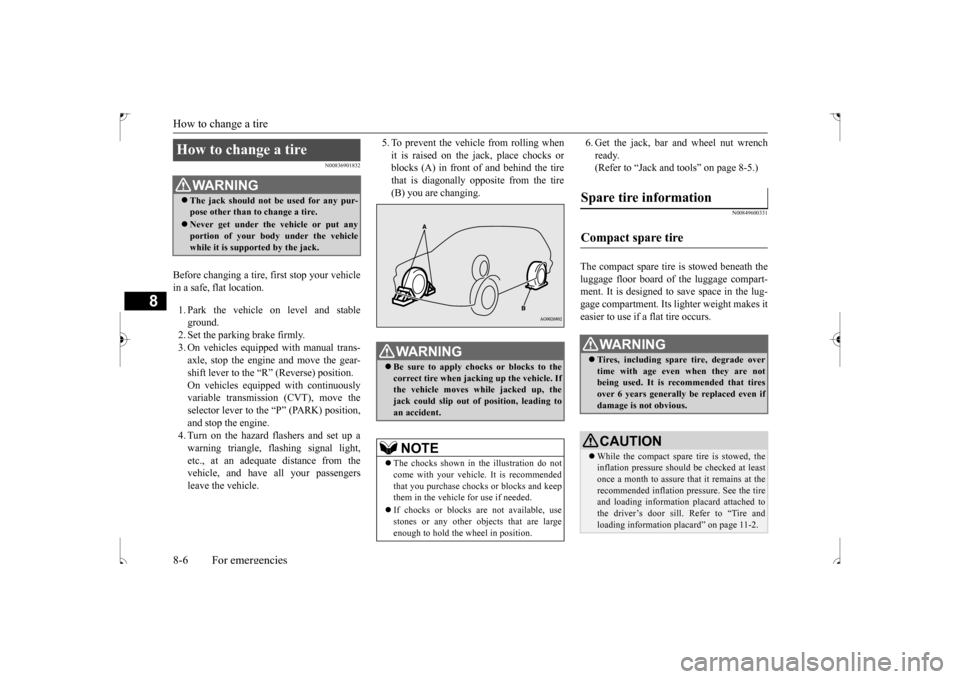
5. To prevent the vehicle from rolling when it is raised on the jack, place chocks or blocks (A) in front of and behind the tire that is diagonally opposite from the tire(B) you are changing.
6. Get the jack, bar and wheel nut wrench ready. (Refer to “Jack and tools” on page 8-5.)
N00849600331
The compact spare tire is stowed beneath the luggage floor board of the luggage compart- ment. It is designed to save space in the lug- gage compartment. Its lighter weight makes iteasier to use if a flat tire occurs.
How to change a tire
WA R N I N G The jack should not be used for any pur- pose other than to change a tire. Never get under the vehicle or put any portion of your body under the vehicle while it is supported by the jack.
WA R N I N G Be sure to apply chocks or blocks to the correct tire when jacking up the vehicle. Ifthe vehicle moves while jacked up, the jack could slip out of position, leading to an accident.NOTE
The chocks shown in the illustration do not come with your vehicle. It is recommended that you purchase chocks or blocks and keepthem in the vehicle for use if needed. If chocks or blocks are not available, use stones or any other objects that are large enough to hold the wheel in position.
Spare tire information Compact spare tire
WA R N I N G Tires, including spare tire, degrade over time with age even when they are not being used. It is recommended that tires over 6 years generally be replaced even ifdamage is not obvious.CAUTION While the compact spare tire is stowed, the inflation pressure should be checked at least once a month to assure that it remains at the recommended inflation pressure. See the tireand loading information placard attached to the driver’s door sill. Refer to “Tire and loading information placard” on page 11-2.
BK0239500US.bo
ok 6 ページ 2016年5月13日 金曜日 午前8時53分
Page 328 of 399
How to change a tire
For emergencies 8-7
8
N00849701355
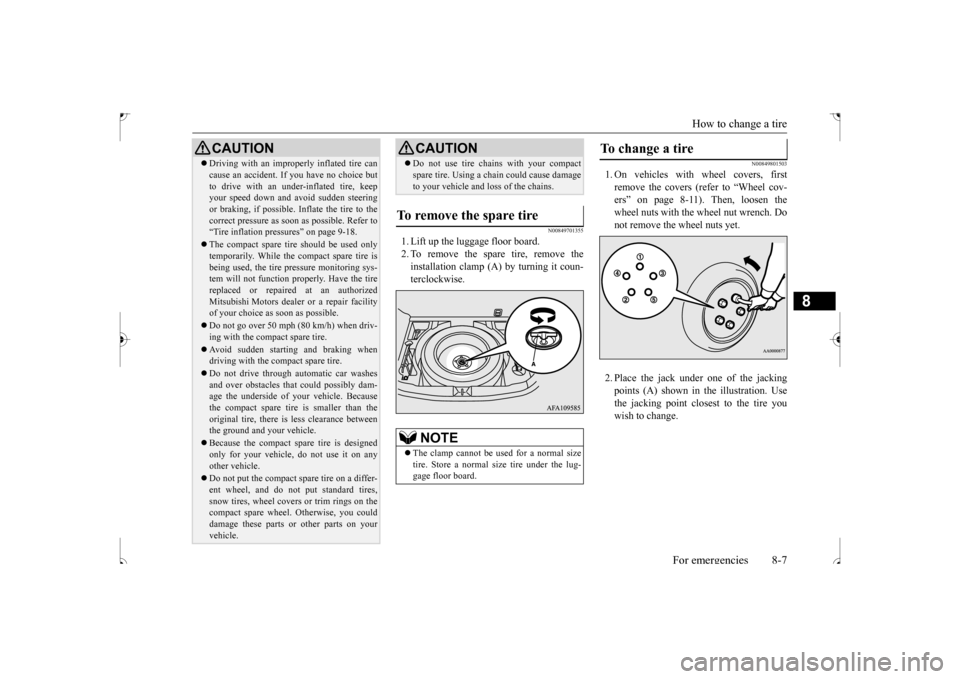
1. Lift up the luggage floor board. 2. To remove the spare tire, remove theinstallation clamp (A) by turning it coun-terclockwise.
N00849801503
1. On vehicles with wheel covers, firstremove the covers (refer to “Wheel cov-ers” on page 8-11). Then, loosen the wheel nuts with the wheel nut wrench. Do not remove the wheel nuts yet. 2. Place the jack under
one of the jacking
points (A) shown in the illustration. Use the jacking point closest to the tire youwish to change.
Driving with an improperly inflated tire can cause an accident. If you have no choice but to drive with an under-inflated tire, keep your speed down and avoid sudden steering or braking, if possible
. Inflate the tire to the
correct pressure as soon as possible. Refer to “Tire inflation pressures” on page 9-18. The compact spare tire should be used only temporarily. While the compact spare tire is being used, the tire pressure monitoring sys-tem will not function properly. Have the tire replaced or repaired at an authorized Mitsubishi Motors dealer or a repair facilityof your choice as soon as possible. Do not go over 50 mph (80 km/h) when driv- ing with the compact spare tire. Avoid sudden starting and braking when driving with the compact spare tire. Do not drive through automatic car washes and over obstacles that could possibly dam- age the underside of your vehicle. Because the compact spare tire is smaller than theoriginal tire, there is less clearance between the ground and your vehicle. Because the compact spare tire is designed only for your vehicle, do not use it on any other vehicle. Do not put the compact spare tire on a differ- ent wheel, and do not put standard tires, snow tires, wheel covers or trim rings on the compact spare wheel. Otherwise, you coulddamage these parts or other parts on your vehicle.CAUTION
Do not use tire chains with your compact spare tire. Using a chain could cause damage to your vehicle and loss of the chains.
To remove the spare tire
NOTE
The clamp cannot be us
ed for a normal size
tire. Store a normal size tire under the lug- gage floor board.CAUTION
To change a tire
BK0239500US.bo
ok 7 ページ 2016年5月13日 金曜日 午前8時53分
Page 329 of 399
How to change a tire 8-8 For emergencies
8
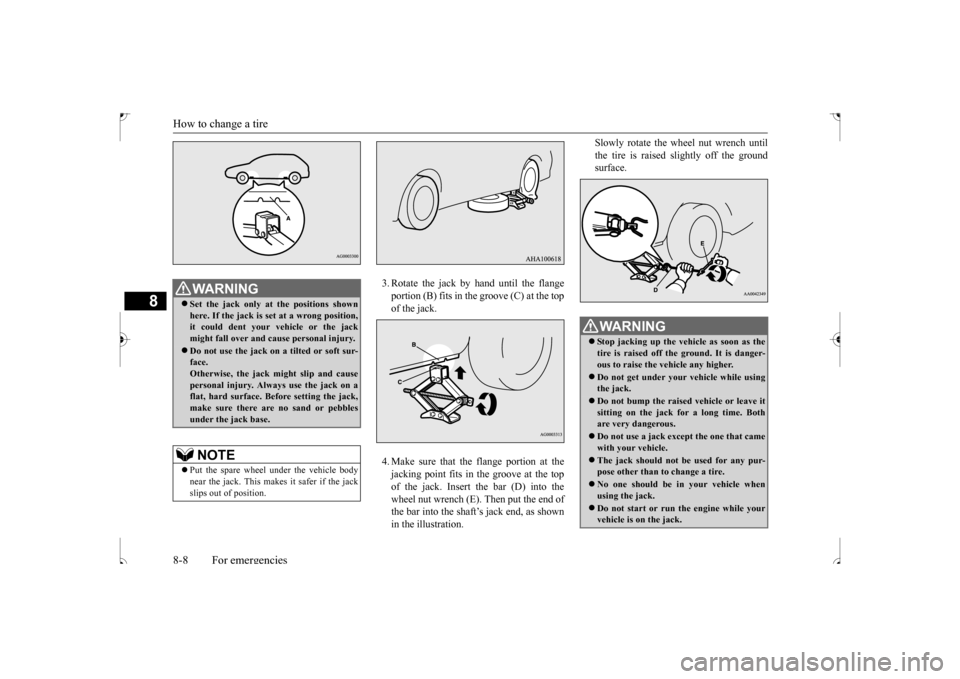
3. Rotate the jack by hand until the flange portion (B) fits in the groove (C) at the top of the jack. 4. Make sure that the flange portion at the jacking point fits in the groove at the topof the jack. Insert the bar (D) into thewheel nut wrench (E). Then put the end of the bar into the shaft’s jack end, as shown in the illustration.
Slowly rotate the wheel nut wrench until the tire is raised slightly off the ground surface.
WA R N I N G Set the jack only at the positions shown here. If the jack is set at a wrong position, it could dent your vehicle or the jackmight fall over and cause personal injury. Do not use the jack on a tilted or soft sur- face. Otherwise, the jack might slip and cause personal injury. Always use the jack on aflat, hard surface. Before setting the jack, make sure there are no sand or pebbles under the jack base.NOTE
Put the spare wheel under the vehicle body near the jack. This makes it safer if the jack slips out of position.
WA R N I N G Stop jacking up the vehicle as soon as the tire is raised off the ground. It is danger- ous to raise the vehicle any higher. Do not get under your vehicle while using the jack. Do not bump the raised vehicle or leave it sitting on the jack for a long time. Bothare very dangerous. Do not use a jack except the one that came with your vehicle. The jack should not be used for any pur- pose other than to change a tire. No one should be in your vehicle when using the jack. Do not start or run the engine while your vehicle is on the jack.
BK0239500US.bo
ok 8 ページ 2016年5月13日 金曜日 午前8時53分
Page 330 of 399
How to change a tire
For emergencies 8-9
8
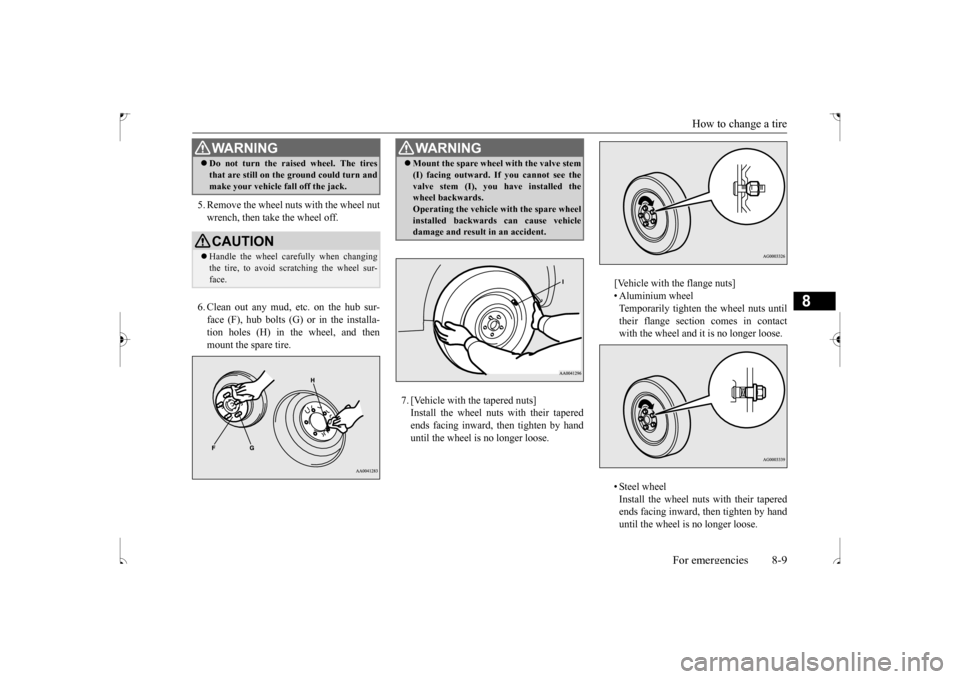
5. Remove the wheel nuts with the wheel nut wrench, then take the wheel off. 6. Clean out any mud, etc. on the hub sur- face (F), hub bolts (G) or in the installa-tion holes (H) in the wheel, and then mount the spare tire.
7. [Vehicle with the tapered nuts] Install the wheel nuts with their tapered ends facing inward, then tighten by handuntil the wheel is no longer loose.
[Vehicle with the flange nuts] • Aluminium wheel Temporarily tighten the wheel nuts untiltheir flange section comes in contact with the wheel and it is no longer loose. • Steel wheel Install the wheel nuts with their tapered ends facing inward, then tighten by hand until the wheel is no longer loose.
Do not turn the raised wheel. The tires that are still on the ground could turn and make your vehicle fall off the jack.CAUTION Handle the wheel carefully when changing the tire, to avoid scratching the wheel sur- face.WA R N I N G
WA R N I N G Mount the spare wheel with the valve stem (I) facing outward. If you cannot see the valve stem (I), you have installed the wheel backwards. Operating the vehicle with the spare wheelinstalled backwards can cause vehicle damage and result in an accident.
BK0239500US.bo
ok 9 ページ 2016年5月13日 金曜日 午前8時53分
Page 331 of 399
How to change a tire 8-10 For emergencies
8
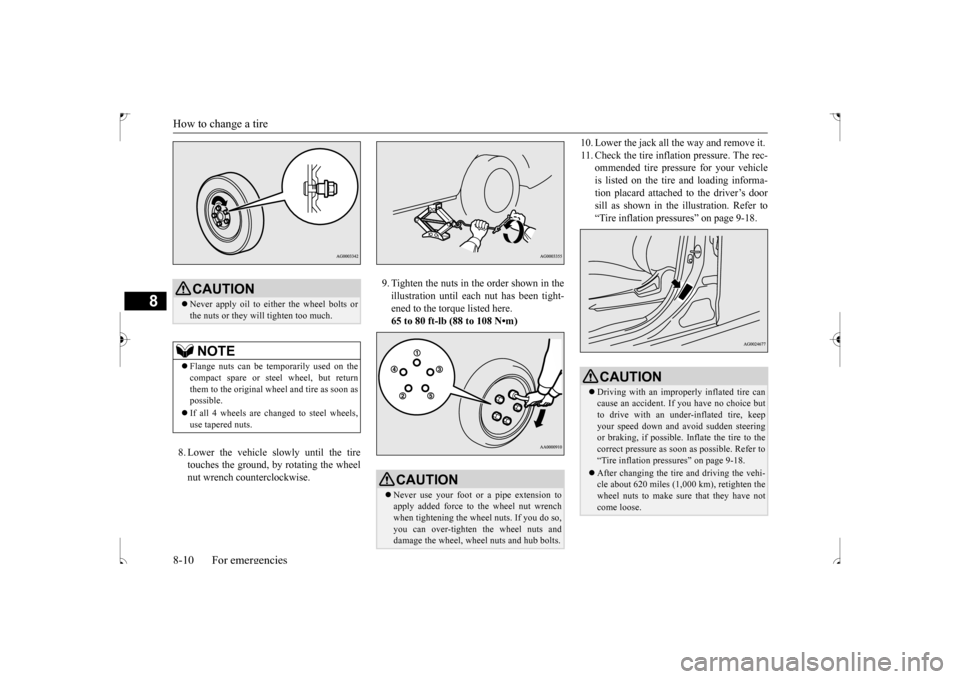
8. Lower the vehicle slowly until the tire touches the ground, by rotating the wheelnut wrench counterclockwise.
9. Tighten the nuts in the order shown in the illustration until each nut has been tight- ened to the torque listed here.65 to 80 ft-lb (88 to 108 N•m)
10. Lower the jack all the way and remove it. 11. Check the tire inflation pressure. The rec-
ommended tire pressure for your vehicle is listed on the tire and loading informa-tion placard attached to the driver’s door sill as shown in the illustration. Refer to “Tire inflation pressures” on page 9-18.
CAUTION Never apply oil to either the wheel bolts or the nuts or they will tighten too much.NOTE
Flange nuts can be temporarily used on the compact spare or steel wheel, but return them to the original wheel and tire as soon as possible. If all 4 wheels are changed to steel wheels, use tapered nuts.
CAUTION Never use your foot or a pipe extension to apply added force to the wheel nut wrenchwhen tightening the wheel nuts. If you do so, you can over-tighten the wheel nuts and damage the wheel, wheel nuts and hub bolts.
CAUTION Driving with an improperly inflated tire can cause an accident. If
you have no choice but
to drive with an under-inflated tire, keep your speed down and avoid sudden steeringor braking, if possible
. Inflate the tire to the
correct pressure as soon as possible. Refer to “Tire inflation pressures” on page 9-18. After changing the tire and driving the vehi- cle about 620 miles (1,000 km), retighten thewheel nuts to make sure that they have not come loose.
BK0239500US.bo
ok 10 ページ 2016年5月13日 金曜日 午前8時53分