2017 MITSUBISHI OUTLANDER Daytime lights
[x] Cancel search: Daytime lightsPage 9 of 521

Outside (Front)
1
N00100602694
Outside (Front)
Sunroof (if so equipped) P.5-51
Windshield wipers P.5-232
Engine hood P.9-3
Front fog lights (if so equipped) P.5-231, 9-32, 9-36
Outside rearview mirrors P.5-60 Side turn-signal lights (if so equipped) P.5-230, 9-32, 9-36Side-view camera (if so equipped) Fuel tank filler P.3-3
Power window P.5-49
Front turn-s
ignal lights
P.5-230, 9-32, 9-36
Front turn signal lights P.5-230, 9-32, 9-36
Headlights, low beam P.5-220, 9-32, 9-34
Parking lights P.5-220, 9-32, 9-36 Daytime running lights P.5-220, 9-32, 9-36
Headlights, low beam P.5-220, 9-32, 9-34
Parking lights P.5-220, 9-32, 9-36 Daytime running lights P.5-220, 9-32, 9-36
Headlights, high beam P.5-220, 9-32, 9-35
Headlights, high beam P.5-220, 9-32, 9-35
Halogen headlights type LED headlights type
Front side-marker lights P.5-220, 9-32, 9-35
Front side-marker lights P.5-220, 9-32, 9-35
Sensor (if so equipped) [for Fo
rward Collision Mitigation System
(FCM), Lane Departure Warning System (LDW) and Automatic high beam system] P. 5-117, 5-139, 5-224 Rain sensor (if so equipped) P.5-232 Front-view camera (if so equipped) P.5-154
Ultrasonic misacceleration Mitig
ation System (if so equipped)
P.5-127Parking sensors (if so equipped) P.5-147
BK0239700US.book 7 ページ 2016年6月16日 木曜日 午前10時58分
Page 140 of 521

Inside rearview mirror
Features and controls 5-59
5
The day/night knob (A) at
the bottom of the
mirror can be used to adjust the mirror to reduce the glare from the headlights of vehi- cles behind you during night driving.
When the headlights of the vehicles behind you are very bright, the reflection factor of the rearview mirror is automatically changed to reduce the glare. Normally, use the automatic mode. When the ignition switch is turned to the “ON” positionor the operation mode is put in ON, the reflection factor of the mirror is automatically changed.
When the headlights of the vehicles behind you are very bright, th
e reflection factor of
the rearview mirror is automatically changed to reduce the glare. Normally, use the automatic mode. When the ignition switch is turned to the “ON” positionor the operation mode is put in ON, the green indicator (1) illuminates and the reflection factor of the mirror is
automatically changed.
To reduce the glare Ty p e 1 1- Daytime position 2- Night position
Ty p e 2
NOTE
Do not hang items on, or spray glass cleaner on the sensor (1), as reduced sensitivity could result.
Ty p e 3
NOTE
Do not hang items on,
or spray glass cleaner
on the sensor (2), as reduced sensitivity could result.
BK0239700US.book 59 ページ 2016年6月16日 木曜日 午前10時58分
Page 302 of 521

Combination headlights and dimmer switch
Features and controls 5-221
5
Rotate the switch to operate the lights. The combinations of switch operations and illuminated lights differ in accordance with the following conditions. [When the engine is started, and the parking brake is released]
[When the engine is not running, or when the engine is running but the parking brake is notreleased] The engine starts when the lights are off.
Rotate the switch to operate the lights. The combinations of switch operations and illuminated lights differ in accordance withthe following conditions. [When the engine is started, and the parking brake is released]
When it rains, or wh
en the vehicle has been
washed, the inside of the lens sometimesbecomes foggy. This is the same as whenwindow glass mists up
on a humid day, and
does not indicate a problem. When the light is switched on, the heat
will dry out the fog.
However, if water collects inside the light, have it checked by an
authorized Mitsubishi
Motors dealer or a repair facility of yourchoice.
Ty p e 1
NOTE
OFF
The daytime running lights illumi- nated The daytime running lights illumi- nated Tail, front and rear side-marker lights, license plate, instrument panel lights and downlight on Headlights and other lights onNOTE
Once the daytime running light come on, they do not go out until the ignition switch is turned to the “OFF” or “ACC” position or the operation mode is changed to OFF orACC.
OFF All lights off
Parking, tail, front and rear side- marker lights, license plate, instru- ment panel lights and downlight on Headlights and other lights on
Ty p e 2 OFF
The daytime running lights illumi- nated
AUTO
The daytime running lights illumi- nated (when it is light outside the vehicle) Headlights and other lights turn on and off automatically in accor-dance with outside light level.
BK0239700US.book 221 ページ 2016年6月16日 木曜日 午前10時58分
Page 303 of 521
![MITSUBISHI OUTLANDER 2017 3.G Owners Manual Combination headlights and dimmer switch 5-222 Features and controls
5
[When the engine is not running, or when the engine is running but the parking brake is notreleased] The engine starts when the l MITSUBISHI OUTLANDER 2017 3.G Owners Manual Combination headlights and dimmer switch 5-222 Features and controls
5
[When the engine is not running, or when the engine is running but the parking brake is notreleased] The engine starts when the l](/manual-img/19/7536/w960_7536-302.png)
Combination headlights and dimmer switch 5-222 Features and controls
5
[When the engine is not running, or when the engine is running but the parking brake is notreleased] The engine starts when the lights are off.
N00532601580
If the following operation is performed with the combination headlights and dim- mer switch in the “ ” or “ ” position, the lights automatically turn off. [Except for vehicles
equipped with the
F. A . S . T. - k e y ]The ignition switch is turned to the “OFF” from the ignition switch and the driver’sdoor is opened. [For vehicles equipped
with the F.A.S.T.-
key] The operation mode is changed to OFF orACC and the driver’s door is opened. If the following operation is performed with the combination headlights and dim- mer switch in the “ ” or “ ” position, the lights automatically turn off afterabout 3 minutes. [Except for vehicles
equipped with the
F. A . S . T. - k e y ] The ignition switch is turned to the “OFF” from the ignition switch and the driver’s door is not opened.
The daytime running lights illumi- nated Tail, front and rear side-marker lights, license pl
ate, instrument
panel lights and downlight on Headlights and other lights on
NOTE
Once the daytime running light come on, they do not go out until the ignition switch isturned to the “OFF” or “ACC” position or the operation mode is changed to OFF or ACC.OFF All lights off AUTO
Headlights and other lights turn on and off automatically in accor- dance with outside light level. Parking, tail, front
and rear side-
marker lights, license plate, instru- ment panel lights and downlight on Headlights and other lights on
NOTE
The sensitivity of the automatic on/off con- trol can be adjusted.For further informati
on, please contact your
authorized Mitsubishi Motors dealer or a repair facility of your choice. On vehicles equipped
with Mitsubishi Multi-
Communication System,
screen operations
can be used to make the adjustment. Refer to the separate owner’s manual fordetails. Do not cover the sensor (A) for the automatic on/off control by affixing
a sticker or label to
the windshield. If the lights do not turn on or off with the switch in the “AUTO” operate the switch. Have
the system checked
by an authorized Mitsubishi Motors dealer ora repair facility
of your choice.
Light auto-cutout function (headlights and other lights)
BK0239700US.book 222 ページ 2016年6月16日 木曜日 午前10時58分
Page 482 of 521

Fuses
Vehicle care and maintenance 9-29
9
*: Fusible link
SBF2 Starter 30 A* SBF3
Air condition- ing condenser fan motor
30 A*
SBF4
Radiator fan
motor
40 A*
SBF5
Anti-lock brak- ing system
40 A*
SBF6
Electric parking
brake
50 A*
SBF7
Anti-lock brak- ing system
30 A*
BF1 Power liftgate 30 A BF2
Audio system amplifier
30 A
BF3 IOD IOD 30 A BF4 Diesel 30 A F1
Automatic transaxle
20 A
F2 Wiper de-icer 15A F3
Electric parking
brake
7.5 A
F4
Daytime run- ning lights
10 A
No.
Sym- bol
Electrical sys-
tem
Capacity
F5 Front fog lights 15 A F6 Air conditioner 10 A F7
Headlight washer
20 A
F8 Security horn 20 A F9 Horn 10 A F10 ETV 15 AF11 Alternator 7.5 AF12 Engine 7.5 A F13
ENG/POWER 20 A Fuel line heater 25 A
F14 Fuel pump 15 A F15 Ignition coil 10 AF16 ENG/POWER 10 A F17
Headlight (high beam) (left)
10 A
F18
Headlight (high beam) (right)
10 A
No.
Sym- bol
Electrical sys-
tem
Capacity
F19
Head- light (low beam) (left)
LED 20 A
F20
Head- light (low beam) (right)
LED 20 A
F21
Head- light (low beam) (left)
Halo- gen
10 A
F22
Head- light (low beam) (right)
Halo- gen
10 A
F23
Battery current
sensor
7.5 A
#1 — Spare fuse 10 A #2 — Spare fuse 15 A #3 — Spare fuse 20 ANo.
Sym- bol
Electrical sys-
tem
Capacity
BK0239700US.book 29 ページ 2016年6月16日 木曜日 午前10時58分
Page 485 of 521

Replacement of light bulbs 9-32 Vehicle care and maintenance
9
N00943000132
The bulb should only be replaced with a new bulb with the same rating and type. The typeand rating are listed on the base of the bulb.
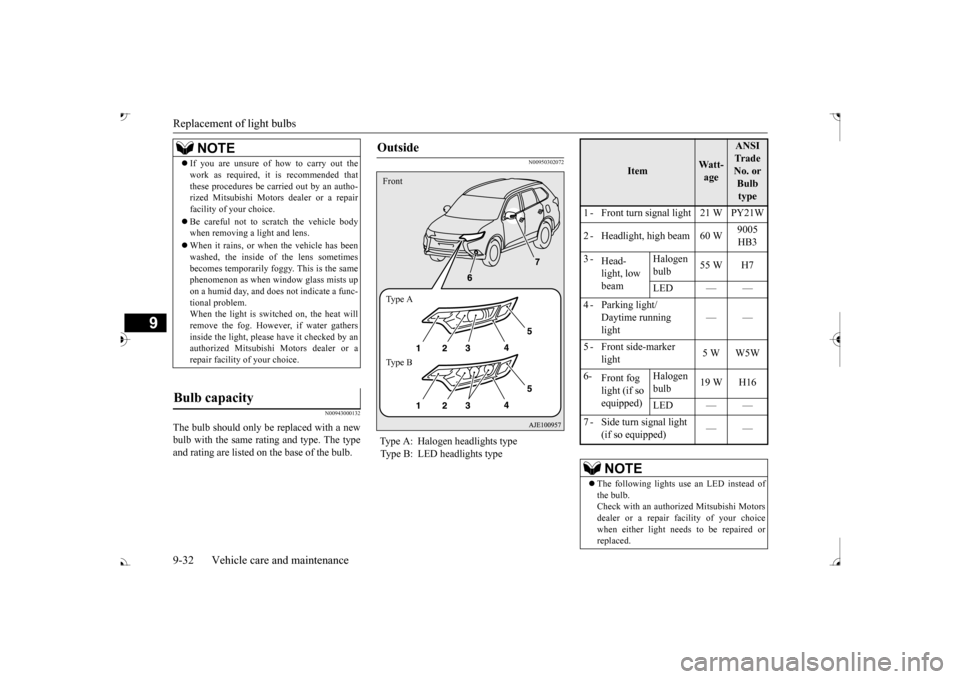
N00950302072
NOTE
If you are unsure of how to carry out the work as required, it is recommended thatthese procedures be ca
rried out by an autho-
rized Mitsubishi Motors
dealer or a repair
facility of your choice. Be careful not to scratch the vehicle body when removing a light and lens. When it rains, or wh
en the vehicle has been
washed, the inside of the lens sometimes becomes temporarily foggy. This is the samephenomenon as when window glass mists up on a humid day, and does not indicate a func- tional problem.When the light is switched on, the heat will remove the fog. However, if water gathers inside the light, please
have it checked by an
authorized Mitsubishi Motors dealer or a repair facility of your choice.
Bulb capacity
Outside Type A: Halogen headlights type Type B: LED headlights typeFront Ty p e A Ty p e B
Item
Wa t t-age
ANSI Tr a d e No. or Bulb type
1 - Front turn signal light 21 W PY21W 2 - Headlight, high beam 60 W
9005 HB3
3 -
Head- light, low beam
Halogen bulb
55 W H7
LED — —
Daytime running light
——
5 - Front side-marker
light
5 W W5W
6-
Front fog light (if so equipped)
Halogen bulb
19 W H16
LED — —
(if so equipped)
The following lights use an LED instead of the bulb. Check with an authorized Mitsubishi Motors dealer or a repair fa
cility of your choice
when either light need
s to be repaired or
replaced.
BK0239700US.book 32 ページ 2016年6月16日 木曜日 午前10時58分
Page 486 of 521

Replacement of light bulbs
Vehicle care and maintenance 9-33
9
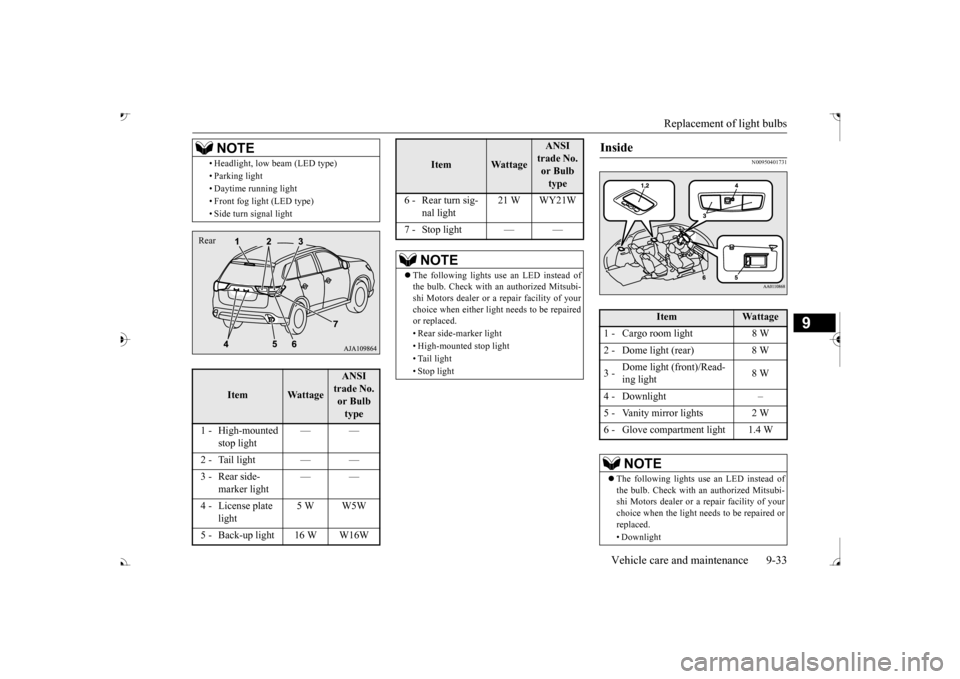
N00950401731
• Headlight, low be
am (LED type)
• Parking light • Daytime running light • Front fog light (LED type) • Side turn signal light
Item
Wattage
ANSI trade No. or Bulb type
1 - High-mounted
stop light
——
2 - Tail light — —
marker light
——
4 - License plate
light
5 W W5W
5 - Back-up light 16 W W16W
NOTE
Rear
6 - Rear turn sig-
nal light
21 W WY21W
7 - Stop light — — The following lights use an LED instead of the bulb. Check with an authorized Mitsubi- shi Motors dealer or a
repair facility of your
choice when either light
needs to be repaired
or replaced. • Rear side-marker light• High-mounted stop light • Tail light • Stop light
Item
Wattage
ANSI trade No. or Bulb type
Inside
Item
Wattage
1 - Cargo room light 8 W 2 - Dome light (rear) 8 W 3 -
Dome light (front)/Read- ing light
8 W
4 - Downlight – 6 - Glove compartment light 1.4 W
NOTE
The following lights us
e an LED instead of
the bulb. Check with an authorized Mitsubi- shi Motors dealer or a repair facility of yourchoice when the light needs to be repaired or replaced. • Downlight
BK0239700US.book 33 ページ 2016年6月16日 木曜日 午前10時58分
Page 489 of 521

Replacement of light bulbs 9-36 Vehicle care and maintenance
9
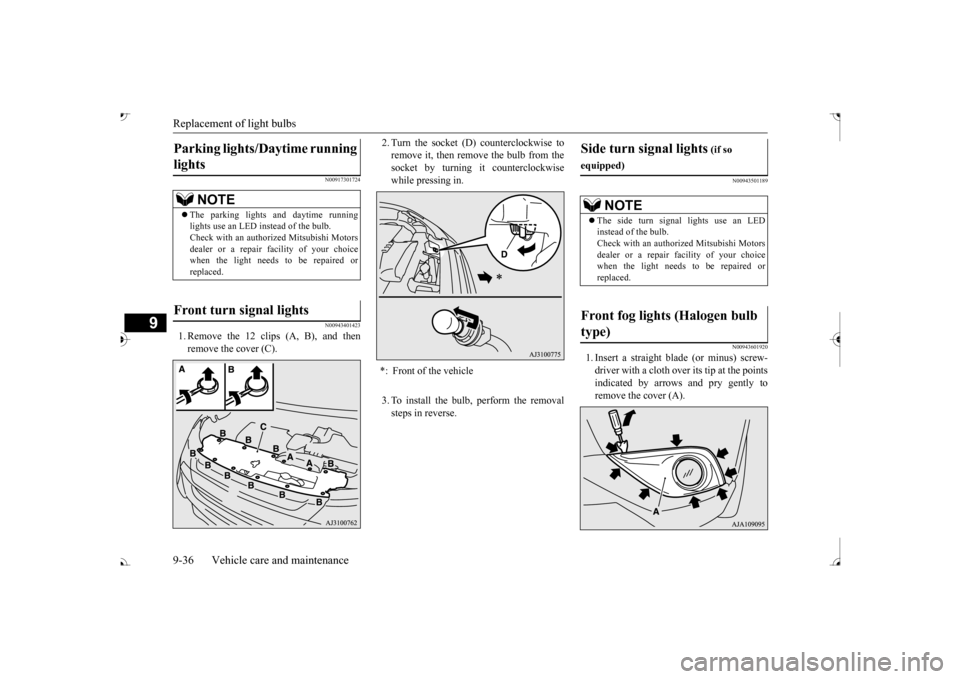
N00917301724 N00943401423
1. Remove the 12 clips (A, B), and then remove the cover (C).
2. Turn the socket (D
) counterclockwise to
remove it, then remove the bulb from thesocket by turning it counterclockwise while pressing in. 3. To install the bulb, perform the removal steps in reverse.
N00943501189 N00943601920
1. Insert a straight
blade (or minus) screw-
driver with a cloth over its tip at the points indicated by arrows and pry gently to remove the cover (A).
Parking lights/Daytime running lights
NOTE
The parking lights and daytime running lights use an LED in
stead of the bulb.
Check with an authorized Mitsubishi Motorsdealer or a repair fa
cility of your choice
when the light needs to be repaired or replaced.
Front turn signal lights
*: Front of the vehicle
Side turn signal lights
(if so
equipped)
NOTE
The side turn signal lights use an LED instead of the bulb. Check with an authorized Mitsubishi Motors dealer or a repair fa
cility of your choice
when the light needs to be repaired or replaced.
Front fog lights (Halogen bulb type)
BK0239700US.book 36 ページ 2016年6月16日 木曜日 午前10時58分