2017 MITSUBISHI OUTLANDER fog light
[x] Cancel search: fog lightPage 3 of 521

Instruments and controls 1-1
1
Overview
N00100202762
Instruments and controls
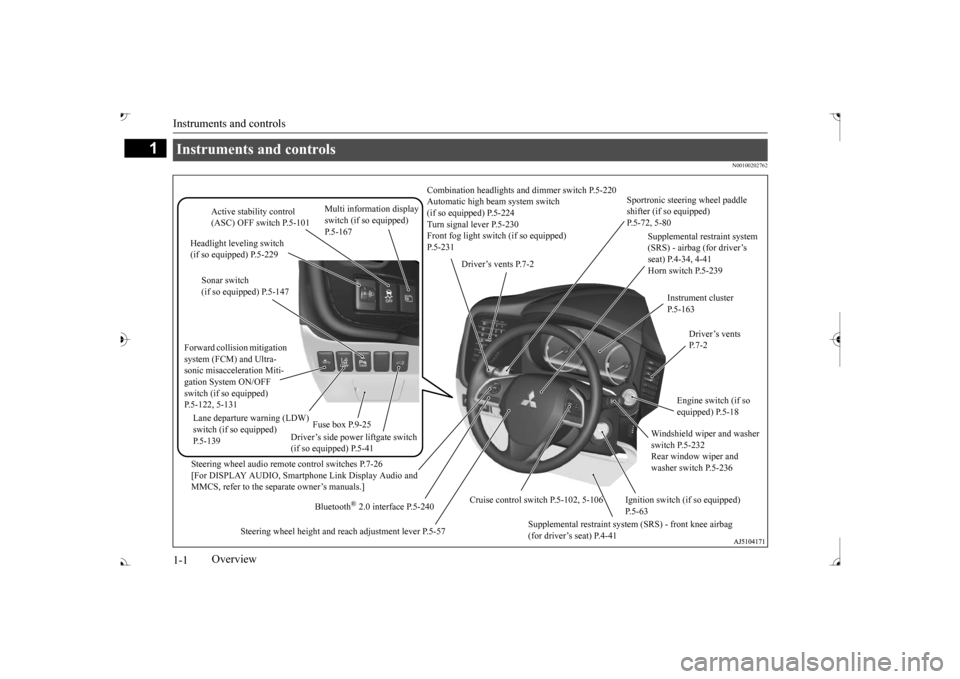
Combination headlights an
d dimmer switch P.5-220
Automatic high beam system switch (if so equipped) P.5-224 Turn signal lever P.5-230 Front fog light switc
h (if so equipped)
P.5-231
Steering wheel audio remote control switches P.7-26 [For DISPLAY AUDIO, Smartphone Link Display Audio and MMCS, refer to the separate owner’s manuals.]
Active stability control (ASC) OFF switch P.5-101
Supplemental restraint system (SRS) - airbag (for driver’s seat) P.4-34, 4-41 Horn switch P.5-239
Instrument cluster P.5-163
Windshield wiper and washer switch P.5-232 Rear window wiper and washer switch P.5-236
Cruise control switch P.5-102, 5-106
Steering wheel height and reach adjustment lever P.5-57
Engine switch (if so equipped) P.5-18
Bluetooth
® 2.0 interface P.5-240
Driver’s vents P. 7 - 2
Sportronic steering wheel paddle shifter (if so equipped) P.5-72, 5-80
Driver’s vents P.7-2
Multi information display switch (if so equipped)
Headlight leveling switch (if so equipped) P.5-229
Driver’s side power liftgate switch (if so equipped) P.5-41
Fuse box P.9-25
Lane departure warning (LDW) switch (if so equipped) P.5-139 Forward collisio
n mitigation
system (FCM) and Ultra-sonic misacceleration Miti- gation System ON/OFF switch (if so equipped)P.5-122, 5-131
Supplemental restraint system (SRS) - front knee airbag (for driver’s seat) P.4-41
Ignition switch (if so equipped) P.5-63
Sonar switch (if so equipped) P.5-147
BK0239700US.book 1 ページ 2016年6月16日 木曜日 午前10時58分
Page 4 of 521

Instruments and controls
Overview 1-2
1
Audio (if so equipped) P.7-14 Mitsubishi Multi-Communication Syst
em (MMCS) (if so equipped)
Multi around monitor (if
so equipped) P.5-154
[For DISPLAY AUDIO, Smartphone Link Display Audio and MMCS, refer to the separate owner’s manuals.]
Hazard warning flasher switch P.5-231
Electric rear window defogger switch P.5-237 Wiper deicer switch (if so equipped) P.5-237 Fuel tank filler door release lever P. 3 - 3
Air conditioner P.7-5 Hood release lever P. 9 - 3
Floor console box P.5-277 Arm rest 12 V power outlet P.5-267 USB input terminal P.5-263
Cup holder P.5-279
12 V power outlet P.5-267
Power liftgate main switch (if so equipped) P.5-40
Key slot (if so equipped)
Passenger’s vents P. 7 - 2
Passenger’s airbag off indicator P.4-39
Front passenger seat belt warning light P.4-23
Heated steering wheel switch (if so equipped) P.5-239
Blind Spot Warning (BSW) switch (if so equipped) P.5-131
Camera switch (if so equipped) P.5-157
BK0239700US.book 2 ページ 2016年6月16日 木曜日 午前10時58分
Page 9 of 521

Outside (Front)
1
N00100602694
Outside (Front)
Sunroof (if so equipped) P.5-51
Windshield wipers P.5-232
Engine hood P.9-3
Front fog lights (if so equipped) P.5-231, 9-32, 9-36
Outside rearview mirrors P.5-60 Side turn-signal lights (if so equipped) P.5-230, 9-32, 9-36Side-view camera (if so equipped) Fuel tank filler P.3-3
Power window P.5-49
Front turn-s
ignal lights
P.5-230, 9-32, 9-36
Front turn signal lights P.5-230, 9-32, 9-36
Headlights, low beam P.5-220, 9-32, 9-34
Parking lights P.5-220, 9-32, 9-36 Daytime running lights P.5-220, 9-32, 9-36
Headlights, low beam P.5-220, 9-32, 9-34
Parking lights P.5-220, 9-32, 9-36 Daytime running lights P.5-220, 9-32, 9-36
Headlights, high beam P.5-220, 9-32, 9-35
Headlights, high beam P.5-220, 9-32, 9-35
Halogen headlights type LED headlights type
Front side-marker lights P.5-220, 9-32, 9-35
Front side-marker lights P.5-220, 9-32, 9-35
Sensor (if so equipped) [for Fo
rward Collision Mitigation System
(FCM), Lane Departure Warning System (LDW) and Automatic high beam system] P. 5-117, 5-139, 5-224 Rain sensor (if so equipped) P.5-232 Front-view camera (if so equipped) P.5-154
Ultrasonic misacceleration Mitig
ation System (if so equipped)
P.5-127Parking sensors (if so equipped) P.5-147
BK0239700US.book 7 ページ 2016年6月16日 木曜日 午前10時58分
Page 17 of 521

If this problem occurs... 2-6 Quick index
2
Cannot shift the selector lever from the “P” (PARK) position.
Shift the selector lever while pressing the brake pedal. Check that the ignition switch
or the operation mode is in ON.
P. 5-68
The windows are fogged up.
Push the defogger switch to
change to the “ ” position.
P. 7-8
The engine does not start. The lights do not come on. The lights are dim.The horn does not honk. The horn sound is weak.
Have the battery checked. Rech
arge or replace as needed.
P. 8-2, 9-13
Problem
Do this
Ref. Page
BK0239700US.book 6 ページ 2016年6月16日 木曜日 午前10時58分
Page 83 of 521

5
Features and controlsWarning lights ............................................................................. 5-216 Information screen display (Vehicle equipped with the mul
ti information display - Type 1)
.................................................................................................. 5-219 Combination headlights and dimmer switch ............................... 5-220 Headlight leveling switch (if so equipped) .................................. 5-229Turn signal lever .......................................................................... 5-230 Hazard warning flasher switch .................................................... 5-231 ECO mode switch ........................................................................ 5-231Front fog light switch (if so equipped) ......................................... 5-231 Wiper and washer switch ............................................................ 5-232 Wiper deicer switch (if so equipped)............................................ 5-237Electric rear window def
ogger switch ......
...........
...........
............. 5-237
Heated steering wheel switch (if so equipped)............................. 5-239 Horn switch ................................................................................. 5-239Link System ................................................................................. 5-239 Bluetooth
® 2.0 interface .............................................................. 5-240
USB input terminal ...................................................................... 5-263Sun visors .................................................................................... 5-266 12 V power outlets ...................................................................... 5-267 HomeLink
® Wireless Control System (if so equipped) ............... 5-268
Interior lights ............................................................................... 5-273 Storage spaces ............................................................................. 5-276 Cup holders ................................................................................. 5-279Bottle holders .............................................................................. 5-280 Cargo area cover (if so equipped) ............................................... 5-281 Assist grips .................................................................................. 5-283Coat hooks ................................................................................... 5-283
Luggage hooks .........
...........
...........
...........
...........
.........
.........
..... 5-283
BK0239700US.book 2 ページ 2016年6月16日 木曜日 午前10時58分
Page 107 of 521

Free-hand Advanced
Security Transmitter (F.A.S
.T.-key) (if so equipped)
5
5. Press the engine switch. 6. Confirm that all warning lights and warn-ing displays are functioning properly.
After several attempts
, you may experience
that the engine still does not start. 1. Make sure that all electric devices, such as lights, air conditi
oning blower and rear
window defogger, are turned off. 2. While depressing the brake pedal, pressthe accelerator peda
l halfway and hold it
there, then crank th
e engine. Release the
accelerator pedal, immediately after theengine starts.
3. If the engine still wi
ll not start, the engine
could be flooded with too much gasoline.While depressing the brake pedal, push the accelerator pedal all the way down and hold it there, then press the engineswitch to crank the engine. If the engine does not start after 5 to 6 seconds, push the engine switch to stop cranking theengine, and release th
e accelerator pedal.
Put the operation mode in OFF. Wait a few seconds, and then press the engine switch to crank the engine again while depressing the brake pedal, but do notpush the accelerator pedal. If the engine fails to start, repeat these procedures. If the engine still will
not start, contact your
local Mitsubishi Motors dealer or a repair facility of your choi
ce for assistance.
Startability of the en
gine with an ambient
temperature of -22 °F (-30 °C) or lowerWhen the ambient temperature is -22 °F (-30 °C) or lower, it may not be possible to start from a standstill even wi
th the selector lever
in the
Page 144 of 521

Ignition switch
Features and controls 5-63
5
N00549301260
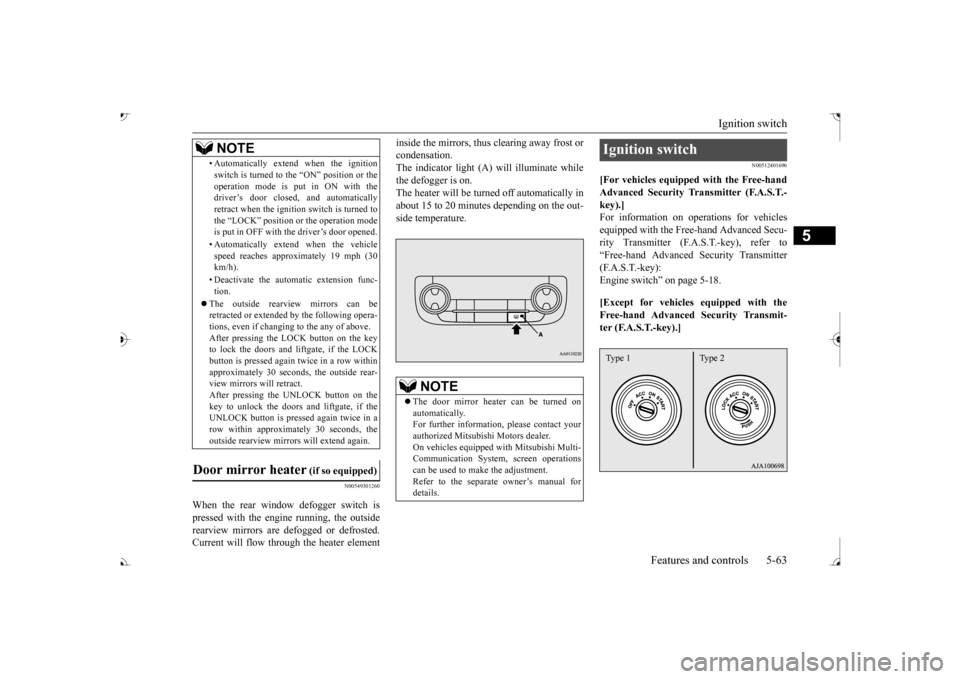
When the rear window defogger switch is pressed with the engine running, the outside rearview mirrors are defogged or defrosted. Current will flow thr
ough the heater element
inside the mirrors, thus clearing away frost or condensation.The indicator light (A) will illuminate while the defogger is on. The heater will be turned off automatically inabout 15 to 20 minutes depending on the out- side temperature.
N00512401696
[For vehicles equipped with the Free-handAdvanced Security Tr
ansmitter (F.A.S.T.-
key).]For information on operations for vehicles equipped with the Free-hand Advanced Secu- rity Transmitter (F.A
.S.T.-key), refer to
“Free-hand Advanced
Security Transmitter
(F.A.S.T.-key): Engine switch” on page 5-18. [Except for vehicles equipped with the Free-hand Advanced Security Transmit- ter (F.A.S.T.-key).]
• Automatically extend when the ignition switch is turned to the “ON” position or theoperation mode is put in ON with thedriver’s door closed, and automatically retract when the ignition switch is turned to the “LOCK” position or the operation modeis put in OFF with the driver’s door opened. • Automatically extend when the vehicle speed reaches approximately 19 mph (30 km/h). • Deactivate the automatic extension func- tion.
The outside rearvi
ew mirrors can be
retracted or extended
by the following opera-
tions, even if changing to the any of above.After pressing the LOCK
button on the key
to lock the doors and liftgate, if the LOCK button is pressed again twice in a row withinapproximately 30 seconds
, the outside rear-
view mirrors will retract. After pressing the
UNLOCK button on the
key to unlock the doors and liftgate, if the UNLOCK button is pressed again twice in a row within approximately 30 seconds, theoutside rearview mirro
rs will extend again.
Door mirror heater
(if so equipped)
NOTE
The door mirror heater can be turned on automatically.For further informati
on, please contact your
authorized Mitsubishi Motors dealer. On vehicles equipped
with Mitsubishi Multi-
Communication System, screen operations can be used to ma
ke the adjustment.
Refer to the separate
owner’s manual for
details.
Ignition switch Type 1 Type 2
BK0239700US.book 63 ページ 2016年6月16日 木曜日 午前10時58分
Page 148 of 521

Automatic transaxle (if so equipped)
Features and controls 5-67
5
5. Turn the ignition switch to the “ON” posi- tion and make certain that all warninglights are functioning properly before starting the engine. 6. Turn the ignition switch to the “START”
ng the accelerator
pedal. Release the ignition switch when the engine starts.
After several attempts, you may experience that the engine still does not start. 1. Make sure that all electric devices, such as lights, air conditio
ning blower and rear
window defogger, are turned off. 2. While depressing the brake pedal, press the accelerator peda
l halfway and hold it
there, then crank th
e engine. Release the
accelerator pedal, immediately after the engine starts.
3. If the engine still will not start, the engine could be flooded with too much gasoline.While depressing the brake pedal, push the accelerator pedal all the way down and hold it there, then crank the engine for5 to 6 seconds. Retu
rn the ignition switch
to the “OFF” or “LOCK” position and release the accelerator pedal. Wait a fewseconds, and then crank the engine again for 5 to 6 seconds while depressing the brake pedal, but do no
t push the accelera-
tor pedal. Release the ignition key if the engine starts. If the
engine fails to start,
repeat these procedures
. If the engine still
will not start, cont
act your local Mitsubi-
shi Motors dealer or
a repair facility of
your choice for assistance.
When the ambient temperature is -22 °F (-30 °C) or lower, it may not be possible to start from a standstill even with the selector lever in the