2017 MITSUBISHI iMiEV inflation pressure
[x] Cancel search: inflation pressurePage 197 of 296

Loading information Driving safety 6-7
6
It is important to famil
iarize yourself with the
following terms before loading your vehicle: Vehicle maximum load on the tire: load on an individual tire that is determined bydistributing to each axle its share of the maximum loaded vehicle weight and dividing by two. Vehicle normal load on the tire: load on an individual tire that is determined by dis- tributing to each axle its share of the curbweight, accessory weight, and normal occupant weight and dividing by two. Maximum loaded vehicle weight: the sum of - (a) Curb weight; (b) Accessory weight;(c) Vehicle capacity weight; and (d) Production options weight. Curb weight: the weight of a motor vehi- cle with standard e
quipment including the
maximum capacity of oil, and coolant.
Accessory weight: the combined weight (in excess of those st
andard items which
may be replaced) of automatic transmis- sion, power steering, power brakes, power windows, power seats,
radio, and heater,
to the extent that these items are available as factory- installe
d equipment (whether
installed or not). Vehicle capacity weight: the rated cargo and luggage load plus 150 lbs (68 kg)
*
times the vehicle’s designated seating capacity. Production options weight: the combined weight of those installed regular produc- tion options weighing over 5 lbs (2.3 kg) in excess of those standard items whichthey replace, not prev
iously considered in
curb weight or accessory weight, includ- ing heavy duty brakes,
ride levelers, roof
rack, heavy duty battery, and special trim. Normal occupant weight: 150 lbs (68 kg)
*
times the number of specified occupants.(In your vehicle the number is 2) Occupant distributi
on: distribution of
occupants in a vehicle as specified. (Inyour vehicle the distribution is 2 in front seat)
N00630100370
The tire and loading information placard is located on the driver’s door sill. This placard shows the maximum number of occupants permitted to
ride in your vehicle as
well as “the combined
weight of occupants
and cargo” (C), which
is called the vehicle
capacity weight. This
placard also tells you
the size and recomme
nded inflation pressure
for the original equipment tires on your vehi-cle. For more information, refer to “Tires” on page 9-10.
WA R N I N G Never overload your ve
hicle. Overloading
can damage your vehicl
e, adversely affect
vehicle performance, including handlingand braking, cause tire failure, and result in an accident.
* : 150 lbs (68 kg) is the weight of one per- son as defined by U.S.A. and Canadian regulations.
Tire and loading information placard
BK0220401US.book 7 ページ 2015年6月3日 水曜日 午前7時42分
Page 237 of 296

Tire repair kit
For emergencies 8-5
8
If you drive your vehicle with a low battery charge, after the electric motor unit has beenstarted by using jumper
cables, it can cause
the anti-lock braking sy
stem warning light to
illuminate. This is only due to the low batteryvoltage. It is not a problem with the brake system. If this happens, fully charge the 12V starter battery and ensure the charging system is operating properly.
N00836600366
This vehicle is equipped
with a tire repair kit
which can be used to repair a minor puncture in tread area caused by
a nail, screw or simi-
lar object. A spare tire
is not provided with
this vehicle.
N00837701026
The tire repair kit is
stowed under the rear
seat cushion.
N00837800033
1. Pull forward the seat stoppers (A) underthe rear seat cushion (B). 2. Lift up the seat
cushion and pull it for-
ward to remove it. 3. Remove the screws (C) with a coin or the washer (D) at a position shown in the illustration, and re
move the cover (E).
As your vehicle has anti-lock brakes Tire repair kit
WA R N I N G The tire repair kit may not permanently seal a punctured tire. Using the tire repair
kit may damage the
wheel and/or the tire inflation pressuresensor for the tire. The vehicle must promptly be inspected and repaired by a certified i-MiEV dealer after using the tirerepair kit.
Use only the Mitsubishi genuine tire repair kit. Sealant in other repair kits maynot sufficiently seal the tire puncture.
Tire repair kit storage 1- Tire compressorWA R N I N G
2- Tire repair set: Items #3-#8 shown
above
3- Tire sealant bottle4- Filler hose 5- Valve insert (spare)7- Speed restriction sticker 8- Instruction manual for tire repairTo remove
BK0220401US.book 5 ページ 2015年6月3日 水曜日 午前7時42分
Page 241 of 296

Tire repair kit
For emergencies 8-9
8
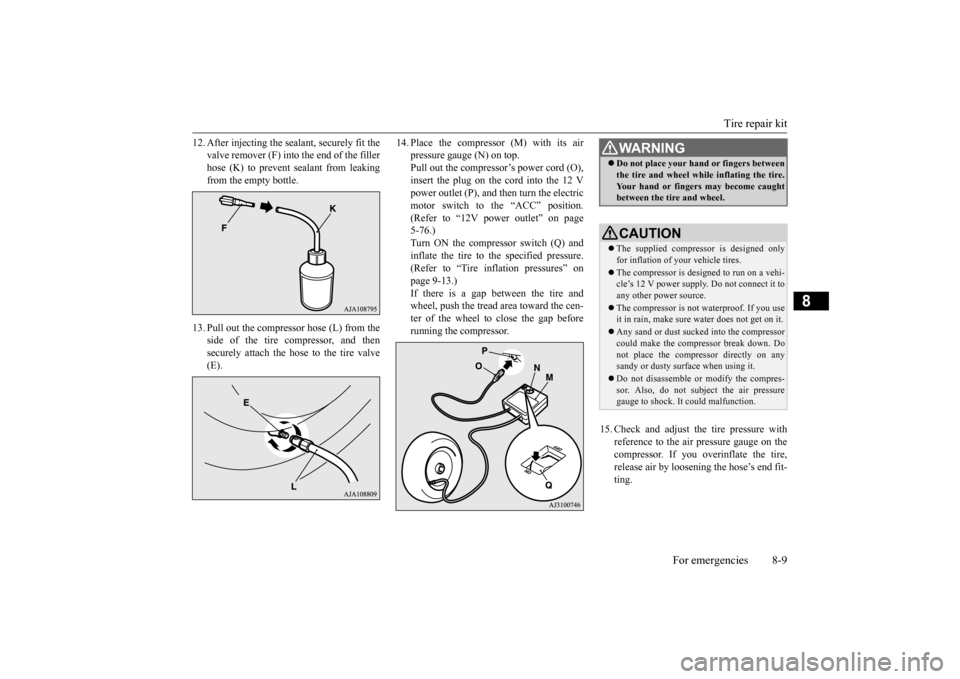
12. After injecting the sealant, securely fit the
valve remover (F) into
the end of the filler
hose (K) to prevent sealant from leaking from the empty bottle.
13. Pull out the compressor hose (L) from the
side of the tire compressor, and thensecurely attach the hose to the tire valve (E).
14. Place the compressor (M) with its air
pressure gauge (N) on top.Pull out the compressor’s power cord (O), insert the plug on the cord into the 12 V power outlet (P), and then turn the electricmotor switch to the “ACC” position. (Refer to “12V power outlet” on page 5-76.)Turn ON the compressor switch (Q) and inflate the tire to the specified pressure. (Refer to “Tire inflation pressures” on page 9-13.) If there is a gap between the tire andwheel, push the tread area toward the cen- ter of the wheel to close the gap before running the compressor.
15. Check and adjust the tire pressure with
reference to the air pressure gauge on the compressor. If you overinflate the tire,release air by loosening the hose’s end fit- ting.WA R N I N G Do not place your hand or fingers between the tire and wheel while inflating the tire.Your hand or fingers may become caughtbetween the tire and wheel.CAUTION The supplied compressor is designed only for inflation of
your vehicle tires.
The compressor is designed to run on a vehi- cle’s 12 V power supply.
Do not connect it to
any other power source. The compressor is not waterproof. If you use it in rain, make sure wa
ter does not get on it.
Any sand or dust sucked into the compressor could make the compressor break down. Donot place the compressor directly on any sandy or dusty surface when using it. Do not disassemble or modify the compres- sor. Also, do not subject the air pressure gauge to shock. It
could malfunction.
BK0220401US.book 9 ページ 2015年6月3日 水曜日 午前7時42分
Page 256 of 296

Tires 9-10 Vehicle care and maintenance
9
N00939201619
It is important to familiarize yourself with the following terms: Cold tire pressure: • The measured pressure after the vehiclehas been parked for
at least three hours,
or • The measured pressure when the vehicleis driven less than 1 mile (1.6 km) after having been parked for three hours.
Maximum inflation pressure: the maxi- mum permissible cold
tire inflation pres-
sure for this tire. Recommended inflation pressure: the inflation pressure for optimum tire perfor- mance.
WA R N I N G Open doors and wind
ows in any closed
space where you may be charging orworking with the 12V starter battery. Always wear protective clothing and gog- gles when working wi
th the 12V starter
battery, or have a sk
illed automobile tech-
nician do it. If you are quick-charging your 12V starter battery, first disconnect the 12V starter battery cables. In order to prevent a short circuit, be sure to disconnect the negative (-) terminalfirst, and reconnect it last. If the electrolyte level
is very low, have the
12V starter battery checked at a certified i-MiEV dealer. 12V starter battery te
rminals and related
accessories contain
lead and lead com-
pounds. Wash hands after handling. CAUTION When replacing the
12V starter battery,
remove the connected
positive (+) and nega-
tive (-) terminals after turning the electric motor switch to the “LOCK” position andwaiting at least 1 minut
e. If the 12V starter
battery terminal is removed just after the electric motor switch is turned to the “LOCK” position, this
may cause damage to
components of the electric motor unit.
NOTE
Before cleaning the 12V starter battery, tighten all the filler port
caps to keep dirt and
moisture out. Check each 12V starter battery terminal for corrosion. If necessary, clean the terminalswith a solution of baking soda and water. Grease the posts and cl
amps after cleaning or
tightening them. Check to see that the 12V starter battery is securely installed and
cannot be moved. Also
check each terminal for tightness. If you will not be driv
ing your vehicle for a
long period of time, re
move the 12V starter
battery and store it in a place where the 12V starter battery fluid wi
ll not freeze. Memory
data for settings made by the user may be erased when the 12V starter battery is removed. If this happens, reset the settingsagain using the releva
nt procedures. The
12V starter battery
only should be stored
with a full charge.
Tires
WA R N I N G Driving with tires that are worn, damaged or improperly inflated is dangerous.These type tire conditions will adversely affect vehicle performance. These type tire conditions can also cause atread separation or blowout which may result in an accide
nt causing serious
injury or death. Tires degrade over ti
me with age even
when they are not being used. It is recom-mended that tires ove
r 6 years generally
be replaced even if
damage is not obvious.
BK0220401US.book 10 ページ 2015年6月3日 水曜日 午前7時42分
Page 259 of 296

Tires
Vehicle care and maintenance 9-13
9
code may only be on one side. Look for the TIN on the outboard side of tires as mounted on the vehicle. If the TIN is not found on the outboard sidethen you will find it on the inboard side of the tire. EXAMPLE: DOT MA L9 ABCD 1504
The treadwear grade is a comparative rating based on the wear rate of the tire when testedunder controlled conditions on a specified government test course
. For example, a tire
graded 150 would wear one and one-half (11/2) times as well on the government course
as a tire graded 100. The relative performance of tires depends upon the actual conditions of their use, however, and may depart signifi-cantly from the norm due to variations in driving habits, service practices and differ- ences in road characteristics and climate. The traction grades, from highest to lowest, are AA, A, B and C. Those grades represent the tire’s ability to stop on wet pavement as measured under contro
lled conditions on
specified government te
st surfaces of asphalt
and concrete. A tire marked C may have poor traction performance. The temperature grades are A (the highest), B and C, representing the ti
re’s resistance to the
generation of heat and it
s ability to dissipate
heat when tested u
nder controlled conditions
on a specified indoor
laboratory test wheel.
Sustained high temperature can cause the material of the tire to
degenerate and reduce
tire life, and excessive temperature can lead to sudden tire failure. The grade C corre-sponds to a level of
performance which all
passenger car tires must
meet under the Fed-
eral Motor Vehicle Safety Standard No. 109.Grades B and A represent higher levels of performance on the laboratory test wheel than the minimum required by law.
N00939300873
Proper tire inflation pre
ssure is essential for
the safe and satisfac
tory operation of your
vehicle. The wrong tire pressure will cause problems in three major areas: Safety
DOT
Department of Transporta- tion This symbol certifies that the tire is in compliance with the U.S.
Department
of Transportation tire safety standards, and is approved for highway use.
MA
Code representing the tire manufacturing location. (2 digits)
L9 ABCD
Code representing the tire size. (2 digits)Code used by tire manufac- turer. (1 to 4 digits)
15
Number representing the week in which the tire was manufactured. (2 digits)
04
Number representing the year in which the tire was manufactured. (2 digits)
ature Grades Treadwear Tr a c t i o n
TemperatureTire inflation pressures
BK0220401US.book 13 ページ 2015年6月3日 水曜日 午前7時42分
Page 260 of 296

Tires 9-14 Vehicle care and maintenance
9
Too little pressure increases flexing in the tire and can cause tire failure. Too muchpressure can cause a tire to lose its ability to cushion shock. Objects on the road and potholes could then cause tire damage thatmay result in tire failure. Economy The wrong tire pressure can cause unevenwear patterns in the tire tread. These abnormal wear patterns will reduce the tread life, and the tire will have to be replaced sooner. Too little pressure also makes it harder forthe tire to roll, and this uses up more power. Ride comfort and vehicle stability The superior riding
experience built into
your vehicle partly depends on the correct tire pressure. Too mu
ch pressure gives an
uncomfortable and ja
rring ride. Too little
pressure feels as if your vehicle is slow to respond.Unequal tire pressures can make steering your vehicle uneven and unpredictable.
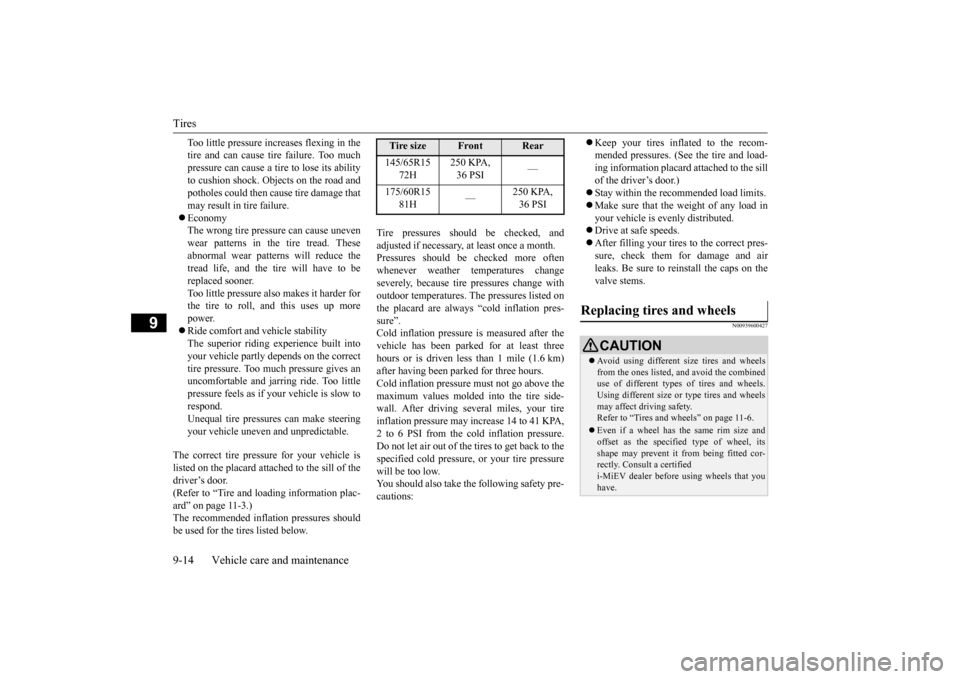
The correct tire pressure for your vehicle is listed on the placard attached to the sill of thedriver’s door. (Refer to “Tire and loading information plac- ard” on page 11-3.)The recommended inflation pressures should be used for the tires listed below.
Tire pressures should be checked, and adjusted if necessary, at least once a month.Pressures should be checked more often whenever weather temperatures change severely, becaus
e tire pressures change with
outdoor temperatures. The pressures listed on the placard are always
“cold inflation pres-
sure”.Cold inflation pressure is measured after the vehicle has been parked
for at least three
hours or is driven less than 1 mile (1.6 km)after having been parked for three hours. Cold inflation pressure must not go above the maximum values molded into the tire side-wall. After driving se
veral miles, your tire
inflation pressure may increase 14 to 41 KPA, 2 to 6 PSI from the cold inflation pressure.Do not let air out of the tires to get back to the specified cold pressure, or your tire pressure will be too low.You should also take the following safety pre- cautions:
Keep your tires inflated to the recom- mended pressures. (See the tire and load-ing information placard attached to the sill of the driver’s door.) Stay within the recommended load limits. Make sure that the weight of any load in your vehicle is evenly distributed. Drive at safe speeds. After filling your tires to the correct pres- sure, check them for damage and air leaks. Be sure to reinstall the caps on the valve stems.
N00939600427
Tire size
Front
Rear
145/65R15
72H
250 KPA, 36 PSI
—
175/60R15
81H
—
250 KPA, 36 PSI
Replacing tires and wheels
CAUTION Avoid using different size tires and wheels from the ones listed, and avoid the combined use of different types
of tires and wheels.
Using different size or
type tires and wheels
may affect driving safety. Refer to “Tires and wheels” on page 11-6. Even if a wheel has the same rim size and offset as the specifie
d type of wheel, its
shape may prevent it
from being fitted cor-
rectly. Consult a certified i-MiEV dealer before
using wheels that you
have.
BK0220401US.book 14 ページ 2015年6月3日 水曜日 午前7時42分
Page 295 of 296

Alphabetical index
12-5
12
Bulb capacity
.................................
9-22
Replacement
..................................
9-25
Storage spaces
....................................
5-79
Sun visors
..........................................
5-76
Supplemental Re
straint System
............
4-20
How the Supplement Restraint System works
..........................................
4-23
Servicing
.......................................
4-34
Warning light
.................................
4-26
T
Tail lights
Bulb capacity
.................................
9-22
Replacement
..................................
9-25
Theft-alarm system
.............................
5-12
Tire
Quality grading
...............................
10-2
Tire pressure monitoring system
...........
5-30
Tire repair kit
.......................................
8-5
Tires
..................................................
9-10
Inflation pressure
............................
9-13
Maintenance
...................................
9-15
Replacing tires and wheels
...............
9-14
Rotation
.........................................
9-15
Size (tire and wheel)
.......................
11-6
Snow tires
......................................
9-15
Tire and loading information placard
.6-7
,
11-3 Tire chains
.....................................
9-16
Tread wear indicators
.....................
9-15
Towing
..............................................
8-11
Traction control function
.....................
5-29
Trailer towing
....................................
6-10
Trip odometer
............................
5-37
, 5-38
Turn signal lights
Indicators
......................................
5-44
Lever
............................................
5-49
U
USB input terminal
.............................
5-73
How to connect a USB memory device
....
5-73 How to connect an iPod
..................
5-74
V
Vanity mirror
.....................................
5-76
Vehicle care precautions
.....................
9-28
Vehicle dimensions
............................
11-4
Vehicle labeling
.................................
11-2
Vehicle preparation before driving
.........
6-3
Vehicle weights
..................................
11-4
Vents
..................................................
7-2
W
Warning lights
...................................
5-44
Washer
Fluid
.......................................
9-7
, 11-7
Rear window washer
.......................
5-51
Switch
...........................................
5-51
Windshield washer
..........................
5-51
Waxing
..............................................
9-31
Weights
.............................................
11-4
Wheel
Specification
..................................
11-6
Wiper
Rear window wiper
.........................
5-51
Windshield
.....................................
5-50
Wiper blades
..................................
9-16
BK0220401US.book 5 ページ 2015年6月3日 水曜日 午前7時42分