2017 MERCEDES-BENZ SPRINTER brake light
[x] Cancel search: brake lightPage 56 of 286

ASR (accelerationskid control )
Gene ral notes
Important safety notes
Observ eth eimportant safet yguidelines for th e
drivin gsafet ysystem (Ypage 53).
AS Rcan neither reduce th eris kof an acciden t
no rsuspen dth elaws of physics if th edriver
does no tpay attention when pullin gaway or
accelerating .AS Ris only an aid. Always adapt
your drivin gstyle to suit th eprevailing road and
weather conditions.
If you activat eor deactivat eth eall-whee ldrive
in avehicl ewit hthis option ,AS Rwill be deacti -
vated for th eduration of th eactivation/deacti-
vation process.
Vehicles without steering whee lbuttons :if AS R
is malfunctioning ,th e: indicator lamp lights
up while th eengin eis runnin gand th eengin e
powe rmay be reduce d (
Ypage 191).
AS Rsignificantly improve straction ,i.e .th e
transmission of powe rfrom th etires to th eroad
surface, and thus increases th evehicle's drivin g
stability. If th edrivin gwheels start to spin ,AS R
brakes individual drive wheels and limits th e
engin etorque .AS Rthus significantly assist syou
when pullin gaway and accelerating ,especially
on wet or slipper yroads.
If traction on th eroad surfac eis no tsufficient,
eve nAS Rwill no tallow you to pull away without
difficulty. The typ eof tire
s and total weigh
tof th e
vehicl eas well as th egradien tof th eroad also
play acrucia lrole.
If AS Rintervenes, th ed warning lamp in th e
instrumen tcluste rflashes .
Activating/deactivating ASR
GWARNIN G
If deactivated, AS Rwill no tattemp tto stabi-
liz eth evehicl eduring pullin gaway and accel-
eration .There is an increased ris kof skiddin g
and of an accident.
Only deactivat eAS Rin th esituation sdescri-
bed in th efollowing.
!If you deactivat eASR, ES P®will still inter-
ven eto stabiliz eth evehicle. Frequen tbraking
automatically triggered by ES P
®can damage
th ebrak esystem. Fo
rthis reason ,deactivat eAS Ronly briefl y
and when absolutely necessary.
When ES P®is intervening and th ed warning
lamp in th einstrumen tcluste ris flashing, leav e
AS Ron .In this case, only depress th eacceler -
ato rpedal as far as require dwhen pullin gaway.
XPress th eà button.
If AS Ris deactivated, th ed warning lamp
in th einstrumen tcluste rlights up.
AS Ris automatically activated when th eengin e
is started.
It may be best to deactivat eAS Rbriefl yin th e
followin gsituations:
Rwhen usin gsnow chain s
Rin deep snow
Ron sandor gravel
If you deactivat eASR:
Rengin etorque is no tlimite dand th edrive
wheels are able to spin .The spinnin gwheels
will then achiev e acutting effec tfor bette r
traction .
Rtraction control remain sactive throug hbrak e
intervention .If adrive whee lattain sits tire
traction limi tbecause on eside of th eroad is
slippery, for example, that whee lis braked.
The traction is then increased in this situation .
Ractive brakeintervention by ES P®to increase
drivin gstabilit yremain sactive .The d
warning lamp in th einstrumen tcluste r
flashes when ES P
®is intervening.
BAS (Brake Assist System)
GWARNING
If BA Sis malfunctioning ,th ebraking distanc e
in an emergenc ybraking situation is
increased. There is aris kof an accident.
54Driving safety systems
Safety
Page 57 of 286

In an emergency braking situation, depress
the brake pedal with full force. ABS prevents
the wheels from locking.
Vehicles without steering wheel buttons: if the
BAS driving safety system is malfunctioning,
the : warning lamp lights up while the
engine is running (
Ypage 191).
BAS operates in emergency braking situations.
If you depress the brake quickly, BAS automat-
ically increases the brake pressure, thereby
reducing the stopping distance.
The brakes will function as usual once you
release the brake pedal. BAS is deactivated.
EBD (electronic brake force distribu-
tion)
GWARNING
If EBD is malfunctioning, the rear wheels can
lock, e.g. under full braking. This increases the
risk of skidding and an accident.
You should therefore adapt your driving style
to the different handling characteristics. Have
the brake system checked at a qualified spe-
cialist workshop.
EBD monitors and controls the brake pressure
to the rear wheels. This enables EBD to improve
handling during braking.
Observe the information on warning and indica-
tor lamps (
Ypage 191).
ESP®(Electronic Stability Program)
Important safety notes
GWARNING
If ESP
®is malfunctioning it will not provide
any vehicle stabilization. There is an increased
risk of skidding or of an accident.
Exercise caution when continuing to drive.
Have ESP
®checked at a qualified specialist
workshop.
!Do not run the vehicle on a roller dynamom-
eter (e.g. for performance tests). If you must
operate the vehicle on a roller dynamometer, please consult a qualified specialist workshop
in advance. You could otherwise damage the
drive train or the brake system.
If you activate or deactivate the all-wheel drive
in a vehicle with this option, ESP
®will be deac-
tivated for the duration of the activation/deac-
tivation process.
If ESP
®is malfunctioning, the hindicator
lamp lights up while the engine is running and
the engine power may be reduced
(
Ypage 190).
iOnly use wheels with the recommended tire
sizes. Only then will ESP®function properly.
4ETS (Electronic Traction System)
!A function or performance test should only
be carried out on a two-axle dynamometer.
Before you operate the vehicle on such a
dynamometer, please consult a qualified
workshop. You could otherwise damage the
drive train or the brake system.
4ETS is only active when all-wheel drive is acti-
vated (
Ypage 145).
4ETS ensures permanent drive for all four
wheels, and together with ESP
®it improves the
vehicle's traction.
If a driven wheel spins due to lack of traction:
RWhen pulling away, make use of the traction
control integrated in ESP®. Depress the
accelerator pedal as far as necessary.
RWhile driving, slowly take your foot off the
accelerator pedal.
In wintry driving conditions, always use winter
tires (M+S tires) and if necessary, snow chains
(
Ypage 246). This is the only way to get the full
benefit from the all-wheel drive system.
Crosswind Assist
Crosswind Assist does not work if ESP®is deac-
tivated or disabled because of a malfunction.
Crosswind Assist does not react:
Rin the event of severe jolts and vibrations, e.g.
as a result of uneven surfaces or potholes.
Rif the vehicle loses traction, e.g. on snow or
ice or when hydroplaning.
Rto large and sudden steering movements by
the driver.
Driving safety systems55
Safety
Z
Page 65 of 286

ProblemPossible causes/consequences andMSolutions
The engine cannot be
started using the key.The on-board voltage is too low.
XSwitch off all non-essential consumers, such as interior lighting, and
try to start the engine again.
If this does not work:
XCheck the starter battery and charge it if necessary (Ypage 228).
or
XJump-start the vehicle (Ypage 238).
or
XConsult a qualified specialist workshop.
You have lost a key.XHave the key deactivated at a qualified specialist workshop.
XReport the loss immediately to the vehicle insurers.
XIf necessary, have the mechanical locks replaced.
Central locking
Important safety notes
GWARNING
If children are left unsupervised in the vehicle,
they could:
Ropen the doors, thus endangering other
people or road users.
Rget out and disrupt traffic.
Roperate the vehicle's equipment.
Additionally, children could set the vehicle in
motion if, for example, they:
Rrelease the parking brake.
Rshifting the automatic transmission out of
park position P
RStart the engine.
There is a risk of an accident and injury.
When leaving the vehicle, always take the
SmartKey with you and lock the vehicle. Never
leave children or animals unattended in the
vehicle. Always keep the SmartKey out of
reach of children.
GWARNING
If persons, particularly children are subjected to prolonged exposure to extreme heat or
cold, there is a risk of injury, possibly even
fatal. Never leave children unattended in the
vehicle.
You can open a locked front door from the inside
at any time. You can open a locked sliding door
or rear door from the inside if it has been previ-
ously unlocked from inside.
Locking and unlocking manually
Central locking buttons
Use the central locking buttons to centrally
lock/unlock either the entire vehicle or just the sliding doors and rear doors from the inside.
Central locking63
Opening and closing
Z
Page 76 of 286

while driving, the restraint systems may not
be able to provide the intended protection.
There is an increased risk of injury, possibly
even fatal.
Engage the driver's and front-passenger seatsso they are facing the direction of travel
before starting the engine.
!When rotating the seats, make sure that
there is sufficient space to do so.
Move the seat forward or back first. This will
help to avoid contact with other parts of the
interior.
Push the handbrake lever down to the stop.
The parking brake or handbrake lever could
otherwise be damaged.
Seat release (example: front-passenger seat)
The driver's seat and front-passenger seat can
be rotated by 50° and 180°.
The seats engage when facing in the direction of travel as well as when facing in the opposite
direction and also engage at an angle of 50° to
the door.
XMake sure that the parking brake has been
engaged and that the handbrake lever has
been pushed down to the stop (
Ypage 128).
XAdjust the steering wheel to provide the nec-
essary space to rotate and adjust the driver's seat (
Ypage 77).
XBefore rotating, push the front-passenger
seat forwards (Ypage 73).
XTo rotate the seat: push lever:on the rear
of the seat towards the center of the vehicle
and rotate the seat slightly inwards.
The rotation device is released.
XRelease lever :.
XTurn the seat about 50° towards the outside
or inside to the desired position.
Twin front-passenger seat
XTo fold a seat cushion forwards: lift the seat
cushion out of front anchorage :.
XPull the seat cushion forwards slightly and out
of rear anchorage;.
XFold the rear edge of the seat cushion up.
iYou can stow various articles in the space
under the twin front-passenger seat.
XTo fold the seat cushion back: fold down
the seat cushion by the rear edge.
XSlide the seat cushion under the seat back-
rest into rear anchorage ;.
XPush down on the seat cushion at the front
until it engages in front anchorage :.
Folding seat
GWARNING
If the key is inserted in the partition sliding
door, it may come into contact with the per-
son on the folding seat. There is a risk of
injury.
Always remove the key from the partition slid-
ing door before a person sits on the folding
seat.
74Seats
Seats, steering wheel and mirrors
Page 85 of 286

The headlamp range control is used to adapt the
downward angle of the headlamp beams in
accordance with the load on your vehicle. The
cone of light from the headlamps changes if
seats are occupied or if the cargo compartmentis being loaded or unloaded. This can impair vis-
ibility and cause glare to oncoming traffic.
You can only adjust the headlamp range while
the engine is running.
XTurn headlamp range control :to the cor-
responding position. The road ahead should
be lit up for 40 mto 100 mand the low-beam
headlamps should not cause glare to oncom-
ing traffic.
Select position gif the vehicle is unladen.
Cornering lamps
The cornering lamps improve the illumination of
the road over a wide angle in the direction you
are turning, enabling better visibility in tight
bends, for example.
The cornering light function switches on
automatically, if:
Ryou are traveling at a speed of less than
25 mph (40 km/h) and you switch on a turn
signal or turn the steering wheel.
Ryou are traveling at a speeds of between
25 mph (40 km/h) and 43 mph (70 km/h) and
turn the steering wheel.
The cornering lamp may remain lit for a short
time, but is automatically switched off after no
more than 3 minutes.
iIf reverse gear is engaged the lamp on the
opposite side of the vehicle switches on
instead.
Hazard warning lamps
GWARNING
The rear exterior light will be covered if you:
Ropen the rear doors by 90°
Ropen the rear dropside.
The vehicle will then be difficult for other road users to see or will not be seen by them at all,
particularly if it is dark or visibility is poor.
There is a risk of an accident.
You should therefore ensure in this and simi-
lar situations that the vehicle is visible from
the rear in accordance with the relevant
national regulations, by using the warning tri-
angle, for instance.
Hazard warning lamp switch
XTo switch on/off: press the£hazard
warning lamp switch.
If you have indicated a turn while the hazard
warning lamps are switched on, only the turn
signal lamps on the side of the vehicle selected
will light up.
The hazard warning lamps switch on automati-
cally if:
Ran air bag is deployed.
Ryou brake sharply and bring the vehicle to a
halt from a speed of more than 45 mph
(70 km/h).
If the hazard warning lamps have been switched
on automatically, press the £hazard warn-
ing lamp switch to switch them off.
iThe hazard warning lamps work even when
the ignition is switched off.
Headlamp cleaning system
The headlamps are cleaned automatically with a
high-pressure water jet if the "Wipe with washer
fluid" function is activated (
Ypage 94) while
the low-beam headlamps are on and the engine is running.
You can find information on refilling washer fluid
in the "Maintenance and care" section
(
Ypage 220).
Exterior lighting83
Lights and windshield wiper s
Z
Page 88 of 286

Switching the rear/cargo compart-
ment lamp on/off
Interior light with switch (example: Cargo Van)
1
Automatic control
2To switch off the interior lighting
3To switch on the interior lighting
Interior light with switch (example: Passenger Van
with rear-compartment air conditioning)
1
To switch on the interior lighting
2To switch off the interior lighting
3Automatic control
For Cargo Vans and Passenger Vans without
convenience control, the switch for the interior
lighting is on the rear interior light in the cargo
compartment/vehicle interior.
If you move the switch to automatic control, the
rear/cargo compartment lamps go on when you
open a door or unlock the vehicle. They switch
off automatically after 20 minutes, or when you
close the doors.
Motion detector
GWARNING
The motion detector sends the invisible infra- red radiation emitted by LEDs (light emitting
diodes).
These LEDs are classified as class 1M lasers
and can damage the retina if you:
Rlook directly into the unfiltered laser beam
of the motion detector for an extended
period
Rlook directly into the laser beam of the
motion detector using optical instruments,
e.g. eyeglasses or a magnifying glass.
There is a risk of injury.
Never look directly into the motion detector.
The load compartment lighting is also switched
on by the motion detector in the load compart-
ment on panel vans equipped with this feature.
If the motion detector detects a movement in
the cargo compartment when the vehicle is sta-
tionary, the cargo compartment lighting
switches on for approximately two minutes.
The cargo compartment lighting can be
switched on by the motion detector within
four seconds if:
Rthe rear interior light switch (Ypage 85) is set
to automatic control.
Rthe vehicle is stationary, the parking brake is
applied and the brake pedal is not being
depressed
or
Rthe selector lever is in position Pon vehicles
with automatic transmission and the brake
pedal is not being depressed and
Rthe vehicle has not been locked from the out-
side using the key
The motion detector switches off automatically
if no change is detected in the vehicle for several
hours, e.g. if a door is opened, if the ignition key
is turned, etc. This prevents the battery from
becoming discharged.
86Interior lighting
Lights and windshield wipers
Page 89 of 286

Changing bulbs
Important safety notes
GDANGER
Xenon bulbs carry a high voltage. You can get an electric shock if you remove the cover of
the Xenon bulb and touch the electrical con-
tacts. There is a risk of fatal injury.
Never touch the parts or the electrical con-
tacts of the Xenon bulb. Always have work on
the Xenon bulbs carried out at a qualified spe-
cialist workshop.
GWARNING
Bulbs, lamps and connectors can get very hot
when operating. If you change a bulb, you
could burn yourself on these components.
There is a risk of injury.
Allow these components to cool down before
changing a bulb.
!Make sure the bulbs are always securely
installed.
If your vehicle is equipped with Bi-Xenon bulbs,
you can recognize this by the following: the cone
of light from the Xenon bulbs moves from the
top to the bottom and back again when you start
the engine. For this to be observed, the low-
beam headlamps must be switched on before
starting the engine.
The bulbs and lamps are an essential compo-
nent of vehicle safety. You must therefore make
sure that these function correctly at all times.
Have the headlamp setting checked regularly.
RAlways switch off the vehicle's lighting sys-
tem before changing a bulb.
This will prevent a short circuit.
RDo not touch the glass tube of new bulbs with your bare hands. Always use a clean, lint-free
cloth or only touch the base of the bulb when
installing.
Even minor contamination can burn into the
glass surface and reduce the service life of the
bulbs.
RDo not use a bulb that has been dropped or
that has scratches on its glass tube.
The bulb could explode.
ROnly use bulbs in closed lamps which have
been designed for this purpose.
ROnly use spare bulbs of the same type and
with the prescribed voltage
RProtect the bulbs from moisture when in use.
If the new bulb still does not light up, consult a
qualified specialist workshop.
RHave the LEDs and bulbs of the following
lamps changed at a qualified specialist work-
shop:
-the additional turn signals in the exterior
mirrors
-the high-mounted brake lamp
-LED daytime running lamps (Bi-Xenon
headlamps)
-Bi-Xenon lamps (Bi-Xenon headlamps)
-front fog lamps
If you require assistance changing bulbs, con-
sult a qualified specialist workshop.
Front bulbs
Overview of bulb replacement – bulb
types
The following bulbs can be replaced. Bulb types can be found in the legend.
Vehicle swit hhalogen headlamps
:
Turn signal: PY21W
;Daytime running lamps: W21W
=Low-beam headlamps: H7 55W
?High-beam headlamps: H7 55W
AParking lamps/standing lamps: W5W
Changing bulbs87
Lights and windshield wipers
Z
Page 92 of 286
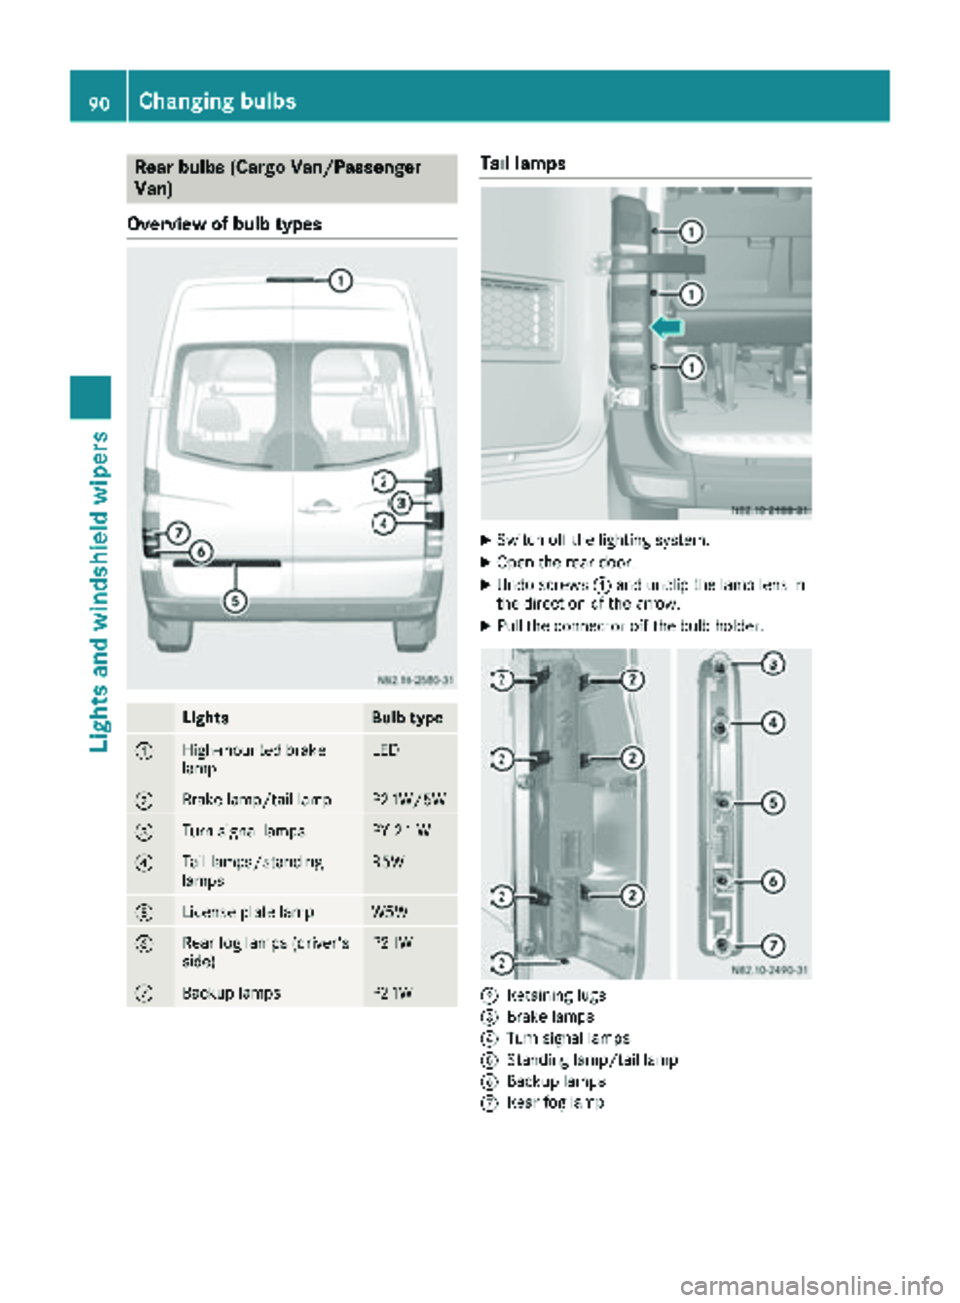
Rear bulbs (Cargo Van/Passenger
Van)
Overview of bulb types
LightsBulb type
:High-mounted brake
lampLED
;Brake lamp/tail lampP21W/5W
=Turn signal lampsPY 21 W
?Tail lamps/standing
lampsR5W
ALicense plate lampW5W
BRear fog lamps (driver's
side)P21W
CBackup lampsP21W
Tail lamps
XSwitch off the lighting system.
XOpen the rear door.
XUndo screws :and unclip the lamp lens in
the direction of the arrow.
XPull the connector off the bulb holder.
;Retaining lugs
=Brake lamps
?Turn signal lamps
AStanding lamp/tail lamp
BBackup lamps
CRear fog lamp
90Changing bulbs
Lights and windshield wipers