2017 MERCEDES-BENZ SL-Class audio
[x] Cancel search: audioPage 188 of 202
Using the main loudspeakers
This function is available in conjunction with the
multimedia system.
You can use the vehicle loudspeakers to listen to
a disc inserted in the rear-compartment drive.
To do so, disc mode (audio CD/audio DVD/
MP3) must be activated on at least one rear
screen.
The headphones' volume setting does not affect
the main loudspeakers.
XTo set on the multimedia system:press the
$ button, for example, to switch on an
audio mode.
XTo select Info6slide and press the con-
troller.
A menu appears.
XTurn the controller until Rear Seat Enter‐tainment System: Audiois brought to the
front.
XPress the controller.
Selecting sound settings
You can select sound settings in the following
operating modes:
RAudio CD/MP3
RVideo DVD
RRadio (active media source in COMAND)
RAUX
XSwitch on an operating mode (e.g. audio CD
mode) (Ypage 187).
XSelect TrebleorBassusing
the :=; buttons on the remote
control and press the 9button to confirm.
An adjustment scale appears.
XSelect a setting using the 9:buttons
and press the 9button to confirm.
Multiple users
Simultaneous use of the rear-compart-
ment disc drive
The two rear-compartment screens can be oper- ated almost entirely independently from one
another. However, a conflict may occur in some
menus if the two screens are used simultane-
ously. The following functions affect both screens:
Rchanging playback options
Rselecting a track (from a track list or folder)
Rusing the play, pause and stop functions
Rfast forward and rewind or scrolling
Rcalling up the DVD menu and navigating
within it
Rsetting the language, subtitles and camera
angle
Rcalling up interactive DVD content
The following functions affect only one screen:
Rchanging audio and video functions as well as picture settings
Rswitching between full screen and the menu
Switching between operating modes
When you exit an operating mode (e.g. audio CD
mode), the current setting is saved. If you call up
this operating mode again later, there are two
possibilities:
Rthe operating mode has been changed on the
other screen.
Rthe operating mode has not been changed.
In the first case, the operating mode appears as
it is on the other screen.
In the second case, the setting appears on the
screen as it was when you last exited the oper-
ating mode.
Picture settings
Overview
You can select the picture settings in video DVD
and AUX mode (Ypage 196).
Adjusting the brightness, contrast and
color
XSwitch to video DVD mode (Ypage 190).
XTo show the menu: press the9button on
the remote control.
186Basic functions
Rear Seat Entertainment System
Page 189 of 202
XSelectDVD-Videousing the :=;
buttons and press the 9button to confirm.
XSelect Brightness,Contrastor Colorusing the 9: buttons and press the 9
button to confirm.
A scale appears.
XSelect a setting using the 9:buttons
and press the 9button to confirm.
Changing the picture format
XTo show the menu: press the9button on
the remote control.
XSelect DVD-Videousing the :=;
buttons and press the 9button to confirm.
The dot in front of one of the menu items
Automatic
, 16:9 Optimized,4:3or Wide‐screenshows the currently set picture for-
mat.
XSelect a format using the 9:buttons
and press the 9button to confirm.
System settings
Note
You can adjust all system settings individually
for each rear screen without affecting the other
screen.
Selecting the display language
XSelect Systemusing the 9=; but-
tons on the remote control and press 9to
confirm.
You see the system menu on the selected rear screen.
XSelect Settingsusing the :button and
press the 9button to confirm.
XConfirm Languageby pressing the 9button.
The list of languages appears. The #dot indi-
cates the current setting.
XSelect a language using the 9:but-
tons and press the 9button to confirm.
The Rear Seat Entertainment System sets the
selected language.
Switching the display design
XSelect Settingsusing the :button and
press the 9button to confirm.
XSelect Day Mode,Night Modeor Automaticwith the 9: buttons and confirm with
the 9button.
The dot indicates the current setting.
DesignExplanation
Day ModeThe display is set perma-
nently to day design.
Night ModeThe display is set perma-
nently to night design.
AutomaticThe display design
changes depending on
the vehicle instrument
cluster illumination.
Setting the brightness
XSelect Settingsusing the :button and
press the 9button to confirm.
XSelect Brightnesswith the 9: but-
tons and confirm with the 9button.
A scale appears.
XAdjust the brightness using the 9:
buttons and press the 9button to confirm.
The bar moves up or down. The picture
becomes lighter or darker.
Showing/hiding the picture
XTo hide the picture: selectDisplay Offin
the system menu with the :;buttons
on the remote control and confirm with the 9
button.
The picture is hidden.
XTo display the picture: press the9button.
Audio CD/DVD and MP3 mode
Important safety notes
GWARNING
The CD/DVD drive is a class 1 laser product.
If you open the housing of the CD/DVD drive,
there is a risk of exposure to invisible laser
Audio CD/DVD and MP3 mode187
Rear Seat Entertainment System
Z
Page 190 of 202
radiation. This laser radiation could damage
your retina. There is a risk of injury.
Never open the housing. Always have main-
tenance and repair work carried out at a quali-fied specialist workshop.
General notes
The rear-compartment drive is a single disc
drive.
Notes on audio mode can be found in the
"Media" section (
Ypage 145):
RNotes on CDs and DVDs
RNotes on MP3 mode
RNotes on copyright
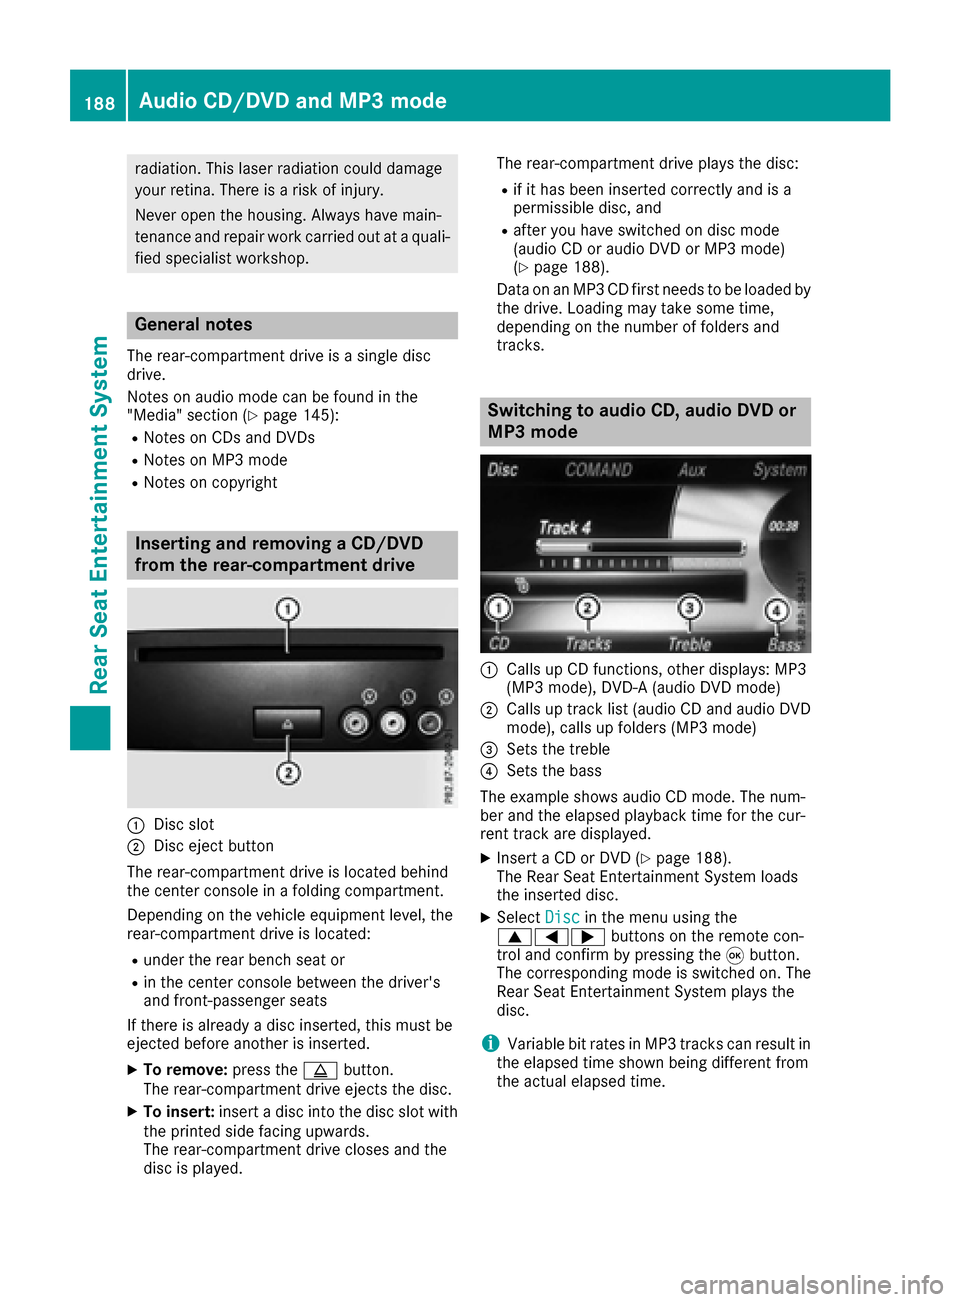
Inserting and removing a CD/DVD
from the rear-compartment drive
:Disc slot
;Disc eject button
The rear-compartment drive is located behind
the center console in a folding compartment.
Depending on the vehicle equipment level, the
rear-compartment drive is located:
Runder the rear bench seat or
Rin the center console between the driver's
and front-passenger seats
If there is already a disc inserted, this must be
ejected before another is inserted.
XTo remove: press theþbutton.
The rear-compartment drive ejects the disc.
XTo insert: insert a disc into the disc slot with
the printed side facing upwards.
The rear-compartment drive closes and the
disc is played. The rear-compartment drive plays the disc:
Rif it has been inserted correctly and is a
permissible disc, and
Rafter you have switched on disc mode
(audio CD or audio DVD or MP3 mode)
(
Ypage 188).
Data on an MP3 CD first needs to be loaded by the drive. Loading may take some time,
depending on the number of folders and
tracks.
Switching to audio CD, audio DVD or
MP3 mode
:Calls up CD functions, other displays: MP3
(MP3 mode), DVD-A (audio DVD mode)
;Calls up track list (audio CD and audio DVD
mode), calls up folders (MP3 mode)
=Sets the treble
?Sets the bass
The example shows audio CD mode. The num-
ber and the elapsed playback time for the cur-
rent track are displayed.
XInsert a CD or DVD (Ypage 188).
The Rear Seat Entertainment System loads
the inserted disc.
XSelect Discin the menu using the
9=; buttons on the remote con-
trol and confirm by pressing the 9button.
The corresponding mode is switched on. The
Rear Seat Entertainment System plays the
disc.
iVariable bit rates in MP3 tracks can result in
the elapsed time shown being different from
the actual elapsed time.
188Audio CD/DVD and MP3 mode
Rear Seat Entertainment System
Page 191 of 202
Selecting a track
Via skip function
XPress the =or; button on the remote
control.
or
XPress the EorF button.
The skip forward function skips to the next
track.
If the elapsed track time has passed 8 sec-
onds, the function skips back to the beginning of the track. If the elapsed time is shorter, it
will skip to the start of the previous track.
If the Random tracks
orRandom folderplayback option has been selected, the track
order is random.
Via track list
In audio CD mode, the track list contains all
tracks on the disc currently playing. In audio
DVD mode, the track list contains all tracks in
the currently active group.
In MP3 mode, the track list shows all tracks in
the currently active folder as well as the folder
structure, allowing you to select any track on the
MP3 CD.
XSelect Tracks(audio CD/DVD mode) or
Folder(MP3 mode) using
the :=; buttons on the remote
control, and confirm by pressing the 9but-
ton.
or
XPress the 9button when the selection win-
dow is active.
The track list appears. The #dot indicates the
current track.
XSelect a track using the 9:buttons
and press the 9button to confirm.
By entering the track number directly
XPress the hbutton on the remote control.
The track entry display appears.
Example: track 2
XPress the ·button. Example: track 23
XPress the
·and¸ buttons in quick
succession.
XWait for approximately three seconds after
making the entry.
You will hear the track which has been
entered. The corresponding basic menu then
reappears.
iIt is not possible to enter numbers that
exceed the number of tracks on the CD or in
the currently active folder.
Fast forwarding/rewinding
XWith the selection window active, press the
= or; button on the remote control
repeatedly until you reach the desired posi-
tion.
or
XPress and hold the EorF button until
the desired position has been reached.
Selecting a folder
This function is available in MP3 mode.
XSelect Folderin MP3 mode using
the :=; buttons on the remote
control and press the 9button to confirm.
or
XPress the 9button when the selection win-
dow is active.
The folder content appears.
XTo switch to the superordinate folder:
select symbol Uusing the 9: but-
tons on the remote control and press the 9
button to confirm.
The display shows the next folder up.
XTo select a folder: select a folder by pressing
the 9: button and confirm by pressing
the 9button.
You will see the tracks in the folder.
XSelect a track using the 9:buttons
and press the 9button to confirm.
The track is played and the selected folder is
now the active folder.
Pause function
This function is available in audio DVD mode.
Audio CD/DVD and MP3 mode189
Rear Seat Entertainment System
Z
Page 192 of 202
XTo pause playback:selectËusing
the :=; buttons on the remote
control and press the 9button to confirm.
The Ë display changes to Ì.
XTo continue playback: selectÌand
press the 9button to confirm.
The Ì display changes to Ë.
Stop function
This function is available in audio DVD mode.
XTo interrupt playback: selectÉusing
the :=; buttons on the remote
control and press the 9button to confirm.
The Ë display changes to Ì.
XTo continue playback: selectÌand
press the 9button to confirm.
Playback continues from the point where it
was interrupted.
XTo stop playback: while playback is inter-
rupted, select Éagain and press the 9
button to confirm.
Playback stops and returns to the beginning
of the DVD. Ìis highlighted.
XTo restart playback: selectÌand press
the 9button to confirm.
Playback starts from the beginning of the
DVD.
Setting the audio format
The content of an audio DVD can be divided into
up to 9 groups. The availability and type of group
depends on the respective DVD. A group can
contain music of different sound qualities
(stereo and multichannel formats, for example),
or bonus tracks.
XSelect DVD-Ausing the :=; but-
tons on the remote control and press 9to
confirm.
XSelect Groupusing the 9: buttons
and press the 9button to confirm.
The list of available audio formats appears.
The #dot indicates the format currently
selected.
XSelect an audio format using the 9:
buttons and press the 9button to confirm.
XTo exit the menu: press the=or;
button.
Playback options
XSelect CD,DVD-Aor MP3using
the :=; buttons on the remote
control and press the 9button to confirm.
A list appears. The #dot indicates the play-
back option currently selected.
XSelect Normal track sequence,Randomtracksor Random folderusing the
9: buttons and press the 9button to
confirm.
The option is switched on. For all options
except Normal track sequence
, you will
see a corresponding display in the selection
window.
iIf you switch the data carrier which you are
currently listening to, the Normal track
sequenceoption is activated automatically. If
an option is selected, it remains selected after
the Rear Seat Entertainment System is
switched on or off.
Switching track information on/off
(MP3 mode only)
If the function is switched on, folder and track
names are displayed.
If the function is switched off, disc and file
names are displayed.
XSelect MP3using the :=; buttons
on the remote control and press the 9button
to confirm.
XSelect Display track informationusing
the 9: buttons and press the 9but-
ton to confirm.
The function is switched on Oor off ª,
depending on the previous status.
Video DVD mode
Important safety notes
GWARNING
The CD/DVD drive is a class 1 laser product.
If you open the housing of the CD/DVD drive,
there is a risk of exposure to invisible laser
radiation. This laser radiation could damage
your retina. There is a risk of injury.
190Video DVD mode
Rear Seat Entertainment System
Page 195 of 202

DVD menu
Calling up th eDVD menu
The DV Dmen uis th emen ustored on th eDV D
itself. It is structured in various ways accordin g
to th eindividual DV Dand permit svarious
action sand settings.
In th ecas eof multi-languag eDVDs ,fo rexample,
you can chang eth eDV Dlanguag ein th eDV D
menu.
XTo show th emenu :press th e9 butto non
th eremot econtrol.
XSelec tDVD-Videoand press th e9 butto non
th eremot econtro lto confirm .
XSelectDVDFunctionsand press th e9 but -
to nto confirm .
XSelectMen uand press th e9 butto nto con-
firm.
The DV Dmen uappears .
Selecting menu item sin th eDVD menu
XSelec t amen uitem usin gth e
9:= ;buttons on th eremot e
contro land press th e9 butto nto confirm .
A men uappears .
XConfirmSelectby pressing th e9 button.
A submen uis displayed.
XIf available ,additional option scan no wbe
selected.
The Rear Seat Entertainmen tSyste mthen
switches bac kto th eDV Dmenu.
iMen uitems whic hcanno tbe selecte dare
shown in gray.
iDependin gon th eDVD, th emen uitems
Bac k(to movie),Pla y,Sto p,E ,F
or GoUpmay no tfunction at all or no tat cer-
tain points in th eDV Dmenu. To indicat ethis,
th eK symbol appears in th edisplay.
Stopping afil m or skipping to th ebegin -
ning or end of ascene
XSelec tany men uitem from th eDV Dmenu.
The men uappears .
XTo stop th efilm: selectth eSto pmen uitem
and press th e9 butto non th eremot econtro l
to confirm .
XTo skipto th eend of ascene: selectth e
F menuitem and press th e9 butto nto
confirm .
XTo skipto th ebeginnin gof ascene: select
th eE menuitem and press th e9 butto n
to confirm .
Moving up one level in th eDVD menu
XCall up th eDV Dmenu.
XPress th e% backbutto non th eremot e
contro lor selec tth ecorrespondin gmen u
item in th eDV Dmenu.
or
XSelec tany men uitem in th eDV Dmen uand
press th e9 remot econtro lbutto nto con-
firm.
XSelec tGo Upand press Wto confirm .
Back to th emovie
XPress th ek backbutto nrepeatedly until
you see th efilm.
or
XSelec tany men uitem in th eDV Dmen uand
press th e9 remot econtro lbutto nto con-
firm.
XSelec tth eBac k(to movie)men uitem in
th emen uand press th e9 butto nto confirm .
Setting th eaudi oforma t
You can use this function to set th eaudio lan -
guag eor th eaudio format .The number of set -
ting sis determined by th eDV Dcontent. It may
also be possible to access th esetting sfrom th e
DV Dmenu. Thi sfunction is no tavailable on all
DVDs .
XTo show th emenu :press th e9 butto non
th eremot econtrol.
XSelec tDVD-Videoand press th e9 butto non
th eremot econtro lto confirm .
XSelectDVDFunctionsand press th e9 but -
to nto confirm .
XSelectAudio Languageand press th e9
butto nto confirm .
A men uappears after ashort while. The #dot
indicates th ecurrentl yset language.
Video DVD mode19 3
Rear Seat Entertainment System
Z
Page 197 of 202

3. Loading the active media source to
the Rear Seat Entertainment System
XSelectCOMANDusing the 9=; but-
tons on the remote control and press 9to
confirm.
A message appears stating that the desired
audio or video source needs to be activated in
the multimedia system. If the media source is
activated in the multimedia system, it is loa-
ded on the Rear Seat Entertainment System
and is then played.
If Rear Off
is activated in the multimedia sys-
tem, the COMAND is off or there is no
active COMAND source.message appears.
Radio mode functions
XTo select a station: press the=or;
button.
or
XPress the EorF button.
The radio selects the previous or next station in the alphabetical station list.
DAB stations are displayed first, followed by
stations with available station names. Sta-
tions showing station frequency are shown
last.
Additional setting option:
XAdjust the sound settings (Ypage 186).
Audio CD mode functions
XTo select by skipping to a track: press the
= or; button.
or
XPress the EorF button.
The skip forward function skips to the next
track. If more than 8 seconds of track time have
elapsed, the function skips back to the begin-
ning of the track.
If less than 8 seconds of track time have
elapsed, the function skips back to the begin-
ning of the previous track.
Additional setting option:
XAdjust the sound settings (Ypage 186).
Audio DVD mode functions
XTo skip to the next or previous group:
press the :button on the remote control.
XTo select KL, highlight using the =
or ; button and press 9.
Additional setting option:
XAdjust the sound settings (Ypage 186).
MP3 mode functions
XTo select a track by skipping to a track:
press the =or; button on the remote
control.
or
XPress the EorF button.
The skip forward function skips to the next
track.
If the elapsed track time has exceeded 8 sec-
onds, the function skips back to the beginning
of the track.
If the elapsed track time is less than 8 sec-
onds, the function skips back to the beginning of the previous track.
Additional setting option:
XAdjust the sound settings (Ypage 186).
DVD video mode functions
To hide the menu:
XPress the 9or: button on the remote
control.
or
XWait about eight seconds.
The menu is hidden.
Active COMAND media source mode195
Rear Seat Entertainment System
Z
Page 198 of 202

Additional setting options:
XAdjust thebrightness, contrast and color
(Ypage 186).
XChange the picture format (Ypage 187).
XAdjust the sound settings (Ypage 186).
AUX mode
Introduction
You can connect external video sources with a
sound and video signal to the Rear Seat Enter-
tainment System:
Rone external video source to each of the rear
screens (AUX display)
Rone external video source to the rear-com-
partment disc drive (AUXdrive)
Operating the external video source; see the
manufacturer's operating instructions.
For further details about externalvideo sources,
please consult an authorized Mercedes-Benz
Center.
Connecting AUX equipment
AUX drive jacks
The AUX drive jacks are located on the rear-
compartment drive to the right of the þ
(
Ypage 183) button.
AUX display jacks
The AUX display jacks are on the sideof the two
rear screens (Ypage 181).
Connecting audio and video cables
XIn sert the audio plugs for the left and right
signals into the corresponding Land Rjacks.
XInsert the videoplug into the Vjack.
Activating AUX mode
AUX drive
Requir ements: the external video source iscon-
nected to the rear-compartment drive and play-
back isselected.
XSelect Auxinthe menu using the
9=; buttons on the remote con-
trol and press the 9button to confirm.
The AUX menu appears.
XSelect Sourcefrom the AUX menu and press
the 9button to confirm.
XSelect Disc drive Auxand press the 9
button to confirm.
Playback starts. Ifan external video source
does not provide a video picture, an audio
menu appears.
Displaying AUX
Requirements: the external video source is con-
nected to the rear-compartment screen and
playback isselected.
XSelect a screen using the thumbwheel on the
remote control (Ypage 182) until "L REAR"
(left-hand screen) or "R REAR"(right-hand
screen) is highlighted in the window.
XSelect Auxinthe menu using the
9=; buttons on the remote con-
trol and press the 9button to confirm.
XSelect Sourcefrom the AUX menu and press
the 9button to confirm.
XSelect DisplayAuxand press the 9button
to confirm.
Playback starts. Ifan external video source
does not provide a video picture, an audio
menu appears.
Adjusting treble and bass
XSelect TrebleorBassinthe AUX menu and
press the 9button on the remote control to
confirm.
A scale appears.
XSelect a setting using the 9or: but-
ton and press the 9button to confirm.
196AUX mode
Rear Seat Entertainment System