Page 183 of 202

Your multimediasyste mequipment
These operatin ginstruction sdescribe all th e
standar dan doptional equipment of your multi-
media system, as available at th etime of going
to press. Country-specifi cdifference sare pos -
sible. Bear in min dthat your vehicle may no t
feature all function sdescribed here. Thi salso
applies to safety-relevan tsystems an dfunc-
tions.
Read th einformation on qualifie dspecialis t
workshop sin th evehicle Operator's Manual.
Overview
Important safet ynotes
GWARNING
The CD/DVD drive is aclass 1lase rproduct.
If you ope nth ehousin gof th eCD/DVD drive,
there is aris kof exposure to invisible lase r
radiation .Thi slase rradiation could damage
your retina. There is aris kof injury.
Never ope nth ehousing. Always hav emain -
tenanc ean drepair wor kcarrie dout at aquali -
fie dspecialis tworkshop .
GWARNING
If objects suc has headphones/headset sor
external audio/video sources are no tsecure d
in th epassenger compartment, they can be
flun garound an dhit vehicle occupants .There
is aris kof injury, fo rexample in th eevent of
sudden braking or asudden change in direc -
tion .
Always stow these items or similar objects
carefully so that they canno tbe flung around ,
fo rexample in alockable vehicle stowag e
compartment.
Equipment
Observ ethat arange of Rear Seat Entertain -
men tSystems are available fo rMercedes-Ben z
vehicles .In this Operator's Manual, th eRear
Seat Entertainmen tSyste mCode 86 4is used
fo rillustration purposes. If you hav e adifferen t
Rear Seat Entertainmen tSyste min your vehicle,
please refer to th emanufacturer's operatin g
instructions.
Component s
The Rear Seat Entertainmen tSyste mincludes :
Rtwoscreens fo rth erea rbehin dth efront-seat
head restraints
Rtw oremot econtrols
Rasingle drive (rear-compartmen tdrive)
RAU Xjack son bot hrea rscreens (AUX display)
RAU Xjack son th erea rdrive (AUX drive)
Rheadphone sfo reac hrea rscree n
Rtwoset sof cordless headphone s
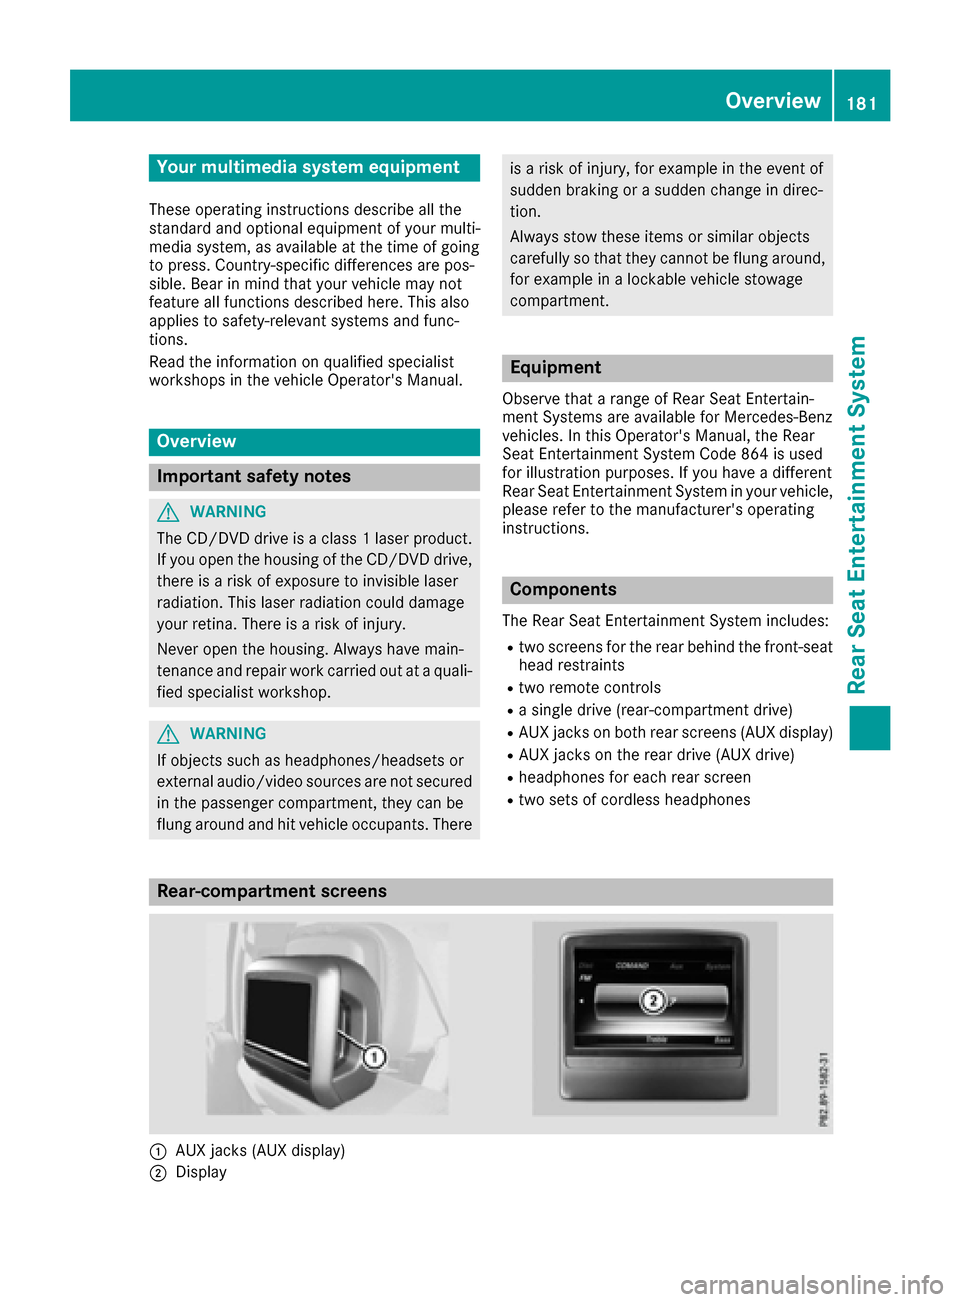
Rear-compartment screens
:AUXjack s(AUX display)
;Display
Overview181
Rear Seat Entertainment System
Z
Page 189 of 202

XSelectDVD-Videousing the :=;
buttons and press the 9button to confirm.
XSelect Brightness,Contrastor Colorusing the 9: buttons and press the 9
button to confirm.
A scale appears.
XSelect a setting using the 9:buttons
and press the 9button to confirm.
Changing the picture format
XTo show the menu: press the9button on
the remote control.
XSelect DVD-Videousing the :=;
buttons and press the 9button to confirm.
The dot in front of one of the menu items
Automatic
, 16:9 Optimized,4:3or Wide‐screenshows the currently set picture for-
mat.
XSelect a format using the 9:buttons
and press the 9button to confirm.
System settings
Note
You can adjust all system settings individually
for each rear screen without affecting the other
screen.
Selecting the display language
XSelect Systemusing the 9=; but-
tons on the remote control and press 9to
confirm.
You see the system menu on the selected rear screen.
XSelect Settingsusing the :button and
press the 9button to confirm.
XConfirm Languageby pressing the 9button.
The list of languages appears. The #dot indi-
cates the current setting.
XSelect a language using the 9:but-
tons and press the 9button to confirm.
The Rear Seat Entertainment System sets the
selected language.
Switching the display design
XSelect Settingsusing the :button and
press the 9button to confirm.
XSelect Day Mode,Night Modeor Automaticwith the 9: buttons and confirm with
the 9button.
The dot indicates the current setting.
DesignExplanation
Day ModeThe display is set perma-
nently to day design.
Night ModeThe display is set perma-
nently to night design.
AutomaticThe display design
changes depending on
the vehicle instrument
cluster illumination.
Setting the brightness
XSelect Settingsusing the :button and
press the 9button to confirm.
XSelect Brightnesswith the 9: but-
tons and confirm with the 9button.
A scale appears.
XAdjust the brightness using the 9:
buttons and press the 9button to confirm.
The bar moves up or down. The picture
becomes lighter or darker.
Showing/hiding the picture
XTo hide the picture: selectDisplay Offin
the system menu with the :;buttons
on the remote control and confirm with the 9
button.
The picture is hidden.
XTo display the picture: press the9button.
Audio CD/DVD and MP3 mode
Important safety notes
GWARNING
The CD/DVD drive is a class 1 laser product.
If you open the housing of the CD/DVD drive,
there is a risk of exposure to invisible laser
Audio CD/DVD and MP3 mode187
Rear Seat Entertainment System
Z
Page 192 of 202

XTo pause playback:selectËusing
the :=; buttons on the remote
control and press the 9button to confirm.
The Ë display changes to Ì.
XTo continue playback: selectÌand
press the 9button to confirm.
The Ì display changes to Ë.
Stop function
This function is available in audio DVD mode.
XTo interrupt playback: selectÉusing
the :=; buttons on the remote
control and press the 9button to confirm.
The Ë display changes to Ì.
XTo continue playback: selectÌand
press the 9button to confirm.
Playback continues from the point where it
was interrupted.
XTo stop playback: while playback is inter-
rupted, select Éagain and press the 9
button to confirm.
Playback stops and returns to the beginning
of the DVD. Ìis highlighted.
XTo restart playback: selectÌand press
the 9button to confirm.
Playback starts from the beginning of the
DVD.
Setting the audio format
The content of an audio DVD can be divided into
up to 9 groups. The availability and type of group
depends on the respective DVD. A group can
contain music of different sound qualities
(stereo and multichannel formats, for example),
or bonus tracks.
XSelect DVD-Ausing the :=; but-
tons on the remote control and press 9to
confirm.
XSelect Groupusing the 9: buttons
and press the 9button to confirm.
The list of available audio formats appears.
The #dot indicates the format currently
selected.
XSelect an audio format using the 9:
buttons and press the 9button to confirm.
XTo exit the menu: press the=or;
button.
Playback options
XSelect CD,DVD-Aor MP3using
the :=; buttons on the remote
control and press the 9button to confirm.
A list appears. The #dot indicates the play-
back option currently selected.
XSelect Normal track sequence,Randomtracksor Random folderusing the
9: buttons and press the 9button to
confirm.
The option is switched on. For all options
except Normal track sequence
, you will
see a corresponding display in the selection
window.
iIf you switch the data carrier which you are
currently listening to, the Normal track
sequenceoption is activated automatically. If
an option is selected, it remains selected after
the Rear Seat Entertainment System is
switched on or off.
Switching track information on/off
(MP3 mode only)
If the function is switched on, folder and track
names are displayed.
If the function is switched off, disc and file
names are displayed.
XSelect MP3using the :=; buttons
on the remote control and press the 9button
to confirm.
XSelect Display track informationusing
the 9: buttons and press the 9but-
ton to confirm.
The function is switched on Oor off ª,
depending on the previous status.
Video DVD mode
Important safety notes
GWARNING
The CD/DVD drive is a class 1 laser product.
If you open the housing of the CD/DVD drive,
there is a risk of exposure to invisible laser
radiation. This laser radiation could damage
your retina. There is a risk of injury.
190Video DVD mode
Rear Seat Entertainment System
Page:
< prev 1-8 9-16 17-24