2017 MERCEDES-BENZ S-Class MAYBACH start stop button
[x] Cancel search: start stop buttonPage 222 of 382

XPress:or9 on the steering wheel to
select the Telephonemenu.
XConfirm by pressing aon the steering
wheel.
You will see one of the following display mes-
sages in the multifunction display:
RPhone READYor the name of the network
provider: the mobile phone has found a net-
work and is ready to receive.
RPhone No Service: there is no network
available or the mobile phone is searching for
a network.
Accepting a call
If someone calls you when you are in the Tele‐phonemenu, a display message appears in the
multifunction display.
You can accept a call at any time regardless of
the menu selected.
XPress the 6button on the steering wheel
to accept an incoming call.
Rejecting or ending a call
XPress the ~button on the steering wheel
to reject or end a call.
Selecting an entry in the phone book
XPress the òbutton on the steering wheel
to open the menu list.
XPress :or9 on the steering wheel to
select the Telephonemenu.
XConfirm by pressing aon the steering
wheel.
XPress the :,9ora button to
switch to the phone book.
XPress :or9 to select the names one
after the other.
or
XTo start rapid scrolling: press and hold:
or 9 for longer than one second.
The names are displayed quickly one after the
other in the phone book.
If you press and hold the :or9 button
for longer than five seconds, the name
appears with the next or previous letter initial letter in the alphabet.
Rapid scrolling stops when you release the
button or reach the end of the list.
XIf only one telephone number is stored for
a name: press the 6ora button to
start dialing.
or
XIf there is more than one telephone num-
ber for a particular name: press the6or
a button to display the numbers.
XPress :or9 to select the number you
want to dial.
XPress the 6ora button to start dialing.
or
XTo exit the phone book: press the~or
% button briefly.
Redialing
The on-board computer saves the last names or
numbers dialed in the redial memory.
XPress the òbutton on the steering wheel
to open the menu list.
XPress :or9 on the steering wheel to
select the Telephonemenu.
XConfirm by pressing aon the steering
wheel.
XPress the 6button to switch to the redial
memory.
XPress the :or9 button to select the
desired name or number.
XPress the 6ora button to start dialing.
or
XTo exit the redial memory: press the~
or % button.
220Menus and submenus
On-board computer and displays
Page 276 of 382
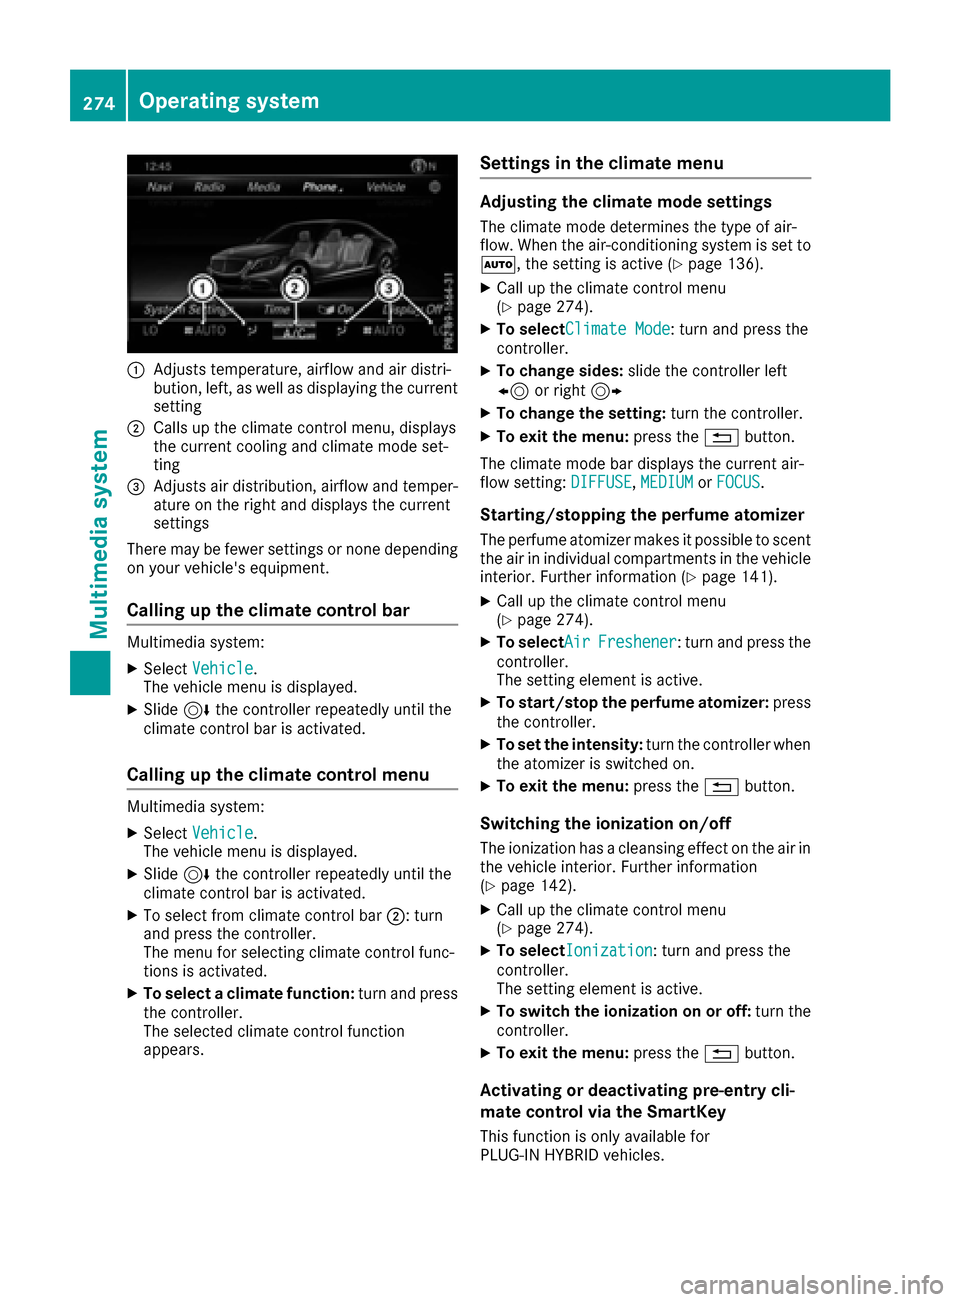
:Adjusts temperature, airflow and air distri-
bution, left, as well as displaying the current
setting
;Calls up the climate control menu, displays
the current cooling and climate mode set-
ting
=Adjusts air distribution, airflow and temper-
ature on the right and displays the current
settings
There may be fewer settings or none depending
on your vehicle's equipment.
Calling up the climate control bar
Multimedia system:
XSelect Vehicle.
The vehicle menu is displayed.
XSlide 6the controller repeatedly until the
climate control bar is activated.
Calling up the climate control menu
Multimedia system:
XSelect Vehicle.
The vehicle menu is displayed.
XSlide 6the controller repeatedly until the
climate control bar is activated.
XTo select from climate control bar ;: turn
and press the controller.
The menu for selecting climate control func-
tions is activated.
XTo select a climate function: turn and press
the controller.
The selected climate control function
appears.
Settings in the climate menu
Adjusting the climate mode settings
The climate mode determines the type of air-
flow. When the air-conditioning system is set to
Ã, the setting is active (
Ypage 136).
XCall up the climate control menu
(Ypage 274).
XTo selectClimate Mode: turn and press the
controller.
XTo change sides: slide the controller left
8 or right 9
XTo change the setting: turn the controller.
XTo exit the menu:press the%button.
The climate mode bar displays the current air-
flow setting: DIFFUSE
,MEDIUMor FOCUS.
Starting/stopping the perfume atomizer
The perfume atomizer makes it possible to scent
the air in individual compartments in the vehicle
interior. Further information (
Ypage 141).
XCall up the climate control menu
(Ypage 274).
XTo selectAirFreshener: turn and press the
controller.
The setting element is active.
XTo start/stop the perfume atomizer: press
the controller.
XTo set the intensity: turn the controller when
the atomizer is switched on.
XTo exit the menu: press the%button.
Switching the ionization on/off
The ionization has a cleansing effect on the air in
the vehicle interior. Further information
(
Ypage 142).
XCall up the climate control menu
(Ypage 274).
XTo selectIonization: turn and press the
controller.
The setting element is active.
XTo switch the ionization on or off: turn the
controller.
XTo exit the menu: press the%button.
Activating or deactivating pre-entry cli-
mate control via the SmartKey
This function is only available for
PLUG‑IN HYBRID vehicles.
274Operating system
Multimedia system
Page 316 of 382
Let an overheated engine cool down before
opening the hood. If there is a fire in the
engine compartment, keep the hood closed
and contact the fire department.
Hybrid vehicles: make sure that you read the
separate operating instructions. You could oth-
erwise fail to recognize dangers, e.g. due to high
voltage.
General notes
Depending on your driving style, the vehicle
consumes up to 0.9 US qt (0.8 l)of oil per
600 miles (1000 km). The oil consumption may be higher than this when the vehicle is new or if
you frequently drive at high engine speeds.
Depending on the engine, the oil dipstick may be
in a different location.
When checking the oil level:
Rpark the vehicle on a level surface
Rthe engine should be switched off for approx-
imately five minutes if the engine is at normal
operating temperature
Rif the engine is not at normal operating tem-
perature, e.g. if the engine was only started
briefly, wait about 30 minutes before carrying
out the measurement
Checking the oil level using the oil dip-
stick (except S 600 and Mercedes-AMG
S 65)
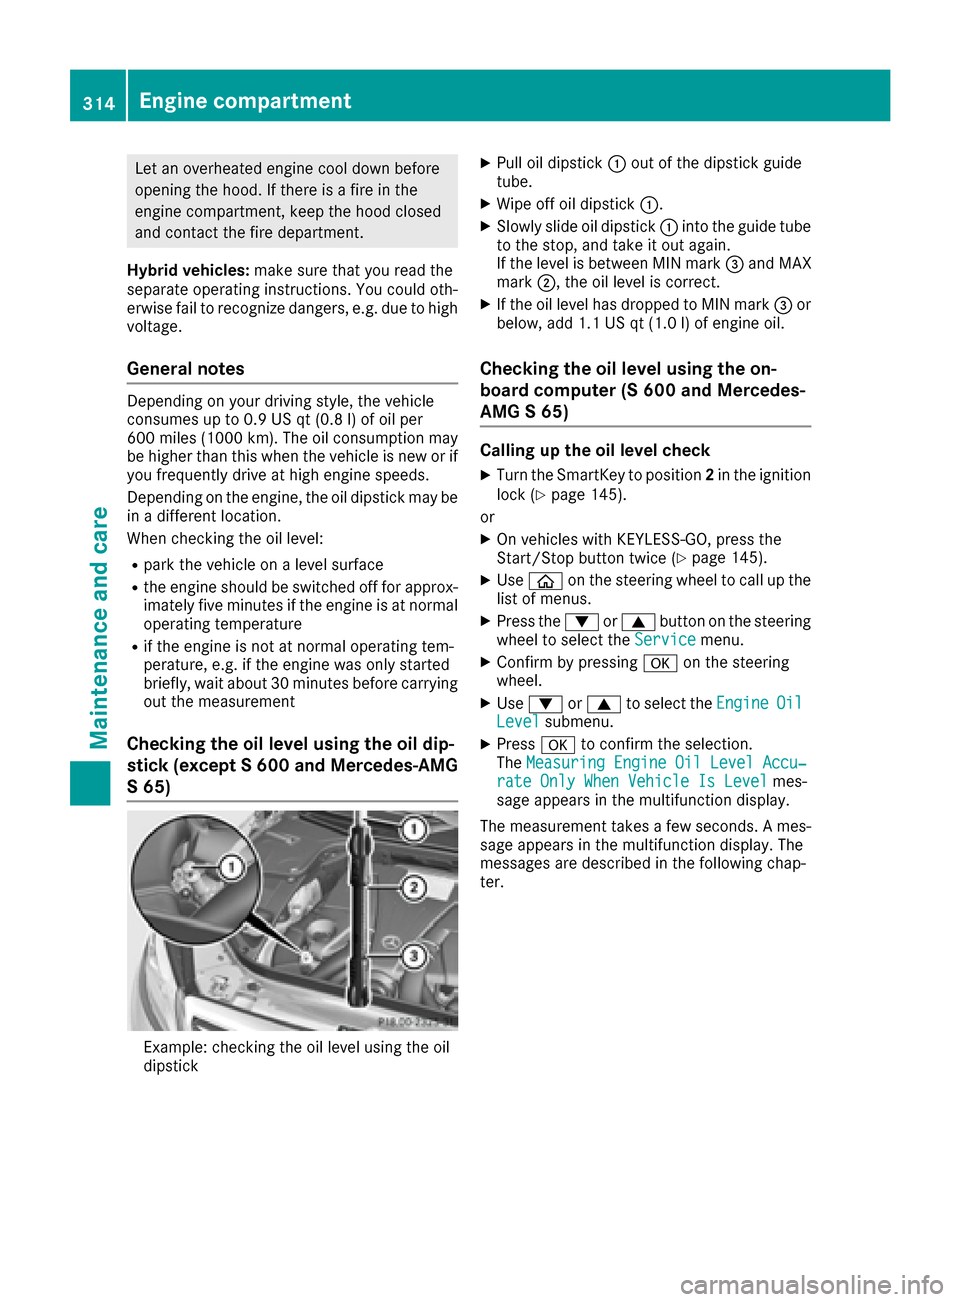
Example: checking the oil level using the oil
dipstick
XPull oil dipstick :out of the dipstick guide
tube.
XWipe off oil dipstick :.
XSlowly slide oil dipstick :into the guide tube
to the stop, and take it out again.
If the level is between MIN mark =and MAX
mark ;, the oil level is correct.
XIf the oil level has dropped to MIN mark =or
below, add 1.1 US qt (1.0 l)of engine oil.
Checking the oil level using the on-
board computer (S 600 and Mercedes-
AMG S 65)
Calling up the oil level check
XTurn the SmartKey to position 2in the ignition
lock (Ypage 145).
or
XOn vehicles with KEYLESS-GO, press the
Start/Stop button twice (Ypage 145).
XUse ò on the steering wheel to call up the
list of menus.
XPress the :or9 button on the steering
wheel to select the Servicemenu.
XConfirm by pressing aon the steering
wheel.
XUse : or9 to select the EngineOilLevelsubmenu.
XPressato confirm the selection.
The Measuring Engine Oil Level Accu‐
rate Only When Vehicle Is Levelmes-
sage appears in the multifunction display.
The measurement takes a few seconds. A mes-
sage appears in the multifunction display. The
messages are described in the following chap-
ter.
314Engine compartment
Maintenance and care
Page 317 of 382
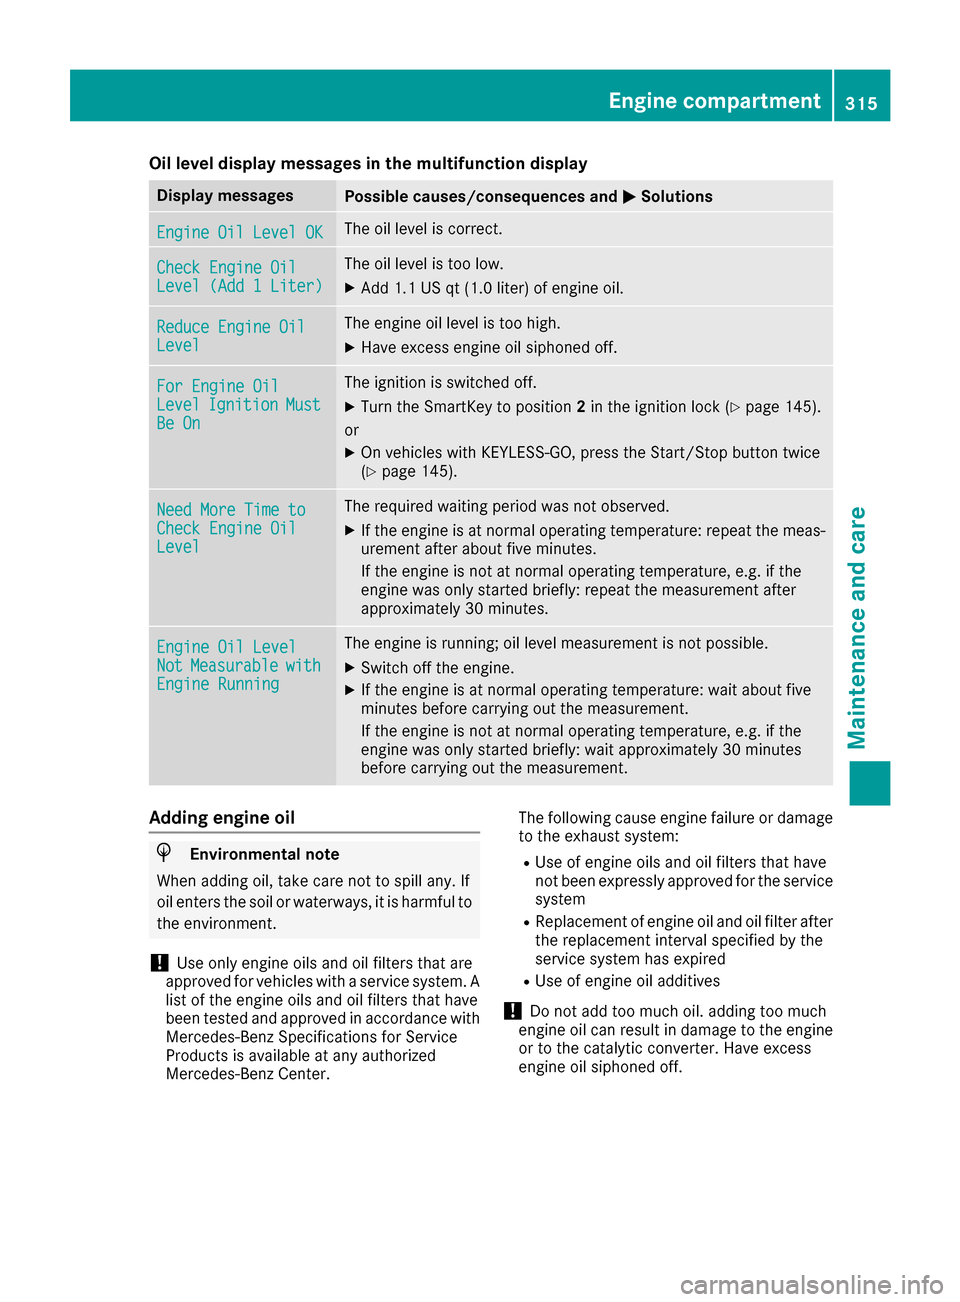
Oil level display messages in the multifunction display
Display messagesPossible causes/consequences andMSolutions
Engine Oil Level OKThe oil level is correct.
Check Engine OilLevel (Add 1 Liter)
The oil level is too low.
XAdd 1.1 US qt (1.0 liter) of engine oil.
Reduce Engine OilLevel
The engine oil level is too high.
XHave excess engine oil siphoned off.
For Engine OilLevelIgnitionMustBe On
The ignition is switched off.
XTurn the SmartKey to position2in the ignition lock (Ypage 145).
or
XOn vehicles with KEYLESS-GO, press the Start/Stop button twice
(Ypage 145).
Need More Time toCheck Engine OilLevel
The required waiting period was not observed.
XIf the engine is at normal operating temperature: repeat the meas-
urement after about five minutes.
If the engine is not at normal operating temperature, e.g. if the
engine was only started briefly: repeat the measurement after
approximately 30 minutes.
Engine Oil LevelNotMeasurablewithEngine Running
The engine is running; oil level measurement is not possible.
XSwitch off the engine.
XIf the engine is at normal operating temperature: wait about five
minutes before carrying out the measurement.
If the engine is not at normal operating temperature, e.g. if the
engine was only started briefly: wait approximately 30 minutes
before carrying out the measurement.
Adding engine oil
HEnvironmental note
When adding oil, take care not to spill any. If
oil enters the soil or waterways, it is harmful to
the environment.
!Use only engine oils and oil filters that are
approved for vehicles with a service system. A list of the engine oils and oil filters that have
been tested and approved in accordance with
Mercedes-Benz Specifications for Service
Products is available at any authorized
Mercedes-Benz Center. The following cause engine failure or damage
to the exhaust system:
RUse of engine oils and oil filters that have
not been expressly approved for the service
system
RReplacement of engine oil and oil filter after
the replacement interval specified by the
service system has expired
RUse of engine oil additives
!Do not add too much oil. adding too much
engine oil can result in damage to the engine
or to the catalytic converter. Have excess
engine oil siphoned off.
Engine compartment315
Maintenance and care
Z
Page 322 of 382
low speeds. Otherwise, when in transmis-
sion positionDor Rthe automatic trans-
mission will automatically switch to park
position Pand block the wheels.
ROperating with the Start/Stop button:
Do not open the driver's door when the
engine is switched off or at very low
speeds. Otherwise, when in transmission
position Dor Rthe automatic transmission
will automatically switch to park position P
and block the wheels.
Observe the following to make sure that the
automatic transmission stays in position Nneu-
tral:
Operating with the SmartKey:
XMake sure that the ignition is switched on.
XMake sure that the vehicle is stationary.
XDepress and hold the brake pedal.
XShift to neutral N.
XRelease the brake pedal.
XRelease the electric parking brake, if neces-
sary.
XSwitch off the ignition and leave the SmartKey
in the ignition lock.
Operating with the Start/Stop button:
XMake sure that the ignition is switched on.
XMake sure that the vehicle is stationary.
XDepress and hold the brake pedal.
XEngage park position P.
XRelease the brake pedal.
XRemove Start/Stop button from ignition lock
(Ypage 145).
XInsert the SmartKey into the ignition lock.
XSwitch on the ignition.
XDepress and hold the brake pedal.
XShift to neutral N.
XRelease the brake pedal.
XRelease the electric parking brake, if neces-
sary.
XSwitch off the ignition and leave the SmartKey
in the ignition lock.
You can wash the vehicle in an automatic car
wash from the very start.
If the vehicle is very dirty, pre-wash it before
cleaning it in an automatic car wash.
After using an automat
ic car wash, wipe off wax
from the windshield and the wiper blades. This will prevent smears and reduce wiping noises
caused by residue on the windshield.
Washing by hand
In some countries, washing by hand is only
allowed at specially equipped washing bays.
Observe the legal requirements in each country.
XDo not use hot water and do not wash the
vehicle in direct sunlight.
XUse a soft sponge to clean.
XUse a mild cleaning agent, such as a car
shampoo approved by Mercedes-Benz.
XThoroughly hose down the vehicle with a gen-
tle jet of water.
XDo not point the water jet directly towards the
air inlet.
XUse plenty of water and rinse out the sponge
frequently.
XRinse the vehicle with clean water and dry
thoroughly with a chamois.
XDo not let the cleaning agent dry on the paint-
work.
Carefully remove all deposits of road salt as
soon as possible when driving in winter.
Power washers
GWARNING
The water jet from a circular jet nozzle (dirt
blasters) can cause invisible exterior damage
to the tires or chassis components. Compo-
nents damaged in this way may fail unexpect-
edly. There is a risk of an accident.
Do not use power washers with circular jet
nozzles to clean the vehicle. Have damaged
tires or chassis components replaced imme-
diately.
!Always maintain a distance of at least
11.8 in (30 cm) between the vehicle and the
power washer nozzle. Information about the
correct distance is available from the equip-
ment manufacturer.
Move the power washer nozzle around when
cleaning your vehicle.
Do not aim directly at any of the following:
RTires
RDoor gaps, roof gaps, joints, etc.
RElectrical components
320Care
Maintenance and care
Page 325 of 382

Cleaning the mirror turn signals
!Only use cleaning agents or cleaning cloths
that are suitable for plastic lenses. Unsuitable
cleaning agents or cleaning cloths could
scratch or damage the plastic lenses of the
mirror turn signals.
XClean the plastic lenses of the mirror turn sig-
nals in the exterior mirror housing using a wet
sponge and mild cleaning agent, e.g.
Mercedes-Benz car shampoo or cleaning
cloths.
Cleaning the sensors
!If you clean the sensors with a power
washer, make sure that you keep a distance
of at least 11.8 in (30 cm)betwee nthe vehicl e
and the power washer nozzle. Information
about the correct distance is available from
the equipment manufacturer.
XClean sensors :of the driving systems with
water, car shampoo and a soft cloth.
Cleaning the rear view camera and 360°
camera
!Do not clean the camera lens and the area
around the rear view camera or 360° camera
with a power washer.
XMake sure that the vehicle is stationary.
XTurn the SmartKey to position 1or 2in the
ignition lock (Ypage 145).
or
XPress the Start/Stop button once or twice on
vehicles with KEYLESS-GO (Ypage 145).
XOpen the camera cover for cleaning via the
multimedia system; see Digital Operator's
Manual.
XTo clean the camera: use clean water and a
soft cloth to clean the camera lens :.
The camera cover closes automatically:
Rif you are driving at speeds above 6 mph
(10 km/ h)
Rif the ignition is switched off
Cleaning the exhaust pipes
GWARNING
The exhaust tail pipe and tail pipe trim can
become very hot. If you come into contact
with these parts of the vehicle, you could burn
yourself. There is a risk of injury.
Always be particularly careful around the
exhaust tail pipe and the tail pipe trim. Allow
these components to cool down before touch-
ing them.
!Do not clean the exhaust pipe with acid-
based cleaning agents, such as bathroom
cleaner or wheel cleaner.
Impurities combined with the effects of road grit and corrosive environmental factors may cause
flash rust to form on the surface. You can
restore the original shine of the exhaust pipe by
cleaning it regularly, especially in winter and
after washing.
Care323
Maintenance and care
Z
Page 330 of 382
XStop the vehicle on solid, non-slippery and
level ground, as far away as possible from
traffic.
XSwitch on the hazard warning lamps.
XSecure the vehicle against rolling away
(Ypage 162).
XIf possible, bring the front wheels into the
straight-ahead position.
XSwitch off the engine.
XOpen the driver's door.
The on-board electronics now have status0.
This is the same as the SmartKey having been
removed.
XRemove the Start/Stop button from the igni-
tion lock (Ypage 145).
or, if the SmartKey is inserted in the ignition
lock:
XRemove the SmartKey from the ignition lock.
XMake sure that the engine cannot be started
via your smartphone (Ypage 147).
XMake sure that the passengers are not endan-
gered as they do so. Make sure that no one is
near the danger area while a wheel is being
changed. Anyone who is not directly assisting
in the wheel change should, for example,
stand behind the barrier.
XGet out of the vehicle. Pay attention to traffic
conditions when doing so.
XClose the driver's door.
MOExtended tires (tires with run-flat
properties)
General notes
With MOExtended tires (tires with run flat char-
acteristics), you can continue to drive your vehi-
cle even if there is a total loss of pressure in one
or more tires. The affected tire must not show
any clearly visible damage.
You can recognize MOExtended tires by the
MOExtended marking which appears on the
sidewall of the tire. You will find this marking
next to the tire size designation, the load-bear-
ing capacity and the speed index (
Ypage 357).
MOExtended tires may only be used in conjunc-
tion with an active tire pressure loss warning
system or with an active tire pressure monitor. If a pressure loss warning message appears
in the multifunction display:
Robserve the instructions in the display mes-
sages (Ypage 252).
Rcheck the tire for damage.
Rif driving on, observe the following notes.
The driving distance possible in run-flat mode is
approximately 50 miles (80 km) when the vehi-
cle is partially laden. When the vehicle is fully
laden it is approximately 19 miles (30 km).
In addition to the vehicle load, the driving dis-
tance possible depends upon:
RVehicle speed
RRoad condition
ROutside temperature
The driving distance possible in run-flat mode
may be reduced by extreme driving conditions
or maneuvers, or it can be increased through a
moderate style of driving.
The driving distance possible in run-fla
t mode is
counted from the moment the tire pressure loss
warning appears in the multifunction display.
You must not exceed a maximum permissible
speed of 50 mph (80 km/h).
When replacing one or all tires, please observe
the following specifications for your vehicle's
tires:
Rsize
Rthe type and
Rthe "MOExtended" mark
If a tire has gone flat and cannot be replaced
with a MOExtended tire, a standard tire may be
used as a temporary measure. Make sure that
you use the proper size and type (summer or
winter tires).
Vehicles equipped with MOExtended tires are
not equipped with a TIREFIT kit at the factory. It
is therefore recommended that you additionally
equip your vehicle with a TIREFIT kit if you mount tires that do not feature run-flat properties, e.g.
winter tires. A TIREFIT kit may be obtained from
a qualified specialist workshop.
Important safety notes
GWARNING
When driving in emergency mode, the driving
characteristics deteriorate, e.g. when corner-
ing, accelerating quickly and when braking.
There is a risk of an accident.
328Flat tire
Breakdown assistance
Page 341 of 382
The battery must be connected and charged.
Otherwise, you:
Rcannot turn the SmartKey to position2in the
ignition lock
Rcannot release the electric parking brake
Rcannot shift the automatic transmission to
position N
Disarm the automatic locking feature before the vehicle is towed (
Ypage 84). You could other-
wise be locked out when pushing or towing the
vehicle.
If the vehicle is in a dangerous area, it can be
towed out of that area with both axles on the
ground. In this case, the towing distance must
not be greater than 165 ft (50 m)and must not
exceed a towing speed of 6 mph (10 km/h). For
longer distances, have the vehicle loaded and
transported.
Installing/removing the towing eye
Installing the towing eye
GWARNING
The exhaust tail pipe may be very hot. There is
a risk of burns when removing the rear cover.
Do not touch the exhaust pipe. Take particular
care when removing the rear cover.
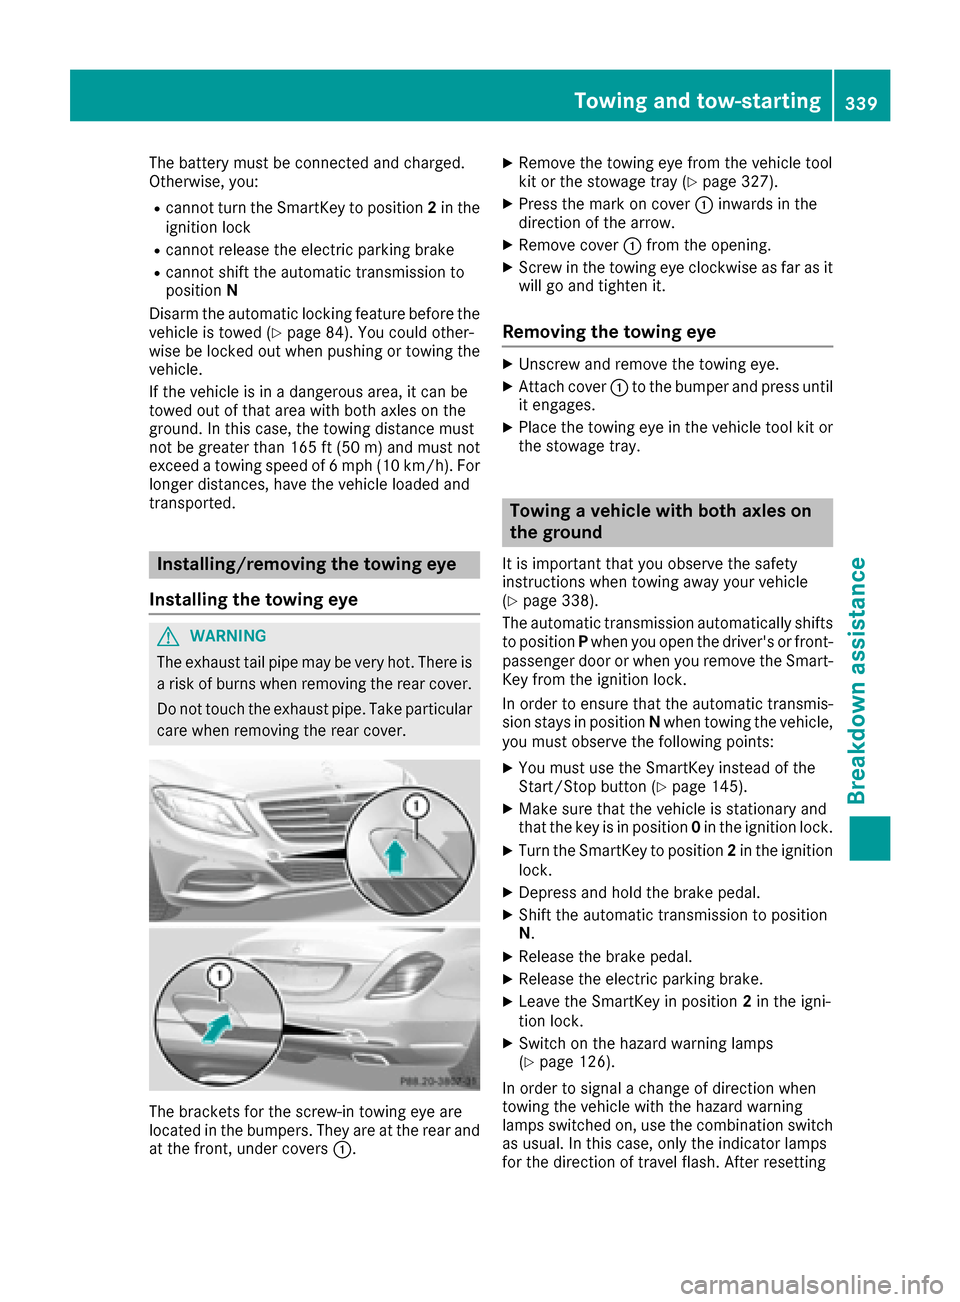
The brackets for the screw-in towing eye are
located in the bumpers. They are at the rear and
at the front, under covers :.
XRemove the towing eye from the vehicle tool
kit or the stowage tray (Ypage 327).
XPress the mark on cover:inwards in the
direction of the arrow.
XRemove cover :from the opening.
XScrew in the towing eye clockwise as far as it
will go and tighten it.
Removing the towing eye
XUnscrew and remove the towing eye.
XAttach cover :to the bumper and press until
it engages.
XPlace the towing eye in the vehicle tool kit or
the stowage tray.
Towing a vehicle with both axles on
the ground
It is important that you observe the safety
instructions when towing away your vehicle
(
Ypage 338).
The automatic transmission automatically shifts
to position Pwhen you open the driver's or front-
passenger door or when you remove the Smart-
Key from the ignition lock.
In order to ensure that the automatic transmis-
sion stays in position Nwhen towing the vehicle,
you must observe the following points:
XYou must use the SmartKey instead of the
Start/Stop button (Ypage 145).
XMake sure that the vehicle is stationary and
that the key is in position 0in the ignition lock.
XTurn the SmartKey to position 2in the ignition
lock.
XDepress and hold the brake pedal.
XShift the automatic transmission to position
N .
XRelease the brake pedal.
XRelease the electric parking brake.
XLeave the SmartKey in position 2in the igni-
tion lock.
XSwitch on the hazard warning lamps
(Ypage 126).
In order to signal a change of direction when
towing the vehicle with the hazard warning
lamps switched on, use the combination switch
as usual. In this case, only the indicator lamps
for the direction of travel flash. After resetting
Towing and tow-starting339
Breakdown assistance
Z