2017 MERCEDES-BENZ S-Class MAYBACH roof
[x] Cancel search: roofPage 134 of 382
Overview of climate control systems
General notes
Observe the settings recommended on the fol-
lowing pages. The windows could otherwise fog
up.
To prevent the windows from fogging up:
Rswitch off climate control only briefly
Rswitch on air-recirculation mode only briefly
Rswitch on the cooling with air dehumidifica-
tion function
Rswitch on the defrost windshield function
briefly, if required
Climate control regulates the temperature and
air humidity in the vehicle interior. The air filter
cleans the air, thus improving the interior cli-
mate.
The "Cooling with air dehumidification" function
is available only when the engine is running.
Optimum climate control is only achieved with
the side windows and roof closed.
If you start the engine using your smartphone,
the last selected climate control setting is reac-
tivated (
Ypage 147).
The residual heat function can only be activated
or deactivated with the ignition switched off
(
Ypage 140).
To enable the air conditioning, pollutant moni-
toring and air filtering systems to function cor-
rectly, an interior filter must be used at all times. Ensure that the filter is properly installed and
that the filter housing in the engine compart-
ment is correctly and tightly sealed by the cover at all times during operation. Use filters that
have been recommended and approved by
Mercedes-Benz. Always have service work car-
ried out at a qualified specialist workshop.
The integrated filter filters out most particles of
dust and soot and completely filters out pollen.
It also reduces gaseous pollutants and odors. A
clogged filter reduces the amount of air suppliedto the vehicle interior. For this reason, you
should always observe the interval for replacing
the filter, which is specified in the Maintenance
Booklet. As it depends on environmental condi- tions, e.g. heavy air pollution, the interval may
be shorter than stated in the Maintenance Book-
let.
iVentilate the vehicle for a brief period during
warm weather, e.g. using the convenience
opening feature (
Ypage 92). This will speed
up the cooling process and the desired inte-
rior t
emperature will be reached more
quickly.
iIt is possible that the blower may be activa-
ted automatically 60 minutes after the Smart-
Key has been removed depending on various
factors, e.g. the outside temperature. In vehi-
cles with the KEYLESS-GO or KEYLESS-GO
start function, the blower can switch on auto-
matically after the engine has been switched
off and the door opened. The vehicle is then
ventilated for 30 minutes to dry the automatic
climate control.
iHybrid vehicles: observe the notes on cli-
mate control in the separate Operator's Man-
ual.
132Overview of climate control systems
Climate control
Page 150 of 382
Rthe panic alarm is not activated
Rthe hazard warning lamps are switched off
Rthe hood is closed.
Rthe doors are closed and locked
Rthe windows and sliding sunroof are closed
Also make sure that:
Rthe fuel tank is sufficiently filled
Rthe starter battery is sufficiently charged
GWARNING
Limbs could be crushed or trapped if the
engine is started unintentionally during ser-
vice or maintenance work. There is a risk of
injury.
Always secure the engine against uninten-
tional starting before carrying out mainte-
nance or repair work.
Make sure that the engine cannot be started via
your smartphone before carrying out mainte-
nance or repairs. You can prevent an engine
start via your smartphone, for example, if you:
Rswitch on the hazard warning lamps
Rdo not lock the doors
Ropen the hood
Pulling away
General notes
GWARNING
If the engine speed is above the idling speed
and you engage transmission position Dor R,
the vehicle could pull away suddenly. There is
a risk of an accident.
When engaging transmission position Dor R,
always firmly depress the brake pedal and do not simultaneously accelerate.
Depress the accelerator carefully when pulling
away.
The vehicle locks centrally once you have pulled
away. The locking knobs in the doors drop down.
You can open the doors from the inside at any
time.
You can also deactivate the automatic locking
feature (
Ypage 84). It is only possible to shift the transmission from
position
Pto the desired position if you depress
the brake pedal. Only then is the parking lock
released.
If you do not depress the brake pedal, the
DIRECT SELECT lever can still be moved but the
parking lock remains engaged.
iUpshifts take place at higher engine speeds
after a cold start. This helps the catalytic con-
verter to reach its operating temperature
more quickly.
Information on the automatic release of the
electric parking brake (
Ypage 164).
Hill start assist
Hill start assist helps you when pulling away for-
wards or in reverse on an uphill gradient. It holds
the vehicle for a short time after you have
removed your foot from the brake pedal. This
gives you enough time to move your foot from
the brake pedal to the accelerator pedal and to
depress it before the vehicle begins to roll.
GWARNING
After a short time, hill start assist will no lon-
ger brake your vehicle and it could roll away.
There is a risk of an accident and injury.
Therefore, quickly move your foot from the
brake pedal to the accelerator pedal. Never
leave the vehicle when it is held by hill start
assist.
Hill start assist is not active if:
Ryou are pulling away on a level road or on a
downhill gradient.
Rthe transmission is in position i.
Rthe electric parking brake is applied.
RESP®is malfunctioning.
ECO start/stop function
Introduction
Hybrid vehicles: observe the notes on the ECO
start/stop function in the separate operating
instructions.
The ECO start/stop function switches the
engine off automatically if the vehicle is stopped
under certain conditions.
148Driving
Dr iving an d parking
Page 167 of 382
Observe the legal requirements for the country
in which you are driving. Some jurisdictions pro-
hibit the driver from using a mobile phone while
driving a vehicle.
If you make a call while driving, always use
hands-free mode. Only operate the telephone
when the traffic situation permits. If you are
unsure, pull over to a safe location and stop
before operating the telephone.
Bear in mind that at a speed of only 30 mph
(approximately 50 km/h), the vehicle covers a
distance of 44 ft (approximately 14m)per sec-
ond.
Drive sensibly – save fuel
Observe the following tips to save fuel:
XThe tires should always be inflated to the rec-
ommended tire pressure.
XRemove unnecessary loads.
XRemove roof racks when they are not needed.
XWarm up the engine at low engine speeds.
XAvoid frequent acceleration or braking.
XHave all maintenance work carried out as
indicated by the service intervals in the Main-
tenance Booklet or by the service interval dis-
play.
Fuel consumption also increases when driving in cold weather, in stop-start traffic and in hilly ter-
rain.
Drinking and driving
GWARNING
Drinking and driving and/or taking drugs and driving are very dangerous combinations.
Even a small amount of alcohol or drugs can
affect your reflexes, perceptions and judg-
ment.
The possibility of a serious or even fatal acci-
dent is greatly increased when you drink or
take drugs and drive.
Do not drink or take drugs and drive or allow
anyone to drive who has been drinking or tak-
ing drugs.
Emission control
GWARNING
Combustion engines emit poisonous exhaust
gases such as carbon monoxide. Inhaling
these exhaust gases leads to poisoning. There
is a risk of fatal injury. Therefore never leave
the engine running in enclosed spaces with-
out sufficient ventilation.
Certain engine systems are designed to keep
the level of poisonous components in exhaust
fumes within legal limits.
These systems only work at peak efficiency if
they are serviced exactly in accordance with the
manufacturer's specifications. Always have
work on the engine carried out at a qualified
specialist workshop . Mercedes-Benz recom-
mends that you use an authorized Mercedes-
Benz Center for this purpose. In particular, work
relevant to safety or on safety-related systems
must be carried out at a qualified specialist
workshop.
The engine settings must not be changed under any circumstances. Furthermore, all specific
service work must be carried out at regular
intervals and in accordance with the Mercedes-
Benz service requirements. Details can be found in the Maintenance Booklet.
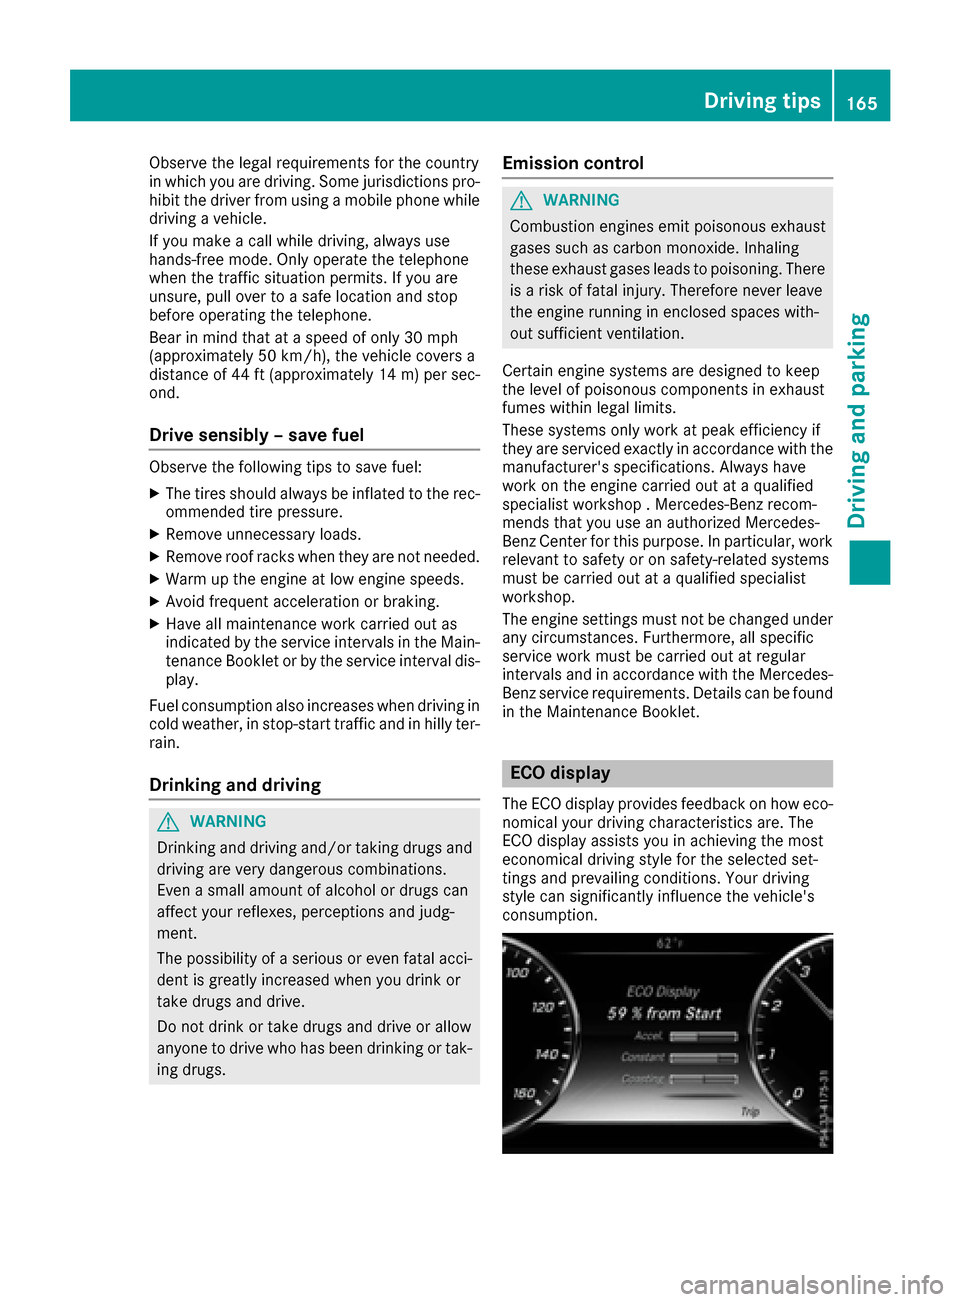
ECO display
The ECO display provides feedback on how eco-
nomical your driving characteristics are. The
ECO display assists you in achieving the most
economical driving style for the selected set-
tings and prevailing conditions. Your driving
style can significantly influence the vehicle's
consumption.
Driving tips165
Driving and parking
Z
Page 171 of 382
GDANGER
If th eexhaust pipe is blocke dor adequate
ventilation is no tpossible, poisonous gase s
suc has carbon monoxide (CO) may ente rth e
vehicle. This is th ecase, e.g. if th evehicl e
become strapped in snow. There is aris kof
fatal injury.
If you leav eth eengin eor th eauxiliary heating
running, mak esur eth eexhaust pipe and area
around th evehicl eare clear of snow. To
ensur ean adequate supply of fresh air, open a
window on th eside of th evehicl ethat is no t
facing int oth ewind.
Hav eyour vehicl ewinter-proofe dat aqualified
specialist workshop at th eonset of winter.
Drive particularly carefully on slipper yroa dsur -
faces. Avoid sudden acceleration ,steering and
braking maneuvers .Do no tuse th ecruise con-
trol or DISTRONI CPLUS.
If th evehicl ethreaten sto skid or canno tbe
stoppe dwhen moving at low speed:
XShift th etransmission to position N.
The outside temperature indicator is no t
designed to serve as an ice-warning device and
is therefor eunsuitable for that purpose .
Changes in th eoutside temperature are dis-
played after ashort delay.
Indicate dtemperatures jus tabov eth efreezing
poin tdo no tguarantee that th eroa dsurfac eis
free of ice .The roa dmay s
till be icy, especially in
wooded area sor on bridges .
You should pay special attention to roa dcondi-
tion swhen temperatures are around freezing
point.
Fo rmor einformation on drivin gwit hsnow
chains, see (
Ypage 345).
Fo rmor einformation on drivin gwit hsummer
tires ,see (
Ypage 345).
Observ eth enote sin th e"Winte roperation "sec -
tion (
Ypage 345).
Driving systems
Mercedes-Benz Intelligent Drive
Mercedes-Ben zIntelligent Drive stand sfor inno-
vative driver assistanc eand safet ysystems
whic henhance comfort and support th edriver in critical situations. Wit
hthese intelligen tco-ordi -
nated systems Mercedes-Ben zhas set amile -
ston eon th epat htoward sautonomous driving.
Mercedes-Ben zIntelligent Drive embraces all
elements of active and passive safet yin on ewell
though tout system –for th esafet yof th evehi-
cle occupant sand that of other roa dusers.
Further information on drivin gsafet ysystems
(
Ypage 65).
Cruise control
Gene ral notes
Cruis econtrol maintains aconstan troa dspeed
for you. It brakes automatically in order to avoid
exceedin gth eset speed. Change int o alower
gear in goo dtime on lon gand steep downhill
gradients .This is especially important if th e
vehicl eis laden .By doin gso, you will mak euse
of th ebraking effec tof th eengine. This relieves
th eload on th ebrak esystem and prevents th e
brakes from overheating and wearing to o
quickly.
You can use cruise control if you wan tto drive at
a steady speed for aprolonged period of time.
You can store any roa dspeed abov e20 mph
(30 km/h).
Import ant safety notes
If you fail to adapt your drivin gstyle, cruise con-
trol can neither reduce th eris kof an acciden t
no roverride th elaws of physics .Cruis econtrol
canno ttak eint oaccoun tth eroad, traffic and
weather conditions. Cruis econtrol is only an
aid. You are responsibl efor maintainin g asafe
distanc eto th evehicl ein front, for vehicl e
speed, for braking in goo dtime and for stayin gin
lane.
Do no tuse cruise control :
Rin roadand traffic condition swhic hdo no t
allow you to maintai n aconstan tspeed, e.g. in
heav ytraffic or on windin groads
Ron slipper yroa dsurfaces. Braking or accel-
erating could caus eth edrive wheels to lose
traction and th evehicl ecould then skid
Rwhen there is poor visibility, e.g. due to fog ,
heav yrain or snow
If there is achang eof drivers, advise th ene w
driver of th espeed stored.
Driving systems169
Driving and parking
Z
Page 291 of 382

Trunk
There are up to four parcel net hooks in the trunk
depending on the equipment installed.
Stowage well under the trunk floor
XTo open:open the trunk lid.
XPress handle ;on the ribbing downwards.
Handle ;folds upwards.
XSwing trunk floor :upwards using handle ;
until it rests against the trunk partition.
XFold out hook =on the underside of the
trunk floor.
XClip hook =into groove ?.
XTo close:unclip hook =from groove ?.
XFasten hook =to the bracket on the under-
side of the trunk floor.
XFold the trunk floor down.
Roof carrier
Important safety notes
GWARNING
When you load the roof, the center of gravity
of the vehicle rises and the driving character-
istics change. If you exceed the maximum roof
load, the driving characteristics, as well as
steering and braking, will be greatly impaired.
There is a risk of an accident.
Never exceed the maximum roof load and
adjust your driving style.
You will find information on the maximum roof
load in the "Technical data" section
(
Ypage 376).
!Mercedes-Benz recommends that you only
use roof carriers that have been tested and
approved for Mercedes-Benz vehicles. This
helps to avoid damage to the vehicle.
Position the load on the roof carrier in such a
way that the vehicle will not sustain damage
even when it is in motion.
Ensure that, depending on the vehicle's
equipment, you can raise the panorama roof
with power tilt/sliding panel fully and open
the trunk lid fully when the roof carrier is
installed.
Stowag earea s289
Stowag ean d features
Z
Page 292 of 382
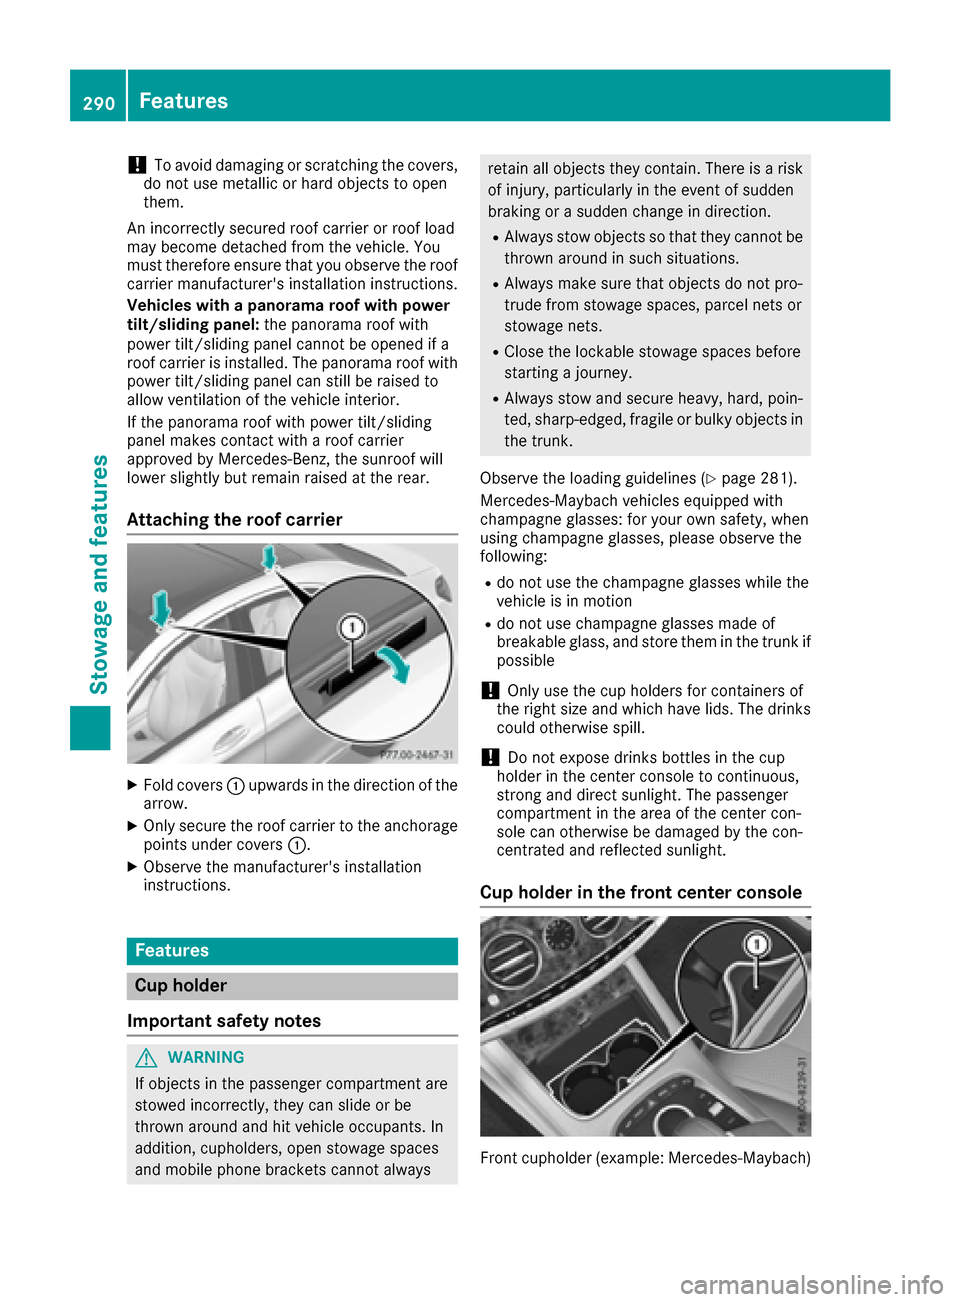
!To avoid damaging or scratching the covers,
do not use metallic or hard objects to open
them.
An incorrectly secured roof carrier or roof load
may become detached from the vehicle. You
must therefore ensure that you observe the roof carrier manufacturer's installation instructions.
Vehicles with a panorama roof with power
tilt/sliding panel: the panorama roof with
power tilt/sliding panel cannot be opened if a
roof carrier is installed. The panorama roof with
power tilt/sliding panel can still be raised to
allow ventilation of the vehicle interior.
If the panorama roof with power tilt/sliding
panel makes contact with a roof carrier
approved by Mercedes-Benz, the sunroof will
lower slightly but remain raised at the rear.
Attaching the roof carrier
XFold covers :upwards in the direction of the
arrow.
XOnly secure the roof carrier to the anchorage
points under covers :.
XObserve the manufacturer's installation
instructions.
Features
Cup holder
Important safety notes
GWARNING
If objects in the passenger compartment are
stowed incorrectly, they can slide or be
thrown around and hit vehicle occupants. In
addition, cupholders, open stowage spaces
and mobile phone brackets cannot always
retain all objects they contain. There is a risk of injury, particularly in the event of sudden
braking or a sudden change in direction.
RAlways stow objects so that they cannot be
thrown around in such situations.
RAlways make sure that objects do not pro-
trude from stowage spaces, parcel nets or
stowage nets.
RClose the lockable stowage spaces before
starting a journey.
RAlways stow and secure heavy, hard, poin-
ted, sharp-edged, fragile or bulky objects in
the trunk.
Observe the loading guidelines (
Ypage 281).
Mercedes-Maybach vehicles equipped with
champagne glasses: for your own safety, when
using champagne glasses, please observe the
following:
Rdo not use the champagne glasses while the
vehicle is in motion
Rdo not use champagne glasses made of
breakable glass, and store them in the trunk if
possible
!Only use the cup holders for containers of
the right size and which have lids. The drinks
could otherwise spill.
!Do not expose drinks bottles in the cup
holder in the center console to continuous,
strong and direct sunlight. The passenger
compartment in the area of the center con-
sole can otherwise be damaged by the con-
centrated and reflected sunlight.
Cup holder in the front center console
Front cupholder (example: Mercedes ‑Maybach)
290Features
Stowage and features
Page 321 of 382
replaced or changed more frequently. Under
arduous operating conditions, the tires must be
checked more often. Further information can beobtained at a qualified specialist workshop, e.g.
an authorized Mercedes-Benz Center.
Driving abroad
An extensive Mercedes-Benz Service network is
also available in other countries. You can obtain
further information from any authorized
Mercedes-Benz Center.
Care
General notes
!
For cleaning your vehicle, do not use any of
the following:
Rdry, rough or hard cloths
Rabrasive cleaning agents
Rsolvents
Rcleaning agents containing solvents
Do not scrub.
Do not touch the surfaces or protective films
with hard objects, e.g. a ring or ice scraper.
You could otherwise scratch or damage the
surfaces and protective film.
!Do not park your vehicle for a long period of
time directly after cleaning, particularly after
cleaning the wheel rim with wheel cleaner.
Wheel cleaner can lead to the increased cor-
rosion of the brake discs and pads. Therefore,
drive for a few minutes after cleaning. By
heating up the brakes, the brake discs and
pads dry. The vehicle can then be parked for a
long period of time.
HEnvironmental note
Dispose of empty packaging and cleaning
cloths in an environmentally responsible man-
ner.
Regular care of your vehicle is a condition for
retaining the quality in the long term.
Use care products and cleaning agents recom-
mended and approved by Mercedes-Benz.
Washing the vehicle and cleaning the
paintwork
Automatic car wash
GWARNING
Braking efficiency is reduced after washing
the vehicle. There is a risk of an accident.
After the vehicle has been washed, brake
carefully while paying attention to the traffic
conditions until full braking power is restored.
!When DISTRONIC PLUS or the HOLD func-
tion is activated, the vehicle brakes automat-
ically in certain situations.
To avoid damage to the vehicle, deactivate
DISTRONIC PLUS and the HOLD function in
the following or similar situations:
Rwhen towing the vehicle
Rin the car wash
!Never clean your vehicle in a Touchless
Automatic Car Wash as these use special
cleaning agents. These cleaning agents can
damage the paintwork or plastic parts.
!Make sure that:
Rthe side windows and the sliding sunroof
are fully closed
Rthe blower is switched off
Rthe windshield wiper switch is at position 0
Rthe 360° camera or rear view camera is
switched off
The vehicle may otherwise be damaged
!If the SmartKey is within the rear detection
range of KEYLESS-GO, the following situa-
tions, for example, could lead to the uninten-
tional opening of the trunk:
Rusing a car wash
Rusing a power washer
Make sure that the SmartKey is at least 10 ft
(3 m) away from the vehicle.
!Make sure that the automatic transmission
is in neutral position Nwhen washing your
vehicle in a tow-through car wash. The vehicle
may otherwise be damaged.
ROperating with the SmartKey:
Do not remove the SmartKey from the igni-
tion lock. Do not open the driver's door
when the engine is switched off or at very
Care319
Maintenance and care
Z
Page 322 of 382
low speeds. Otherwise, when in transmis-
sion positionDor Rthe automatic trans-
mission will automatically switch to park
position Pand block the wheels.
ROperating with the Start/Stop button:
Do not open the driver's door when the
engine is switched off or at very low
speeds. Otherwise, when in transmission
position Dor Rthe automatic transmission
will automatically switch to park position P
and block the wheels.
Observe the following to make sure that the
automatic transmission stays in position Nneu-
tral:
Operating with the SmartKey:
XMake sure that the ignition is switched on.
XMake sure that the vehicle is stationary.
XDepress and hold the brake pedal.
XShift to neutral N.
XRelease the brake pedal.
XRelease the electric parking brake, if neces-
sary.
XSwitch off the ignition and leave the SmartKey
in the ignition lock.
Operating with the Start/Stop button:
XMake sure that the ignition is switched on.
XMake sure that the vehicle is stationary.
XDepress and hold the brake pedal.
XEngage park position P.
XRelease the brake pedal.
XRemove Start/Stop button from ignition lock
(Ypage 145).
XInsert the SmartKey into the ignition lock.
XSwitch on the ignition.
XDepress and hold the brake pedal.
XShift to neutral N.
XRelease the brake pedal.
XRelease the electric parking brake, if neces-
sary.
XSwitch off the ignition and leave the SmartKey
in the ignition lock.
You can wash the vehicle in an automatic car
wash from the very start.
If the vehicle is very dirty, pre-wash it before
cleaning it in an automatic car wash.
After using an automat
ic car wash, wipe off wax
from the windshield and the wiper blades. This will prevent smears and reduce wiping noises
caused by residue on the windshield.
Washing by hand
In some countries, washing by hand is only
allowed at specially equipped washing bays.
Observe the legal requirements in each country.
XDo not use hot water and do not wash the
vehicle in direct sunlight.
XUse a soft sponge to clean.
XUse a mild cleaning agent, such as a car
shampoo approved by Mercedes-Benz.
XThoroughly hose down the vehicle with a gen-
tle jet of water.
XDo not point the water jet directly towards the
air inlet.
XUse plenty of water and rinse out the sponge
frequently.
XRinse the vehicle with clean water and dry
thoroughly with a chamois.
XDo not let the cleaning agent dry on the paint-
work.
Carefully remove all deposits of road salt as
soon as possible when driving in winter.
Power washers
GWARNING
The water jet from a circular jet nozzle (dirt
blasters) can cause invisible exterior damage
to the tires or chassis components. Compo-
nents damaged in this way may fail unexpect-
edly. There is a risk of an accident.
Do not use power washers with circular jet
nozzles to clean the vehicle. Have damaged
tires or chassis components replaced imme-
diately.
!Always maintain a distance of at least
11.8 in (30 cm) between the vehicle and the
power washer nozzle. Information about the
correct distance is available from the equip-
ment manufacturer.
Move the power washer nozzle around when
cleaning your vehicle.
Do not aim directly at any of the following:
RTires
RDoor gaps, roof gaps, joints, etc.
RElectrical components
320Care
Maintenance and care