2017 MERCEDES-BENZ S-Class MAYBACH remove seats
[x] Cancel search: remove seatsPage 119 of 382
Position of the steering wheel and the
driver's seat for driving
The steering wheel and the driver's seat are
moved to the previously set position if:
Rthe driver's door is closed and you insert the
SmartKey into the ignition lock
Ryou close the driver's door when the ignition
is switched on
Ryou press the Start/Stop button once
iThe steering wheel and the driver's seat only
return to the last set position if the driving
position is stored after the seat or steering
column has been adjusted.
The last position of the steering wheel or seat is
stored if:
Rthe ignition is switched off
Rthe setting is stored with the memory function
(Ypage 120).
Crash-responsive EASY-EXIT feature
If the crash-responsive EASY-EXIT feature is trig-
gered in an accident, the steering column will
move upwards when the driver's door is opened
or the SmartKey is removed from the ignition
lock. This makes it easier to exit the vehicle and rescue the occupants.
The crash-responsive EASY-EXIT feature is only
operational if the EASY-EXIT/ENTRY feature is
activated in the multimedia system (see the sep-
arate Operator's Manual).
Mirrors
Rear-view mirror
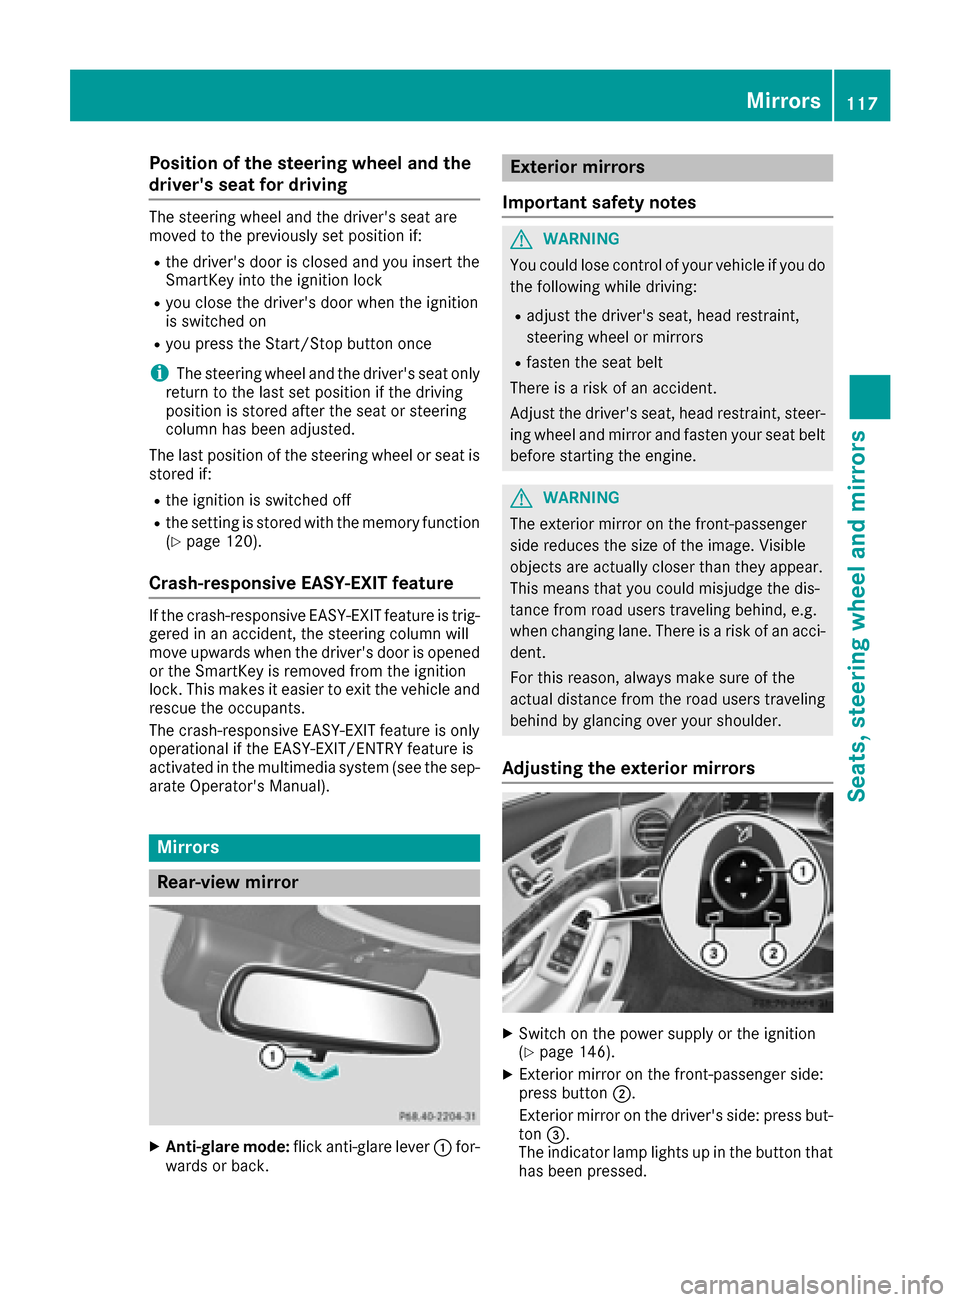
XAnti-glare mode: flick anti-glare lever :for-
wards or back.
Exterior mirrors
Important safety notes
GWARNING
You could lose control of your vehicle if you do the following while driving:
Radjust the driver's seat, head restraint,
steering wheel or mirrors
Rfasten the seat belt
There is a risk of an accident.
Adjust the driver's seat, head restraint, steer-
ing wheel and mirror and fasten your seat belt before starting the engine.
GWARNING
The exterior mirror on the front-passenger
side reduces the size of the image. Visible
objects are actually closer than they appear.
This means that you could misjudge the dis-
tance from road users traveling behind, e.g.
when changing lane. There is a risk of an acci-
dent.
For this reason, always make sure of the
actual distance from the road users traveling
behind by glancing over your shoulder.
Adjusting the exterior mirrors
XSwitch on the power supply or the ignition
(Ypage 146).
XExterior mirror on the front-passenger side:
press button ;.
Exterior mirror on the driver's side: press but-
ton =.
The indicator lamp lights up in the button that
has been pressed.
Mirrors117
Seats, steering wheel and mirrors
Z
Page 288 of 382
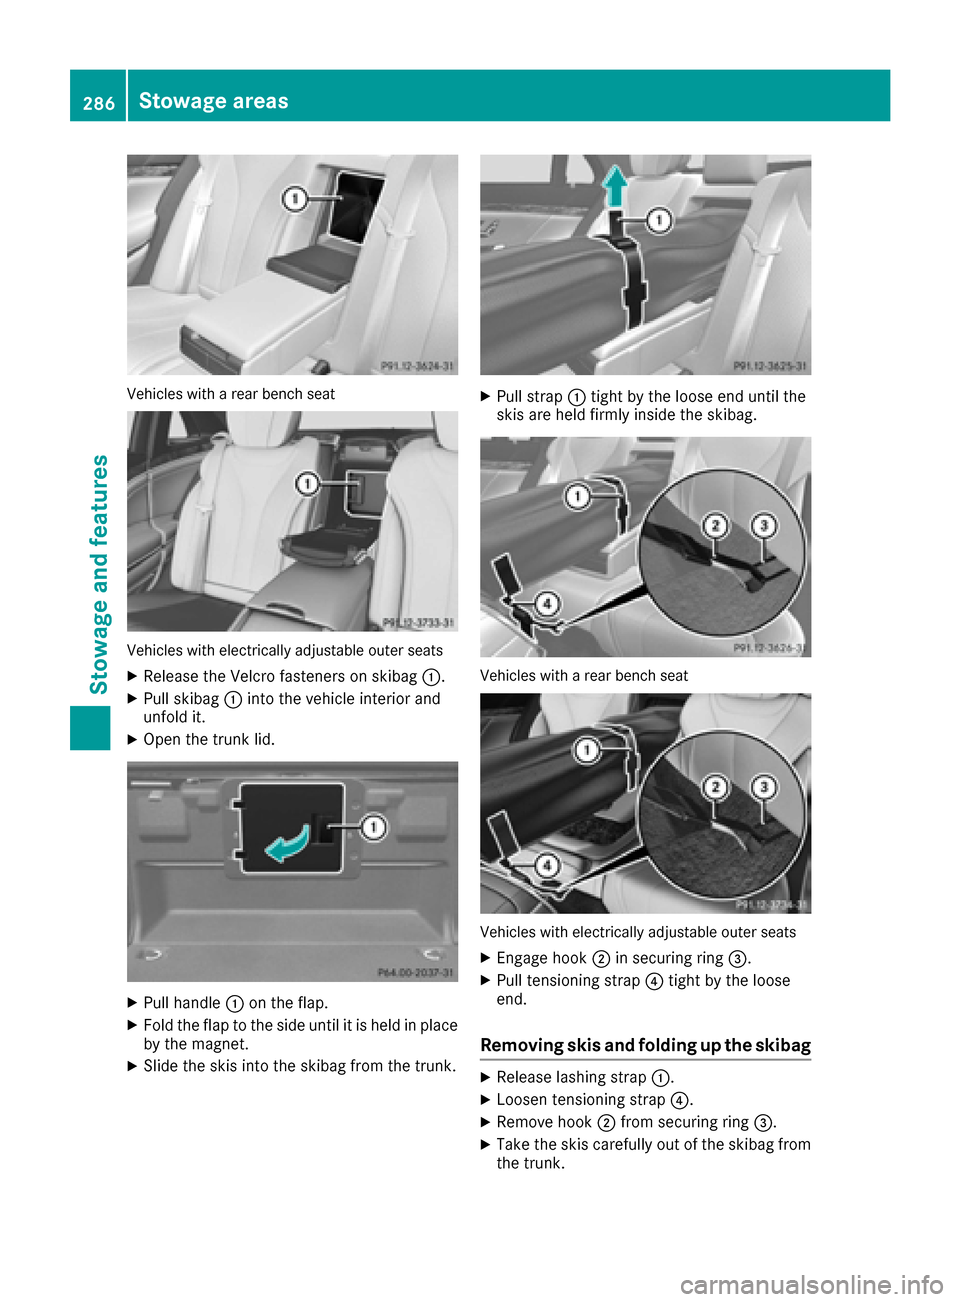
Vehicles with a rear bench seat
Vehicles with electrically adjustable outer seats
XRelease the Velcro fasteners on skibag:.
XPull skibag:into the vehicle interior and
unfold it.
XOpen the trunk lid.
XPull handle :on the flap.
XFold the flap to the side until it is held in place
by the magnet.
XSlide the skis into the skibag from the trunk.
XPull strap :tight by the loose end until the
skis are held firmly inside the skibag.
Vehicles with a rear bench seat
Vehicles with electrically adjustable outer seats
XEngage hook ;in securing ring =.
XPull tensioning strap ?tight by the loose
end.
Removing skis and folding up the skibag
XRelease lashing strap :.
XLoosen tensioning strap ?.
XRemove hook;from securing ring =.
XTake the skis carefully out of the skibag from
the trunk.
286Stowage areas
Stowage and features
Page 293 of 382
XTo open:open the stowage compartment
(Ypage 282).
XOpen the protective flap if necessary.
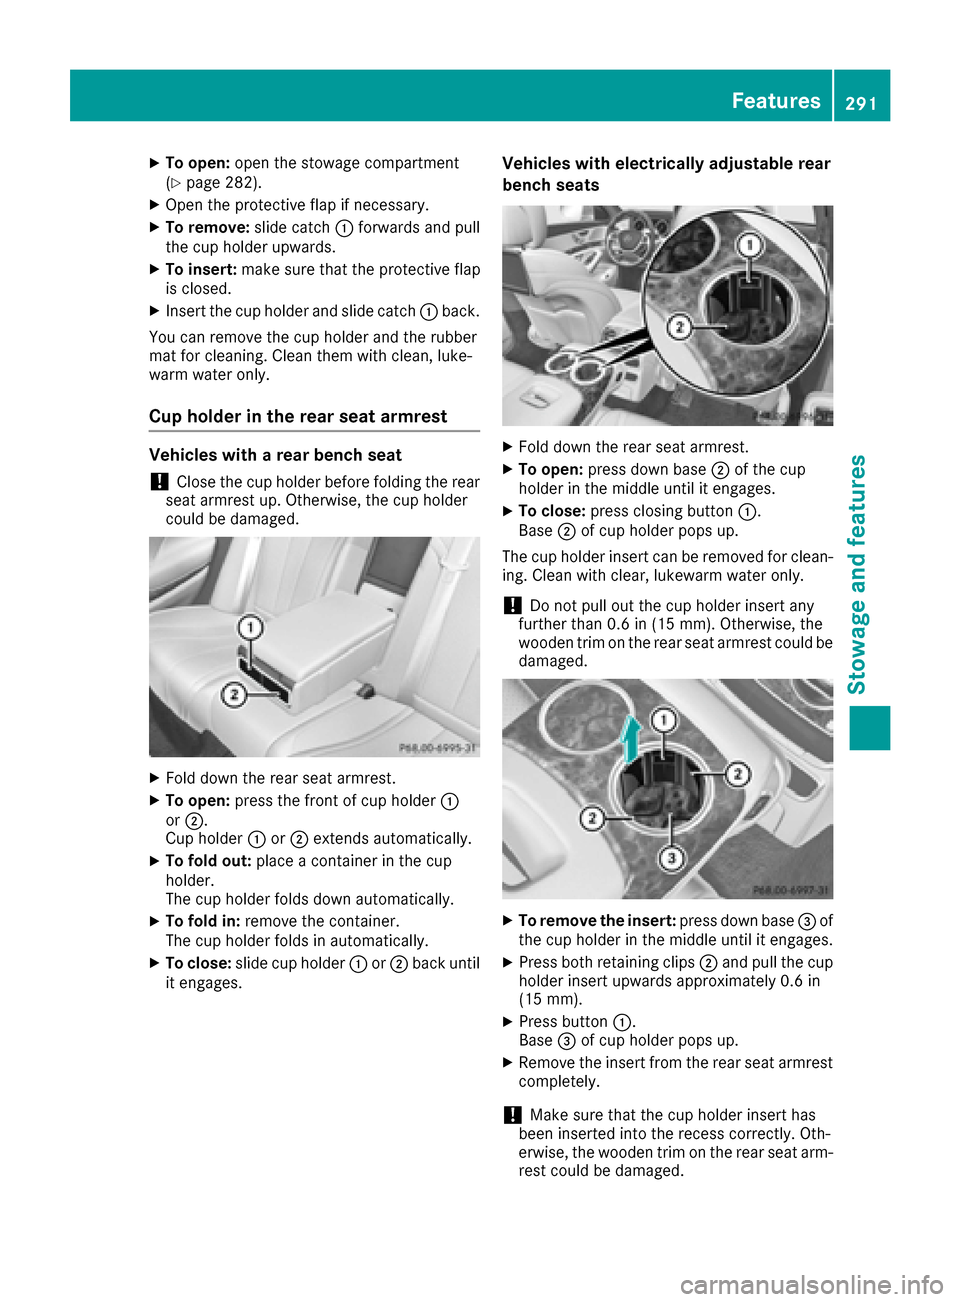
XTo remove: slide catch:forwards and pull
the cup holder upwards.
XTo insert: make sure that the protective flap
is closed.
XInsert the cup holder and slide catch :back.
You can remove the cup holder and the rubber
mat for cleaning. Clean them with clean, luke-
warm water only.
Cup holder in the rear seat armrest
Vehicles with a rear bench seat
!Close the cup holder before folding the rear
seat armrest up. Otherwise, the cup holder
could be damaged.
XFold down the rear seat armrest.
XTo open: press the front of cup holder :
or ;.
Cup holder :or; extends automatically.
XTo fold out: place a container in the cup
holder.
The cup holder folds down automatically.
XTo fold in: remove the container.
The cup holder folds in automatically.
XTo close: slide cup holder :or; back until
it engages.
Vehicles with electrically adjustable rear
bench seats
XFold down the rear seat armrest.
XTo open: press down base ;of the cup
holder in the middle until it engages.
XTo close: press closing button :.
Base ;of cup holder pops up.
The cup holder insert can be removed for clean-
ing. Clean with clear, lukewarm water only.
!Do not pull out the cup holder insert any
further than 0.6 in (15 mm). Otherwise, the
wooden trim on the rear seat armrest could be
damaged.
XTo remove the insert: press down base=of
the cup holder in the middle until it engages.
XPress both retaining clips ;and pull the cup
holder insert upwards approximately 0.6 in
(15 mm).
XPress button :.
Base =of cup holder pops up.
XRemove the insert from the rear seat armrest
completely.
!Make sure that the cup holder insert has
been inserted into the recess correctly. Oth-
erwise, the wooden trim on the rear seat arm-
rest could be damaged.
Features291
Stowag ean d features
Z
Page 300 of 382
!Note that work and repairs on the 115 V
power socket should only be carried out by
qualified specialist personnel.
General notes
The 115 V power socket provides an alternating
voltage of 115 V so that small electronic devices
can be connected. These devices, such as
games consoles, chargers and laptops, must not
consume more than a maximum of 150 watts
altogether.
Requirements for operation of these devices:
Rthe electronic device that you connect has a
suitable connector and conforms to stand-
ards specific to the country you are in.
Rthe plug of the electronic device is plugged
correctly into 115 V power socket.
Rthe maximum wattage of the device to be
connected must not exceed 150 watts.
Rthe on-board power supply is within a permis- sible voltage range.
Rthe 12 V sockets in the center console in the
front compartment (Ypage 296) and in the
trunk are functional (Ypage 297).
Using the 115 V power socket
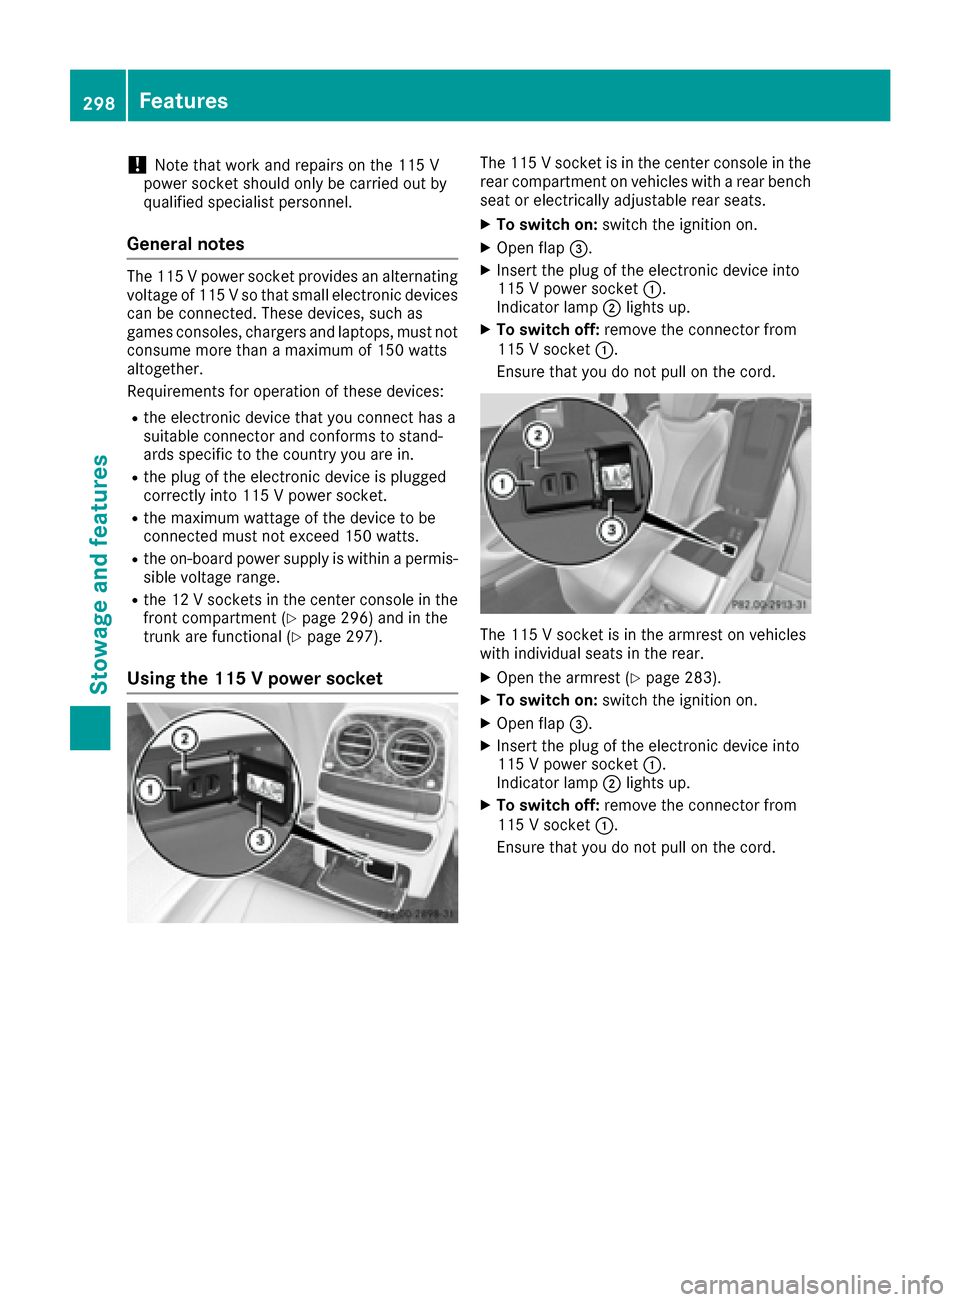
The 115 V socket is in the center console in the
rear compartment on vehicles with a rear bench
seat or electrically adjustable rear seats.
XTo switch on: switch the ignition on.
XOpen flap=.
XInsert the plug of the electronic device into
115 V power socket :.
Indicator lamp ;lights up.
XTo switch off: remove the connector from
115 V socket :.
Ensure that you do not pull on the cord.
The 115 V socket is in the armrest on vehicles
with individual seats in the rear.
XOpen the armrest (Ypage 283).
XTo switch on: switch the ignition on.
XOpen flap=.
XInsert the plug of the electronic device into
115 V power socket :.
Indicator lamp ;lights up.
XTo switch off: remove the connector from
115 V socket :.
Ensure that you do not pull on the cord.
298Features
Stowage and features
Page 334 of 382
Battery (vehicle)
12 V battery – important safety notes
Hybrid vehicles:make sure that you read the
separate Operator's Manual. You could other-
wise fail to recognize dangers, e.g. due to high
voltage.
Special tools and expert knowledge are required
when working on the battery, e.g. removal and
installation. You should therefore have all work
involving the battery carried out at a qualified
specialist workshop.
GWARNING
Work carried out incorrectly on the battery
can lead, for example, to a short circuit and
thus damage the vehicle electronics. This can
lead to function restrictions applying to
safety-relevant systems, e.g the lighting sys-
tem, the ABS (anti-lock braking system) or the
ESP
®(Electronic Stability Program). The oper-
ating safety of your vehicle may be restricted.
You could lose control of the vehicle, for
example:
Rwhen braking
Rin the event of abrupt steering maneuvers
and/or when the vehicle's speed is not
adapted to the road conditions
There is a risk of an accident.
In the event of a short circuit or a similar inci-
dent, contact a qualified specialist workshop
immediately. Do not drive any further. You
should have all work involving the battery car- ried out at a qualified specialist workshop.
For further information about ABS (
Ypage 66)
and ESP®(Ypage 71).
Mercedes-AMG vehicles:
GWARNING
Electrostatic build-up can lead to the creation of sparks, which could ignite the highly explo-
sive gases of a battery. There is a risk of an
explosion.
Before handling the battery, touch the vehicle
body to remove any existing electrostatic
build-up. The highly flammable gas mixture forms when
charging the battery as well as when jump-start-
ing.
Always make sure that neither you nor the bat-
tery is electrostatically charged. A build-up of
electrostatic charge can be caused, for exam-
ple:
Rby wearing clothing made from synthetic
fibers
Rdue to friction between clothing and seats
Rif you push or pull the battery across the car-
pet or other synthetic materials
Rif you wipe the battery with a cloth
GWARNING
During the charging process, a battery produ-
ces hydrogen gas. If a short circuit occurs or
sparks are created, the hydrogen gas can
ignite. There is a risk of an explosion.
RMake sure that the positive terminal of a
connected battery does not come into con- tact with vehicle parts.
RNever place metal objects or tools on a bat-
tery.
RIt is important that you observe the descri-
bed order of the battery terminals when
connecting and disconnecting a battery.
RWhen jump-starting, make sure that the
battery poles with identical polarity are
connected.
RIt is particularly important to observe the
described order when connecting and dis-
connecting the jumper cables.
RNever connect or disconnect the battery
terminals while the engine is running.
GWARNING
Battery acid is caustic. There is a risk of injury.
Avoid contact with skin, eyes or clothing. Do
not inhale any battery gases. Do not lean over
the battery. Keep children away from batter-
ies. Wash away battery acid immediately with
plenty of clean water and seek medical atten-
tion.
All vehicles:
332Battery (vehicle)
Breakdo wn assis tance