2017 MERCEDES-BENZ S-Class COUPE stop start
[x] Cancel search: stop startPage 84 of 338

XPress closing button0043on the trunk lid.
or
XIf the SmartKey is located in the immediate
vicinity of the vehicle: press the 0054button
on the SmartKey.
You can release the button as soon as the
trunk lid starts to close.
XTo stop the closing process:
RPress the 0054button on the SmartKey.
RPress the top of the star on the trunk lid.
RPress closing button 0043or locking but-
ton 0044on the trunk lid.
RPress the remote operating switch on the
driver's door.
RIn vehicles with HANDS-FREE ACCESS:
kick into the sensor detection range under
the bumper with your foot.
iIf the 0054 button on the SmartKey is
pressed or HANDS-FREE ACCESS is initiated
after the closing process is stopped, the trunk
lid opens.
Vehicles with trunk lid remote closing fea-
ture and KEYLESS-GO: when all the doors are
closed, you can simultaneously close the trunk
lid and lock the vehicle. The SmartKey must be
located to the rear of the vehicle.
XPress and release locking button 0044on the
trunk lid.
If a KEYLESS-GO key is detected outside the
vehicle, the trunk lid closes and the vehicle
locks.
If KEYLESS-GO detects a second SmartKey out- side the vehicle, the trunk lid remains closed.
If KEYLESS-GO detects a SmartKey in the trunk,
the trunk lid opens again after it is closed.
HANDS-FREE ACCESS
Important safety notes
GWARNING
The vehicle's exhaust system may be very hot. You could burn yourself by touching the
exhaust system if you use HANDS-FREE
ACCESS. There is a risk of injury. Always
ensure that you only make the kicking move-
ment within the detection range of sensors.
!If the SmartKey is within the rear detection
range of KEYLESS-GO, the following situa-
tions, for example, could lead to the uninten-
tional opening of the trunk:
Rusing a car wash
Rusing a power washer
Make sure that the SmartKey is at least 10 ft
(3 m) away from the vehicle.
General notes
With KEYLESS-GO and HANDS-FREE ACCESS,
you can open or close the trunk lid or stop the
procedure without using your hands. This is use- ful if you have your hands full. To do this, make
a kicking movement under the bumper with your
foot.
Observe the following points:
RCarry your KEYLESS-GO key about your per-
son. The KEYLESS-GO key must be in the rear
detection range of the vehicle.
RWhen making the kicking movement, make
sure that you are standing firmly on the
ground and that there is sufficient clearance
to the rear of the vehicle. You could otherwise
lose your balance, for example on ice.
82Trunk
Opening and closing
Page 85 of 338

RAlways ensure that you only make the kicking
movement within the detection range of sen-
sors0043.
RStand at least 12 in (30 cm) away from the
rear area while doing so.
RDo not come into contact with the bumper
while making the kicking movement. Other-
wise, the sensors may not function correctly.
RHANDS-FREE ACCESS does not function
when the engine is started.
RDirt caused by road salt around sensors 0043
may restrict functionality.
RUsing the HANDS-FREE ACCESS with a pros-
thetic leg may restrict functionality.
RIf a KEYLESS-GO key is within the rear detec-
tion range of KEYLESS-GO, HANDS-FREE
ACCESS could be triggered. The trunk lid
could thus be opened or closed unintention-
ally, for example, if you:
-sit on the edge of the trunk.
-set something down or lift something up
behind the vehicle.
-polish the rear of the vehicle.
Do not carry the KEYLESS-GO key about your
person in these situations or in situations sim-
ilar to these. This will prevent unintentional
opening or closing of the trunk lid.
Operation
XTo open or close: kick into sensor detection
range 0043under the bumper with your foot.
A warning tone will sound while the trunk lid is
opening or closing.
XIf the trunk lid does not open or close after
several attempts: wait at least ten seconds
then move your leg under the bumper once
again.
If you hold your foot under the bumper for too
long, the trunk lid does not open or close. Repeat the leg movement more quickly if this
occurs.
To stop the opening or closing procedure, you
have the following options:
RKick with your foot in sensor detection
range
0043under the bumper.
RPress the closing button on the trunk lid.
RPress the top of the star on the trunk lid.
RPress the 0054button on the SmartKey
If the trunk lid closing procedure has been stop-
ped:
Rmove your foot under the bumper again and
the trunk lid will open
If the trunk lid opening procedure has been
stopped:
Rmove your foot under the bumper again and
the trunk lid will close
Opening/closing automatically from
inside
Important safety notes
GWARNING
The reversing feature does not respond:
Rto soft, light and thin objects, e.g. fingers
Rover the last 1/3 in (8 mm) of the closing
movement
The reversing feature cannot prevent some-
one from becoming trapped in these situa-
tions in particular. There is a risk of injury.
Make sure that no body parts are in close
proximity during the closing procedure.
If somebody becomes trapped:
Rpress the 0054button on the SmartKey, or
Rpull or press the remote operating switch
on the driver's door or
Rpress the closing or locking button on the
trunk lid, or
Rpress the top of the star on the trunk lid
Vehicles with HANDS-FREE ACCESS:
It is also possible to stop the closing process by
performing a kicking movement under the rear
bumper.
Trunk83
Opening and closing
Z
Page 88 of 338
GWARNING
The reversing feature does not react:
Rto soft, light and thin objects, e.g. small fin-
gers
Rwhile resetting
This means that the reversing feature cannot
prevent someone being trapped in these sit-
uations. There is a risk of injury.
Make sure that no body parts are in close
proximity during the closing procedure. If
someone becomes trapped, press the switch
to open the side window again.
Opening and closing the side win-
dows
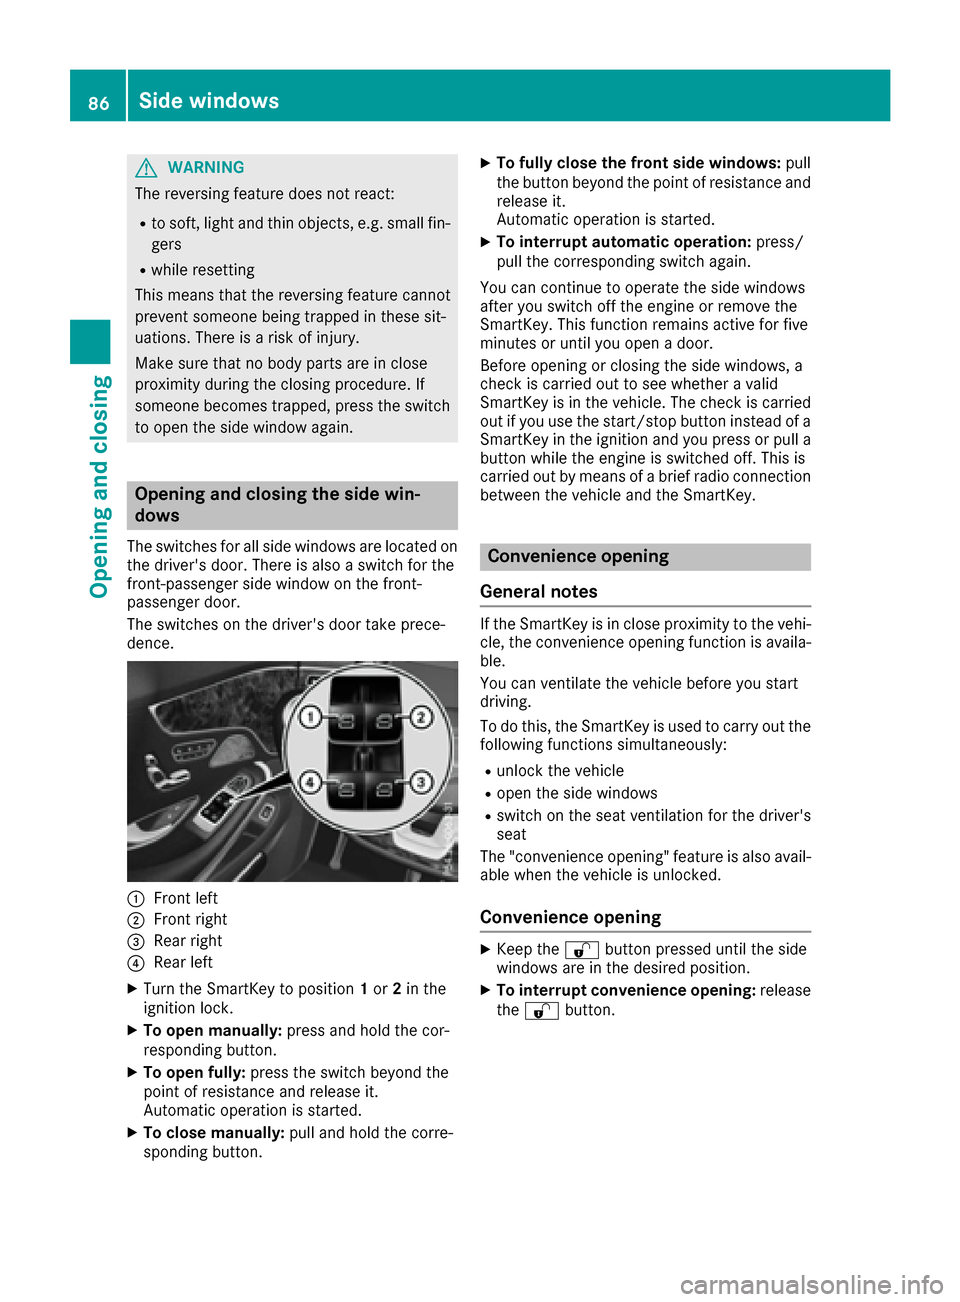
The switches for all side windows are located on the driver's door. There is also a switch for the
front-passenger side window on the front-
passenger door.
The switches on the driver's door take prece-
dence.
0043Front left
0044Front right
0087Rear right
0085Rear left
XTurn the SmartKey to position 1or 2in the
ignition lock.
XTo open manually: press and hold the cor-
responding button.
XTo open fully: press the switch beyond the
point of resistance and release it.
Automatic operation is started.
XTo close manually: pull and hold the corre-
sponding button.
XTo fully close the front side windows: pull
the button beyond the point of resistance and
release it.
Automatic operation is started.
XTo interrupt automatic operation: press/
pull the corresponding switch again.
You can continue to operate the side windows
after you switch off the engine or remove the
SmartKey. This function remains active for five
minutes or until you open a door.
Before opening or closing the side windows, a
check is carried out to see whether a valid
SmartKey is in the vehicle. The check is carried out if you use the start/stop button instead of a
SmartKey in the ignition and you press or pull a
button while the engine is switched off. This is
carried out by means of a brief radio connection
between the vehicle and the SmartKey.
Convenience opening
General notes
If the SmartKey is in close proximity to the vehi-
cle, the convenience opening function is availa-
ble.
You can ventilate the vehicle before you start
driving.
To do this, the SmartKey is used to carry out the
following functions simultaneously:
Runlock the vehicle
Ropen the side windows
Rswitch on the seat ventilation for the driver's
seat
The "convenience opening" feature is also avail-
able when the vehicle is unlocked.
Convenience opening
XKeep the 0036button pressed until the side
windows are in the desired position.
XTo interrupt convenience opening: release
the 0036 button.
86Side windows
Opening and closing
Page 91 of 338
cannot prevent someone being trapped in
these situations. There is a risk of injury.
When closing the roller sunblind, make sure
that no body parts are in the sweep area.
If somebody becomes trapped:
Rrelease the switch immediately, or
Rpress the switch in any direction during the
automatic closing process
The closing process is stopped.
Opening and closing the roller sunblind
XTurn the SmartKey to position 1or 2in the
ignition lock.
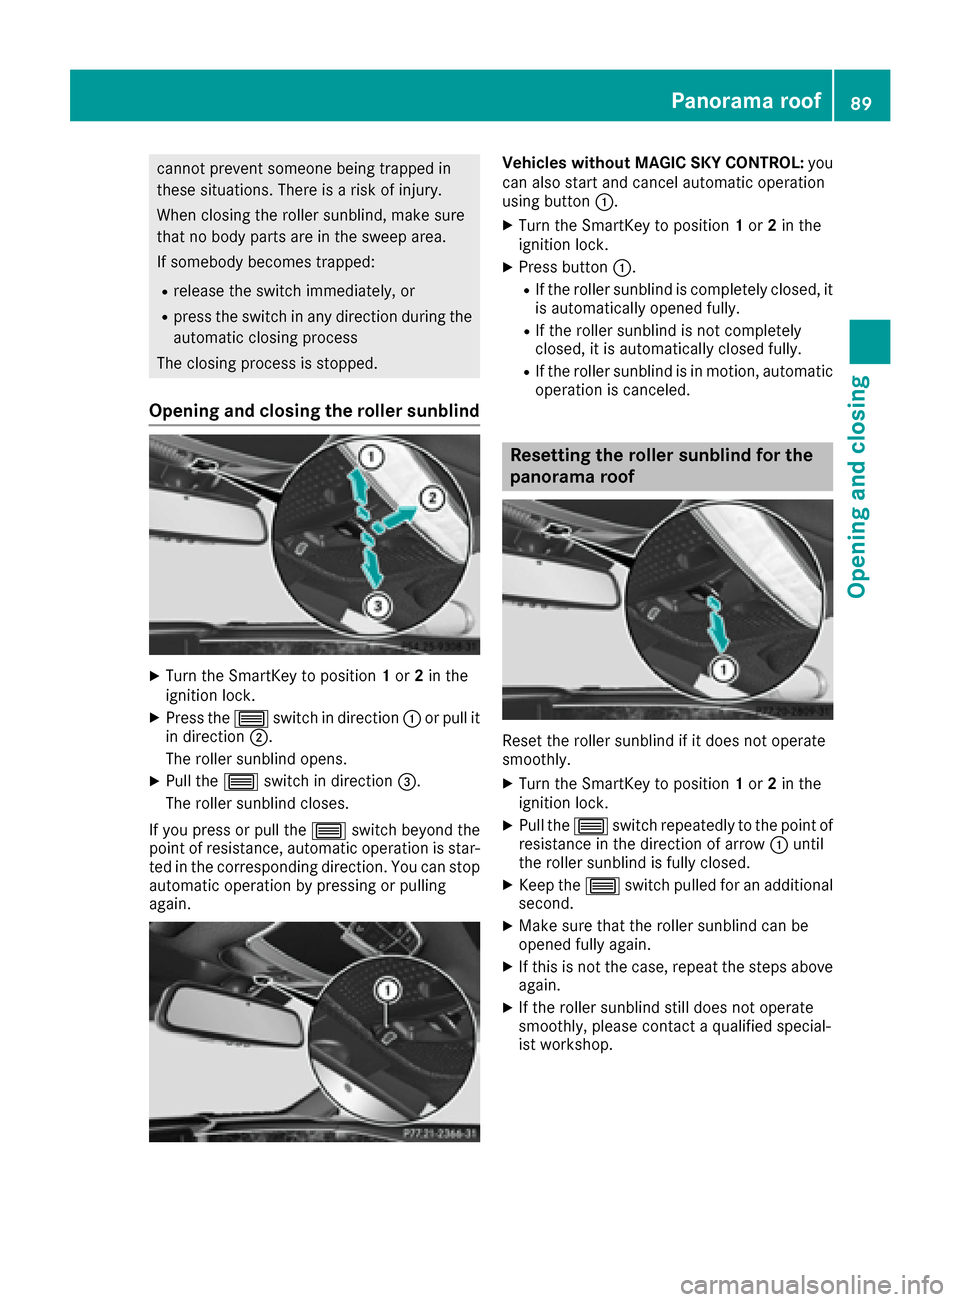
XPress the 0057switch in direction 0043or pull it
in direction 0044.
The roller sunblind opens.
XPull the 0057switch in direction 0087.
The roller sunblind closes.
If you press or pull the 0057switch beyond the
point of resistance, automatic operation is star-
ted in the corresponding direction. You can stop
automatic operation by pressing or pulling
again.
Vehicles without MAGIC SKY CONTROL: you
can also start and cancel automatic operation
using button 0043.
XTurn the SmartKey to position 1or 2in the
ignition lock.
XPress button 0043.
RIf the roller sunblind is completely closed, it
is automatically opened fully.
RIf the roller sunblind is not completely
closed, it is automatically closed fully.
RIf the roller sunblind is in motion, automatic
operation is canceled.
Resetting the roller sunblind for the
panorama roof
Reset the roller sunblind if it does not operate
smoothly.
XTurn the SmartKey to position 1or 2in the
ignition lock.
XPull the 0057switch repeatedly to the point of
resistance in the direction of arrow 0043until
the roller sunblind is fully closed.
XKeep the 0057switch pulled for an additional
second.
XMake sure that the roller sunblind can be
opened fully again.
XIf this is not the case, repeat the steps above
again.
XIf the roller sunblind still does not operate
smoothly, please contact a qualified special-
ist workshop.
Panorama roof89
Opening and closing
Z
Page 101 of 338
Problems with the steering wheel heating
ProblemPossible causes/consequences and0050Solutions
The steering wheel heat-
ing has switched off pre-
maturely or cannot be
switched on.The on-board voltage is too low because too many electrical consum-
ers are switched on.
XSwitch off electrical consumers that you do not need, such as the
rear window defroster or interior lighting.
EASY-ENTRY/EXIT feature
Important safety notes
GWARNING
When the EASY-ENTRY/EXIT feature adjusts
the steering wheel and the driver's seat, you
and other vehicle occupants – particularly
children – could become trapped. There is a
risk of injury.
While the EASY-ENTRY/EXIT feature is mak-
ing adjustments, make sure that no one has
any body parts in the sweep of the seat and
the steering wheel.
If there is a risk of becoming trapped by
Rthe steering wheel: move the steering
wheel adjustment lever.
Rthe seat: press the switch for seat adjust-
ment.
The adjustment process is stopped.
You can stop the adjustment process by press-
ing one of the memory function's position but-
tons. This function is only available on vehicles
with memory function.
GWARNING
If children activate the EASY-ENTRY/EXIT fea-
ture, they can become trapped, particularly
when unattended. There is a risk of injury.
When leaving the vehicle, always take the
SmartKey with you and lock the vehicle. Never
leave children unsupervised in the vehicle.
GWARNING
If you drive off while the EASY-ENTRY/EXIT
feature is making adjustments, you could lose
control of the vehicle. There is a risk of an
accident.
Always wait until the adjustment process is
complete before driving off.
The EASY-ENTRY/EXIT feature makes getting in
and out of your vehicle easier.
You can activate and deactivate the EASY-
ENTRY/EXIT feature using the multimedia sys-
tem (see the Digital Operator's Manual).
Position of the steering wheel and the
driver's seat when the EASY-ENTRY/
EXIT feature is active
The steering wheel tilts upwards and the driver's seat moves backwards if you:
Rremove the SmartKey from the ignition lock
Rwith the start/stop button: open the driv-
er's door; the ignition must be switched off
Rwith the SmartKey: open the driver's door;
the SmartKey must be in position 0or 1in the
ignition lock (
Ypage 121)
iThe steering wheel only tilts upwards and
the driver's seat only moves backwards if the
driving position is stored after the seat or
steering column has been adjusted.
The last position of the steering wheel or seat is
stored if:
Rthe ignition is switched off
Rthe setting is stored with the memory function
(Ypage 103).
iThe steering wheel only moves upwards if it
has not already reached the upper stop. The
driver's seat only moves backwards if it is not
already in the rearmost position.
Steering wheel99
Seats, steering wheel and mirrors
Z
Page 102 of 338
Position of the steering wheel and the
driver's seat for driving
The steering wheel and the driver's seat are
moved to the previously set position if:
Rthe driver's door is closed and you insert the
SmartKey into the ignition lock
Ryou close the driver's door when the ignition
is switched on
Ryou press the Start/Stop button once
iThe steering wheel and the driver's seat only
return to the last set position if the driving
position is stored after the seat or steering
column has been adjusted.
The last position of the steering wheel or seat is
stored if:
Rthe ignition is switched off
Rthe setting is stored with the memory function
(Ypage 103).
Crash-responsive EASY-EXIT feature
If the crash-responsive EASY-EXIT feature is trig-
gered in an accident, the steering column will
move upwards when the driver's door is opened
or the SmartKey is removed from the ignition
lock. This makes it easier to exit the vehicle and rescue the occupants.
The crash-responsive EASY-EXIT feature is only
operational if the EASY-EXIT/ENTRY feature is
activated in the multimedia system (see the sep-
arate Operator's Manual).
Mirrors
Exterior mirrors
Important safety notes
GWARNING
You could lose control of your vehicle if you do the following while driving:
Radjust the driver's seat, head restraint,
steering wheel or mirrors
Rfasten the seat belt
There is a risk of an accident.
Adjust the driver's seat, head restraint, steer- ing wheel and mirror and fasten your seat belt
before starting the engine.
GWARNING
The exterior mirror on the front-passenger
side reduces the size of the image. Visible
objects are actually closer than they appear.
This means that you could misjudge the dis-
tance from road users traveling behind, e.g.
when changing lane. There is a risk of an acci-
dent.
For this reason, always make sure of the
actual distance from the road users traveling
behind by glancing over your shoulder.
Adjusting the exterior mirrors
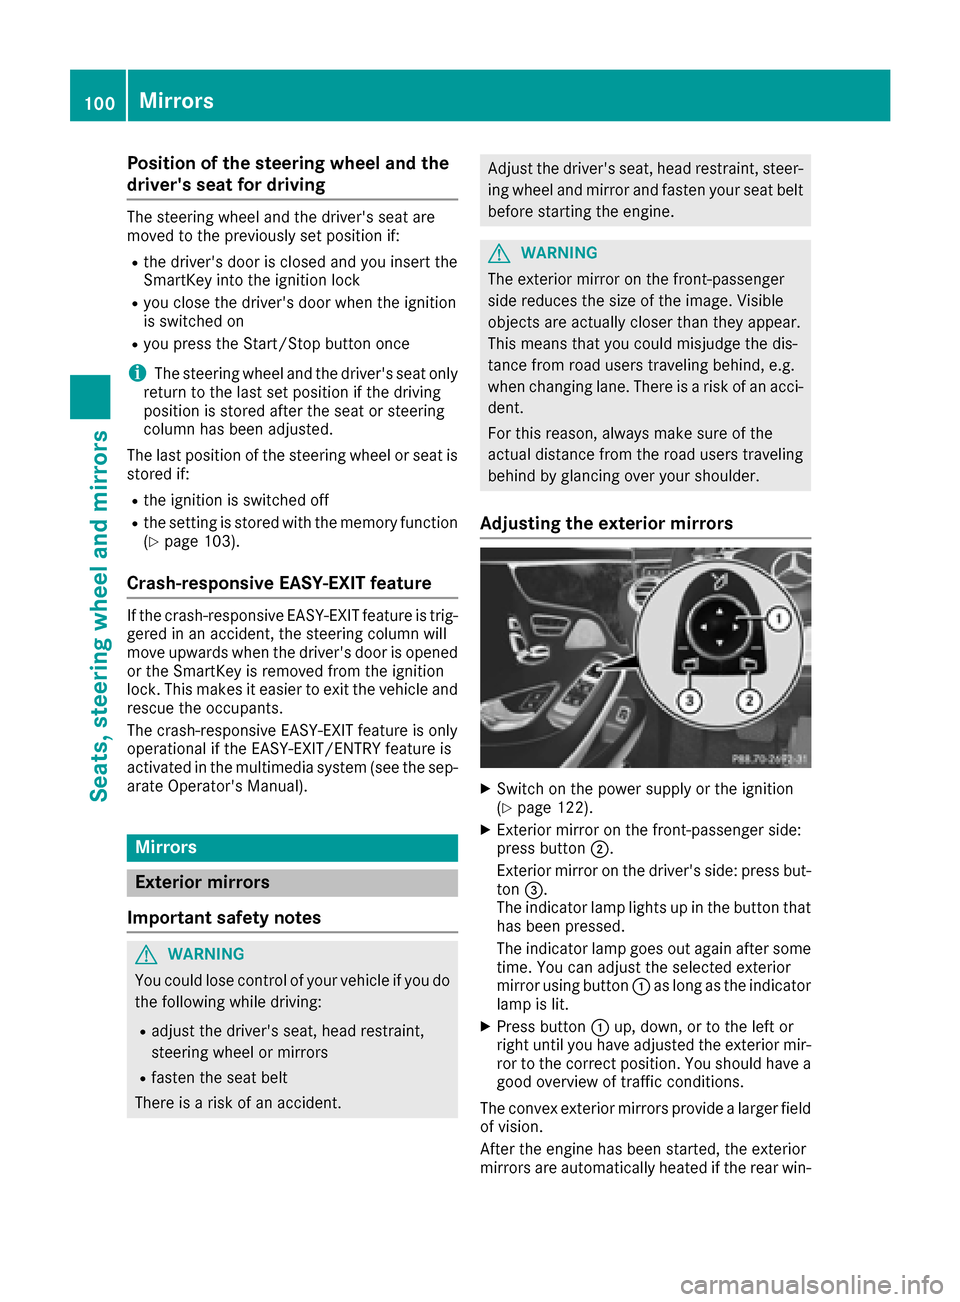
XSwitch on the power supply or the ignition
(Ypage 122).
XExterior mirror on the front-passenger side:
press button 0044.
Exterior mirror on the driver's side: press but-
ton 0087.
The indicator lamp lights up in the button that
has been pressed.
The indicator lamp goes out again after some
time. You can adjust the selected exterior
mirror using button 0043as long as the indicator
lamp is lit.
XPress button 0043up, down, or to the left or
right until you have adjusted the exterior mir- ror to the correct position. You should have a
good overview of traffic conditions.
The convex exterior mirrors provide a larger field of vision.
After the engine has been started, the exterior
mirrors are automatically heated if the rear win-
100Mirrors
Seats, steering wheel and mirrors
Page 111 of 338

shield wipers may be activated inadvertently.
This could then damage the windshield wiper
blades or scratch the windshield.
For this reason, you should always switch off
the windshield wipers in dry weather.
0047003F Windshield wiper off
00480062Intermittent wiping, normal
00490063Intermittent wiping, frequent
004A00AAContinuous wipe, slow
004B00A9Continuous wipe, fast
008400D3Single wipe
00D4 Wipe with washer fluid
XSwitch on the ignition.
XTurn the combination switch to the corre-
sponding position.
In the 0063or0062 position, the appropriate
wiping frequency is set automatically according
to the intensity of the rain. In the 0063position,
the rain sensor is more sensitive than in the
0062 position, causing the windshield wiper to
wipe more frequently.
The washer fluid is fed through the wiper blades;
when the screen is wiped with washer fluid
00D4, the water is emitted directly from the
blades.
If you push and hold the combination switch
beyond the point of resistance in direction of
arrow 0084, the manual wash program is activa-
ted. If you push and hold the combination switch
briefly beyond the point of resistance in direc-
tion of arrow 0084, the automatic wash program is
activated.
If the wiper blades are worn, the windshield will
no longer be wiped properly. This could prevent
you from observing the traffic conditions.
Replacing the wiper blades
Important safety notes
GWARNING
If the windshield wipers begin to move while
you are changing the wiper blades, you could be trapped by the wiper arm. There is a risk of
injury.
Always switch off the windshield wipers and
ignition before changing the wiper blades.
!To avoid damaging the wiper blades, make
sure that you touch only the wiper arm of the
wiper.
!Never open the hood if a windshield wiper
arm has been folded away from the wind-
shield.
Hold the windshield wiper arm firmly when
you change the wiper blade. If you release the
windshield wiper arm without a wiper blade
and it falls onto the windshield, the windshield
may be damaged by the force of the impact.
Mercedes-Benz recommends that you have
the wiper blades changed at a qualified spe-
cialist workshop.
!Always position the windshield wiper arms
vertically before folding them away from the
windshield. By doing so, you will avoid dam-
age to the hood.
Replacing the wiper blades
Moving the wiper arms to a vertical posi-
tion
XSwitch off the engine.
XRemove your foot from the brake pedal.
XSet the windshield wiper to the 00AAposition
on the combination switch.
XPress the Start/Stop button repeatedly until
the windshield wiper starts.
XWhen the wiper arms are vertical to the hood,
press the Start/Stop button.
XFold the wiper arm away from the windshield.
Windshield wipers109
Lights and windshield wipers
Z
Page 114 of 338
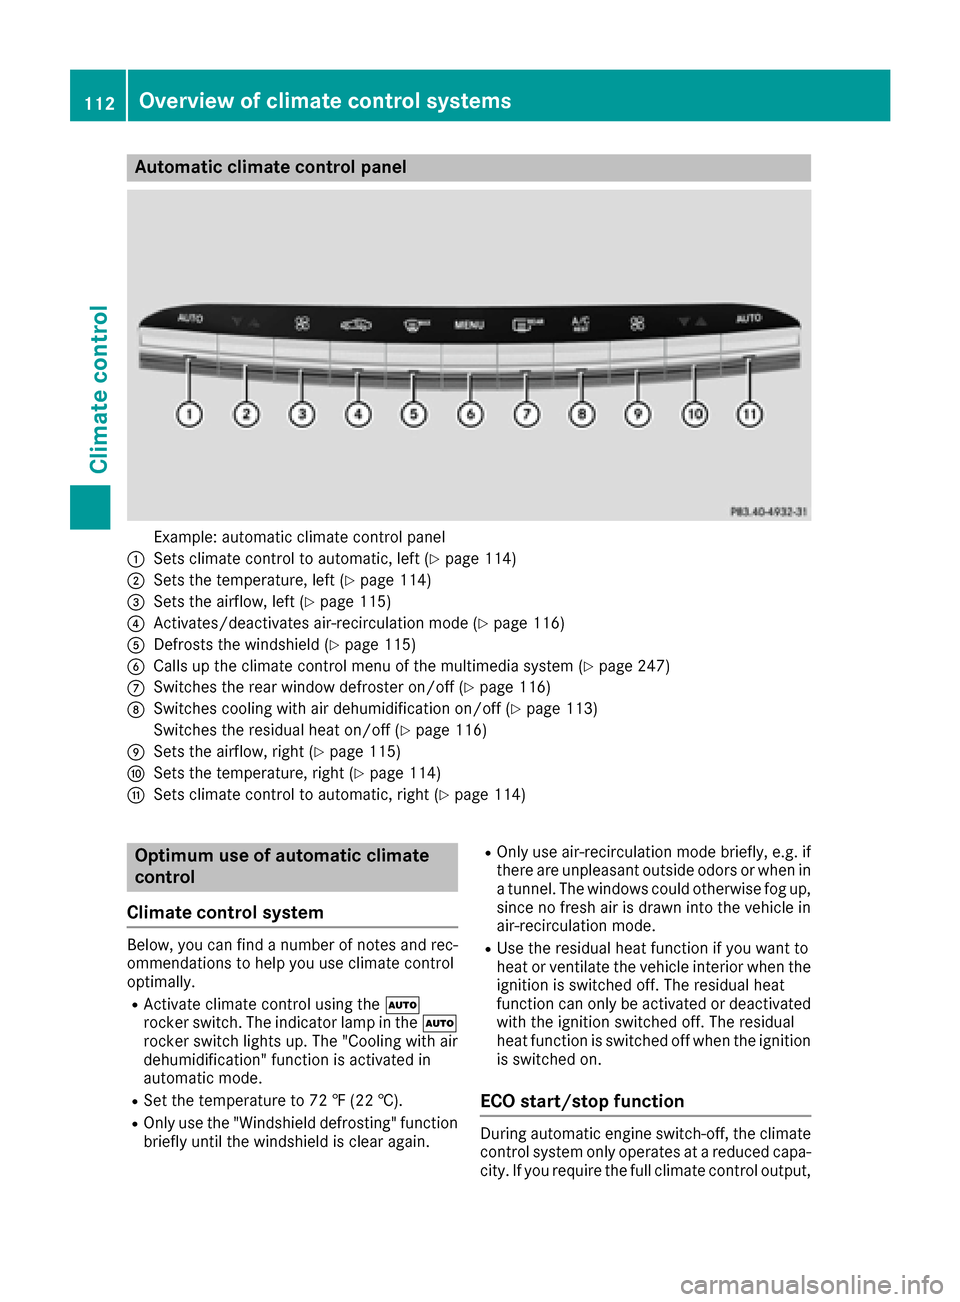
Automa tic climate control panel
Example: automatic climat econtrol panel
0043Sets climat econtrol to automatic, lef t (Ypage 114)
0044Sets thetemperature, lef t (Ypage 114)
0087Sets theairflow, lef t (Ypage 115)
0085Activates/deactivates air-recirculation mod e (Ypage 116)
0083Defroststh ewindshield (Ypage 115)
0084Calls up theclimat econtrol men uof th emultimedia system (Ypage 247)
006BSwitches therear window defroste ron/off (Ypage 116)
006CSwitches coolin gwit hair dehumidification on/off (Ypage 113)
Switches th eresidual heat on/off (
Ypage 116)
006DSets theairflow, right (Ypage 115)
006ESets thetemperature, right (Ypage 114)
006FSets climatecontrol to automatic, right (Ypage 114)
Optimum use ofautomatic climate
control
Climate control system
Below, you can fin d anumber of note sand rec -
ommendation sto help you use climat econtrol
optimally.
RActivat eclimat econtrol usin gth e0058
rocke rswitch .The indicator lamp in th e0058
rocke rswitch lights up. The "Cooling wit hair
dehumidification "function is activated in
automatic mode.
RSe tth etemperature to 72 ‡(22 †).
ROnly use th e"Windshield defrosting "function
briefl yuntil th ewindshield is clear again .
ROnly use air-recirculation mod ebriefly, e.g. if
there are unpleasant outside odor sor when in
a tunnel. The windows could otherwise fog up,
since no fresh air is draw nint oth evehicl ein
air-recirculation mode.
RUse th eresidual heat function if you want to
heat or ventilat eth evehicl einterior when th e
ignition is switched off .The residual heat
function can only be activated or deactivated
wit hth eignition switched off .The residual
heat function is switched off when th eignition
is switched on .
ECO start/stop function
During automatic engin eswitch-off ,th eclimat e
control system only operate sat areduce dcapa-
city. If you require th efull climat econtrol output ,
112Overview of climate control systems
Climate control