2017 MERCEDES-BENZ S-Class COUPE check engine
[x] Cancel search: check enginePage 132 of 338
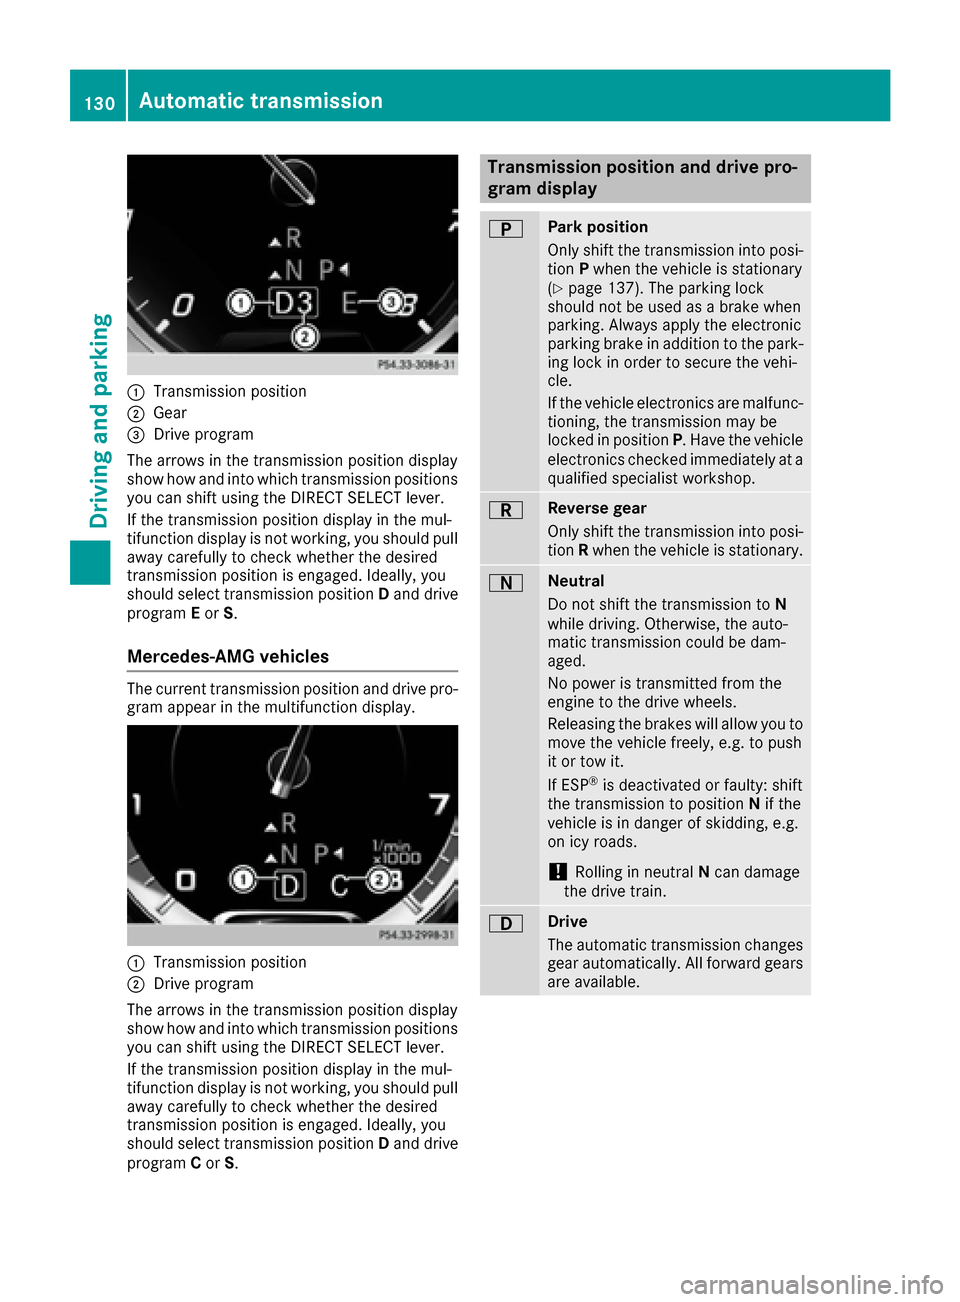
0043Transmission position
0044Gear
0087Drive program
The arrows in the transmission position display
show how and into which transmission positions
you can shift using the DIRECT SELECT lever.
If the transmission position display in the mul-
tifunction display is not working, you should pull
away carefully to check whether the desired
transmission position is engaged. Ideally, you
should select transmission position Dand drive
program Eor S.
Mercedes-AMG vehicles
The current transmission position and drive pro-
gram appear in the multifunction display.
0043Transmission position
0044Drive program
The arrows in the transmission position display
show how and into which transmission positions
you can shift using the DIRECT SELECT lever.
If the transmission position display in the mul-
tifunction display is not working, you should pull
away carefully to check whether the desired
transmission position is engaged. Ideally, you
should select transmission position Dand drive
program Cor S.
Transmission position and drive pro-
gram display
0045Park position
Only shift the transmission into posi-
tion Pwhen the vehicle is stationary
(
Ypage 137). The parking lock
should not be used as a brake when
parking. Always apply the electronic
parking brake in addition to the park-
ing lock in order to secure the vehi-
cle.
If the vehicle electronics are malfunc- tioning, the transmission may be
locked in position P. Have the vehicle
electronics checked immediately at a
qualified specialist workshop.
0046Reverse gear
Only shift the transmission into posi-
tion Rwhen the vehicle is stationary.
0044Neutral
Do not shift the transmission to N
while driving. Otherwise, the auto-
matic transmission could be dam-
aged.
No power is transmitted from the
engine to the drive wheels.
Releasing the brakes will allow you to
move the vehicle freely, e.g. to push
it or tow it.
If ESP
®is deactivated or faulty: shift
the transmission to position Nif the
vehicle is in danger of skidding, e.g.
on icy roads.
!Rolling in neutral Ncan damage
the drive train.
003ADrive
The automatic transmission changes
gear automatically. All forward gears
are available.
130Automatic transmission
Driving and parking
Page 137 of 338
Problems with the transmission
ProblemPossible causes/consequences and0050Solutions
The transmission has
problems shifting gear.The transmission is losing oil.
XHave the transmission checked at a qualified specialist workshop
immediately.
The acceleration ability
is deteriorating.
The transmission no lon-
ger changes gear.The transmission is in emergency mode.
7G-TRONIC:it is only possible to shift into secondgear and reverse
gear.
9G-TRONIC: it is only partly possible to engage the gears or the trans-
mission is in position N.
XStop the vehicle.
XShift the transmission to position P.
XSwitch off the engine.
XWait at least ten seconds before restarting the engine.
XShift the transmission to positionDor R.
7G-TRONIC: IfD is selected, the transmission shifts into second
gear, if Ris selected, the transmission shifts into reverse gear.
XHave the transmission checked at a qualified specialist workshop
immediately.
Transfer case
This section is only valid for vehicles with 4-
wheel drive (4MATIC). Power is always trans-
mitted to both axles.
!Performance tests may only be carried out
on a 2-axle dynamometer. The brake system
or transfer case could otherwise be damaged. Contact a qualified specialist workshop for a
performance test.
!Since ESP®engages automatically, the igni-
tion must be switched off (the SmartKey or
Start/Stop button must be in position 0or 1)
if:
Rthe electric parking brake is being tested
on a brake dynamometer
Rthe vehicle is being towed with only one
axle raised (not permitted for vehicles with
4MATIC).
The brake system could otherwise be dam-
aged.
!Vehicles with 4MATIC must not be towed
with either the front or the rear axle raised, as doing so will damage the transmission.
Refueling
Important safety notes
GWARNING
Fuel is highly flammable. If you handle fuel
incorrectly, there is a risk of fire and explo-
sion.
You must avoid fire, open flames, creating
sparks and smoking. Switch off the engine
and, if applicable, the auxiliary heating before refueling.
GWARNING
Fuel is poisonous and hazardous to health.
There is a risk of injury.
You must make sure that fuel does not come into contact with your skin, eyes or clothing
and that it is not swallowed. Do not inhale fuel
vapors. Keep fuel away from children.
Refueling135
Driving and parking
Z
Page 139 of 338
XCompletely insert thefiller neck of the fuel
pump nozz leinto the tank, hook in place and
refuel.
XOnly fill the tank unt ilthe pump nozz le
swit ches off.
Do not add any more fuel after the pump stops filli ng for the first time. Otherwise, fuel may
leak out.
Closing the fuel filler flap
XReplac e the cap on the filler neck and turn
clock wiseuntil it engages audibly.
XClose the fuel filler flap. If
you drive at speeds above 2 km/hwith the fuel
filler flap open, the Fuel Filler Flap Open
messageisshown on the multifunction display.
Close the fuel filler flap before locking the vehi-
cle.
If you are driving with the fuel filler cap open, the 00B6 reserve fuel warning lamp flashes. A mes-
sage appears in the multifunction display
(
Ypage 218).
In addition, the 00B9Check Engine warning
lamp may light up (
Ypage 237).
For further information on warning and indicator
lamps inthe instrument cluster, see
(
Ypage 237).
Problems with fuel and the fuel tank
ProblemPossible causes/consequences and 0050Solutions
Fuelisleaking from the
veh icle.GWAR NING
The fuel line or the fuel tank is faulty.
Risk of explos ion or fire.
XApply the electr icparking brake.
XSwit ch off the engine.
XMake sure that the ignition is switched off (Ypage 121).
or
XWhen using the SmartKey, turn the SmartKey to position 0in the
ignition lock and remove it(Ypage 121).
XDo not restart the engine under any circumstances.
XConsult a qualified specialist workshop.
The fuel filler flap cannot
be opened.The fuel filler flap isnot unlocked.
XUnlock the veh icle(Ypage 72).
The SmartKey battery is discharged or nearly discharged.
XUnlock the veh icleusing the mechanical key (Ypage 74).
The fuel filler flap isunlocked, but the opening mechanism is jammed.
XConsult a qualified specialist workshop.
Parking
Important safety notes
GWARNING
Flammable material such as leaves, grass or
twigs may ignite ifthey come into contact with
hot parts of the exhaust system or exhaust
gas flow. There is a risk of fire.
Park the vehicle so that no flammable mate-
rials come into contact with parts of the vehi-
cle which are hot. Take particular care not to
park on dry grassland or harvested grain
fields.
Parking137
Driving and parking
Z
Page 145 of 338
on for a short while. This allows the airflow to
cool the brakes more quickly.
Wet roads
If you have driven for a long time in heavy rain
without braking, there may be a delayed reac-
tion from the brakes when braking for the first
time. This may also occur after the vehicle has
been washed or driven through deep water.
You have to depress the brake pedal more
firmly. Maintain a greater distance from the
vehicle in front.
After driving on a wet road or having the vehicle
washed, brake firmly while paying attention to
the traffic conditions. This will warm up the
brake discs, thereby drying them more quickly
and protecting them against corrosion.
Limited braking performance on salt-
treated roads
If you drive on salted roads, a layer of salt resi-
due may form on the brake discs and brake
pads. This can result in a significantly longer
braking distance.
RIn order to prevent any salt build-up, apply the
brakes occasionally while paying attention to
the traffic conditions.
RCarefully depress the brake pedal and the
beginning and end of a journey.
RMaintain a greater distance to the vehicle
ahead.
Servicing the brakes
!The brake fluid level may be too low, if:
Rif the red brake warning lamp lights up in
the instrument cluster and
Ryou hear a warning tone while the engine is
running
Observe additional warning messages in the
multifunction display.
The brake fluid level may be too low due to
brake pad wear or leaking brake lines.
Have the brake system checked immediately.
Consult a qualified specialist workshop to
arrange this.
!Vehicles with 4MATIC: function or per-
formance tests may only be carried out on a 2-
axle dynamometer. If you wish to operate the
vehicle on such a dynamometer, please con- sult a qualified specialist workshop in
advance. You could otherwise damage the
drive train or the brake system.
!Vehicles with 4MATIC:
the ESP®system
operates automatically. The engine and the
ignition must therefore be switched off (the
SmartKey must be in position 0or 1in the
ignition lock or the Start/Stop button must be
in position 0or 1) if the electric parking brake
is tested on a brake dynamometer.
Braking triggered automatically by ESP
®may
cause severe damage to the brake system.
!Vehicles without 4MATIC: the ESP®sys-
tem operates automatically. The engine and
the ignition must therefore be switched off
(the SmartKey must be in position 0or 1in the
ignition lock or the Start/Stop button must be
in position 0or 1) if:
Rthe electric parking brake is tested using a
brake dynamometer.
Rthe vehicle is towed with one axle raised.
Braking triggered automatically by ESP®may
cause severe damage to the brake system.
All checks and maintenance work on the brake
system must be carried out at a qualified spe-
cialist workshop.
Have brake pads installed and brake fluid
replaced at a qualified specialist workshop.
If the brake system has only been subject to
moderate loads, you should test the functional-
ity of your brakes at regular intervals.
Information on BAS (Brake Assist) (
Ypage 62)
and BAS PLUS (Brake Assist PLUS) (Ypage 62).
For safety reasons, Mercedes-Benz recom-
mends only installing the following brake disks
and brake pads/linings:
Rbrake disks that have been approved by
Mercedes-Benz
Rbrake pads/linings that have been approved
by Mercedes-Benz or that are of an equivalent
standard of quality
Other brake disks or brake pads/linings can
compromise the safety of your vehicle.
Always replace all brake disks and brake pads/
linings on an axle at the same time. Always
install new brake pads/linings when replacing
brake disks.
The vehicle is equipped with lightweight brake
disks to which the wheel assembly with rim and
threaded connection is matched.
Driving tips143
Driving and parking
Z
Page 146 of 338
The use of brake disks other than those
approved by Mercedes-Benz can change the
track width and is subject to approval, if appli-
cable.
Shock-type loads when handling the brake
discs, such as when changing wheels, can lead
to a reduction in comfort when driving with light-
weight brake discs. Avoid shock-type loads on
the lightweight brake disks, particularly on the
brake plate.
Mercedes-Benz recommends that you only use
brake fluid that has been specially approved for
your vehicle by Mercedes-Benz, or which corre-
sponds to an equivalent quality standard. Brake
fluid which has not been approved for
Mercedes-Benz vehicles or which is not of an
equivalent quality could affect your vehicle's
operating safety.
AMG high-performance and ceramic
brakes
The high-performance brake system is only
available on Mercedes-AMG vehicles.
The AMG brake systems are designed for heavy
loads. This may lead to noise when braking. This
will depend on:
RSpeed
RBraking force
REnvironmental conditions, such as tempera-
ture and humidity
The wear of individual components of the brake
system, such as the brake pads/linings or brake
discs, depends on the individual driving style
and operating conditions.
For this reason, it is impossible to state a mile-
age that will be valid under all circumstances. An aggressive driving style will lead to high wear.
You can obtain more information on this from a
qualified specialist workshop.
New and replaced brake pads and discs only
reach their optimum braking effect after several
hundred kilometers of driving. Compensate for
this by applying greater force to the brake pedal.
Keep this in mind, and adapt your driving and
braking accordingly during this break-in period.
Excessive heavy braking results in correspond-
ingly high brake wear. Observe the brake wear
warning lamp in the instrument cluster and note
any brake status messages in the multifunction
display. Especially for high performance driving,
it is important to maintain and have the brake
system checked regularly.
Driving on wet roads
Hydroplaning
If water has accumulated to a certain depth on
the road surface, there is a danger of hydro-
planing occurring, even if:
Ryou drive at low speeds
Rthe tires have adequate tread depth
For this reason, in the event of heavy rain or in
conditions in which hydroplaning may occur,
you must drive in the following manner:
Rlower your speed
Ravoid ruts
Ravoid sudden steering movements
Rbrake carefully
Driving on flooded roads
!Do not drive through flooded areas. Check
the depth of any water before driving through
it. Drive slowly through standing water. Oth-
erwise, water may enter the vehicle interior or
the engine compartment. This can damage
the electronic components in the engine or
the automatic transmission. Water can also
be drawn in by the engine's air suction nozzles
and this can cause engine damage.
Winter driving
GWARNING
If you shift down on a slippery road surface in an attempt to increase the engine's braking
effect, the drive wheels could lose their grip.
There is an increased danger of skidding and
accidents.
Do not shift down for additional engine brak-
ing on a slippery road surface.
GDANGER
If the exhaust pipe is blocked or adequate
ventilation is not possible, poisonous gases
such as carbon monoxide (CO) may enter the vehicle. This is the case, e.g. if the vehicle
becomes trapped in snow. There is a risk of
fatal injury.
144Driving tips
Driving and parking
Page 174 of 338
Rif the camera lenses are dirty or covered.
Observe the notes on cleaning
(
Ypage 284)
Rif the vehicle components in which the cam-
eras are installed are damaged. In this event,
have the camera position and setting checked
at a qualified specialist workshop
Do not use the 360° camera in this case. You
can otherwise injure others or cause damage to
objects or the vehicle.
The guide lines on the multimedia system show
the distances to your vehicle. The distances only
apply to road level.
The camera in the rear area is protected from
raindrops and dust by means of a flap. This flap
opens when the 360° camera is activated.
The flap closes again when:
Ryou have finished the maneuvering process
Ryou switch off the engine
Ryou open the trunk
Observe the notes on cleaning (
Ypage 284).
For technical reasons, the flap may remain open
briefly after the 360° camera has been deacti-
vated.
The field of vision and other functions of the
camera system may be restricted due to addi-
tional attachments (e.g. license plate holder,
rear bicycle carrier).
On vehicles with height-adjustable chassis,
depending on technical conditions, leaving the
standard height can result in:
Rinaccuracies in the guide lines
Rinaccuracies in the display of generated
images (top view)
Activation conditions
The image from the 360° camera appears if:
Rthe multimedia system is switched on
Rthe 360° Camerafunction is switched on
If the 360° camera is activated at speeds above
approximately 19 mph (30 km/h), a warning
message appears.
The warning message disappears if:
Rthe vehicle's speed falls below approximately
19 mph (30 km/h). The 360° camera is then
activated.
Rthe message is confirmed with the 0038but-
ton.
Switching the 360° camera on/off with
the button
XTo switch on: press button0043.
Depending on whether position Dor Ris
engaged, the following is shown:
Rfull screen display with the image from the
front camera
Rfull screen display with the image from the
rear view camera
XTo switch off: press button0043again.
Switching on the 360° camera and mul-
timedia system
XPress the 00D4button in the center console.
The vehicle menu is displayed.
XTo select the 360° camera: turn and press the
controller.
Depending on whether position Dor Ris
engaged, the following is shown:
Ra split screen with top view and the image
from the front camera or
Ra split screen with top view and the image
from the rear view camera
Activating the 360° camera using
reverse gear
The 360° camera images can be automatically
displayed by engaging reverse gear.
XMake sure that the Activation by R gearfunction is selected in the multimedia system
(see the Digital Operator's Manual).
XTo show the 360° camera image: engage
reverse gear.
The multimedia system shows the area
behind the vehicle in split-screen mode. You
see the top view of the vehicle and the image
from the rear view camera.
172Driving systems
Driving and parking
Page 181 of 338
The system does not detect:
Rsmaller animals, e.g. dogs and cats
Ranimals whose silhouette is not clearly rec-
ognizable
When detected, animals are marked with small
color frame corners. In contrast to pedestrian
recognition, there is no separate readiness sym-
bol in the multifunction display.
Activating/deactivating Night View
Assist Plus
Activation conditions
You can only activate Night View Assist Plus if all
of the following conditions are met:
Rthe ignition is switched on (Ypage 121) or the
engine has been started.
Rthe light switch is in the 0058or0058 posi-
tion.
Rreverse gear has not been engaged.
Activating/deactivating
XPress button 0043.
If Night View Assist Plus is activated, the
Night View Assist Plus display is shown in the multifunction display.
The infrared headlamps only switch on in the
dark from speeds of approximately 6 mph
(10 km/h) . This means that you do not have the
full visual range while the vehicle is stationary
and cannot check whether Night View Assist
Plus is working. The infrared headlamps are
deactivated at speeds below 3 mph (5 km/h).
The Night View image continues to be displayed
until you deactivate it by pressing button 0043.
Automatic activation
You can select theNightViewAssistAuto‐matic Activationoption via the Night View
Assist menu. The pedestrian and animal search function remains active even when the Night
View image is not displayed. In the dark, in unlit
surroundings and at speeds of more than
60 km/h, the Night View image is automatically
displayed in the multifunction display as soon as
pedestrians or animals are detected.
XIn the assistance menu, select automatic acti-
vation of Night View Assist Plus
(
Ypage 198).
Spotlight function
General notes
Under certain conditions, the spotlight function
uses the headlamps to flash at detected pedes- trians.
The spotlight function is only active if:
Rpedestrian recognition is active
Rthe road surface is not lit
Rthe driving speed is at least 40 mph
(60 km/h)
Rthe "Adaptive Highbeam Assist PLUS" func-
tion is activated (Ypage 107).
The spotlight function is not active or is active
only to a limited extent if:
Ryou are driving in city traffic
Rthere are pedestrians located in the area of an
oncoming vehicle or a vehicle in front
Activating the spotlight function
The pedestrian detection with spotlight function is running the background. If the prerequisites
are met, the spotlight function uses the head-
lamps to flash four short pulses at a pedestrian
detected on or near to the road.
XIn the light menu, select the spotlight function
of Night View Assist Plus (Ypage 201).
The spotlight function does not flash at animals.
Driving systems179
Driving and parking
Z
Page 188 of 338

Important safety notes
GWARNING
If you operate information systems and com-
munication equipmen tintegrate din th evehi-
cle while driving ,you will be distracte dfrom
traffic conditions. You could also lose control
of th evehicle. Ther eis aris kof an accident.
Only operate th eequipmen twhen th etraffic
situation permits. If you are no tsur ethat this
is possible ,park th evehicl epayin gattention
to traffic condition sand operate th eequip-
men twhen th evehicl eis stationary.
You must observ eth elegal requirements for th e
country in whic hyou are currentl ydriving when
operating th eon-board computer.
GWARNIN G
If th einstrumen tcluste rhas faile dor mal-
functioned, you may no trecognize function
restriction sin systems relevan tto safety. The
operating safet yof your vehicl emay be
impaired .Ther eis aris kof an accident.
Drive on carefully. Hav eth evehicl echecke d
at aqualified specialist workshop immedi-
ately.
If th eoperating safet yof your vehicl eis
impaired ,pull ove ras soo nas it is saf eto do so.
Contac t aqualified specialist workshop.
The on-board computer only shows message sor
warning sfrom certain systems in th emultifunc-
tion display. You should therefor emak esur e
your vehicl eis operating safely at all times .
Fo ran overview, see th einstrumen tpanel illus-
tration (
Ypage 34).
Displays and operation
Instrument cluster lighting
The ligh tsensor in th einstrumen tcluste rauto -
matically control sth ebrightness of th emulti-
function display. In daylight, th edisplays in th e
instrumen tcluste rare illuminated. Adimming
function is no tpossible in daylight.
The lighting in th einstrumen tcluster, in th edis-
plays and th econtrol sin th evehicl einterior can
be adjusted usin gth ebrightness control knob. The brightness control is locate
dbetween th e
instrumen tcluste rand th emultimedia system
display (
Ypage 35).
XTurn thebrightness control knob clockwise or
counter-clockwise.
If you tur nth eligh tswitch (
Ypage 104) to th e
0060, 0058or0058 position ,th ebrightness
will depend upon th ebrightness of th eambi -
en tlight.
Speedometer segments
The segments in th espeedometer indicat e
whic hspee drange is available.
RCruis econtrol activated (Ypage 145):
The segments ligh tup from th estore dspee d
to th een dof th escale.
RDISTRONI CPLU Sactivated (Ypage 147):
On eor two segments in th eset spee drange
ligh tup.
RDISTRONI CPLU Sdetects avehicl ein fron t
moving mor eslowly than th estore dspeed:
The segments between th espee dof th evehi-
cle in fron tand th estore dspee dligh tup.
Tachometer
!
Do no tdriv ein th eoverrevving range, as this
could damag eth eengine.
The red ban din th etachometer indicates th e
engine's overrevving range.
The fuel suppl yis interrupted to protect th e
engin ewhen th ered ban dis reached.
Outside temperature display
You should pay special attention to road condi-
tion swhen temperatures are aroun dfreezing
point.
Bea rin min dthat th eoutside temperature dis-
play indicates th etemperature measured and
does no trecord th eroad temperature.
The outside temperature display is in th emulti-
function display (
Ypage 188).
Ther eis ashort delay before achang ein outside
temperature is shown in th emultifunction dis-
play.
186Displays and operation
On-board computer and displays