2017 MERCEDES-BENZ S-Class COUPE maintenance
[x] Cancel search: maintenancePage 113 of 338
Overview of climate control systems
General notes
Observe the settings recommended on the fol-
lowing pages. The windows could otherwise fog
up.
To prevent the windows from fogging up:
Rswitch off climate control only briefly
Rswitch on air-recirculation mode only briefly
Rswitch on the cooling with air dehumidifica-
tion function
Rswitch on the defrost windshield function
briefly, if required
Climate control regulates the temperature and
air humidity in the vehicle interior. The air filter
cleans the air, thus improving the interior cli-
mate.
The "Cooling with air dehumidification" function
is only available when the engine is running.
Optimum climate control is only achieved with
the side windows and roof closed.
If you start the engine using your smartphone,
the last selected climate control setting is reac-
tivated (
Ypage 123).
The residual heat function can only be activated
or deactivated with the ignition switched off
(
Ypage 116).
To enable the air conditioning, pollutant moni-
toring and air filtering systems to function cor-
rectly, an interior filter must be used at all times. Ensure that the filter is properly installed and
that the filter housing in the engine compart- ment is correctly and tightly sealed by the cover
at all times during operation. Use filters that
have been recommended and approved by
Mercedes-Benz. Always have service work car-
ried out at a qualified specialist workshop.
The integrated filter filters out most particles of dust and soot and completely filters out pollen.
It also reduces gaseous pollutants and odors. A
clogged filter reduces the amount of air suppliedto the vehicle interior. For this reason, you
should always observe the interval for replacing
the filter, which is specified in the Maintenance
Booklet. As it depends on environmental condi- tions, e.g. heavy air pollution, the interval may
be shorter than stated in the Maintenance Book-
let.
iVentilate the vehicle for a brief period during
warm weather, e.g. using the convenience
opening feature (
Ypage 86). This will speed
up the cooling process and the desired inte-
rior t
emperature will be reached more
quickly.
iIt is possible that the blower may be activa-
ted automatically 60 minutes after the Smart-
Key has been removed depending on various
factors, e.g. the outside temperature. In vehi-
cles with the KEYLESS-GO or KEYLESS-GO
start function, the blower can switch on auto-
matically after the engine has been switched
off and the door opened. The vehicle is then
ventilated for 30 minutes to dry the automatic
climate control.
Overview of climate control systems111
Climate control
Page 126 of 338
Also make sure that:
Rthe fuel tank is sufficiently filled
Rthe starter battery is sufficiently charged
GWARNING
Limbs could be crushed or trapped if the
engine is started unintentionally during ser-
vice or maintenance work. There is a risk of
injury.
Always secure the engine against uninten-
tional starting before carrying out mainte-
nance or repair work.
Make sure that the engine cannot be started via
your smartphone before carrying out mainte-
nance or repairs. You can prevent an engine
start via your smartphone, for example, if you:
Rswitch on the hazard warning lamps
Rdo not lock the doors
Ropen the hood
Pulling away
General notes
GWARNING
If the engine speed is above the idling speed
and you engage transmission position Dor R,
the vehicle could pull away suddenly. There is
a risk of an accident.
When engaging transmission position Dor R,
always firmly depress the brake pedal and do not simultaneously accelerate.
Depress the accelerator carefully when pulling
away.
The vehicle locks centrally once you have pulled
away. The locking knobs in the doors drop down.
You can open the doors from the inside at any
time.
You can also deactivate the automatic locking
feature (
Ypage 79).
It is only possible to shift the transmission from
position Pto the desired position if you depress
the brake pedal. Only then is the parking lock
released.
If you do not depress the brake pedal, the
DIRECT SELECT lever can still be moved but the
parking lock remains engaged.
iUpshifts take place at higher engine speeds
after a cold start. This helps the catalytic con-
verter to reach its operating temperature
more quickly.
Information on the automatic release of the
electric parking brake (
Ypage 140).
Hill start assist
Hill start assist helps you when pulling away for-
wards or in reverse on an uphill gradient. It holds
the vehicle for a short time after you have
removed your foot from the brake pedal. This
gives you enough time to move your foot from
the brake pedal to the accelerator pedal and to
depress it before the vehicle begins to roll.
GWARNING
After a short time, hill start assist will no lon-
ger brake your vehicle and it could roll away.
There is a risk of an accident and injury.
Therefore, quickly move your foot from the
brake pedal to the accelerator pedal. Never
leave the vehicle when it is held by hill start
assist.
Hill start assist is not active if:
Ryou are pulling away on a level road or on a
downhill gradient.
Rthe transmission is in position 005C.
Rthe electric parking brake is applied.
RESP®is malfunctioning.
ECO start/stop function
Introduction
The ECO start/stop function switches the
engine off automatically if the vehicle is stopped
under certain conditions.
The engine starts automatically when the driver
wants to pull away again. The ECO start/stop
function thereby helps you to reduce the fuel
consumption and emissions of your vehicle.
Important safety notes
GWARNING
If the engine is switched off automatically and
you exit the vehicle, the engine is restarted
124Driving
Driving an d parking
Page 143 of 338
hibit the driver from using a mobile phone while
driving a vehicle.
If you make a call while driving, always use
hands-free mode. Only operate the telephone
when the traffic situation permits. If you are
unsure, pull over to a safe location and stop
before operating the telephone.
Bear in mind that at a speed of only 30 mph
(approximately 50 km/h), the vehicle covers a
distance of 44 ft (approximately 14m)per sec-
ond.
Drive sensibly – save fuel
Observe the following tips to save fuel:
XThe tires should always be inflated to the rec-
ommended tire pressure.
XRemove unnecessary loads.
XRemove roof racks when they are not needed.
XWarm up the engine at low engine speeds.
XAvoid frequent acceleration or braking.
XHave all maintenance work carried out as
indicated by the service intervals in the Main-
tenance Booklet or by the service interval dis-
play.
Fuel consumption also increases when driving in cold weather, in stop-start traffic and in hilly ter-
rain.
Drinking and driving
GWARNING
Drinking and driving and/or taking drugs and driving are very dangerous combinations.
Even a small amount of alcohol or drugs can
affect your reflexes, perceptions and judg-
ment.
The possibility of a serious or even fatal acci-
dent is greatly increased when you drink or
take drugs and drive.
Do not drink or take drugs and drive or allow
anyone to drive who has been drinking or tak-
ing drugs.
Emission control
GWARNING
Combustion engines emit poisonous exhaust
gases such as carbon monoxide. Inhaling
these exhaust gases leads to poisoning. There
is a risk of fatal injury. Therefore never leave
the engine running in enclosed spaces with-
out sufficient ventilation.
Certain engine systems are designed to keep
the level of poisonous components in exhaust
fumes within legal limits.
These systems only work at peak efficiency if
they are serviced exactly in accordance with the
manufacturer's specifications. Always have
work on the engine carried out at a qualified
specialist workshop . Mercedes-Benz recom-
mends that you use an authorized Mercedes-
Benz Center for this purpose. In particular, work
relevant to safety or on safety-related systems
must be carried out at a qualified specialist
workshop.
The engine settings must not be changed under any circumstances. Furthermore, all specific
service work must be carried out at regular
intervals and in accordance with the Mercedes-
Benz service requirements. Details can be found in the Maintenance Booklet.
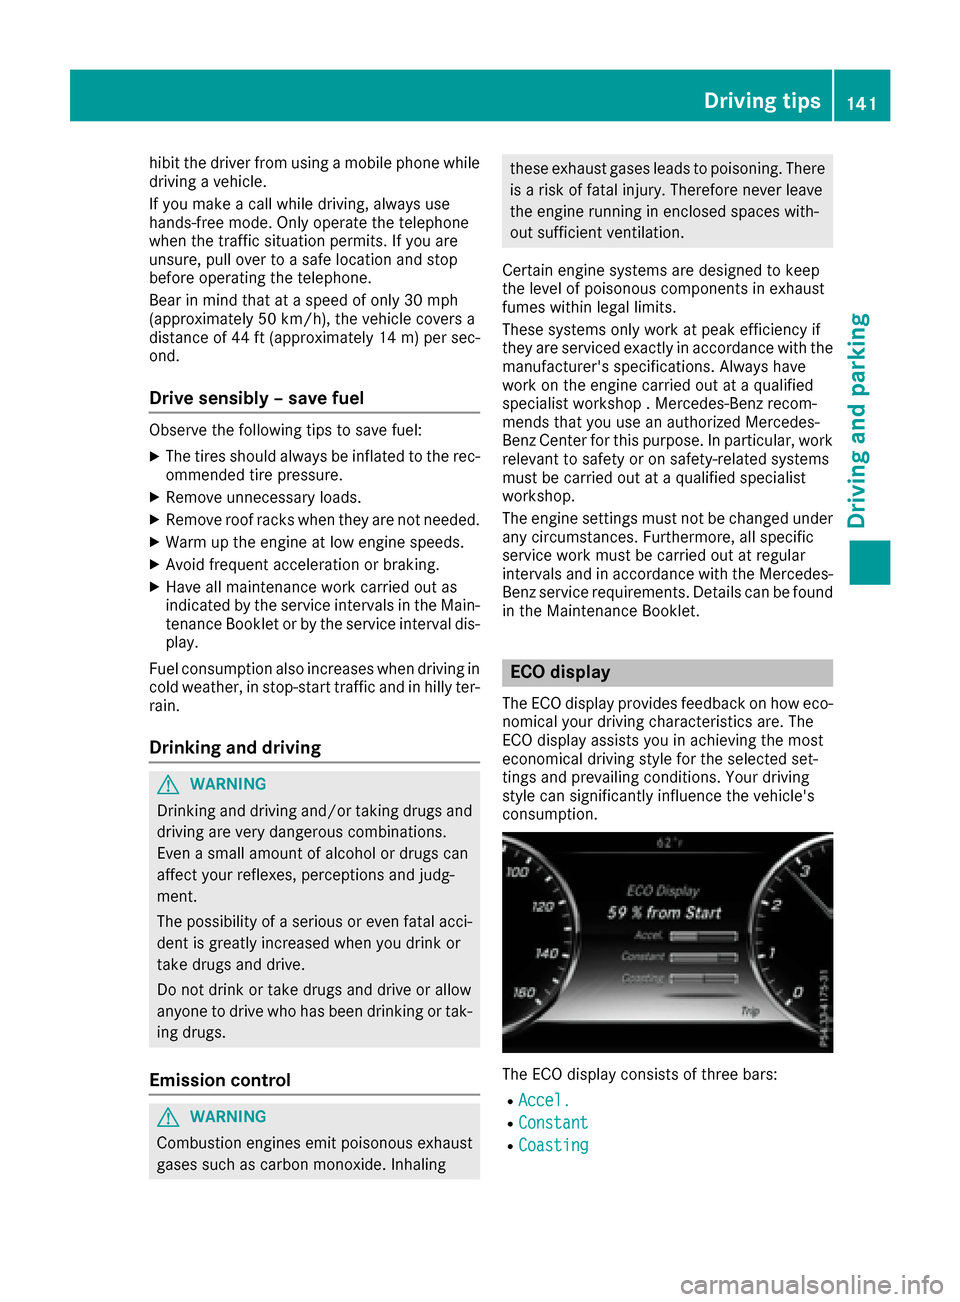
ECO display
The ECO display provides feedback on how eco-
nomical your driving characteristics are. The
ECO display assists you in achieving the most
economical driving style for the selected set-
tings and prevailing conditions. Your driving
style can significantly influence the vehicle's
consumption.
The ECO display consists of three bars:
RAccel.
RConstant
RCoasting
Driving tips141
Driving and parking
Z
Page 145 of 338
on for a short while. This allows the airflow to
cool the brakes more quickly.
Wet roads
If you have driven for a long time in heavy rain
without braking, there may be a delayed reac-
tion from the brakes when braking for the first
time. This may also occur after the vehicle has
been washed or driven through deep water.
You have to depress the brake pedal more
firmly. Maintain a greater distance from the
vehicle in front.
After driving on a wet road or having the vehicle
washed, brake firmly while paying attention to
the traffic conditions. This will warm up the
brake discs, thereby drying them more quickly
and protecting them against corrosion.
Limited braking performance on salt-
treated roads
If you drive on salted roads, a layer of salt resi-
due may form on the brake discs and brake
pads. This can result in a significantly longer
braking distance.
RIn order to prevent any salt build-up, apply the
brakes occasionally while paying attention to
the traffic conditions.
RCarefully depress the brake pedal and the
beginning and end of a journey.
RMaintain a greater distance to the vehicle
ahead.
Servicing the brakes
!The brake fluid level may be too low, if:
Rif the red brake warning lamp lights up in
the instrument cluster and
Ryou hear a warning tone while the engine is
running
Observe additional warning messages in the
multifunction display.
The brake fluid level may be too low due to
brake pad wear or leaking brake lines.
Have the brake system checked immediately.
Consult a qualified specialist workshop to
arrange this.
!Vehicles with 4MATIC: function or per-
formance tests may only be carried out on a 2-
axle dynamometer. If you wish to operate the
vehicle on such a dynamometer, please con- sult a qualified specialist workshop in
advance. You could otherwise damage the
drive train or the brake system.
!Vehicles with 4MATIC:
the ESP®system
operates automatically. The engine and the
ignition must therefore be switched off (the
SmartKey must be in position 0or 1in the
ignition lock or the Start/Stop button must be
in position 0or 1) if the electric parking brake
is tested on a brake dynamometer.
Braking triggered automatically by ESP
®may
cause severe damage to the brake system.
!Vehicles without 4MATIC: the ESP®sys-
tem operates automatically. The engine and
the ignition must therefore be switched off
(the SmartKey must be in position 0or 1in the
ignition lock or the Start/Stop button must be
in position 0or 1) if:
Rthe electric parking brake is tested using a
brake dynamometer.
Rthe vehicle is towed with one axle raised.
Braking triggered automatically by ESP®may
cause severe damage to the brake system.
All checks and maintenance work on the brake
system must be carried out at a qualified spe-
cialist workshop.
Have brake pads installed and brake fluid
replaced at a qualified specialist workshop.
If the brake system has only been subject to
moderate loads, you should test the functional-
ity of your brakes at regular intervals.
Information on BAS (Brake Assist) (
Ypage 62)
and BAS PLUS (Brake Assist PLUS) (Ypage 62).
For safety reasons, Mercedes-Benz recom-
mends only installing the following brake disks
and brake pads/linings:
Rbrake disks that have been approved by
Mercedes-Benz
Rbrake pads/linings that have been approved
by Mercedes-Benz or that are of an equivalent
standard of quality
Other brake disks or brake pads/linings can
compromise the safety of your vehicle.
Always replace all brake disks and brake pads/
linings on an axle at the same time. Always
install new brake pads/linings when replacing
brake disks.
The vehicle is equipped with lightweight brake
disks to which the wheel assembly with rim and
threaded connection is matched.
Driving tips143
Driving and parking
Z
Page 263 of 338
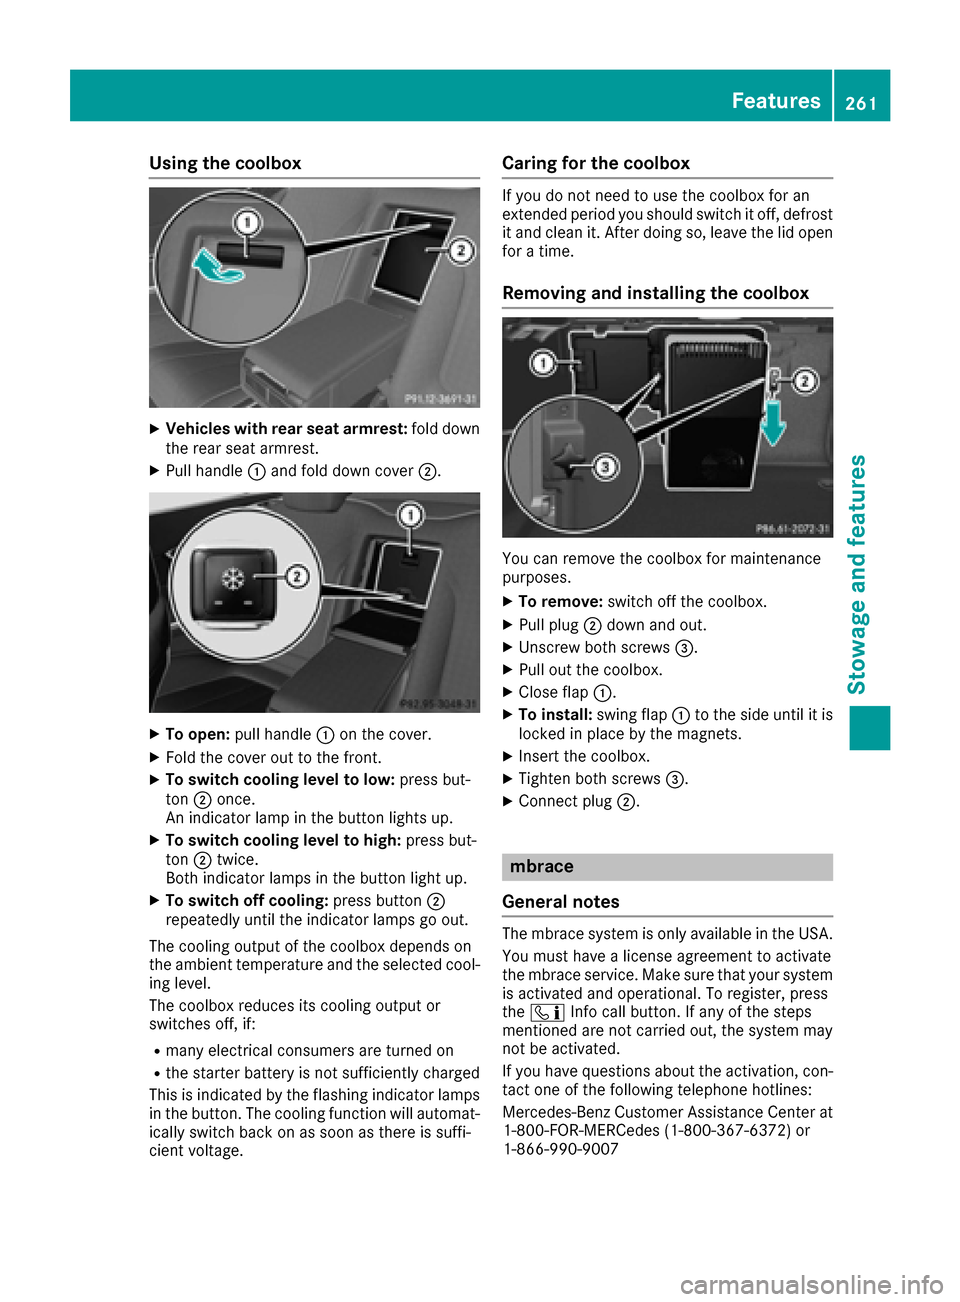
Using the coolbox
XVehicles with rear seat armrest:fold down
the rear seat armrest.
XPull handle 0043and fold down cover 0044.
XTo open:pull handle 0043on the cover.
XFold the cover out to the front.
XTo switch cooling level to low: press but-
ton 0044once.
An indicator lamp in the button lights up.
XTo switch cooling level to high: press but-
ton 0044twice.
Both indicator lamps in the button light up.
XTo switch off cooling: press button0044
repeatedly until the indicator lamps go out.
The cooling output of the coolbox depends on
the ambient temperature and the selected cool-
ing level.
The coolbox reduces its cooling output or
switches off, if:
Rmany electrical consumers are turned on
Rthe starter battery is not sufficiently charged
This is indicated by the flashing indicator lamps
in the button. The cooling function will automat- ically switch back on as soon as there is suffi-
cient voltage.
Caring for the coolbox
If you do not need to use the coolbox for an
extended period you should switch it off, defrost
it and clean it. After doing so, leave the lid open
for a time.
Removing and installing the coolbox
You can remove the coolbox for maintenance
purposes.
XTo remove: switch off the coolbox.
XPull plug0044down and out.
XUnscrew both screws 0087.
XPull out the coolbox.
XClose flap0043.
XTo install: swing flap0043to the side until it is
locked in place by the magnets.
XInsert the coolbox.
XTighten both screws 0087.
XConnect plug0044.
mbrace
General notes
The mbrace system is only available in the USA.
You must have a license agreement to activate
the mbrace service. Make sure that your system
is activated and operational. To register, press
the 00D9 Info call button. If any of the steps
mentioned are not carried out, the system may
not be activated.
If you have questions about the activation, con-
tact one of the following telephone hotlines:
Mercedes-Benz Customer Assistance Center at 1-800-FOR-MERCedes (1-800-367-6372) or
1-866-990-9007
Features261
Stowage and features
Z
Page 275 of 338
Engine compartment
Hood
Important safety notes
GWARNING
If the hood is unlatched, it may open up when the vehicle is in motion and block your view.
There is a risk of an accident.
Never unlatch the hood while driving. Before
every trip, ensure that the hood is locked.
GWARNING
When opening and closing the hood, it may
suddenly fall into the closed position. There is a risk of injury to persons within range of
movement of the hood.
Open and close the hood only when no one is
within its range of movement.
GWARNING
Opening the hood when the engine is over-
heated or when there is a fire in the engine
compartment could expose you to hot gases
or other service products. There is a risk of
injury.
Let an overheated engine cool down before
opening the hood. If there is a fire in the
engine compartment, keep the hood closed
and contact the fire department.
GWARNING
The engine compartment contains moving
components. Certain components, such as
the radiator fan, may continue to run or start
again suddenly when the ignition is off. There is a risk of injury.
If you need to do any work inside the engine
compartment:
Rswitch off the ignition
Rnever reach into the area where there is a
risk of danger from moving components,
such as the fan rotation area
Rremove jewelry and watches
Rkeep items of clothing and hair, for exam-
ple, away from moving parts
GWARNING
The ignition system and the fuel injection sys-
tem work under high voltage. If you touch
components which are under voltage, you
could get an electric shock. There is a risk of
injury.
Never touch components of the ignition sys-
tem or fuel injection system when the ignition
is switched on.
Opening the hood
GWARNING
Certain components in the engine compart-
ment, such as the engine, radiator and parts
of the exhaust system, can become very hot.
Working in the engine compartment poses a
risk of injury.
Where possible, let the engine cool down and touch only the components described in the
following.
GWARNING
When the hood is open and the windshield
wipers are set in motion, you can be injured by
the wiper linkage. There is a risk of injury.
Always switch off the windshield wipers and
the ignition before opening the hood.
!Make sure that the windshield wipers are
not folded away from the windshield. You
could otherwise damage the windshield wip-
ers or the hood.
Engine compartment273
Maintenance and care
Z
Page 276 of 338
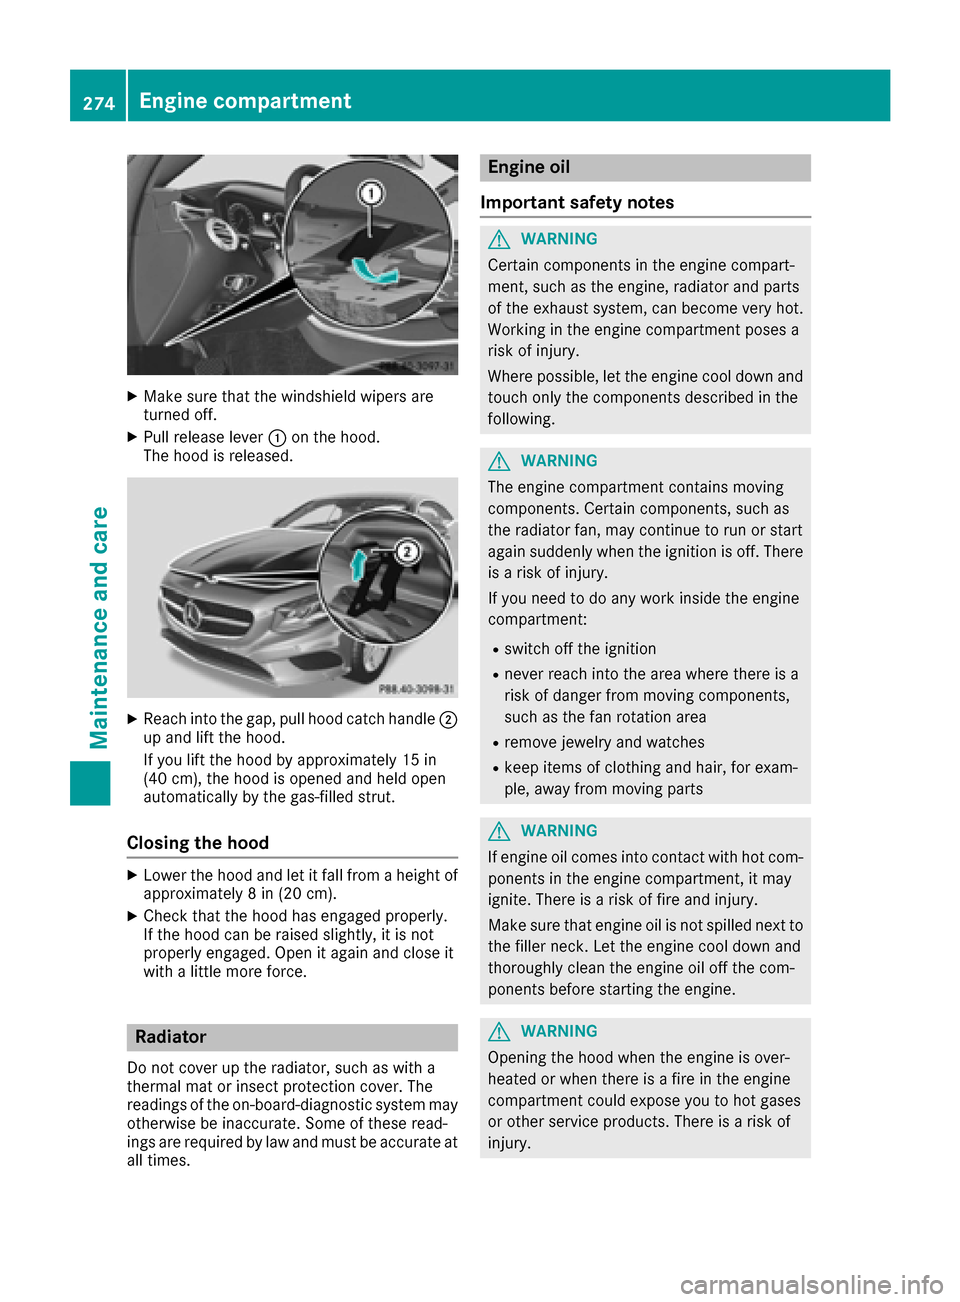
XMake sure that the windshield wipers are
turned off.
XPull release lever0043on the hood.
The hood is released.
XReach into the gap, pull hood catch handle 0044
up and lift the hood.
If you lift the hood by approximately 15 in
(40 cm), the hood is opened and held open
automatically by the gas-filled strut.
Closing the hood
XLower the hood and let it fall from a height of
approximately 8 in (20 cm).
XCheck that the hood has engaged properly.
If the hood can be raised slightly, it is not
properly engaged. Open it again and close it
with a little more force.
Radiator
Do not cover up the radiator, such as with a
thermal mat or insect protection cover. The
readings of the on-board-diagnostic system may
otherwise be inaccurate. Some of these read-
ings are required by law and must be accurate at
all times.
Engine oil
Important safety notes
GWARNING
Certain components in the engine compart-
ment, such as the engine, radiator and parts
of the exhaust system, can become very hot.
Working in the engine compartment poses a
risk of injury.
Where possible, let the engine cool down and touch only the components described in the
following.
GWARNING
The engine compartment contains moving
components. Certain components, such as
the radiator fan, may continue to run or start
again suddenly when the ignition is off. There is a risk of injury.
If you need to do any work inside the engine
compartment:
Rswitch off the ignition
Rnever reach into the area where there is a
risk of danger from moving components,
such as the fan rotation area
Rremove jewelry and watches
Rkeep items of clothing and hair, for exam-
ple, away from moving parts
GWARNING
If engine oil comes into contact with hot com- ponents in the engine compartment, it may
ignite. There is a risk of fire and injury.
Make sure that engine oil is not spilled next to
the filler neck. Let the engine cool down and
thoroughly clean the engine oil off the com-
ponents before starting the engine.
GWARNING
Opening the hood when the engine is over-
heated or when there is a fire in the engine
compartment could expose you to hot gases
or other service products. There is a risk of
injury.
274Engine compartment
Maintenance and care
Page 277 of 338
Let an overheated engine cool down before
opening the hood. If there is a fire in the
engine compartment, keep the hood closed
and contact the fire department.
General notes
Depending on your driving style, the vehicle
consumes up to 0.9 US qt (0.8 l) of oil per
600 miles (1000 km). The oil consumption may
be higher than this when the vehicle is new or if
you frequently drive at high engine speeds.
Depending on the engine, the oil dipstick may be
in a different location.
When checking the oil level:
Rpark the vehicle on a level surface
Rthe engine should be switched off for approx-
imately five minutes if the engine is at normal
operating temperature
Rif the engine is not at normal operating tem-
perature, e.g. if the engine was only started
briefly, wait about 30 minutes before carrying
out the measurement
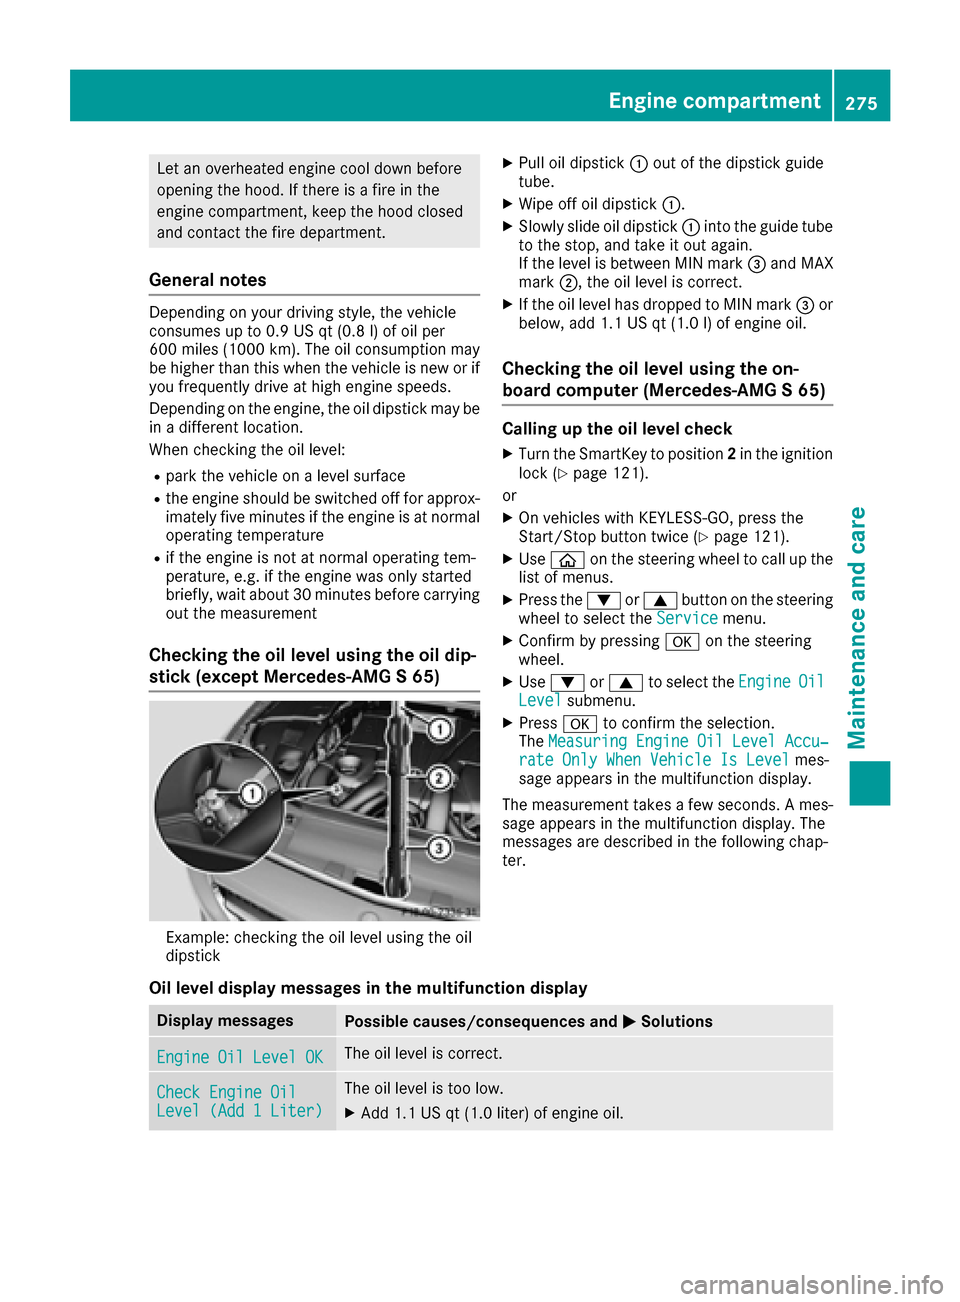
Checking the oil level using the oil dip-
stick (except Mercedes-AMG S 65)
Example: checking the oil level using the oil
dipstick
XPull oil dipstick0043out of the dipstick guide
tube.
XWipe off oil dipstick 0043.
XSlowly slide oil dipstick 0043into the guide tube
to the stop, and take it out again.
If the level is between MIN mark 0087and MAX
mark 0044, the oil level is correct.
XIf the oil level has dropped to MIN mark 0087or
below, add 1.1 US qt (1.0 l)of engine oil.
Checking the oil level using the on-
board computer (Mercedes-AMG S 65)
Calling up the oil level check
XTurn the SmartKey to position 2in the ignition
lock (Ypage 121).
or
XOn vehicles with KEYLESS-GO, press the
Start/Stop button twice (Ypage 121).
XUse 00E2 on the steering wheel to call up the
list of menus.
XPress the 0064or0063 button on the steering
wheel to select the Servicemenu.
XConfirm by pressing 0076on the steering
wheel.
XUse 0064 or0063 to select the EngineOilLevelsubmenu.
XPress0076to confirm the selection.
The Measuring Engine Oil Level Accu‐
rate Only When Vehicle Is Levelmes-
sage appears in the multifunction display.
The measurement takes a few seconds. A mes-
sage appears in the multifunction display. The
messages are described in the following chap-
ter.
Oil level display messages in the multifunction display
Display messagesPossible causes/consequences and 0050Solutions
Engine Oil Level OKThe oil level is correct.
Check Engine OilLevel (Add 1 Liter)
The oil level is too low.
XAdd 1.1 US qt (1.0 liter) of engine oil.
Engine compartment275
Maintenance and care
Z