2017 MERCEDES-BENZ S-Class CABRIOLET lock
[x] Cancel search: lockPage 23 of 338

Optional equipment weight (defi-
nition) ............................................ 320
PSI (pounds per square inch) (def-
inition) ...........................................319
Replacing ....................................... 320
Service life ..................................... 303
Sidewall (definition) ....................... 320
Snow chains .................................. 304
Speed rating (definition) ................ 319
Storing ...........................................3 21
Structure and characteristics
(definition) ..................................... 318
Summer tires in winter .................. 304
Temperature .................................. 315
TIN (Tire Identification Number)
(definition) ..................................... 320
Tire bead (definition) ......................3 20
Tire pressure (definition) ................ 320
Tire pressures (recommended) ...... 319
Tire size (data) ............................... 325
Tire size designation, load-bearing
capacity, speed rating .................... 315
Tire tread ....................................... 303
Tire tread (definition) ..................... 320
Total load limit (definition) ............. 320
Traction ......................................... 314
Traction (definition) ....................... 320
Tread wear ..................................... 314
Uniform Tire Quality Grading
Standards ...................................... 314
Uniform Tire Quality Grading
Standards (definition) .................... 318
Wear indicator (definition) ............. 320
Wheel and tire combination ........... 325
Wheel rim (definition) .................... 319
see Flat tire
Touchpad
Changing the station/music
track .............................................. 246
Character suggestions ................... 245
Deleting characters ....................... 246
Entering a space ............................ 246
Entering characters ....................... 245
Gesture control .............................. 245
Handwriting recognition ................ 246
Operating the touchpad ................. 245
Overview ........................................ 245
Qu
ick access for Audio .................. 246 Quick access for telephone ........... 246
Switching ....................................... 245
Switching input line ....................... 246
Tow-starting
Emergency engine starting ............ 299
Important safety notes .................. 297
Towing away
Important safety guidelines ........... 297
Installing the towing eye ................ 298
Notes for 4MATIC vehicles ............ 299
Removing the towing eye ............... 298
Transporting the vehicle ................ 299
With both axles on the ground ....... 298
Towing eye ......................................... 288
Traffic reports
see also Digital Operator's Man-
ual .................................................. 243
Traffic Sign Assist
Activating ....................................... 177
Display message ............................ 223
Function/notes ............................. 177
Important safety notes .................. 177
Instrument cluster display ............. 178
Switching on/off ........................... 199
Transfer case ..................................... 138
Transmission
see Automatic transmission
Transporting the vehicle .................. 299
Trim pieces (cleaning instruc-
tions) .................................................. 286
Trip computer (on-board com-
puter) .................................................. 192
Trip odometer
Calling up ....................................... 191
Resetting (on-board computer) ...... 192
Trunk
Emergency release .......................... 84
Emergency release button ............... 85
Important safety notes .................... 80
Locking separately ........................... 84
Opening ........................................... 81
Opening/closing (automatically
from inside) ...................................... 83
Opening/closing (automatically
from outside) ................................... 81
Opening/closing (from outside,
HANDS-FREE ACCESS) .................... 82
Index21
Page 24 of 338

Power closing ..................................79
Trunk lid
Display message ............................ 229
Obstacle recognition ........................8 0
Opening dimensions ......................3 34
Opening/closing .............................. 80
Trunk load (maximum) ......................334
Trunk partition
Display message ............................ 230
General notes .................................. 91
Opening/closing .............................. 91
Turn signals
Display message ............................ 216
Switching on/off ........................... 108
Two-way radio
Frequencies ................................... 327
Installation ..................................... 327
Transmission output (maximum) .... 327
Windshield (infrared reflective) ...... 271
Type identification plate
see Vehicle identification plate
U
UnlockingEmergency unlocking ....................... 79
From inside the vehicle (central
unlocking button) .............................7 8
Upshift indicator (on-board com-
puter, Mercedes-AMG vehicles) .......203
USB devices
Connecting to the Media Inter-
face ............................................... 252
V
Vanity mirror (in the sun visor) ........259
Vehicle
Correct use ...................................... 29
Data acquisition ............................... 30
Display message ............................ 227
Equipment ....................................... 26
Individual settings .......................... 198
Limited Warranty .............................3 0
Loading .......................................... 311
Locking (in an emergency) ............... 79
Locking (SmartKey) .......................... 72
Lowering ........................................ 325 Maintenance .................................... 27
Operating safety .............................. 28
Parking .......................................... 140
Parking for a long period ................ 143
Pulling away ................................... 127
Raising ........................................... 322
Reporting problems ......................... 29
Securing from rolling away ............ 321
Towing away .................................. 297
Transporting .................................. 299
Unlocking (in an emergency) ........... 79
Unlocking (SmartKey) ...................... 72
Vehicle data ................................... 334
Vehicle dimensions ........................... 334
Vehicle emergency locking ................ 79
Vehicle identification number
see VIN
Vehicle identification plate .............. 328
Vehicle level
AIRMATIC ...................................... 160
Display message ............................ 220
Vehicle tool kit .................................. 288
Video
Operating the DVD ......................... 196
see also Digital Operator's Man-
ual .................................................. 243
Video-AUX
Connecting an external video
source ............................................ 253
VIN
Type plate ...................................... 328
W
Warning and indicator lampsABS ................................................ 235
Brakes ........................................... 234
Check Engine ................................. 238
Coolant .......................................... 238
Distance warning ........................... 240
ESP
®.............................................. 235
ESP®OFF ....................................... 237
Fuel tank ........................................ 238
General notes ................................ 232
Overview .......................................... 34
Parking brake ................................ 237
PASSENGER AIR BAG ...................... 42
Reserve fuel ................................... 238
22Index
Page 35 of 338

Cockpit
FunctionPage
:Steering wheel paddle shift-
ers135
;Combination switch108
=Horn
?Instrument cluster34
ADIRECT SELECT lever131
BOverhead control panel38
CControl panel for:
ÜLowering the rear seat
head restraints97
Moves the seat-belt extender
forwards44
PASSENGER AIRBAG indica-
tor lamps42
Adjusting the brightness of
the instrument lighting and
the multimedia system dis-
play
DClimate control systems114
EIgnition lock124
Start/Stop button124
FunctionPage
FAdjusts the steering wheel101
Steering wheel heating101
GCruise control lever149
HElectric parking brake142
IDiagnostics connection29
JOpens the hood272
KLight switch107
LControl panel for:
Activating Steering Assist
and Stop&Go Pilot156
Switching on Active Lane
Keeping Assist184
Deactivating PARKTRONIC161
Switching on the 360° cam-
era172
Activating Night View Assist178
Switching on the head-up
display189
Cockpit33
At a glance
Page 41 of 338
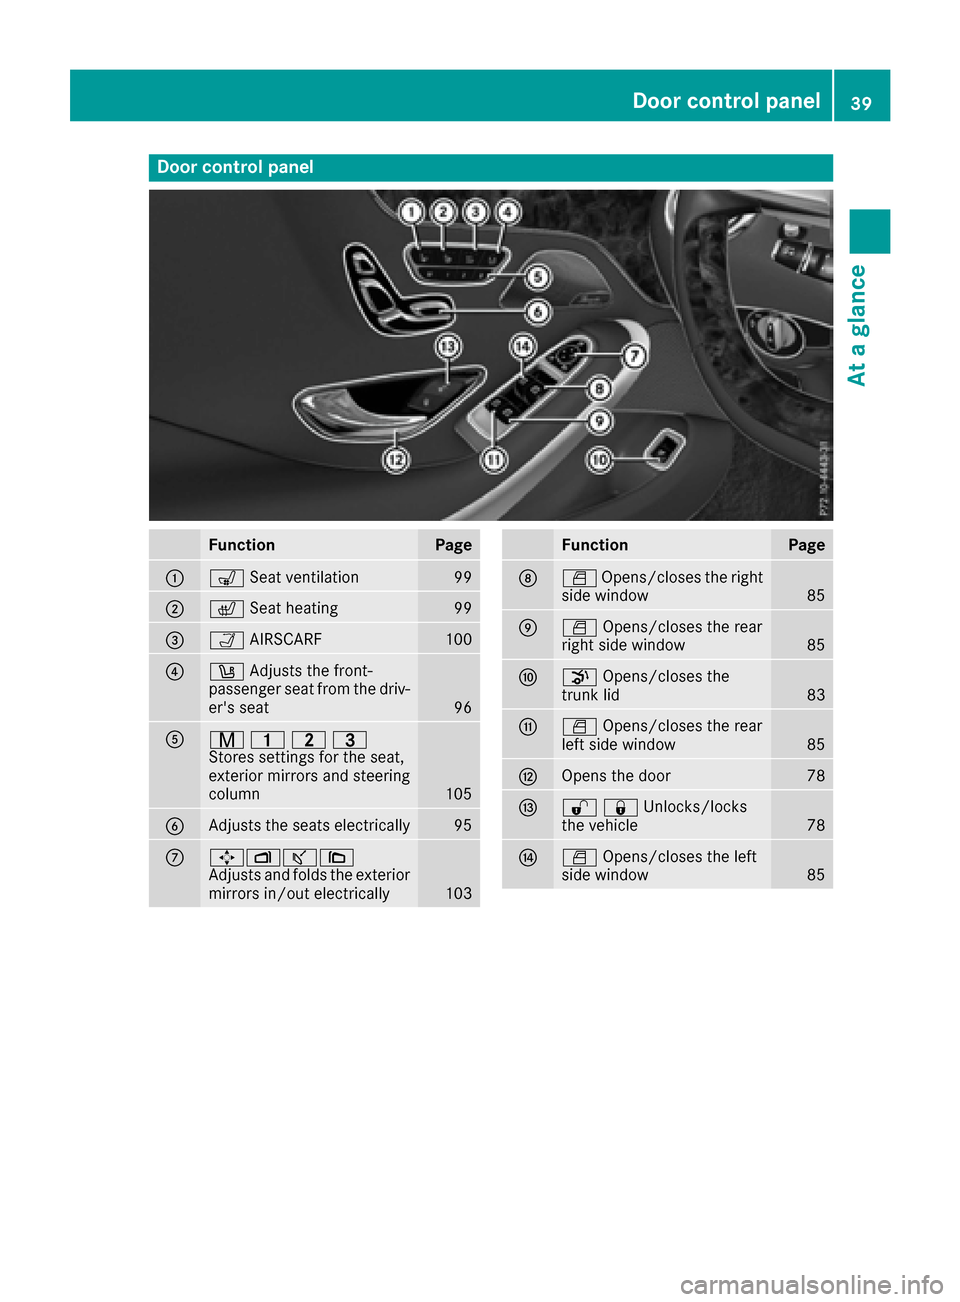
Door controlpanel
FunctionPage
:s Seat ventilation99
;cSeat heatin g99
=ÒAIRSCARF100
?w Adjust sth efront-
passenger seat from th edriv-
er' sseat
96
Ar 45=
Stores settings for the seat,
exterior mirrors and steering
column
105
BAdjusts the seats electrically95
C7Zª\
Adjusts and folds the exterior
mirrors in/out electrically
103
FunctionPage
DW Opens/closes the right
side window85
EW Opens/closes the rear
right side window85
Fp Opens/closes the
trunk lid83
GW Opens/closes the rear
left side window85
HOpens the door78
I%&Unlocks/locks
the vehicle78
JW Opens/closes the left
side window85
Door control panel39
At a glance
Page 43 of 338
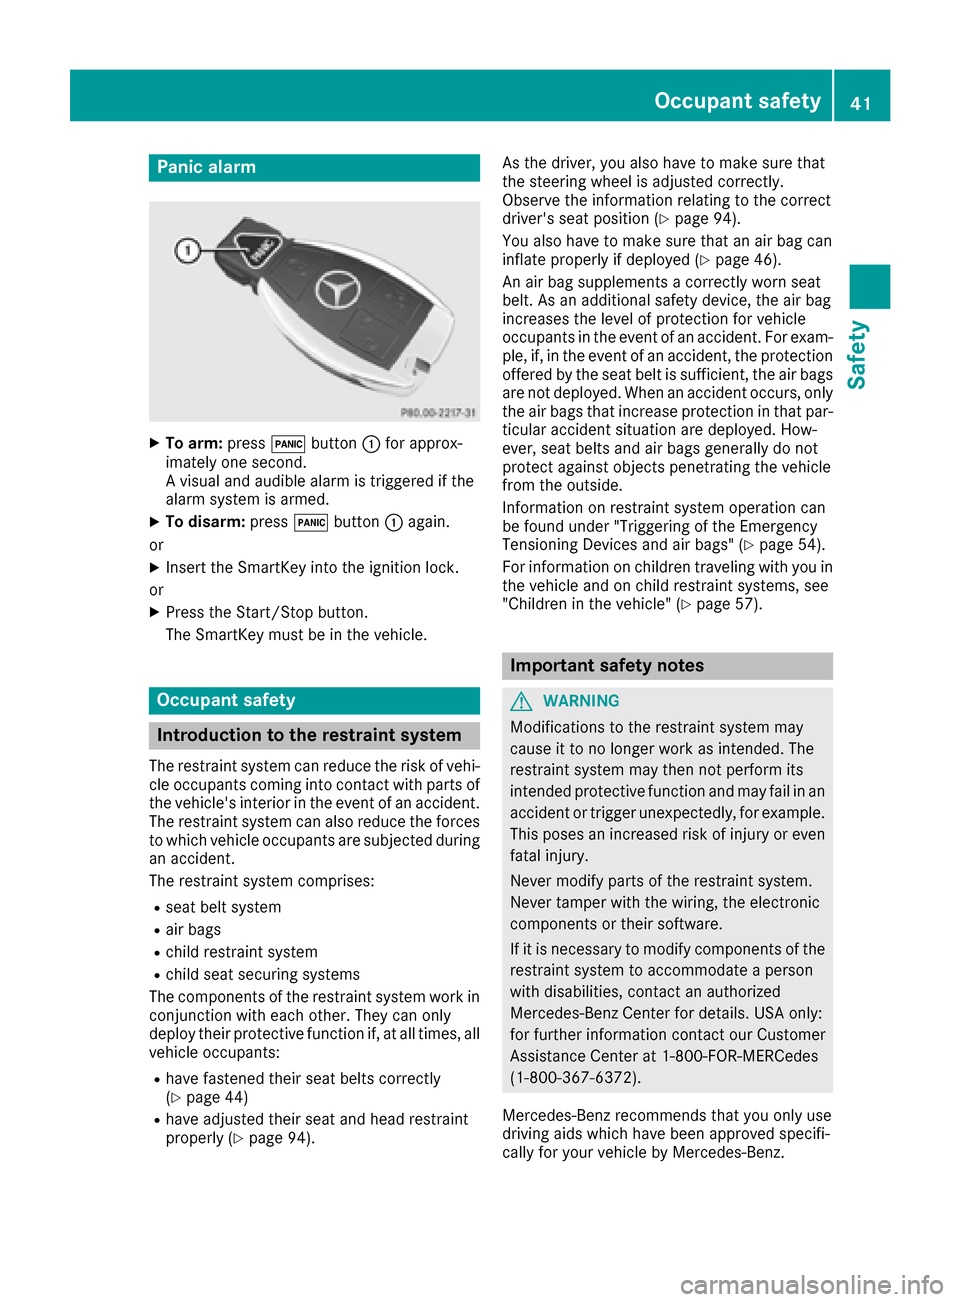
Panic alarm
XTo arm:press!button :for approx-
imately one second.
A visual and audible alarm is triggered if the
alarm system is armed.
XTo disarm: press!button :again.
or
XInsert the SmartKey into the ignition lock.
or
XPress the Start/Stop button.
The SmartKey must be in the vehicle.
Occupant safety
Introduction to the restraint system
The restraint system can reduce the risk of vehi- cle occupants coming into contact with parts of
the vehicle's interior in the event of an accident.
The restraint system can also reduce the forces to which vehicle occupants are subjected during
an accident.
The restraint system comprises:
Rseat belt system
Rair bags
Rchild restraint system
Rchild seat securing systems
The components of the restraint system work in
conjunction with each other. They can only
deploy their protective function if, at all times, all vehicle occupants:
Rhave fastened their seat belts correctly
(Ypage 44)
Rhave adjusted their seat and head restraint
properly (Ypage 94). As the driver, you also have to make sure that
the steering wheel is adjusted correctly.
Observe the information relating to the correct
driver's seat position (
Ypage 94).
You also have to make sure that an air bag can
inflate properly if deployed (
Ypage 46).
An air bag supplements a correctly worn seat
belt. As an additional safety device, the air bag
increases the level of protection for vehicle
occupants in the event of an accident. For exam-
ple, if, in the event of an accident, the protection
offered by the seat belt is sufficient, the air bags are not deployed. When an accident occurs, only
the air bags that increase protection in that par-ticular accident situation are deployed. How-
ever, seat belts and air bags generally do not
protect against objects penetrating the vehicle
from the outside.
Information on restraint system operation can
be found under "Triggering of the Emergency
Tensioning Devices and air bags" (
Ypage 54).
For information on children traveling with you in
the vehicle and on child restraint systems, see
"Children in the vehicle" (
Ypage 57).
Important safety notes
GWARNING
Modifications to the restraint system may
cause it to no longer work as intended. The
restraint system may then not perform its
intended protective function and may fail in an
accident or trigger unexpectedly, for example.
This poses an increased risk of injury or even fatal injury.
Never modify parts of the restraint system.
Never tamper with the wiring, the electronic
components or their software.
If it is necessary to modify components of the
restraint system to accommodate a person
with disabilities, contact an authorized
Mercedes-Benz Center for details. USA only:
for further information contact our Customer
Assistance Center at 1-800-FOR-MERCedes
(1‑800‑367‑6372).
Mercedes-Benz recommends that you only use
driving aids which have been approved specifi-
cally for your vehicle by Mercedes-Benz.
Occupant safety41
Safety
Z
Page 45 of 338

occupant in the best position in relation to the
air bag.
The seat belt system comprises:
RSeat belts
REmergency Tensioning Devices and seat belt
force limiters
If the seat belt is pulled by the seat belt extender
quickly or with a jerky movement, the belt
retractor locks. The belt strap cannot be extrac-
ted any further.
The Emergency Tensioning Device tightens the
seat belt in an accident, pulling the belt close
against the body. However it does not pull the
vehicle occupant back in the direction of the
backrest.
The Emergency Tensioning Device does not cor-
rect an incorrect seat position or the routing of
an incorrectly fastened seat belt.
When triggered, a seat belt force limiter helps to
reduce the force exerted by the seat belt on the
vehicle occupant.
The seat belt force limiters for the front seats are
synchronized with the front air bags, which
absorb part of the deceleration force. This can
reduce the force exerted on the vehicle occu-
pants during an accident.
!If the front-passenger seat is unoccupied,
do not insert the belt tongue into the buckle of
the front-passenger seat. This may otherwise
lead to the triggering of the Emergency Ten-
sioning Device in the event of an accident,
which will then need to be replaced.
Important safety notes
The use of seat belts and child restraint systems
is required by law in:
Rall 50 states
Rthe U.S. territories
Rthe District of Columbia
Rall Canadian provinces
Even where this is not required by law, all vehicle
occupants should correctly fasten their seat
belts before starting the journey.
GWARNING
If the seat belt is not worn correctly, it cannot
perform its intended protective function. An
incorrectly fastened seat belt can also cause
injuries, for example, in the event of an acci-
dent or when braking or changing direction
abruptly. This poses an increased risk of injury or even fatal injury.
Always ensure that all vehicle occupants have
their seat belts fastened correctly and are sit-
ting properly.
GWARNING
The seat belt does not offer the intended level of protection if you have not moved the back-
rest to an almost vertical position. When brak-
ing or in the event of an accident, you could
slide underneath the seat belt and sustain
abdomen or neck injuries, for example. This
poses an increased risk of injury or even fatal injury.
Adjust the seat properly before beginning
your journey. Always ensure that the backrest
is in an almost vertical position and that the
shoulder section of your seat belt is routed
across the center of your shoulder.
GWARNING
Persons less than 5 ft (1.50 m) tall cannot
wear the seat belt correctly without an addi-
tional and suitable restraint system. If the
seat belt is not worn correctly, it cannot per-
form its intended protective function. An
incorrectly fastened seat belt can also cause
injuries, for example, in the event of an acci-
dent or when braking or changing direction
abruptly. This poses an increased risk of injury or even fatal injury.
For this reason, always secure persons under
5 ft (1.50 m) tall in suitable additional restraint
systems.
If a child younger than twelve years old and
under 5 ft (1.50 m) in height is traveling in the
vehicle:
Ralways secure the child in a child restraint
system suitable for this Mercedes-Benz vehi-
cle. The child restraint system must be appro-
priate to the age, weight and size of the child
Ralways observe the instructions and safety
notes on "Children in the vehicle"
(
Ypage 57) in addition to the child restraint
Occupant safety43
Safety
Z
Page 47 of 338

Always make sure that the seat-belt extenderis retracted during a journey.
If the seat-belt extender does not retract auto-
matically, you can return it manually. Press the
seat-belt extender back to the stop before start-
ing the vehicle to do so. Returning the seat-belt
extender requires force.
The seat-belt extender for the driver and front
passenger helps you fasten your seat belt. Seat-
belt extender =is extended when the respec-
tive door is closed.
You can also extend seat-belt extender =with
seat-belt extender button ?.
XTurn the SmartKey to position 1or 2in the
ignition lock.
XPress seat-belt extender button ?.
Seat-belt extender =extends.
Seat-belt extender =is retracted again if:
Rthe belt tongue is engaged in the seat belt
buckle
Rthe belt tongue is not engaged in the seat belt
buckle within 60 seconds
In this case, you can extend seat-belt
extender =again. Press seat-belt extender
button ?again.
Rthe respective door is opened
Ryou release the seat backrest and fold it for-
wards
Rthe front-passenger seat remains unoccupied
If you then press seat-belt extender but-
ton ?, seat-belt extender =will not extend.
Basic illustration
XAdjust the seat (Ypage 94).
The seat backrest must be in an almost ver-
tical position.
XPull the seat belt smoothly out of seat-belt
extender =and engage belt tongue ;into
belt buckle :.
The seat belt on the driver’s seat and the
front-passenger seat may be tightened auto-
matically, see "Belt adjustment" (
Ypage 44).
XIf necessary, pull upwards on the shoulder
section of the seat belt to tighten the belt
across your body.
All seat belts except the driver's seat belt are
equipped with a special seat belt retractor to
securely fasten child restraint systems in the
vehicle. Further information can be found under
"Special seat belt retractor" (
Ypage 58).
Releasing seat belts
!Make sure that the seat belt is fully rolled up.
Otherwise, the seat belt or belt tongue will be
trapped in the door or in the seat mechanism.
This could damage the door, the door trim
panel and the seat belt. Damaged seat belts
can no longer fulfill their protective function
and must be replaced. Visit a qualified spe-
cialist workshop.
Occupant safety45
Safety
Z
Page 52 of 338

:PASSENGER AIR BAG ON indicator lamp
;PASSENGER AIR BAG OFF indicator lamp
The indicator lamps inform you whether the
front-passenger front air bag is deactivated or
enabled.
XPress the Start/Stop button once or twice, or
turn the SmartKey to position 1or 2in the
ignition lock.
The system carries out self-diagnostics.
The PASSENGER AIR BAG OFF and PASSENGER
AIR BAG ON indicator lamps must light up simul-
taneously for approximately six seconds.
The indicator lamps display the status of the
front-passenger front air bag.
RPASSENGER AIR BAG ON lights up for 60 sec-
onds, subsequently both indicator lamps are
off (PASSENGER AIR BAG ON and OFF): the
front-passenger front air bag is able to deploy
in the event of an accident.
RPASSENGER AIR BAG OFF lights up: the front-
passenger front air bag is deactivated. It will
then not be deployed in the event of an acci-
dent.
If the PASSENGER AIR BAG ON indicator lamp is off, only the PASSENGER AIR BAG OFF indicator
lamp shows the status of the front-passenger
front air bag. The PASSENGER AIR BAG OFF
indicator lamp may be lit continuously or be off.
If the status of the front-passenger front air bagchanges while the vehicle is in motion, an air bag
display message appears in the instrument clus- ter (
Ypage 214). When the front-passenger
seat is occupied, always pay attention to the
PASSENGER AIR BAG OFF indicator lamp. Be
aware of the status of the front-passenger front
air bag both before and during the journey.
GWARNING
If the PASSENGER AIR BAG OFF indicator
lamp is lit, the front-passenger front air bag is
disabled. It will not be deployed in the event of an accident and cannot perform its intended
protective function. A person in the front-
passenger seat could then, for example, come
into contact with the vehicle's interior, espe-
cially if the person is sitting too close to the
dashboard. This poses an increased risk of
injury or even fatal injury.
When the front-passenger seat is occupied,
always ensure that:
Rthe classification of the person in the front-passenger seat is correct and the front-
passenger front air bag is enabled or disa-
bled in accordance with the person in the
front-passenger seat
Rthe front-passenger seat has been moved
back as far back as possible.
Rthe person is seated correctly.
Make sure, both before and during the jour-
ney, that the status of the front-passenger
front air bag is correct.
GWARNING
If you secure a child in a rearward-facing child
restraint system on the front-passenger seat
and the PASSENGER AIR BAG OFF indicator
lamp is off, the front-passenger front air bag
may deploy in the event of an accident. The
child could be struck by the air bag. This poses an increased risk of injury or even fatal injury.
Make sure that the front-passenger front air
bag has been disabled. The PASSENGER AIR
BAG OFF indicator lamp must be lit.
If the PASSENGER AIR BAG OFF indicator lamp
stays off, do not install a rearward-facing child
restraint system on the front-passenger seat.
You can find more information on OCS under
"Problems with the Occupant Classification Sys-
tem" (
Ypage 53).
50Occupant safety
Safety