2017 MERCEDES-BENZ GLS engine
[x] Cancel search: enginePage 109 of 390
When leaving the vehicle, always take the
SmartKey with you and lock the vehicle. Never
leave children unsupervised in the vehicle.
G WARNING
If you drive off while the EASY-ENTRY/EXIT
feature is making adjustments, you could lose
control of the vehicle. There is a risk of an
accident.
Always wait until the adjustment process is
complete before driving off.
The EASY-ENTRY/EXIT feature makes getting in
and out of your vehicle easier.
You can activate and deactivate the EASY-
ENTRY/EXIT feature in the on-board computer
( Y
page 240).
Position of the steering wheel when the
EASY-ENTRY/EXIT feature is active The steering wheel swings upwards when you: R
remove the SmartKey from the ignition lock R
open the driver's door with KEYLESS-GO in
position 1R
open the driver's door and the SmartKey is in
position 0 or 1 in the ignition lock
i The steering wheel only moves upwards if it
has not already reached the upper stop.
Position of the steering wheel for driv-
ing The steering wheel is moved to the last selected
position when: R
the driver's door is closed R
you insert the SmartKey into the ignition lock
or R
you press the Start/Stop button once on vehi-
cles with KEYLESS-GO
When you close the driver's door with the igni-
tion switched on, the steering wheel is also
automatically moved to the previously set posi-
tion.
The last position of the steering column is stored
when you: R
switch the ignition off R
save the setting with the memory function
( Y
page 110). Crash-responsive EASY-EXIT feature If the crash-responsive EASY-EXIT feature is trig-
gered in an accident, the steering column will
move upwards when the driver's door is opened.
This occurs irrespective of the position of the
SmartKey in the ignition lock. This makes it eas-
ier to exit the vehicle and rescue the occupants.
The crash-responsive EASY-EXIT feature is only
operational if the EASY-EXIT/ENTRY feature is
activated in the on-board computer
( Y
page 240).
Mirrors
Rear-view mirror
X
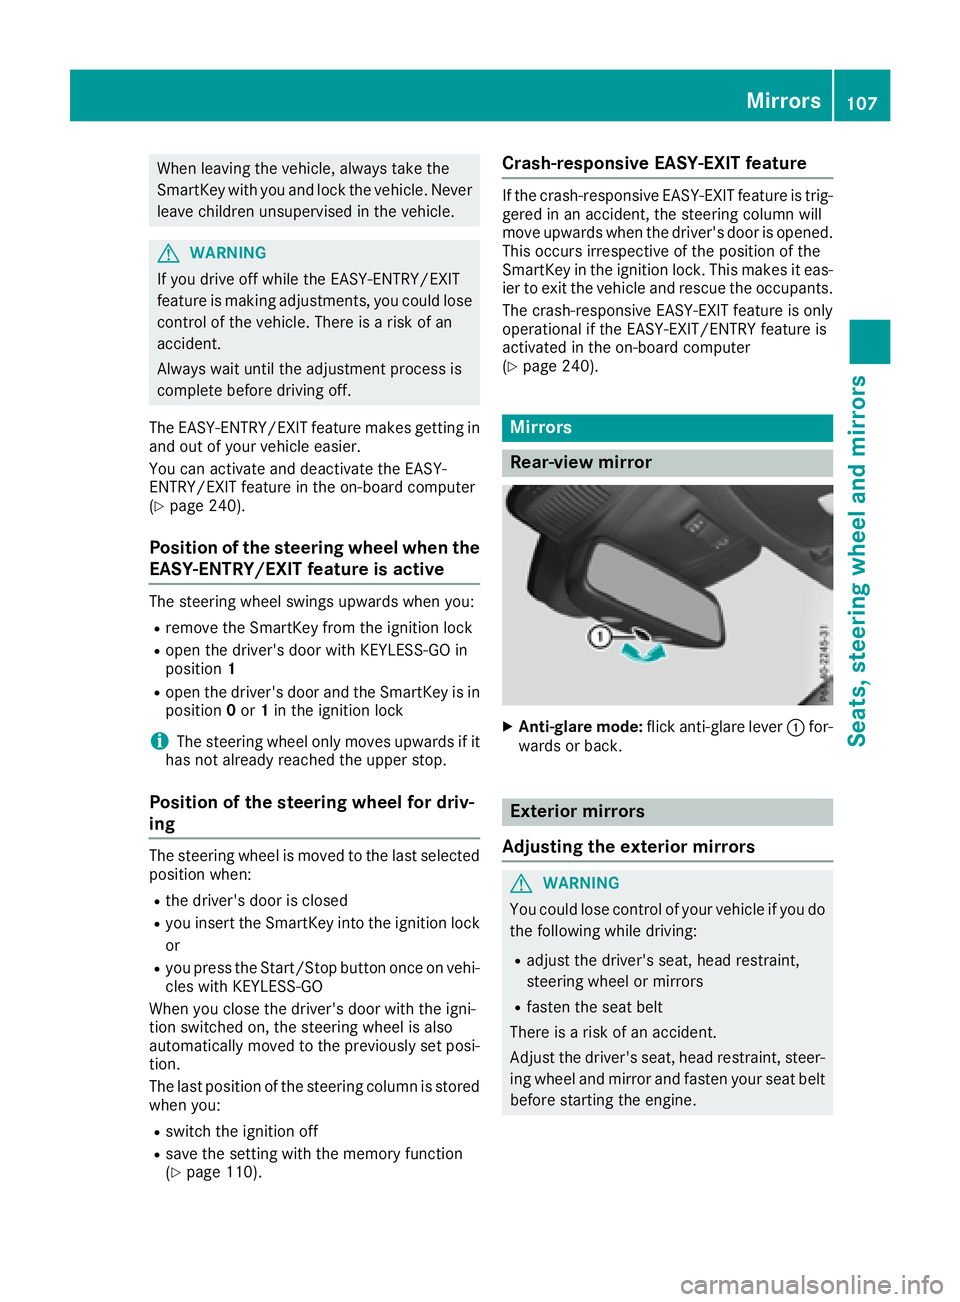
Anti-glare mode: flick anti-glare lever �C for-
wards or back.
Exterior mirrors
Adjusting the exterior mirrors
G WARNING
You could lose control of your vehicle if you do
the following while driving: R
adjust the driver's seat, head restraint,
steering wheel or mirrors R
fasten the seat belt
There is a risk of an accident.
Adjust the driver's seat, head restraint, steer-
ing wheel and mirror and fasten your seat belt
before starting the engine. Mirrors 107
Seats, steering wheel and mirrors Z
Page 115 of 390
The daytime running lamps improve the visibility
of your vehicle during the day. To do this, the
daytime running lamps function must be
switched on using the on-board computer
( Y
page 239).
If the engine is running and you turn the light
switch to �` or �X , the manual settings
take precedence over the daytime running
lamps.
Low-beam headlamps Even if the light sensor does not detect that it is
dark, the parking lamps and low-beam head-
lamps switch on when the ignition is switched on
and the light switch is set to the �X position.
This is a particularly useful function in the event
of rain and fog. X
To switch on the low-beam headlamps:
turn the SmartKey in the ignition lock to posi-
tion 2 or start the engine.X
Turn the light switch to �X .
The green �X indicator lamp in the instru-
ment cluster lights up.
Rear fog lamp The rear fog lamp improves visibility of your
vehicle for the traffic behind in the event of thick
fog. Please take note of the country-specific
regulations for the use of rear fog lamps. X
To switch on the rear fog lamp: turn the
SmartKey in the ignition lock to position 2 or
start the engine. X
Turn the light switch to �X or �q .X
Press the �^ button.
The yellow �^ indicator lamp in the instru-
ment cluster lights up. X
To switch off the rear fog lamp: press the
�^ button.
The yellow �^ indicator lamp in the instru-
ment cluster goes out.
Parking lamps
! If the battery charge is very low, the parking
lamps or standing lamps are automatically
switched off to enable the next engine start.
Always park your vehicle safely and in a well lit
area, in accordance with the relevant legal
stipulations. Avoid using the �` parking
lamps over a period of several hours. If pos-
sible, switch on the right-hand �d or left-
hand �c standing lamps. X
To switch on: turn the light switch to �` .
The green �` indicator lamp in the instru-
ment cluster lights up.
Standing lamps Switching on the standing lamps ensures the
corresponding side of t he vehicle is illuminated.X
To switch on the standing lamps: the
SmartKey should not be in the ignition lock or
it should be in position 0 .X
Turn the light switch to �c (left-hand side of
the vehicle) or �d (right-hand side of the
vehicle).
Vehicles towing a trailer: both the right-hand
and left-hand standing lamps (tail lamps) are
always illuminated on the trailer.
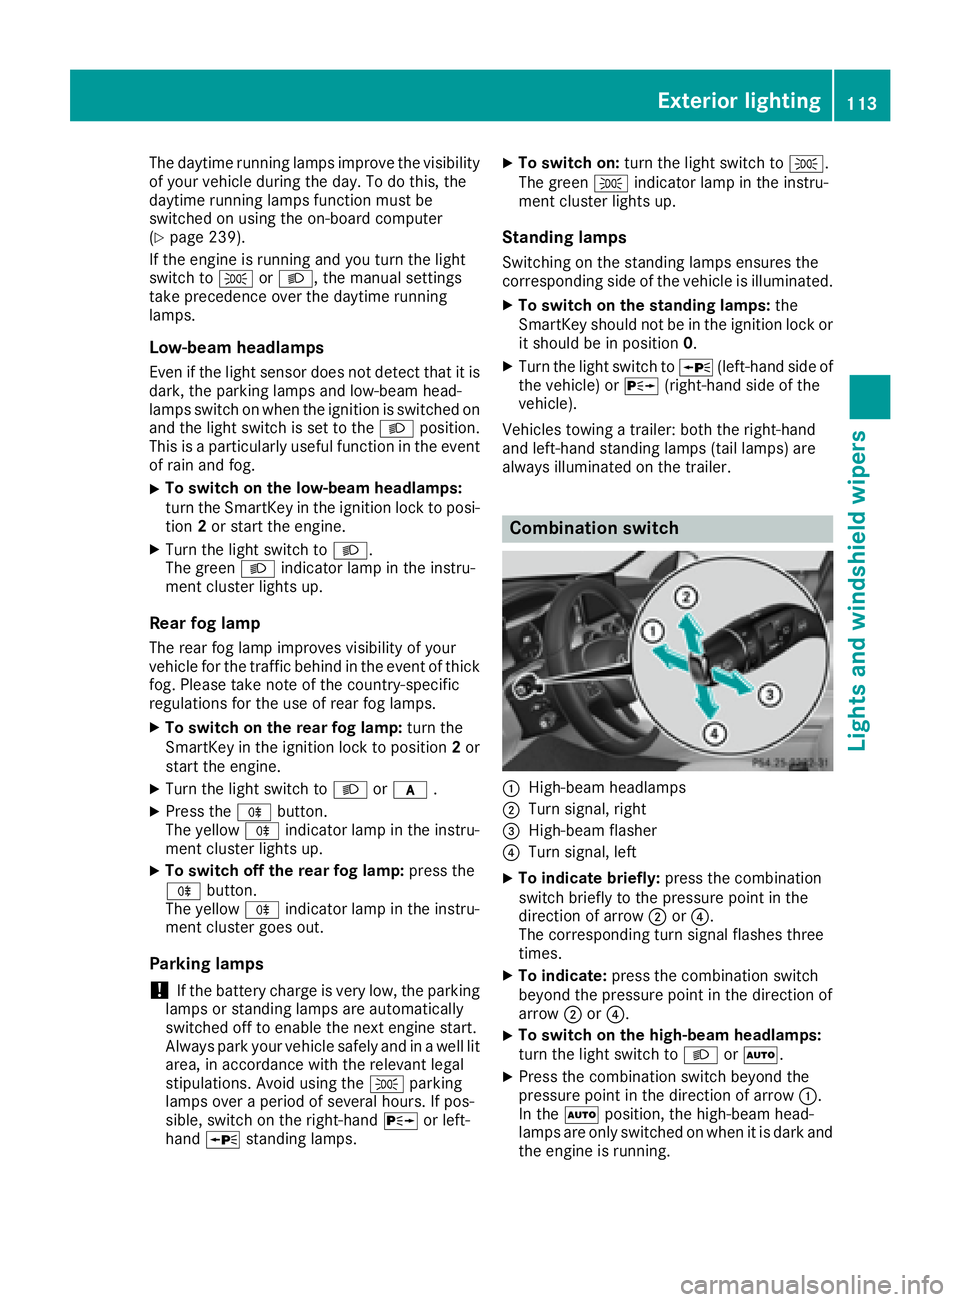
Combination switch
�C
High-beam headlamps �D
Turn signal, right �
Page 124 of 390
Problems with the windshield wipers Problem
Possible causes/consequences and �P Solutions
The windshield wipers
are jammed. Leaves or snow, for example, may be obstructing the windshield wiper
movement. The wiper motor has been deactivated. X
For safety reasons, you should remove the SmartKey from the igni-
tion lock.
or X
Switch off the engine using the Start/Stop button and open the
driver's door. X
Remove the cause of the obstruction. X
Switch the windshield wipers back on.
The windshield wipers
fail completely. The windshield wiper drive is malfunctioning. X
Select another wiper speed on the combination switch. X
Have the windshield wipers checked at a qualified specialist work-
shop.122
Windshield wipers
Lights and windshield wipers
Page 125 of 390
Overview of climate control systems
General notes Observe the settings recommended on the fol-
lowing pages. The windows could otherwise fog
up.
To prevent the windows from fogging up: R
switch off climate control only briefly R
switch on air-recirculation mode only briefly R
switch on the cooling with air dehumidifica-
tion function R
switch on the defrost windshield function
briefly, if required
Climate control regulates the temperature and
the humidity in the vehicle interior and filters
undesirable substances out of the air.
The residual heat function can only be activated
or deactivated with the ignition switched off
( Y
page 133).
i Ventilate the vehicle for a brief period during
warm weather, e.g. using the convenience
opening feature ( Y
page 87).
This will speed up the cooling process and the
desired interior temperature will be reached
more quickly. If you start the engine using your smartphone,
the last selected climate control setting is reac-
tivated ( Y
page 140).
i The integrated filter filters out most parti-
cles of dust and soot and completely filters
out pollen. It also reduces gaseous pollutants
and odors. A clogged filter reduces the
amount of air supplied to the vehicle interior.
For this reason, you should always observe
the interval for replacing the filter, which is
specified in the Maintenance Booklet. As it
depends on environmental conditions, e.g.
heavy air pollution, the interval may be
shorter than stated in the Maintenance Book-
let.
i Vehicles with AIR-BALANCE package: in
addition to ionization, the vehicle has an air
filter with anti-allergenic properties that con-
tribute to improved air filtration.
i It is possible that under certain circumstan-
ces the residual heat function may be activa-
ted automatically an hour after the SmartKey
has been removed in order to dry the auto-
matic climate control. The vehicle is then ven-
tilated for 30 minutes.
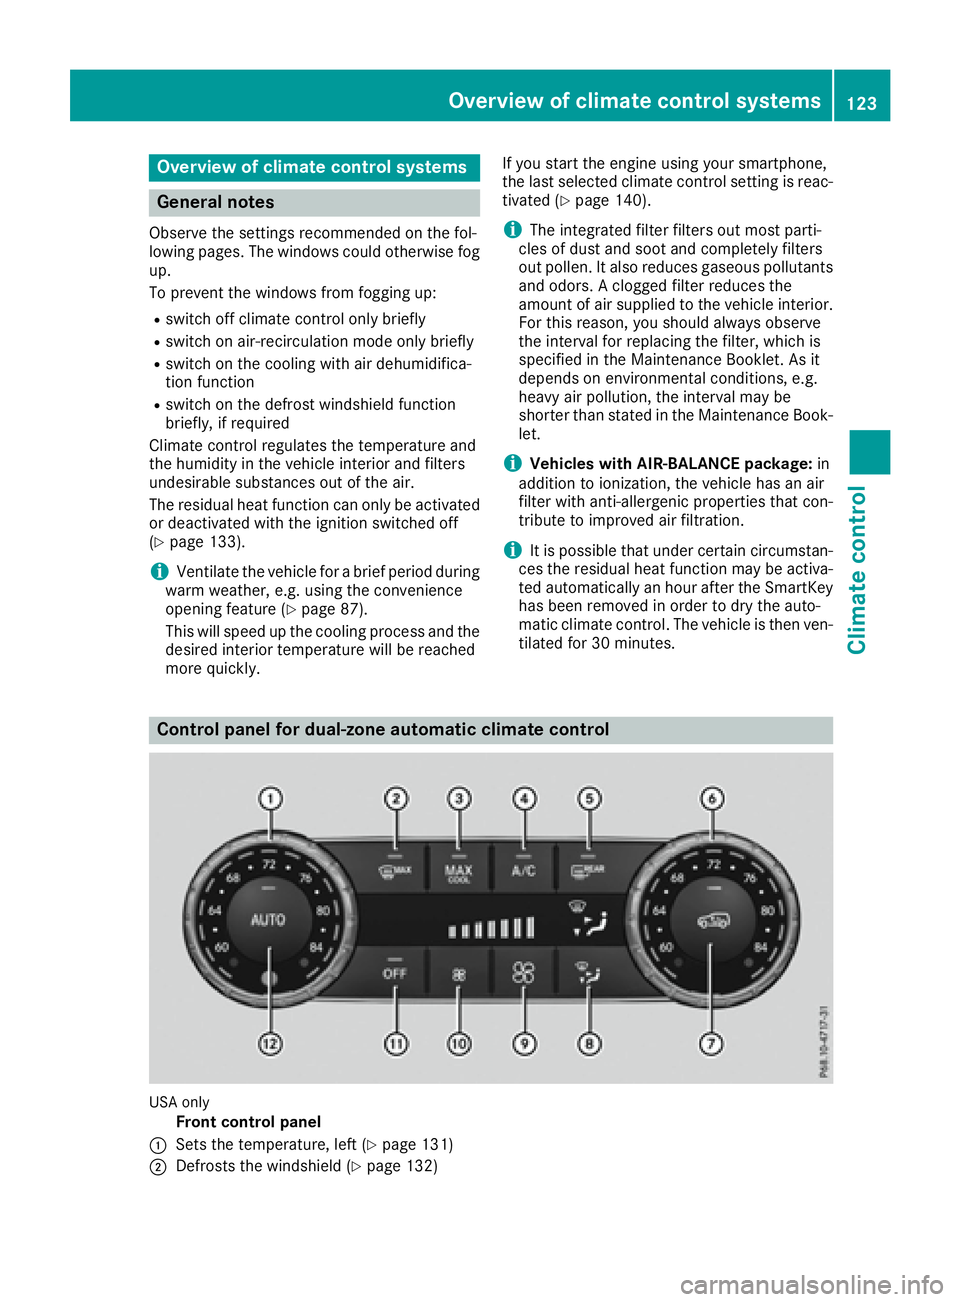
Control panel for dual-zone automatic climate control
USA only
Front control panel
�C
Sets the temperature, left ( Y
page 131)
�D
Defrosts the windshield ( Y
page 132)Overview of climate control systems 123
Climate control
Page 136 of 390
been switched off. The heating time depends on
the set interior temperature.
Switching on/off X
To activate: press the �K or �V button.
The indicator lamp in the �K or �V button
lights up.
i The blower will run at a low speed regardless
of the airflow setting.
i If you activate the residual heat function at
high temperatures, only the ventilation will be
activated. The blower runs at medium speed. X
To deactivate: press the �K or �V but-
ton.
The indicator lamp in the �K or �V button
goes out.
Residual heat is deactivated automatically: R
after approximately 30 minutes R
when the ignition is switched on R
if the battery voltage drops
Ionization Ionization is used to purify the air in the vehicle
interior and attain an improved interior climate.
The ionization of the interior air is odorless and
cannot be perceived directly in the vehicle inte-
rior.
You can switch ionization on and off via the mul-
timedia system (see the separate operating
instructions).
Ionization can only be operated when the auto-
matic climate control is switched on. The side air
vent on the driver's side must be open.
Setting the air vents
Important safety notes
G WARNING
Very hot or very cold air can flow from the air
vents. This could result in burns or frostbite in
the immediate vicinity of the air vents. There
is a risk of injury.
Make sure that all vehicle occupants always
maintain a sufficient distance to the air out- lets. If necessary, redirect the airflow to
another area of the vehicle interior.
In order to ensure the direct flow of fresh air
through the air vents into the vehicle interior,
please observe the following notes: R
keep the air inlet grille on the hood and in the
engine compartment on the front-passenger
side free of blockages, such as ice, snow or
leaves. R
never cover the air vents or air intake grilles in
the vehicle interior.
i For virtually draft-free ventilation, adjust the
sliders of the air vents to the center position.
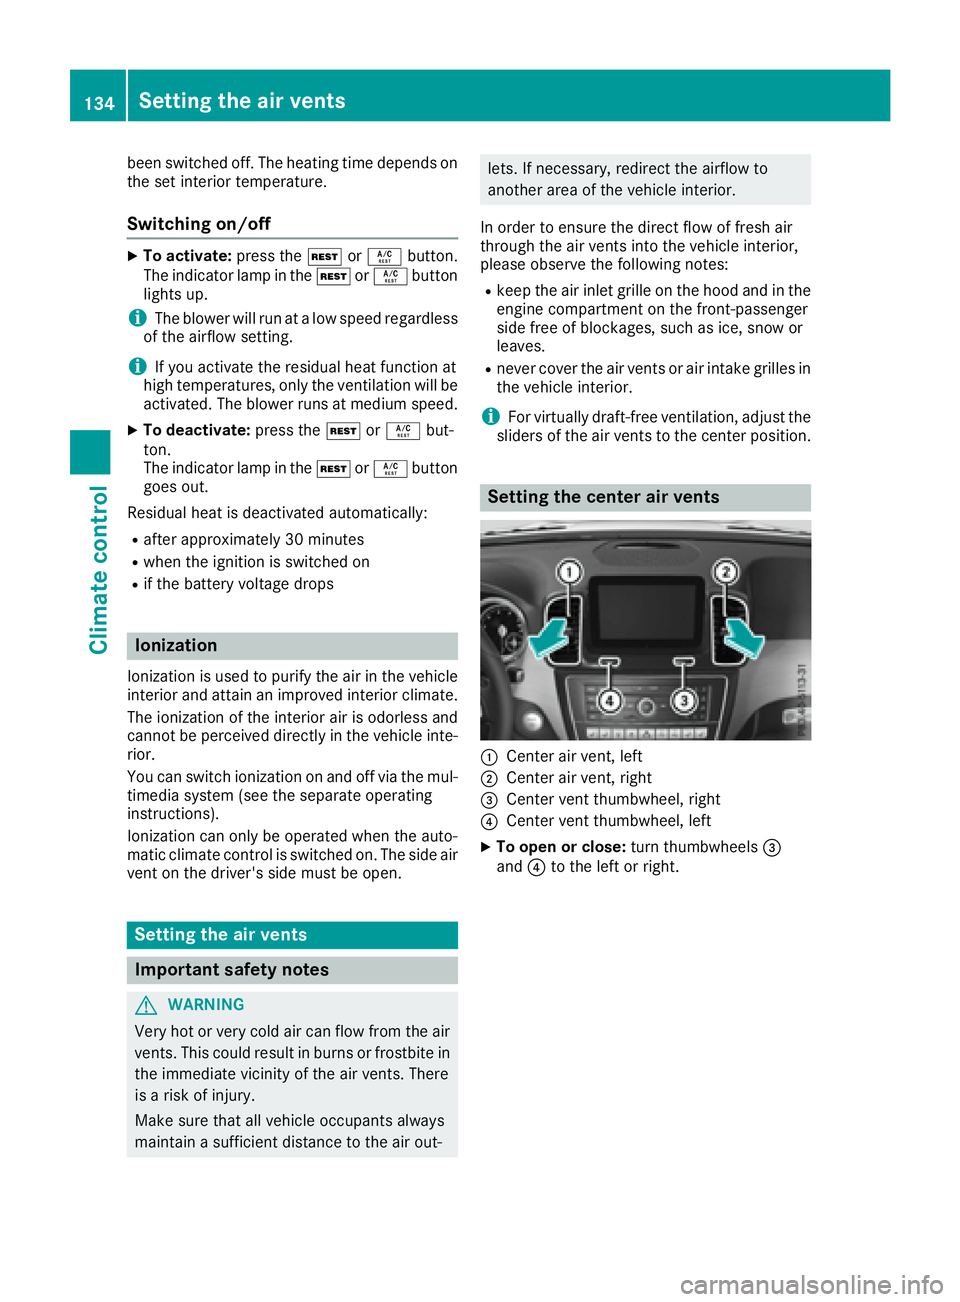
Setting the center air vents
�C
Center air vent, left �D
Center air vent, right �
Page 139 of 390
Notes on breaking-in a new vehicle
Important safety notes The sensor system of some driving and driving
safety systems adjusts automatically while a
certain distance is being driven after the vehicle
has been delivered or after repairs. Full system
effectiveness is not reached until the end of this
teach-in procedure.
New and replaced brake pads and discs only
reach their optimum braking effect after several
hundred kilometers of driving. Compensate for
this by applying greater force to the brake pedal.
The first 1000 miles (1500 km) The more you look after the engine when it is
new, the more satisfied you will be with its per-
formance in the future. R
You should therefore drive at varying vehicle
and engine speeds for the first 1000 miles
(1500 km). R
Avoid heavy loads, e.g. driving at full throttle,
during this period. R
Change gear in good time, before the tach-
ometer needle is �
Page 140 of 390
! Do not warm up the engine with the vehicle
stationary. Drive off immediately. Avoid high
engine speeds and driving at full throttle until
the engine has reached its operating temper-
ature.
Only shift the automatic transmission to the
desired drive position when the vehicle is sta-
tionary.
Where possible, avoid spinning the drive
wheels when pulling away on slippery roads.
You could otherwise damage the drive train.
! Mercedes-AMG vehicles: at low engine oil
temperatures below 68 ‡ (+20 †), the max-
imum engine speed is restricted in order to
protect the engine. To protect the engine and
maintain smooth engine operation, avoid driv-
ing at full throttle when the engine is cold.
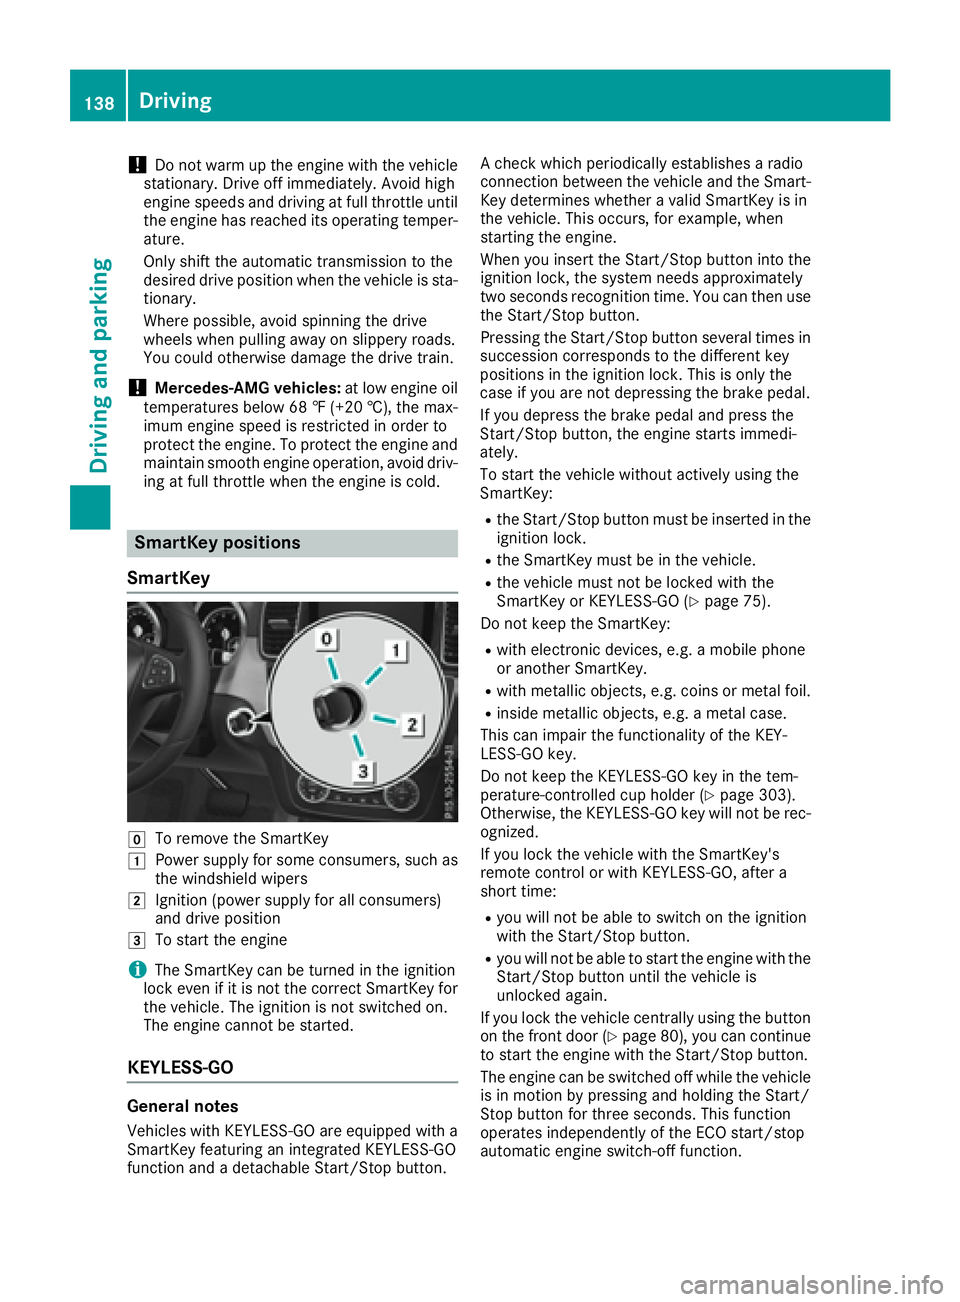
SmartKey positions
SmartKey
�Z
To remove the SmartKey�G
Power supply for some consumers, such as
the windshield wipers�H
Ignition (power supply for all consumers)
and drive position
�I
To start the engine
i The SmartKey can be turned in the ignition
lock even if it is not the correct SmartKey for
the vehicle. The ignition is not switched on.
The engine cannot be started.
KEYLESS-GO
General notes
Vehicles with KEYLESS-GO are equipped with a
SmartKey featuring an integrated KEYLESS-GO
function and a detachable Start/Stop button. A check which periodically establishes a radio
connection between the vehicle and the Smart-
Key determines whether a valid SmartKey is in
the vehicle. This occurs, for example, when
starting the engine.
When you insert the Start/Stop button into the
ignition lock, the system needs approximately
two seconds recognition time. You can then use
the Start/Stop button.
Pressing the Start/Stop button several times in
succession corresponds to the different key
positions in the ignition lock. This is only the
case if you are not depressing the brake pedal.
If you depress the brake pedal and press the
Start/Stop button, the engine starts immedi-
ately.
To start the vehicle without actively using the
SmartKey: R
the Start/Stop button must be inserted in the
ignition lock. R
the SmartKey must be in the vehicle. R
the vehicle must not be locked with the
SmartKey or KEYLESS-GO ( Y
page 75).
Do not keep the SmartKey: R
with electronic devices, e.g. a mobile phone
or another SmartKey. R
with metallic objects, e.g. coins or metal foil. R
inside metallic objects, e.g. a metal case.
This can impair the functionality of the KEY-
LESS-GO key.
Do not keep the KEYLESS-GO key in the tem-
perature-controlled cup holder ( Y
page 303).
Otherwise, the KEYLESS-GO key will not be rec-
ognized.
If you lock the vehicle with the SmartKey's
remote control or with KEYLESS-GO, after a
short time: R
you will not be able to switch on the ignition
with the Start/Stop button. R
you will not be able to start the engine with the
Start/Stop button until the vehicle is
unlocked again.
If you lock the vehicle centrally using the button
on the front door ( Y
page 80), you can continue
to start the engine with the Start/Stop button.
The engine can be switched off while the vehicle
is in motion by pressing and holding the Start/
Stop button for three seconds. This function
operates independently of the ECO start/stop
automatic engine switch-off function.138
Driving
Driving and parking
Page 141 of 390
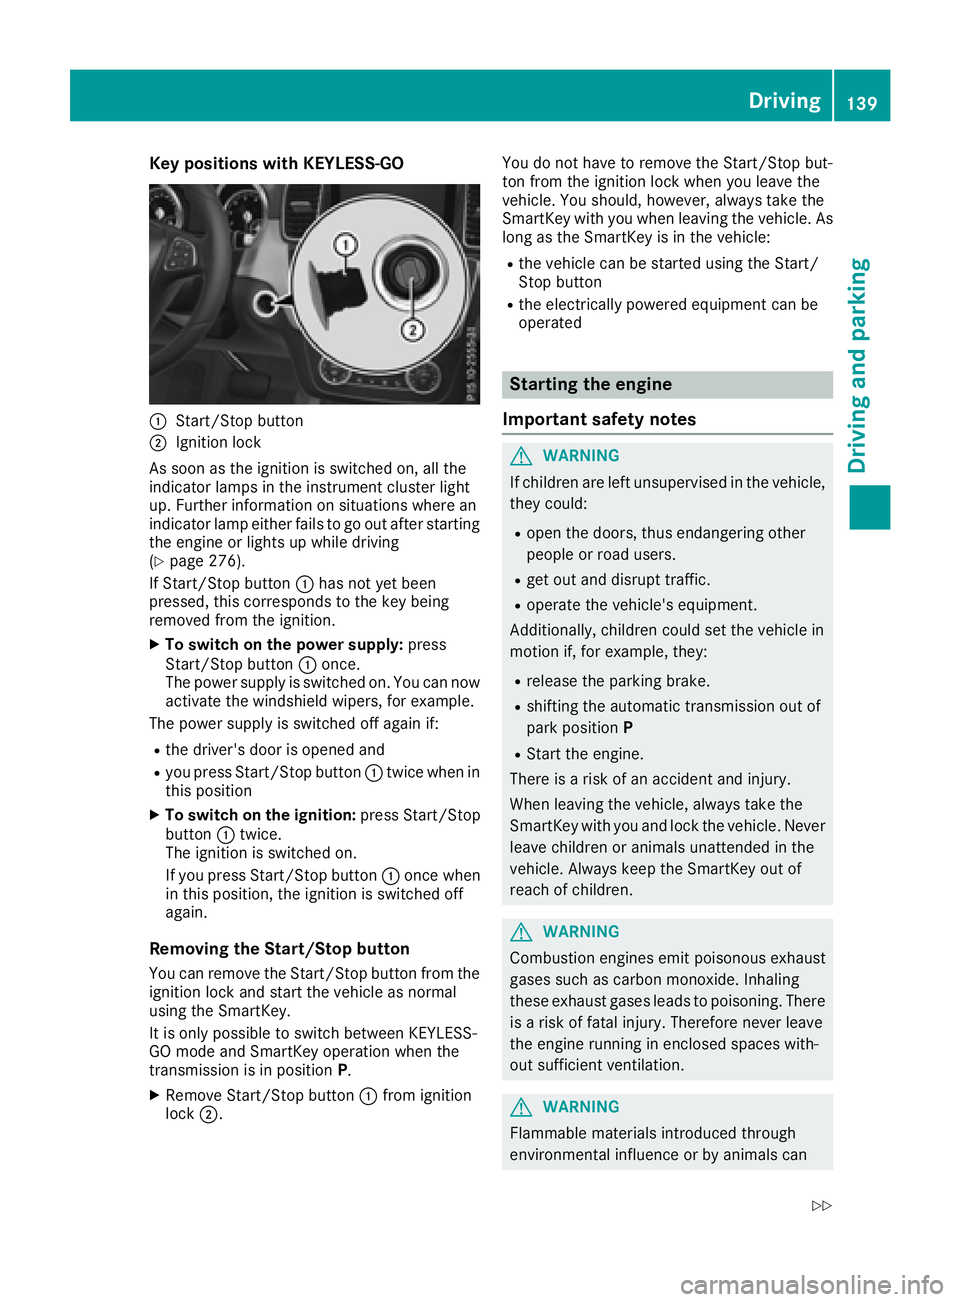
Key positions with KEYLESS- GO
�C
Start/Sto p butto n�D
Ignition loc k
As soo n as th e ignition is switched on , all th e
indicator lamps in th e instrumen t cluste r ligh t
up. Further information on situation s wher e an
indicator lamp either fails to go out after starting
th e engin e or lights up while driving
( Y
page 276).
If Start/Sto p butto n �C has no t yet been
pressed, this correspond s to th e ke y bein g
remove d from th e ignition .X
To switch on th e power supply : press
Start/Sto p butto n �C once.
The power suppl y is switched on . You can no w
activat e th e windshield wipers, for example .
The power suppl y is switched off again if:R
th e driver' s door is opened andR
you press Start/Sto p butto n �C twice when in
this position X
To switch on th e ignition: press Start/Sto p
butto n �C twice.
The ignition is switched on .
If you press Start/Sto p butto n �C once when
in this position , th e ignition is switched off
again .
Removing the Start/S top but ton
You can remove th e Start/Sto p butto n from th e
ignition loc k and start th e vehicl e as normal
usin g th e SmartKey.
It is only possible to switch between KEYLESS -
GO mod e and SmartKey operation when th e
transmission is in position P .X
Remove Start/Sto p butto n �C fr om ignition
loc k �D . You do no t have to remove th e Start/Sto p but -
to n from th e ignition loc k when you leav e th e
vehicle. You should, however , always tak e th e
SmartKey wit h you when leaving th e vehicle. As
lon g as th e SmartKey is in th e vehicle:R
th e vehicl e can be started usin g th e Start /
Stop butto n R
th e electrically powered equipmen t can be
operate d
Starting the engine
Important safety notes
G WARNIN G
If children are lef t unsupervised in th e vehicle,
they could: R
open th e doors, thus endangering other
people or road users. R
get out and disrupt traffic. R
operate th e vehicle's equipment.
Additionally, children could set th e vehicl e in
motion if, for example , they:R
release th e parking brake. R
shiftin g th e automatic transmission out of
park positio n P R
Start th e engine.
Ther e is a ris k of an acciden t and injury.
When leaving th e vehicle, always tak e th e
SmartKey wit h you and loc k th e vehicle. Never
leav e children or animals unattended in th e
vehicle. Always keep th e SmartKey out of
reac h of children .
G WARNIN G
Combustion engines emit poisonous exhaust
gase s suc h as carbon monoxide. Inhalin g
these exhaust gase s leads to poisoning . Ther e
is a ris k of fatal injury. Therefore never leav e
th e engin e runnin g in enclosed spaces with-
out sufficien t ventilation .
G WARNIN G
Flammable materials introduce d throug h
environmental influence or by animals can Driving 139
Driving and parking Z