2017 MERCEDES-BENZ GLS rear view mirror
[x] Cancel search: rear view mirrorPage 109 of 390
When leaving the vehicle, always take the
SmartKey with you and lock the vehicle. Never
leave children unsupervised in the vehicle.
G WARNING
If you drive off while the EASY-ENTRY/EXIT
feature is making adjustments, you could lose
control of the vehicle. There is a risk of an
accident.
Always wait until the adjustment process is
complete before driving off.
The EASY-ENTRY/EXIT feature makes getting in
and out of your vehicle easier.
You can activate and deactivate the EASY-
ENTRY/EXIT feature in the on-board computer
( Y
page 240).
Position of the steering wheel when the
EASY-ENTRY/EXIT feature is active The steering wheel swings upwards when you: R
remove the SmartKey from the ignition lock R
open the driver's door with KEYLESS-GO in
position 1R
open the driver's door and the SmartKey is in
position 0 or 1 in the ignition lock
i The steering wheel only moves upwards if it
has not already reached the upper stop.
Position of the steering wheel for driv-
ing The steering wheel is moved to the last selected
position when: R
the driver's door is closed R
you insert the SmartKey into the ignition lock
or R
you press the Start/Stop button once on vehi-
cles with KEYLESS-GO
When you close the driver's door with the igni-
tion switched on, the steering wheel is also
automatically moved to the previously set posi-
tion.
The last position of the steering column is stored
when you: R
switch the ignition off R
save the setting with the memory function
( Y
page 110). Crash-responsive EASY-EXIT feature If the crash-responsive EASY-EXIT feature is trig-
gered in an accident, the steering column will
move upwards when the driver's door is opened.
This occurs irrespective of the position of the
SmartKey in the ignition lock. This makes it eas-
ier to exit the vehicle and rescue the occupants.
The crash-responsive EASY-EXIT feature is only
operational if the EASY-EXIT/ENTRY feature is
activated in the on-board computer
( Y
page 240).
Mirrors
Rear-view mirror
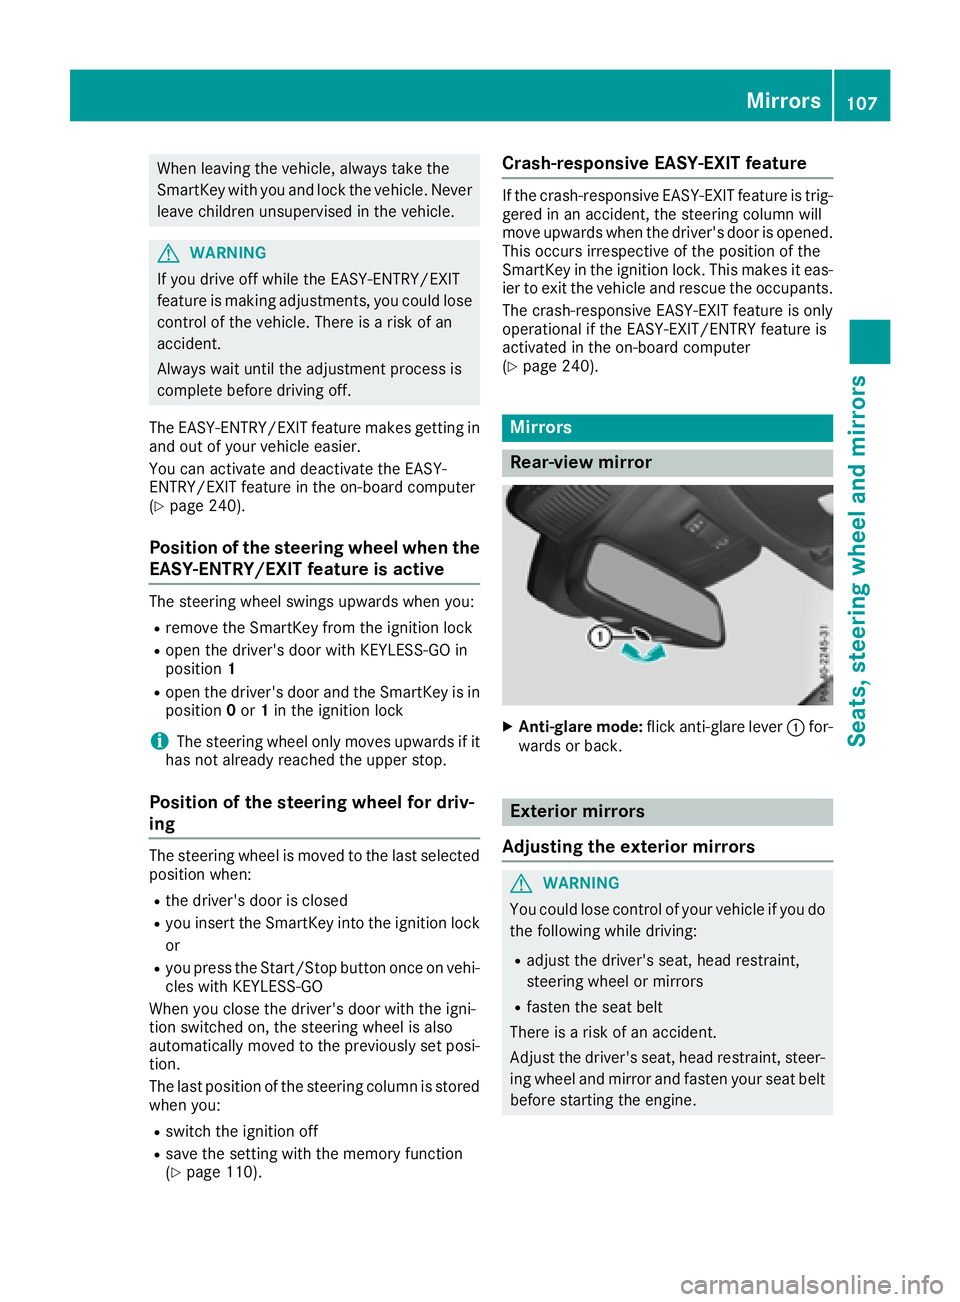
X
Anti-glare mode: flick anti-glare lever �C for-
wards or back.
Exterior mirrors
Adjusting the exterior mirrors
G WARNING
You could lose control of your vehicle if you do
the following while driving: R
adjust the driver's seat, head restraint,
steering wheel or mirrors R
fasten the seat belt
There is a risk of an accident.
Adjust the driver's seat, head restraint, steer-
ing wheel and mirror and fasten your seat belt
before starting the engine. Mirrors 107
Seats, steering wheel and mirrors Z
Page 111 of 390
Exterior mirror pushed out of position If an exterior mirror has been pushed out of
position, proceed as follows: X
Vehicles without electrically folding exte-
rior mirrors: move the exterior mirror into
the correct position manually. X
Vehicles with electrically folding exterior
mirrors: press and hold mirror-folding but-
ton �C until you hear a click and the mirror
engages in position audibly.
The mirror housing is engaged again and you
can adjust the exterior mirrors as usual
( Y
page 107).
Automatic anti-glare mirrors
G WARNING
Electrolyte may escape if the glass in an auto-
matic anti-glare mirror breaks. The electrolyte
is harmful and causes irritation. It must not
come into contact with your skin, eyes, res-
piratory organs or clothing or be swallowed.
There is a risk of injury.
If you come into contact with the electrolyte,
observe the following: R
Rinse off the electrolyte from your skin
immediately with water. R
Immediately rinse the electrolyte out of
your eyes thoroughly with clean water. R
If the electrolyte is swallowed, immediately
rinse your mouth out thoroughly. Do not
induce vomiting. R
If electrolyte comes into contact with your
skin or hair or is swallowed, seek medical
attention immediately. R
Immediately change out of clothing which
has come into contact with electrolyte. R
If an allergic reaction occurs, seek medical
attention immediately. The rear-view mirror and the exterior mirror on
the driver's side automatically go into anti-glare
mode if the following conditions are met simul-
taneously: R
the ignition is switched on and R
incident light from headlamps strikes the sen-
sor in the rear-view mirror
The mirrors do not go into anti-glare mode if
reverse gear is engaged or if the interior lighting
is switched on.
Parking position for the exterior mir-
ror on the front-passenger side
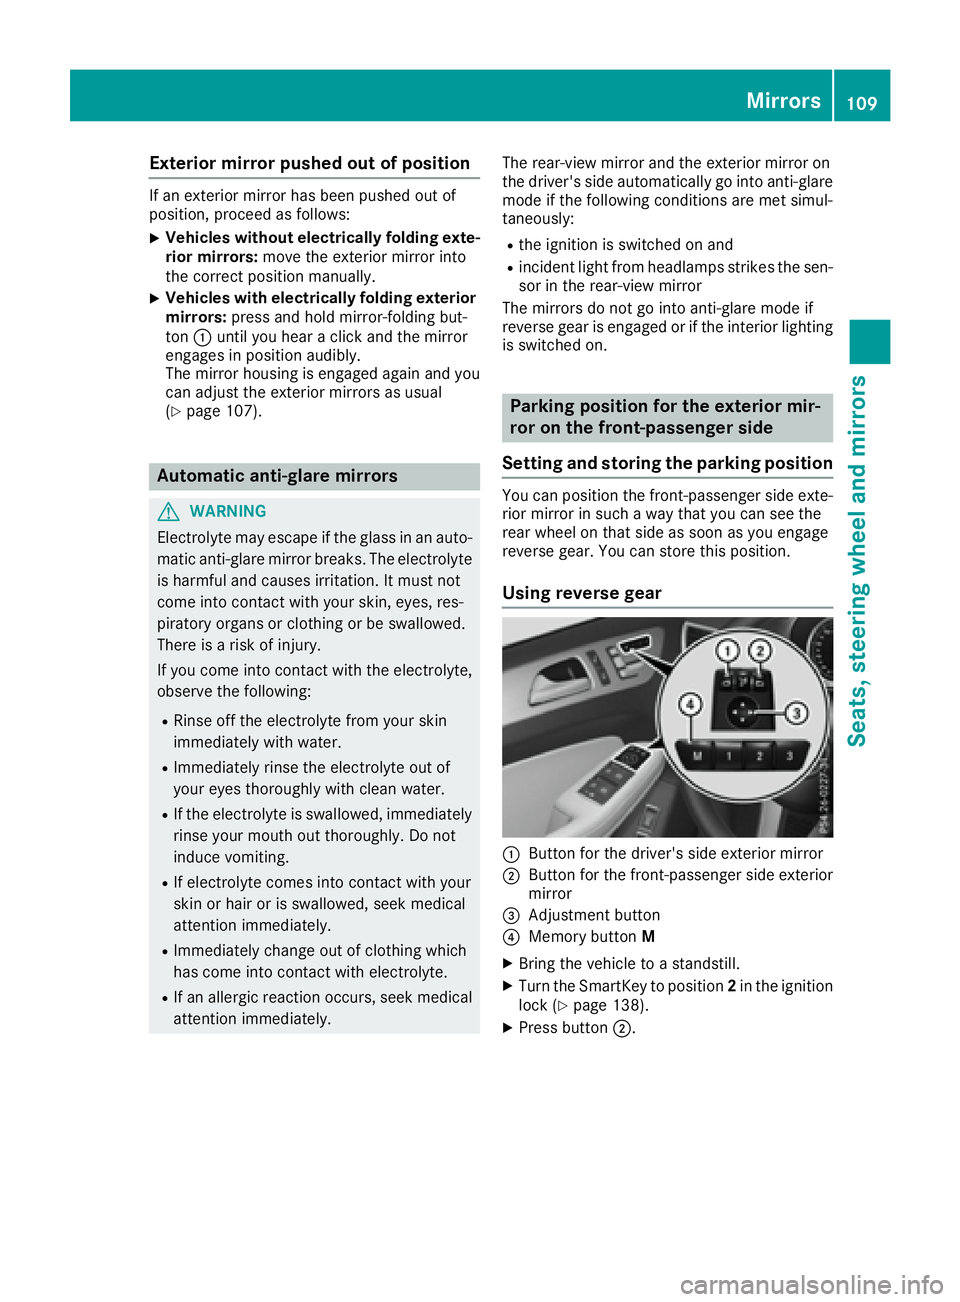
Setting and storing the parking position You can position the front-passenger side exte-
rior mirror in such a way that you can see the
rear wheel on that side as soon as you engage
reverse gear. You can store this position.
Using reverse gear
�C
Button for the driver's side exterior mirror �D
Button for the front-passenger side exterior
mirror �
Page 200 of 390
The flap closes again when: R
you have finished the maneuvering process R
you switch off the engine R
you open the cargo compartment
Observe the notes on cleaning ( Y
page 328).
For technical reasons, the flap may remain
open briefly after the rear view camera has
been deactivated.
Activating/deactivating the rear view
camera X
To activate: make sure that the SmartKey is
in position 2 in the ignition lock.X
Make sure that the Activation by R gear
function is selected in the multimedia system;
see the Digital Operator's Manual. X
Engage reverse gear.
The rear view camera flap opens. The multi-
media system shows the area behind the vehi-
cle with guide lines.
The image from the rear view camera is avail-
able throughout the maneuvering process.
To deactivate: the rear view camera deacti-
vates if you shift the transmission to P or after
driving forwards a short distance.
Displays in the multimedia system The rear view camera may show a distorted view
of obstacles, show them incorrectly or not at all.
The rear view camera does not show objects in
the following positions: R
very close to the rear bumper R
under the rear bumper R
in the area immediately above the tailgate
handle
! Objects not at ground level may appear to
be further away than they actually are, e.g.: R
the bumper of a parked vehicle R
the drawbar of a trailer R
the ball coupling of a trailer tow hitch R
the rear section of an HGV R
a slanted post
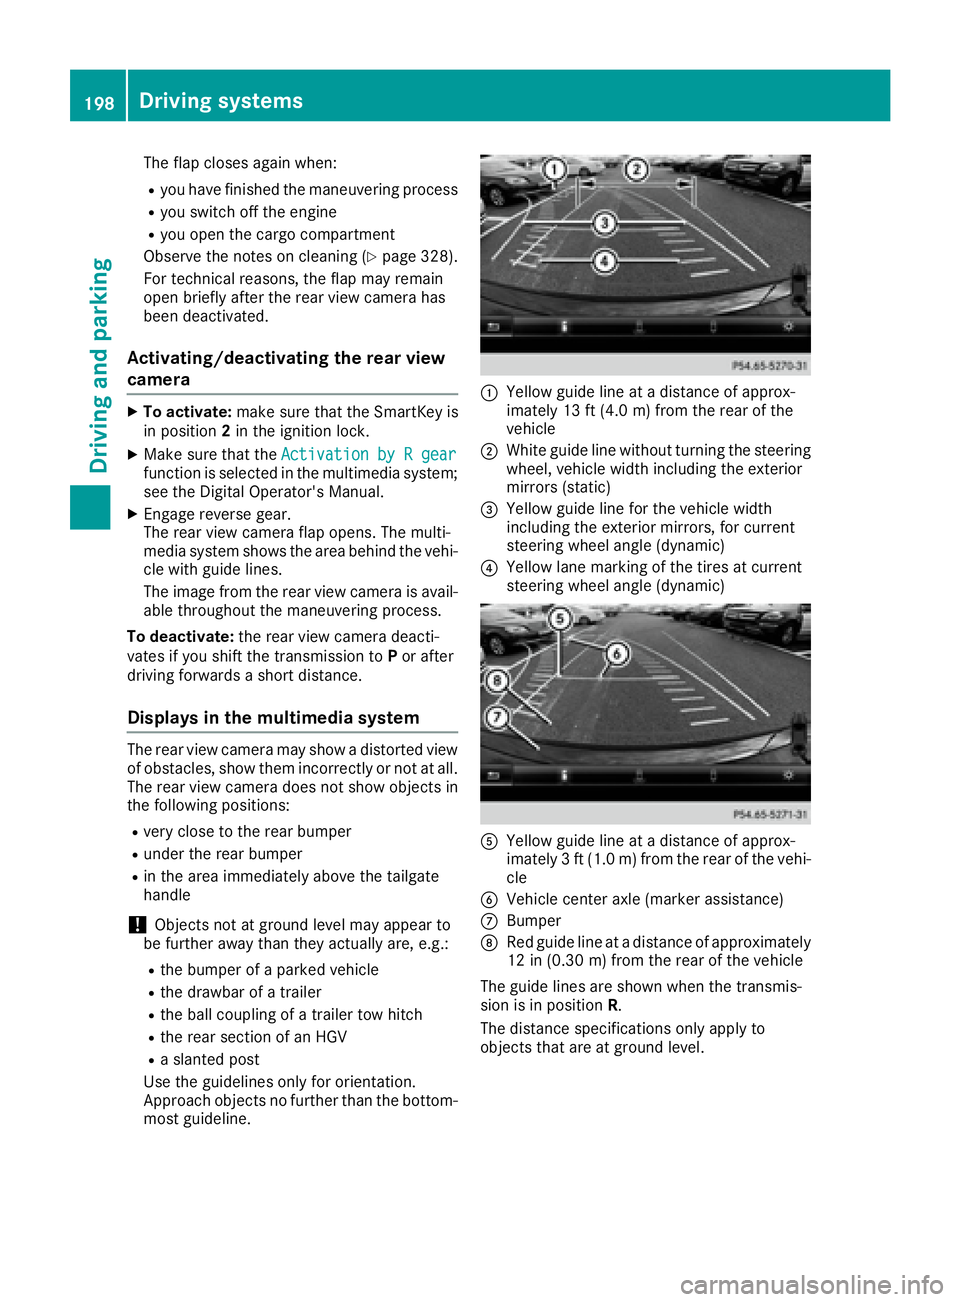
Use the guidelines only for orientation.
Approach objects no further than the bottom-
most guideline. �C
Yellow guide line at a distance of approx-
imately 13 ft (4.0 m) from the rear of the
vehicle �D
White guide line without turning the steering
wheel, vehicle width including the exterior
mirrors (static) �
Page 203 of 390
360° camera
General notes The 360° camera is a system consisting of four
cameras.
The system processes images from the follow-
ing cameras: R
Rear view camera R
Front camera R
Two cameras in the exterior rear view mirrors
The cameras capture the immediate surround-
ings of the vehicle. The system supports you,
e.g. when parking or if vision is restricted at an
exit.
You can show pictures from the 360° camera in
full-screen mode or in seven different split-
screen views on the multimedia system display.
A split-screen view also includes a top view of
the vehicle. This view is calculated from the data
supplied by the installed cameras (virtual cam-
era).
The six split-screen views are: R
Top view and picture from the rear view cam-
era (130° viewing angle) R
Top view and image from the front camera
(130° viewing angle without displaying the
maximum steering wheel angle) R
Top view and enlarged rear view R
Top view and enlarged front view R
Top view and rear-view images from the exte-
rior mirror cameras (rear wheel view) R
Top view and forward-view images from the
exterior mirror cameras (front wheel view)
When the function is active and you shift the
transmission from D or R to N , the dynamic
guidelines are hidden.
When you change between transmission posi-
tions D and R , you see the previously selected
front or rear view.
Distances measured by Parking Assist
PARKTRONIC will also be optically displayed: R
in split screen view as red or yellow brackets
around the vehicle icon in the top view, or R
at the bottom right as red or yellow brackets
around the vehicle symbol in full-screen mode
The line thickness and color of the brackets
show how far the vehicle is away from an object: R
yellow brackets with thin lines: Parking Assist
PARKTRONIC is active R
yellow brackets with normal lines: an object is
present in close range of the vehicle R
red line: an object is present in the immediate
close range of t he vehicle
i The camera in the rear area is protected
from raindrops and dust by means of a flap.
When the camera is activated, this flap opens.
The flap closes again when: R
you have finished the maneuvering process R
you switch off the engine R
you open the cargo compartment
Observe the notes on cleaning ( Y
page 328).
For technical reasons, the flap may remain
open briefly after the camera has been deac-
tivated.
Important safety notes The 360°camera is only an aid and may show a
distorted view of obstacles, show them incor-
rectly or not at all. The 360°camera is not a
substitute for attentive driving.
You are always responsible for safe maneuver-
ing and parking. When maneuvering or parking,
make sure that there are no persons, animals or
objects in the area in which you are maneuver-
ing.
You are always responsible for safety, and must
always pay attention to your surroundings when
parking and maneuvering. This applies to the
areas behind, in front of and beside the vehicle.
You could otherwise endanger yourself and oth-
ers.
The 360° camera will not function or will func-
tion in a limited manner: R
if the doors are open R
if the exterior mirrors are folded in R
if the tailgate is open R
in heavy rain, snow or fog R
at night or in very dark places R
if the cameras are exposed to very bright light R
if the area is lit by fluorescent bulbs or LED
lighting (the display may flicker) R
if there is a sudden change in temperature,
e.g. when driving into a heated garage in win-
terDriving systems 201
Driving and parking Z
Page 228 of 390
Towing a trailer There are numerous legal requirements con-
cerning the towing of a trailer, e.g. speed restric-
tions. Make sure that your car/trailer combina-
tion complies with the local regulations: R
in your place of residence R
in the location to which you are driving
The police and local authorities can provide reli-
able information.
Observe the following when towing a trailer: R
To gain driving experience and to become
accustomed to the new handling characteris-
tics, you should practice the following in a
traffic-free location: -
cornering -
stopping -
backing up R
Before driving, check: -
trailer tow hitch -
safety switch for braked trailers -
safety chains -
electrical connections -
lights -
wheels R
Adjust the exterior mirrors to provide an
unobstructed view of the rear section of the
trailer. R
If the trailer has electronically controlled
brakes, pull away carefully. Brake manually
using the brake controller and check whether
the brakes function correctly. R
Secure any objects on the trailer to prevent
the cargo from slipping when the vehicle is in
motion. R
When you couple up a trailer, check at regular
intervals that the load is firmly secured. If the
tra i ler is equipped with trailer lights and
brakes, check the trailer to ensure that these
are working. R
Bear in mind that the handling will be less
stable when towing a trailer than when driving
without one. Avoid sudden steering move-
ments. R
The vehicle/trailer combination is heavier,
accelerates more slowly, has a decreased
gradient climbing capability and a longer
braking distance.
It is more susceptible to side winds and
requires more careful steering. R
If possible, do not brake suddenly, but instead
depress the brake pedal moderately at first so
that the trailer can activate its brakes. Then
increase the pressure on the brake pedal. R
If the automatic transmission repeatedly
shifts between gears on uphill or downhill gra-
dients, shift to a lower gear using the left-hand
steering wheel paddle shifter.
A lower gear and lower speed reduce the risk
of engine failure. R
When driving downhill, shift to a lower gear to
utilize the engine's braking effect.
Avoid continuous brake application as this
may overheat the vehicle brakes and, if instal-
led, the trailer brakes. R
If the coolant temperature increases dramat-
i cally while the air-conditioning system is
switched on, switch off the air-conditioning
system.
Coolant heat can also be dissipated by open-
ing the windows and switching the ventilation
blower and the interior temperature to the
highest level. R
When overtaking, pay particular attention to
the extended length of your vehicle/trailer
combination.
Due to the length of the vehicle/trailer com-
bination, you require additional road space in
relation to the vehicle you are overtaking
before you can change back to the original
lane.
Decoupling a trailer
G WARNING
If you uncouple a trailer with the overrun
brake engaged, you could trap your hand
between the vehicle and the trailer drawbar.
There is a risk of injury.
Do not uncouple a trailer if the overrun brake
is engaged.
G WARNING
Vehicles with level control:
The vehicle is lowered as soon as you discon-
nect the trailer cable. This could result in your
limbs or those of other people that are
between the vehicle body and tires or under-226
Towing a trailer
Driving an d parking
Page 317 of 390
The data you receive contains the following
information: R
the location where the speed limit was excee-
ded R
the time at which the speed limit was excee-
ded R
the selected speed limit which was exceeded
Geo fencing Geo fencing allows you to select areas which the
vehicle should not enter or leave. You will be
informed if the vehicle crosses the boundaries
of the selected areas. You can select the way in
which you receive this information beforehand.
Possible options include text message, e-mail or
an automated call.
The area can be determined as either a circle or
a polygon with a maximum of ten corners. You
can specify up to ten areas simultaneously. Dif-
ferent settings are possible for each area.
These settings can be called up under "Owners
Online" at http://www.mbusa.com.
Alternatively, you can trigger an MB Info call and
inform the customer service representative that
you wish to activate geo fencing.
Currently inactive areas can be activated by text
message.
Triggering the vehicle alarm With this function, you can trigger the vehicle's
panic alarm via text message. An alarm sounds
and the exterior lighting flashes. Depending on
the setting, the panic alarm lasts five or ten sec-
onds. Afterwards, the alarm switches off.
Garage door opener
General notes The HomeLink ®
garage door opener integrated
in the rear-view mirror allows you to operate up
to three different door and gate systems.
Use the integrated garage door opener only on
garage doors that: R
have safety stop and reverse features and R
meet current U.S. federal safety standards
Once programed, the integrated garage door
opener in the rear-view mirror will assume the
function of the garage door system's remote control. Please also read the operating instruc-
tions for the garage door system.
When programming a garage door opener, park
the vehicle outside the garage. Do not run the
engine while programming.
Certain garage door drives are incompatible
with the integrated garage door opener. If you
have difficulty programing the integrated garage
door opener, contact an authorized Mercedes-
Benz Center.
Alternatively, you can call the following tele-
phone assistance services: R
USA: Mercedes-Benz Customer Assistance
Center at 1-800-FOR-MERCedes R
Canada: Customer Service at
1-800-387-0100 R
HomeLink ®
hotline 1-800-355-3515 (free of
charge)
More information on HomeLink ®
and/or com-
patible products is also available online at
http://www.homelink.com.
Notes on the declaration of conformity
( Y
page 28).
USA: FCC ID: CB2HMIHL4
Canada: IC: 279B-HMIHL4
Important safety notes
G WARNING
When you operate or program the garage door
with the integrated garage door opener, per-
sons in the range of movement of the garage
door can become trapped or struck by the
garage door. There is a risk of injury.
When using the integrated garage door
opener, always make sure that nobody is
within the range of movement of the garage
door.
G WARNING
Combustion engines emit poisonous exhaust
gases such as carbon monoxide. Inhaling
these exhaust gases leads to poisoning. There
is a risk of fatal injury. Therefore never leave
the engine running in enclosed spaces with-
out sufficient ventilation. Features 315
Stowage and features Z