2017 MERCEDES-BENZ GLS manual transmission
[x] Cancel search: manual transmissionPage 188 of 390
When the HOLD function is activated, the trans-
mission is shifted automatically to position P if:R
the driver's door is open and the driver's seat
belt is unfastened. R
the engine is switched off, unless it is auto-
matically switched off by the ECO start/stop
function.
The electric parking brake secures the vehicle
automatically if the HOLD function is activated
when the vehicle is stationary and: R
a system malfunction occurs. R
the power supply is not sufficient.
On steep uphill or downhill inclines or if there is
a malfunction, the transmission may also be
automatically shifted into position P .
AIRMATIC package
General notes AIRMATIC is an air suspension system with var-
iable damping for improved driving comfort.
Level control ensures the best possible suspen-
sion and constant ground clearance, even with a
laden vehicle. When you drive fast, the vehicle is
lowered automatically to improve driving safety
and to reduce fuel consumption. There is also
the option to manually adjust the vehicle level.
AIRMATIC consists of: R
level settings R
level control and R
ADS or ADS PLUS (Adaptive Damping Sys-
tem)
All vehicles (except Mercedes-AMG vehi-
cles): your vehicle may also be equipped with
the ACTIVE CURVE SYSTEM ( Y
page 187).
Mercedes-AMG vehicles: your vehicle is equip-
ped with the ACTIVE CURVE SYSTEM
( Y
page 187).
Observe the notes on driving with a trailer
( Y
page 222).
The vehicle level can be set using the DYNAMIC
SELECT controller ( Y
page 145) or the level but-
ton ( Y
page 188). The setting always corre-
sponds to the last selected function. Important safety notes
G WARNING
When the vehicle is being lowered, people
could become trapped if their limbs are
between the vehicle body and the wheels or
underneath the vehicle. There is a risk of
injury.
Make sure no one is underneath the vehicle or
in the immediate vicinity of the wheel arches
when the vehicle is being lowered.
If you unlock the vehicle or open a door, the
vehicle begins to compensate for load discrep-
ancies while still parked. However, for signifi-
cant level changes, such as after the vehicle has
been stationary for a long period, the engine
must be on. For safety reasons, the vehicle is
only lowered when the doors are closed. Low-
ering is interrupted if a door is opened, and it
continues once the door has been closed.
ADS and ADS PLUS (Adaptive Damping
System)
General notes The Adaptive Damping System automatically
controls the calibration of the dampers. The
damping characteristics adapt to the current
operating and driving situation.
The damping is tuned individually to each wheel
and depends on: R
your driving style, e.g. sporty R
the road surface conditions R
the drive program selected R
the vehicle level setting
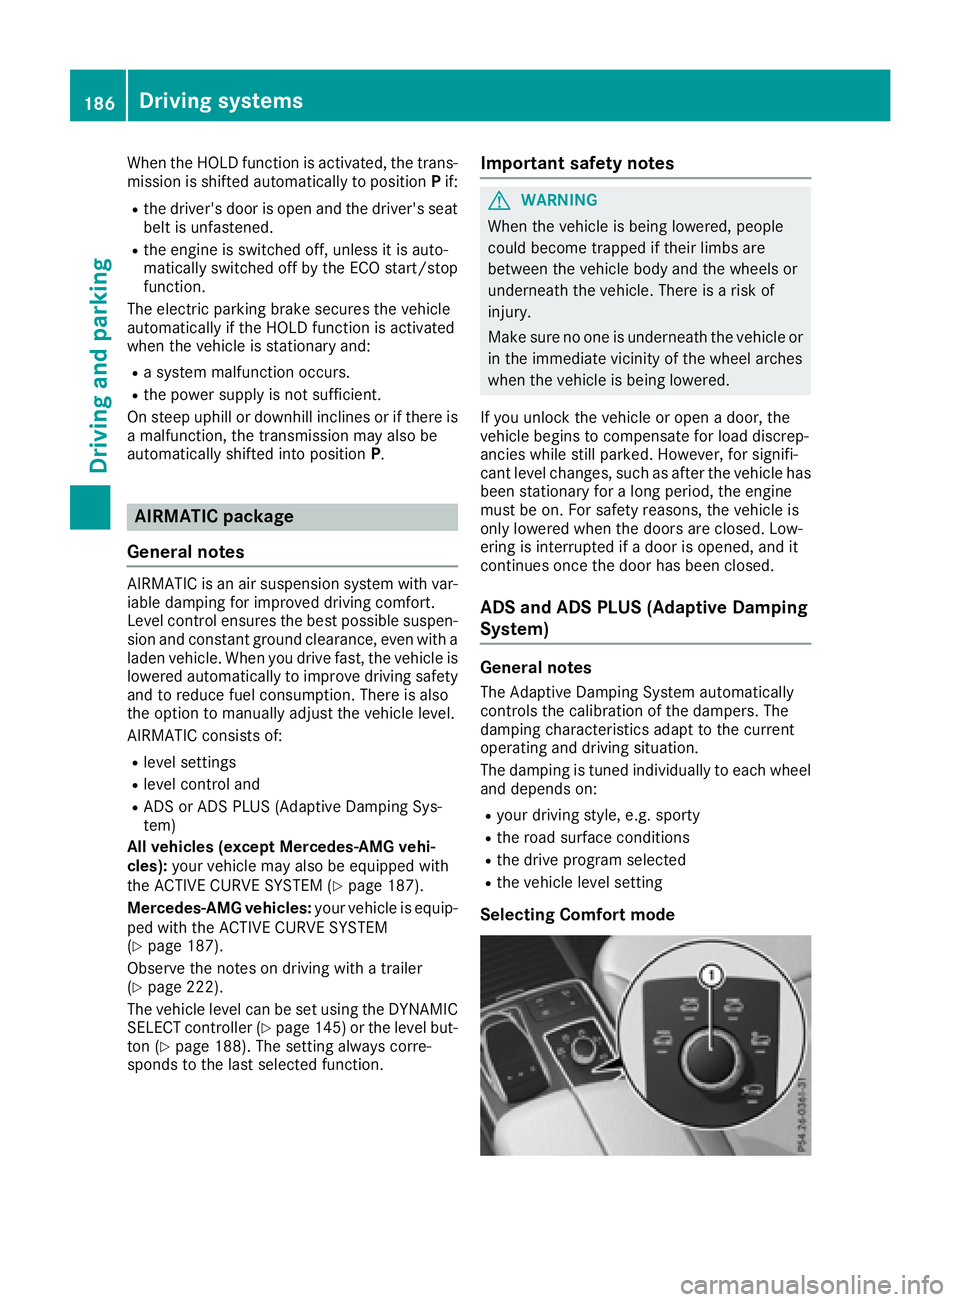
Selecting Comfort mode186
Driving systems
Driving and parking
Page 200 of 390
The flap closes again when: R
you have finished the maneuvering process R
you switch off the engine R
you open the cargo compartment
Observe the notes on cleaning ( Y
page 328).
For technical reasons, the flap may remain
open briefly after the rear view camera has
been deactivated.
Activating/deactivating the rear view
camera X
To activate: make sure that the SmartKey is
in position 2 in the ignition lock.X
Make sure that the Activation by R gear
function is selected in the multimedia system;
see the Digital Operator's Manual. X
Engage reverse gear.
The rear view camera flap opens. The multi-
media system shows the area behind the vehi-
cle with guide lines.
The image from the rear view camera is avail-
able throughout the maneuvering process.
To deactivate: the rear view camera deacti-
vates if you shift the transmission to P or after
driving forwards a short distance.
Displays in the multimedia system The rear view camera may show a distorted view
of obstacles, show them incorrectly or not at all.
The rear view camera does not show objects in
the following positions: R
very close to the rear bumper R
under the rear bumper R
in the area immediately above the tailgate
handle
! Objects not at ground level may appear to
be further away than they actually are, e.g.: R
the bumper of a parked vehicle R
the drawbar of a trailer R
the ball coupling of a trailer tow hitch R
the rear section of an HGV R
a slanted post
Use the guidelines only for orientation.
Approach objects no further than the bottom-
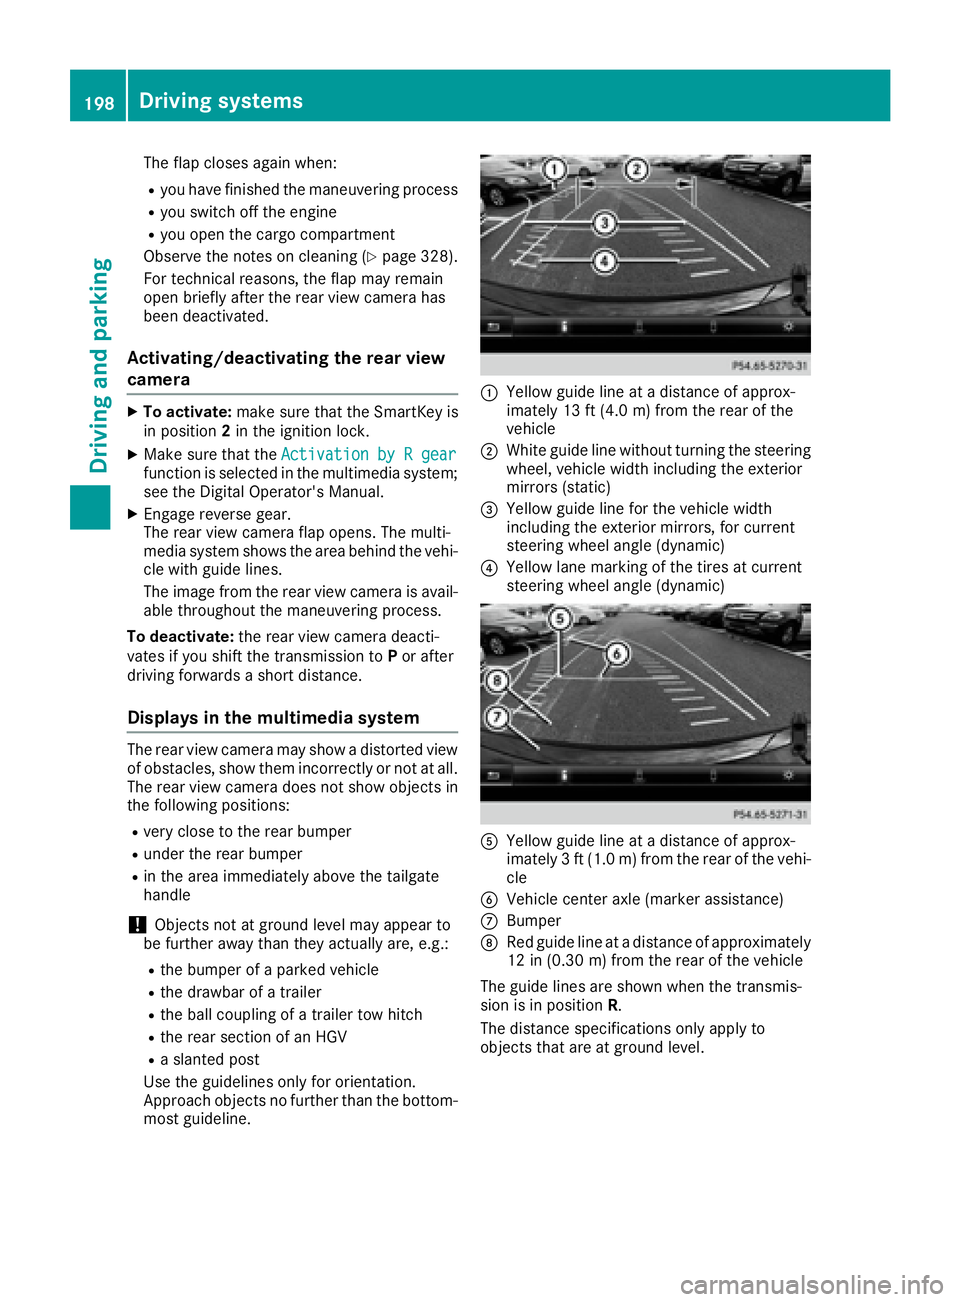
most guideline. �C
Yellow guide line at a distance of approx-
imately 13 ft (4.0 m) from the rear of the
vehicle �D
White guide line without turning the steering
wheel, vehicle width including the exterior
mirrors (static) �
Page 218 of 390
! A function or performance test should only
be carried out on a two-axle dynamometer.
Before you operate the vehicle on such a
dynamometer, please consult a qualified
workshop. You could otherwise damage the
drive train or the brake system.
i In wintry driving conditions, the maximum
effect of 4MATIC can only be achieved if you
use winter tires (M+S tires), with snow chains
if necessary.
Further information about "Driving off-road"
( Y
page 168).
DSR (Downhill Speed Regulation) General notes DSR is an aid to assist you when driving down-
hill. It keeps the speed of travel at the speed
selected on the on-board computer. The steeper
the downhill gradient, the greater the DSR brak-
ing effect on the vehicle. When driving on flat
stretches of road or on an uphill gradient, the
DSR braking effect is minimal or nonexistent.
DSR controls the vehicle’s speed when it is acti-
vated and the transmission is in position D , R or
N . You can drive at a higher or a lower speed
than that set on the on-board computer at any
time by accelerating or braking.
Important safety notes
G WARNING
If the speed driven and the set speed deviate
and you activate DSR on a slippery road sur-
face, the wheels may lose traction. There is an
increased danger of skidding and accidents.
Before switching DSR on, please take into
consideration the road surface and the differ-
ence between driving speed and the set
speed.
If you fail to adapt your driving style, DSR can
neither reduce the risk of accident nor override
the laws of physics. DSR cannot take account of
road, weather and traffic conditions. DSR is only
an aid. You are responsible for the distance to
the vehicle in front, for vehicle speed, for brak-
ing in good time and for staying in your lane.
You are always responsible for keeping control
of the vehicle and for assessing whether the
downhill gradient can be managed. DSR may not
always be able to keep to the set speed, depend- ing on road surface and tire conditions. Select a
set speed suitable for the prevailing conditions
and when necessary, apply the brakes manually.
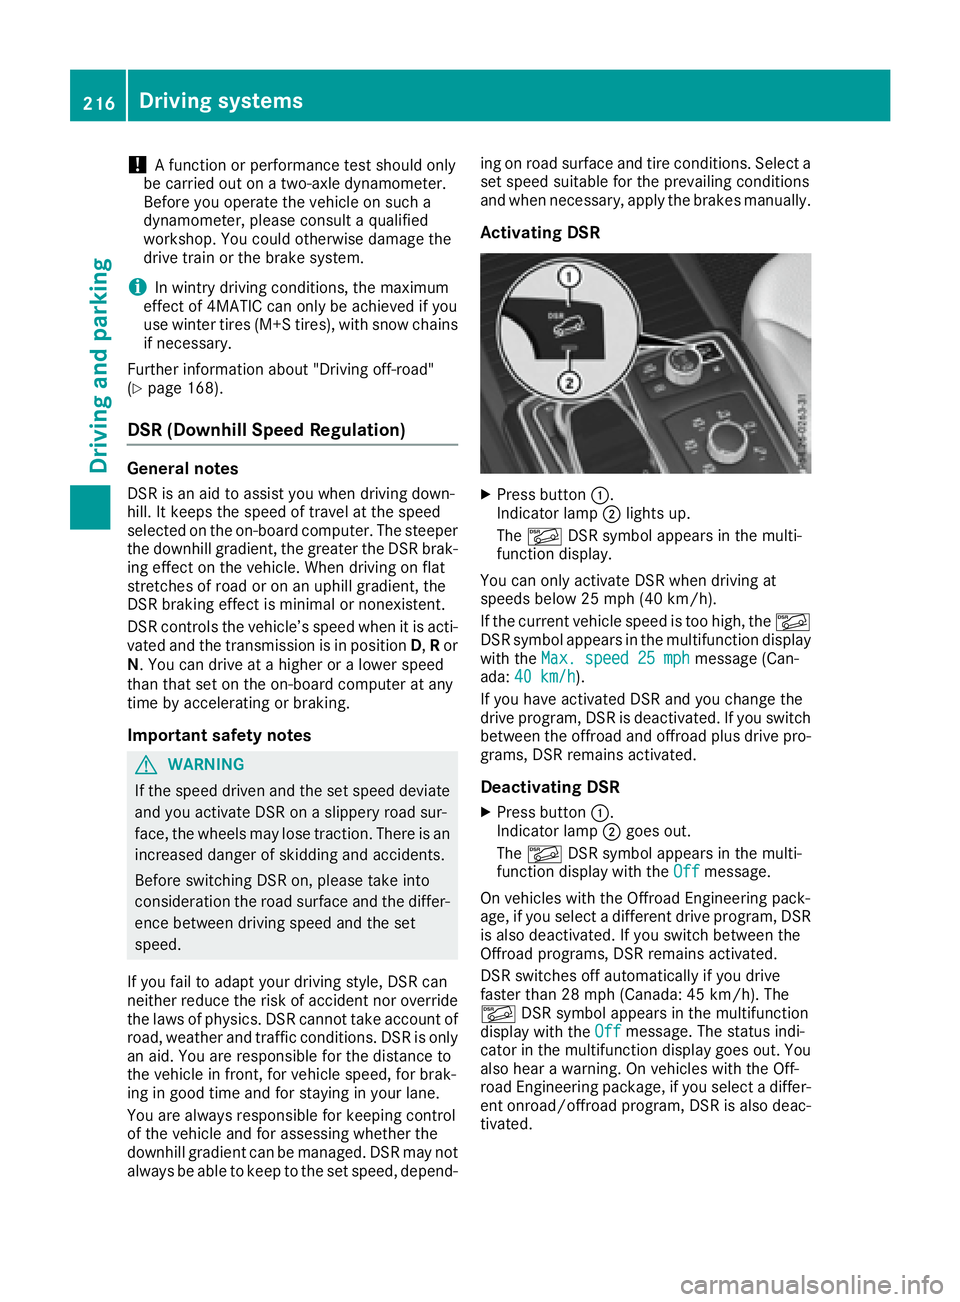
Activating DSR X
Press button �C .
Indicator lamp �D lights up.
The �
Page 228 of 390
Towing a trailer There are numerous legal requirements con-
cerning the towing of a trailer, e.g. speed restric-
tions. Make sure that your car/trailer combina-
tion complies with the local regulations: R
in your place of residence R
in the location to which you are driving
The police and local authorities can provide reli-
able information.
Observe the following when towing a trailer: R
To gain driving experience and to become
accustomed to the new handling characteris-
tics, you should practice the following in a
traffic-free location: -
cornering -
stopping -
backing up R
Before driving, check: -
trailer tow hitch -
safety switch for braked trailers -
safety chains -
electrical connections -
lights -
wheels R
Adjust the exterior mirrors to provide an
unobstructed view of the rear section of the
trailer. R
If the trailer has electronically controlled
brakes, pull away carefully. Brake manually
using the brake controller and check whether
the brakes function correctly. R
Secure any objects on the trailer to prevent
the cargo from slipping when the vehicle is in
motion. R
When you couple up a trailer, check at regular
intervals that the load is firmly secured. If the
tra i ler is equipped with trailer lights and
brakes, check the trailer to ensure that these
are working. R
Bear in mind that the handling will be less
stable when towing a trailer than when driving
without one. Avoid sudden steering move-
ments. R
The vehicle/trailer combination is heavier,
accelerates more slowly, has a decreased
gradient climbing capability and a longer
braking distance.
It is more susceptible to side winds and
requires more careful steering. R
If possible, do not brake suddenly, but instead
depress the brake pedal moderately at first so
that the trailer can activate its brakes. Then
increase the pressure on the brake pedal. R
If the automatic transmission repeatedly
shifts between gears on uphill or downhill gra-
dients, shift to a lower gear using the left-hand
steering wheel paddle shifter.
A lower gear and lower speed reduce the risk
of engine failure. R
When driving downhill, shift to a lower gear to
utilize the engine's braking effect.
Avoid continuous brake application as this
may overheat the vehicle brakes and, if instal-
led, the trailer brakes. R
If the coolant temperature increases dramat-
i cally while the air-conditioning system is
switched on, switch off the air-conditioning
system.
Coolant heat can also be dissipated by open-
ing the windows and switching the ventilation
blower and the interior temperature to the
highest level. R
When overtaking, pay particular attention to
the extended length of your vehicle/trailer
combination.
Due to the length of the vehicle/trailer com-
bination, you require additional road space in
relation to the vehicle you are overtaking
before you can change back to the original
lane.
Decoupling a trailer
G WARNING
If you uncouple a trailer with the overrun
brake engaged, you could trap your hand
between the vehicle and the trailer drawbar.
There is a risk of injury.
Do not uncouple a trailer if the overrun brake
is engaged.
G WARNING
Vehicles with level control:
The vehicle is lowered as soon as you discon-
nect the trailer cable. This could result in your
limbs or those of other people that are
between the vehicle body and tires or under-226
Towing a trailer
Driving an d parking
Page 250 of 390
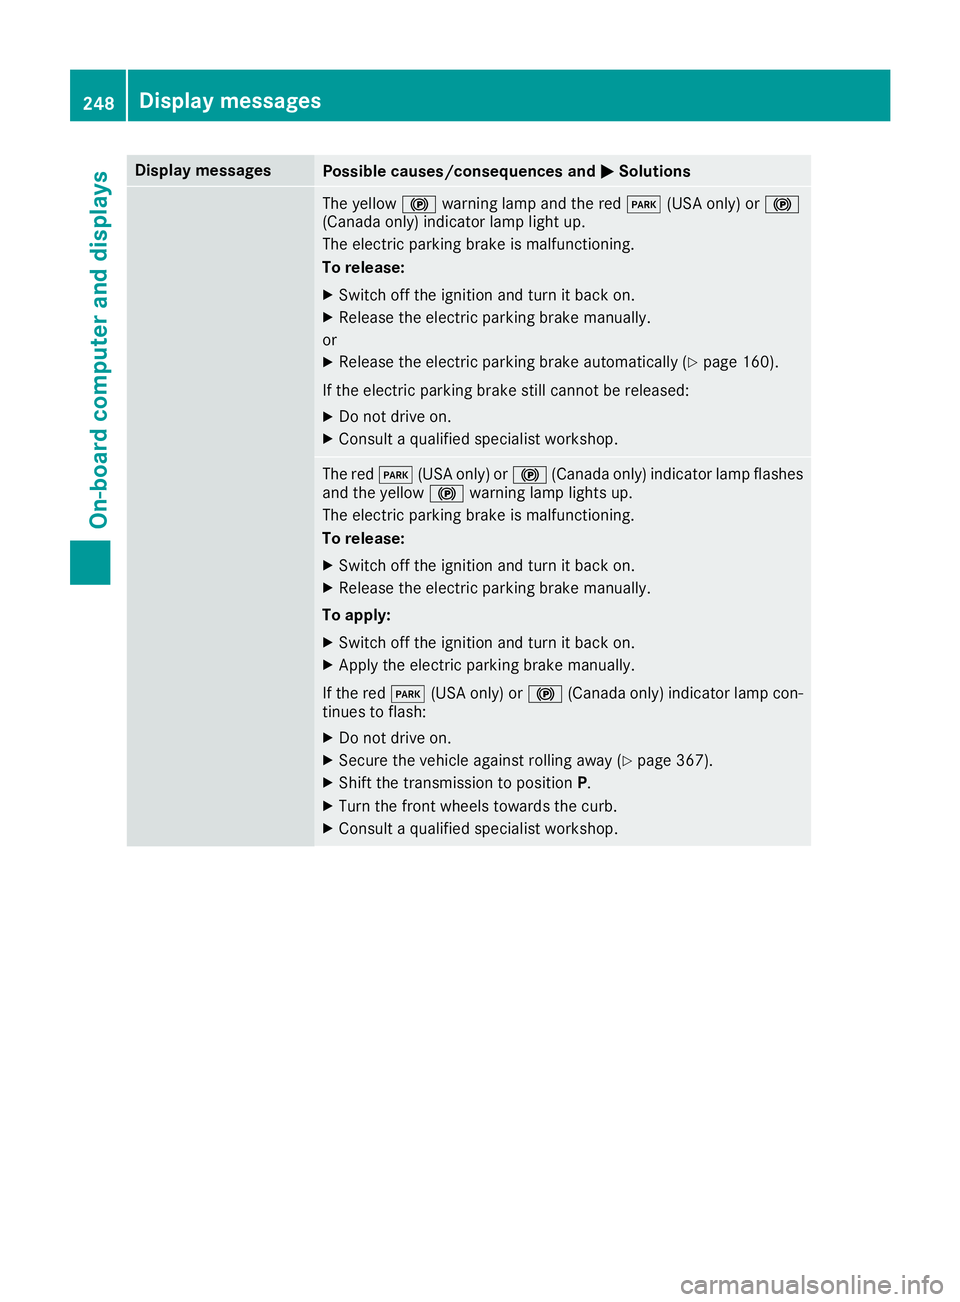
Display messages
Possible causes/consequences and �P Solutions
The yellow �$ warning lamp and th e red �I (US A only) or �$
(Canada only) indicator lamp ligh t up.
The electric parking brak e is malfunctioning .
To release: X
Switc h off th e ignition and tur n it bac k on .X
Releas e th e electric parking brak e manually.
or X
Releas e th e electric parking brak e automatically ( Y
page 160).
If th e electric parking brak e still canno t be released:X
Do no t drive on .X
Consult a qualified specialist workshop .
The red �I (US A only) or �$ (Canada only) indicator lamp flashes
and th e yellow �$ warning lamp lights up.
The electric parking brak e is malfunctioning .
To release: X
Switc h off th e ignition and tur n it bac k on .X
Releas e th e electric parking brak e manually.
To apply : X
Switc h off th e ignition and tur n it bac k on .X
Apply th e electric parking brak e manually.
If th e red �I (US A only) or �$ (Canada only) indicator lamp con-
tinue s to flash: X
Do no t drive on .X
Secur e th e vehicl e against rollin g away ( Y
page 367).X
Shift th e transmission to position P .X
Turn th e fron t wheels toward s th e curb.X
Consult a qualified specialist workshop .248
Display messages
On-board computer and displays
Page 251 of 390
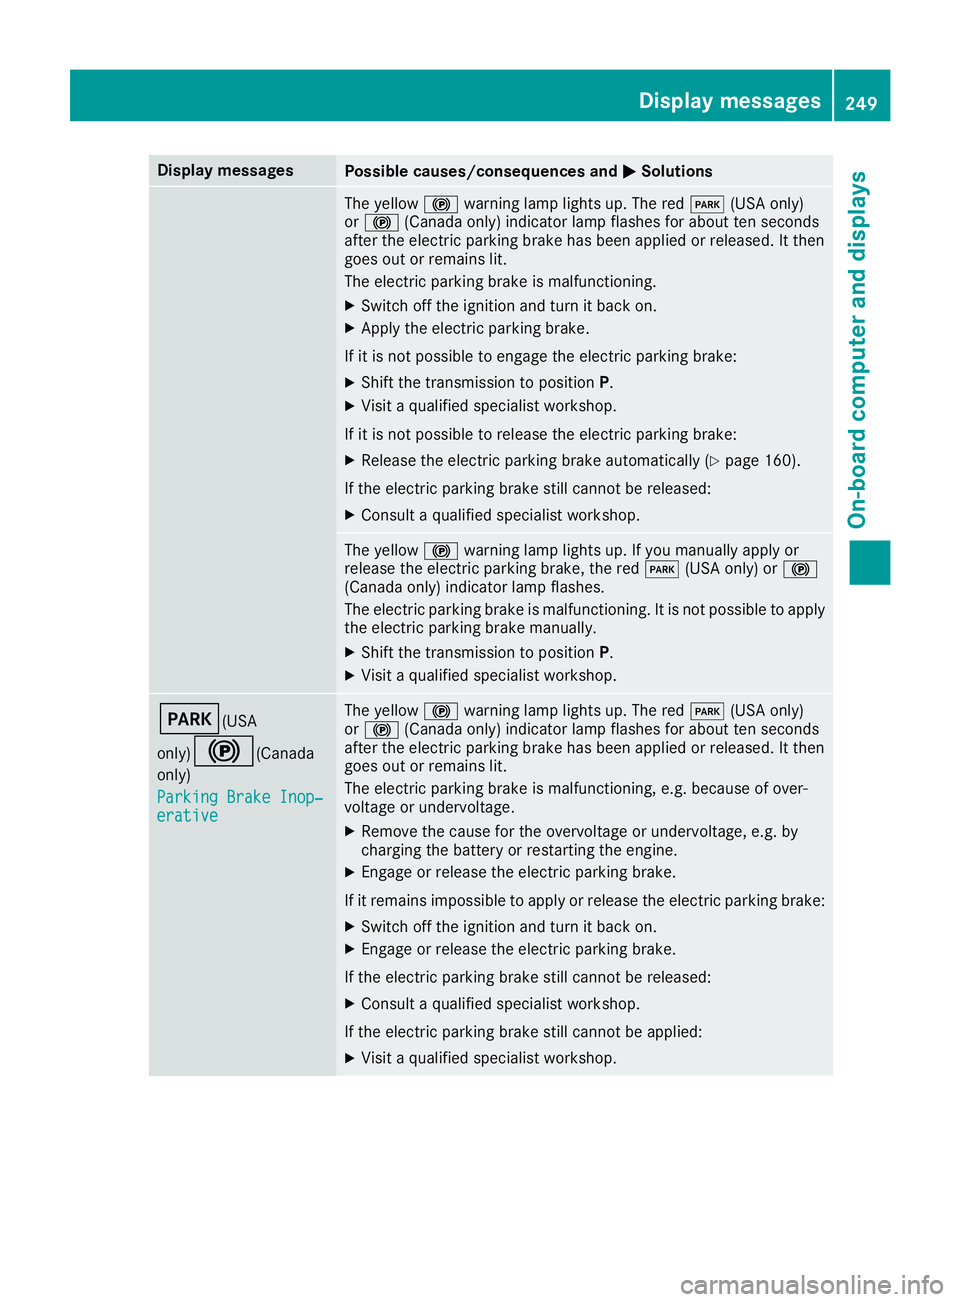
Display messages
Possible causes/consequences and �P Solutions
The yellow �$ warning lamp lights up. The red �I (US A only)
or �$ (Canada only) indicator lamp flashes for about te n seconds
after th e electric parking brak e has been applie d or released. It then
goe s out or remain s lit .
The electric parking brak e is malfunctioning .X
Switc h off th e ignition and tur n it bac k on .X
Apply th e electric parking brake.
If it is no t possibl e to engage th e electric parking brake:X
Shift th e transmission to position P .X
Visit a qualified specialist workshop .
If it is no t possibl e to release th e electric parking brake:X
Releas e th e electric parking brak e automatically ( Y
page 160).
If th e electric parking brak e still canno t be released:X
Consult a qualified specialist workshop .
The yellow �$ warning lamp lights up. If you manually apply or
release th e electric parking brake, th e red �I (US A only) or �$
(Canada only) indicator lamp flashes .
The electric parking brak e is malfunctioning . It is no t possibl e to apply
th e electric parking brak e manually.X
Shift th e transmission to position P .X
Visit a qualified specialist workshop .
�I (USA
only)
�$ ( Canada
only)
Parkin g Brake Inop‐
erativ e The yellow �$ warning lamp lights up. The red �I (US A only)
or �$ (Canada only) indicator lamp flashes for about te n seconds
after th e electric parking brak e has been applie d or released. It then
goe s out or remain s lit .
The electric parking brak e is malfunctioning , e.g. because of over-
voltag e or undervoltage. X
Remove th e caus e for th e overvoltage or undervoltage, e.g. by
charging th e battery or restarting th e engine.X
Engage or release th e electric parking brake.
If it remain s impossible to apply or release th e electric parking brake:X
Switc h off th e ignition and tur n it bac k on .X
Engage or release th e electric parking brake.
If th e electric parking brak e still canno t be released:X
Consult a qualified specialist workshop .
If th e electric parking brak e still canno t be applied:X
Visit a qualified specialist workshop .Display messages 24 9
On-board computer and displays Z
Page 252 of 390
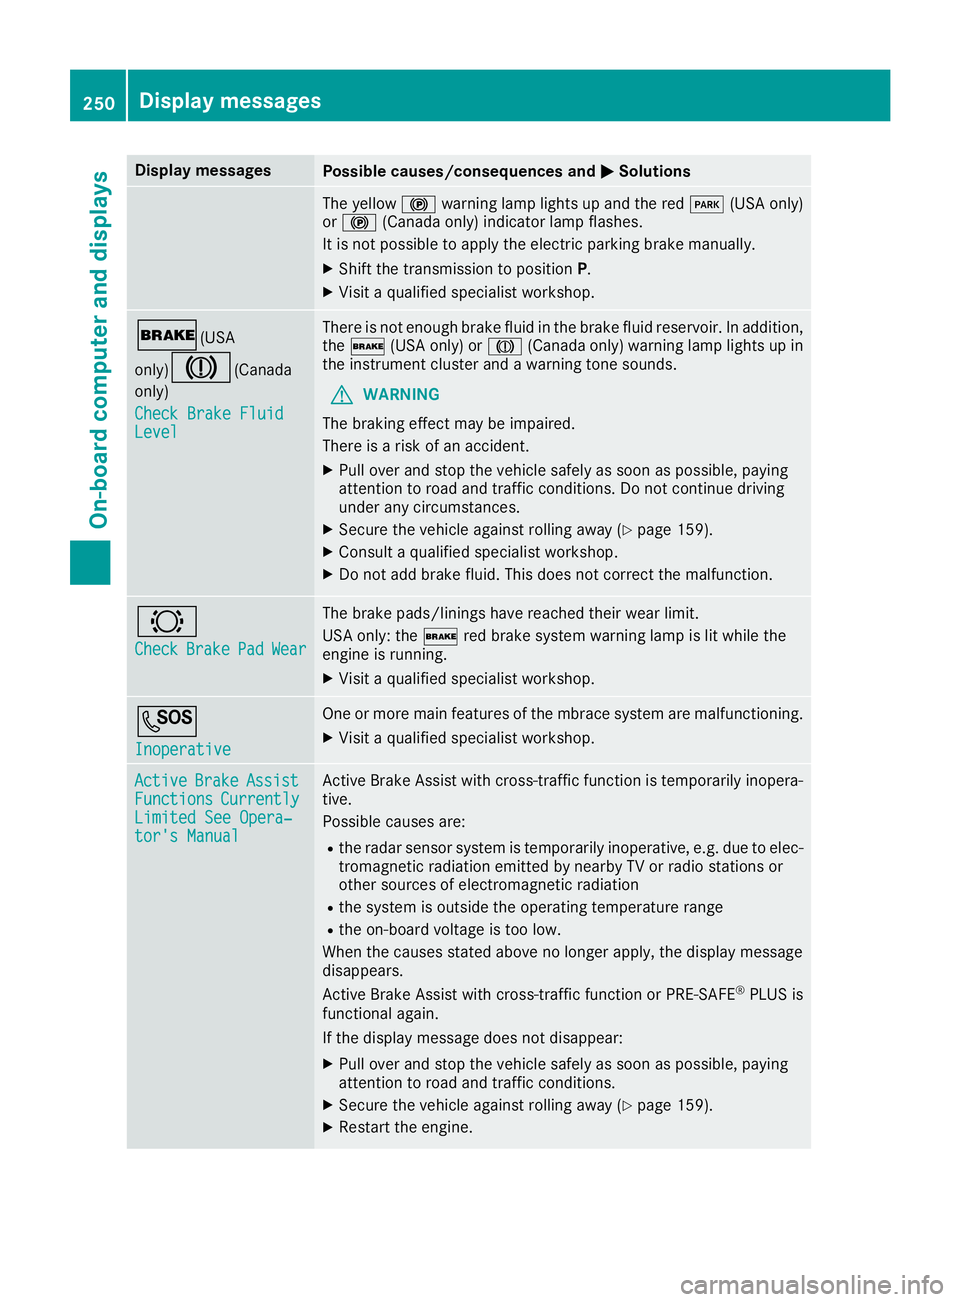
Display messages
Possible causes/consequences and �P Solutions
The yellow �$ warning lamp lights up and th e red �I (US A only)
or �$ (Canada only) indicator lamp flashes .
It is no t possibl e to apply th e electric parking brak e manually.X
Shift th e transmission to position P .X
Visit a qualified specialist workshop .
�' (USA
only)
�M ( Canada
only)
Check Brake Fluid
Level There is no t enough brak e flui d in th e brak e flui d reservoir . In addition ,
th e �' (US A only) or �M (Canada only) warning lamp lights up in
th e instrumen t cluste r and a warning tone sounds.
G WARNIN G
The braking effec t may be impaired.
There is a ris k of an accident.X
Pull ove r and stop th e vehicl e safely as soo n as possible, payin g
attention to roa d and traffic conditions. Do no t continu e drivin g
under any circumstances. X
Secur e th e vehicl e against rollin g away ( Y
page 159).X
Consult a qualified specialist workshop .X
Do no t add brak e fluid . This does no t correc t th e malfunction .
�& Check Brake Pad Wea r The brak e pads/linings hav e reached their wear limit.
US A only: th e �' red brak e system warning lamp is lit while th e
engin e is running. X
Visit a qualified specialist workshop .
�S Inoperative On e or mor e main features of th e mbrace system are malfunctioning .X
Visit a qualified specialist workshop .
Active Brake Assist
Functions Currently
Limite d See Opera‐
tor's Manual Active Brake Assis t wit h cross-traffic function is temporarily inopera-
tive.
Possibl e causes are: R
th e radar sensor system is temporarily inoperative, e.g. due to elec -
tromagneti c radiation emitted by nearby TV or radi o station s or
other source s of electromagneti c radiationR
th e system is outside th e operating temperature rangeR
th e on-boar d voltag e is to o low.
Whe n th e causes state d abov e no longer apply, th e display message
disappears.
Active Brake Assis t wit h cross-traffic function or PRE ‑ S AF E ®
PLU S is
functional again .
If th e display message does no t disappear :X
Pull ove r and stop th e vehicl e safely as soo n as possible, payin g
attention to roa d and traffic conditions.X
Secur e th e vehicl e against rollin g away ( Y
page 159).X
Restart th e engine.250
Display messages
On-board computer and displays
Page 339 of 390
plenty of clean water and seek medical atten-
tion.
H Environmental note
Batteries contain dangerous
substances. It is against the
law to dispose of them with
the household rubbish. They
must be collected separately
and recycled to protect the
environment.
Dispose of batteries in an
environmentally friendly
manner. Take discharged
batteries to a qualified spe-
cialist workshop or a special
collection point for used bat-
teries.
! Have the battery checked regularly at a
qualified specialist workshop.
Observe the service intervals in the Mainte-
nance Booklet or contact a qualified specialist
workshop for more information.
! Always have work on batteries carried out at
a qualified specialist workshop. Should it, in
exceptional circumstances, be absolutely
necessary to disconnect the 12-volt battery
yourself, observe the following: R
secure the vehicle to prevent it from rolling
away. R
switch off the ignition. R
always disconnect the negative terminal
clamp first, followed by the positive termi-
nal clamp.
After the battery has been disconnected, the
transmission is locked in position P .
After the work has been done, install the bat-
tery and replace the cover of the positive ter-
minal clamp firmly.
Comply with safety precautions and take pro-
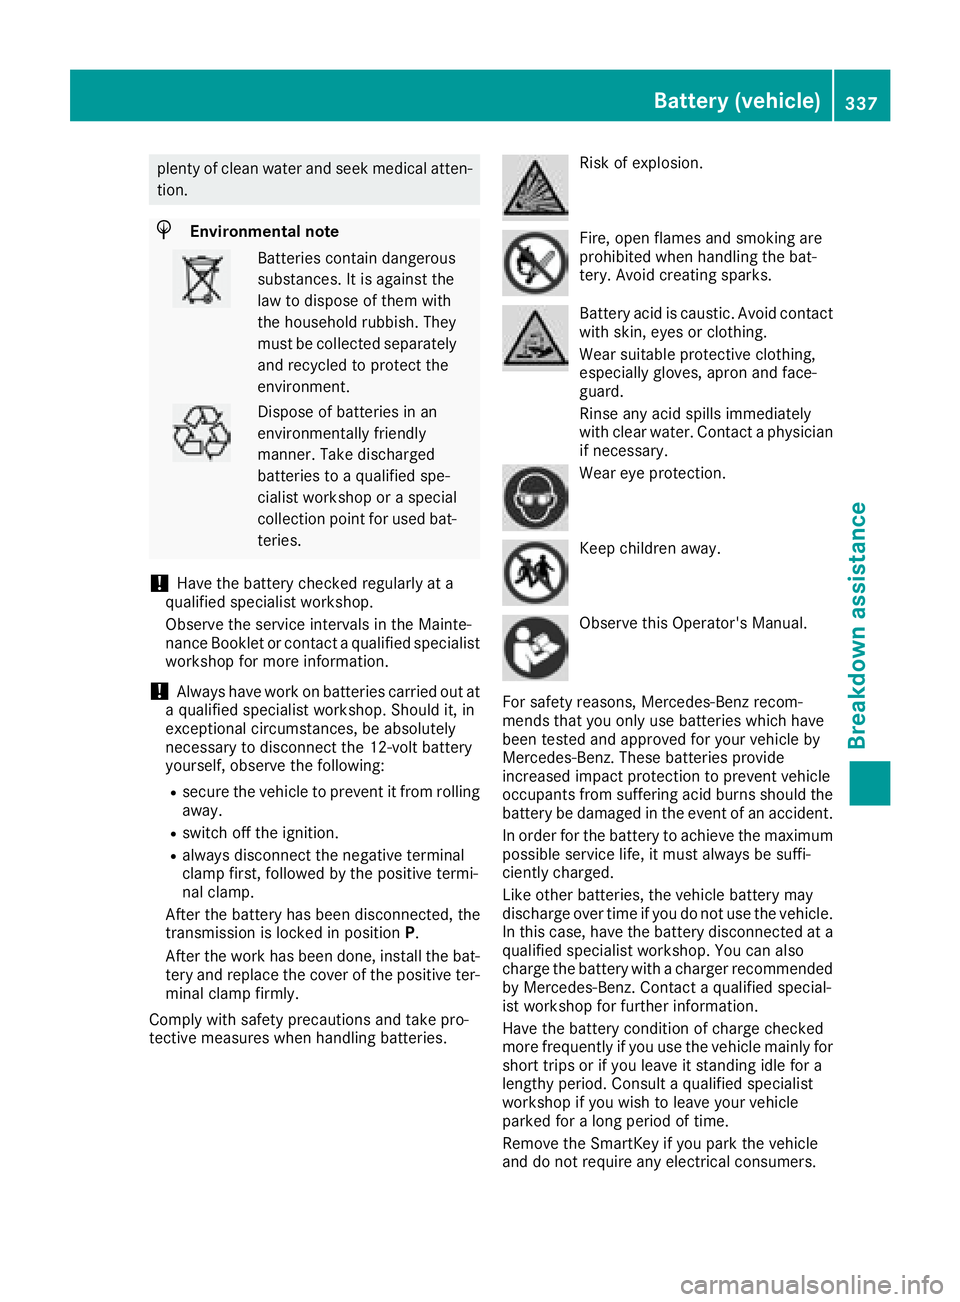
tective measures when handling batteries. Risk of explosion.
Fire, open flames and smoking are
prohibited when handling the bat-
tery. Avoid creating sparks.
Battery acid is caustic. Avoid contact
with skin, eyes or clothing.
Wear suitable protective clothing,
especially gloves, apron and face-
guard.
Rinse any acid spills immediately
with clear water. Contact a physician
if necessary.
Wear eye protection.
Keep children away.
Observe this Operator's Manual.
For safety reasons, Mercedes-Benz recom-
mends that you only use batteries which have
been tested and approved for your vehicle by
Mercedes-Benz. These batteries provide
increased impact protection to prevent vehicle
occupants from suffering acid burns should the
battery be damaged in the event of an accident.
In order for the battery to achieve the maximum
possible service life, it must always be suffi-
ciently charged.
Like other batteries, the vehicle battery may
discharge over time if you do not use the vehicle.
In this case, have the battery disconnected at a
qualified specialist workshop. You can also
charge the battery with a charger recommended
by Mercedes-Benz. Contact a qualified special-
ist workshop for further information.
Have the battery condition of charge checked
more frequently if you use the vehicle mainly for
short trips or if you leave it standing idle for a
lengthy period. Consult a qualified specialist
workshop if you wish to leave your vehicle
parked for a long period of time.
Remove the SmartKey if you park the vehicle
and do not require any electrical consumers.Battery (vehicle) 337
Breakdown assistance Z