2017 MERCEDES-BENZ GLS-Class SUV washer fluid
[x] Cancel search: washer fluidPage 8 of 390

Axle load, permissible (trailer tow-
ing) ...................................................... 387
B
Back button ...................................... .288
Bag hook ............................................ 299
Ball coupling
Installing ........................................ 223
Removing ....................................... 227
BAS (Brake Assist System) ................. 64
Battery (SmartKey)
Checking .......................................... 77
Important safety notes .................... 77
Replacing ......................................... 77
Battery (vehicle)
Charging ........................................ 338
Display message ............................ 258
Important safety notes .................. 336
Jump starting ................................. 338
Overview ........................................ 336
Belt
see Seat belts
Blind Spot Assist
Activating/deactivating ................. 238
Display message ............................ 265
Notes/function .............................. 207
Trailer towing ................................. 209
see Active Blind Spot Assist
Blootooth
®
Connecting a different mobile
phone ............................................ 292
BlueTEC
Adding DEF ....................................1 56
BlueTEC (DEF) ....................................3 81
Bluetooth
®
Searching for a mobile phone ........2 91
see also Digital Operator's Man-
ual ..................................................2 87
Telephony ...................................... 290
Brake Assist
see BAS (Brake Assist System)
Brake fluid
Display message ............................ 250
Notes ............................................. 382
Brake force distribution
see EBD (electronic brake force
distribution) Brake lamps
Display message ............................ 256
Brakes
ABS ..................................................6 3
Adaptive Brake Assist ...................... 65
BAS .................................................. 64
Brake fluid (notes) ......................... 382
Display message ............................ 245
High-performance brake system .... 166
Hill start assist ............................... 141
Impo
rtant safety notes .................. 164
Maintenance .................................. 165
Parking brake ................................ 160
Riding tips ...................................... 164
Warning lamp ................................. 276
Breakdown
Where will I find...? ........................ 331
see Flat tire
see Towing away
Brightness control (instrument
cluster lighting) ................................... 34
Bulbs
see Replacing bulbs
C
CaliforniaImportant notice for retail cus-
tomers and lessees .......................... 26
Calling up a malfunction
see Display messages
Car
see Vehicle
Care
360° camera ................................. 328
Car wash ........................................ 324
Carpets .......................................... 330
Display ........................................... 329
Exhaust pipe .................................. 328
Exterior lights ................................ 327
Gear or selector lever .................... 329
Interior ........................................... 329
Matte finish ................................... 326
Notes ............................................. 324
Paint .............................................. 326
Plastic trim .................................... 329
Power washer ................................ 325
Rear view camera .......................... 328
6Index
Page 21 of 390

Exit position (3rd row of seats) ...... 101
Folding down/up (third row of
seats) ............................................... 99
Folding the 2nd row of seats
forward electrically ........................ 102
Folding the 2nd row of seats
forward manually ........................... 100
Folding the rear bench seat for-
wards/back ................................... 297
Important safety notes .................... 94
Overview .......................................... 94
Seat heating problem .................... 105
Seat ventilation problem ................ 105
Storing settings (memory func-
tion) ............................................... 110
Switching seat heating on/off ....... 103
Switching seat ventilation on/off .. 104
Section
Sliding sunroof ................................. 89
Selector lever
Cleaning ......................................... 329
Sensors (cleaning instructions) ....... 328
Service message
see ASSYST PLUS
Service products
Brake fluid ..................................... 382
Coolant (engine) ............................ 382
DEF special additives ..................... 381
Engine oil ....................................... 381
Fuel ................................................ 379
Important safety notes .................. 378
Refrigerant (air-conditioning sys-
tem) ............................................... 383
Washer fluid ................................... 383
Setting the air distribution ............... 131
Setting the airflow ............................ 131
Setting the date/time format
see also Digital Operator's Man-
ual .................................................. 287
Setting the language
see also Digital Operator's Man-
ual .................................................. 287
Setting the time
see also Digital Operator's Man-
ual .................................................. 287
Settings
Factory (on-board computer) ......... 240
On-board computer ....................... 238 SETUP (on-board computer)
............. 241
Side impact air bag ............................. 48
Side marker lamp (display mes-
sage) ................................................... 256
Side windows
Cle
aning ......................................... 327
Convenience closing feature ............ 87
Convenience opening feature .......... 87
Hinged side windows ....................... 86
Important safety information ........... 85
Opening/closing .............................. 86
Overview .......................................... 85
Problem (malfunction) ..................... 89
Resetting ......................................... 88
Reversing feature ............................. 86
SIRIUS services
see also Digital Operator's Man-
ual .................................................. 287
Sliding sunroof
Important safety notes .................... 89
Opening/closing .............................. 90
Problem (malfunction) ..................... 92
Resetting ......................................... 91
see Panorama roof with power
tilt/sliding panel
SmartKey
Changing the battery ....................... 77
Changing the programming ............. 76
Checking the battery ....................... 77
Convenience closing feature ............ 88
Convenience opening feature .......... 87
Display message ............................ 273
Door central locking/unlocking ....... 74
Important safety notes .................... 74
KEYLESS-GO start function .............. 76
Loss ................................................. 78
Mechanical key ................................ 76
Overview .......................................... 74
Positions (ignition lock) ................. 138
Problem (malfunction) ..................... 78
Starting the engine ........................ 140
Smartphone
Starting the engine ........................ 140
SMS
see also Digital Operator's Man-
ual .................................................. 287
Snow chains
Information .................................... 348
Index19
Page 26 of 390

VideoOperating the DVD ......................... 235
see also Digital Operator's Man-
ual .................................................. 287
VIN ...................................................... 377
Seat ............................................... 378
Type plate ...................................... 377
W
Warning and indicator lamps ABS ................................................ 277
Brakes ........................................... 276
Check Engine ................................. 283
Coolant .......................................... 283
Distance Pilot DISTRONIC ............. 285
Distance warning ........................... 285
ESP
®.............................................. 279
ESP®OFF ....................................... 280
Fuel tank ........................................ 283
Overview .......................................... 34
Parking brake ................................ 282
PASSENGER AIR BAG ...................... 42
Reserve fuel ................................... 283
Restraint system ............................ 282
Seat belt ........................................ 275
Tire pressure monitor .................... 286
Warranty .............................................. 26
Washer fluid
Display message ............................ 273
Weather display (COMAND)
see also Digital Operator's Man-
ual .................................................. 287
Wheel and tire combinations
Tires ............................................... 371
Wheel bolt tightening torque ........... 370
Wheel chock ...................................... 367
Wheels
Changing a wheel .......................... 366
Checking ........................................ 346
Cleaning ......................................... 326
Emergency spare wheel ................. 372
Important safety notes .................. 346
Information on driving .................... 346
Interchanging/changing ................ 366
Mounting a new wheel ................... 369
Mounting a wheel .......................... 367
Overview ........................................ 346 Removing a wheel .......................... 369
Snow chains .................................. 348
Storing ........................................... 367
Tightening torque ........................... 370
Wheel size/tire size ....................... 371
Window curtain air bag
Display message ............................ 253
Operation ......................................... 48
Windows
see Side windows
Windshield
Defrosting ...................................... 132
Windshield washer fluid
see Windshield washer system
Windshield washer system
Adding washer fluid ....................... 322
Important safety notes .................. 383
Windshield wipers
Problem (malfunction) ................... 122
Rear window wiper ........................ 120
Replacing the wiper blades ............ 120
Switching on/off ........................... 119
Winter drivin
g
Slippery road surfaces ................... 167
Winter operation
Overview ........................................ 348
Radiator cover ............................... 320
Winter tires
M+S tires ....................................... 348
Wiper blades
Cleaning ......................................... 327
Replacing ....................................... 120
Replacing (rear window) ................ 121
Replacing (windshield) ................... 121
Wooden trim (cleaning instruc-
tions) .................................................. 330
Workshop
see Qualified specialist workshop
Z
ZONE functionSwitching on/off ........................... 132
24Index
Page 121 of 390
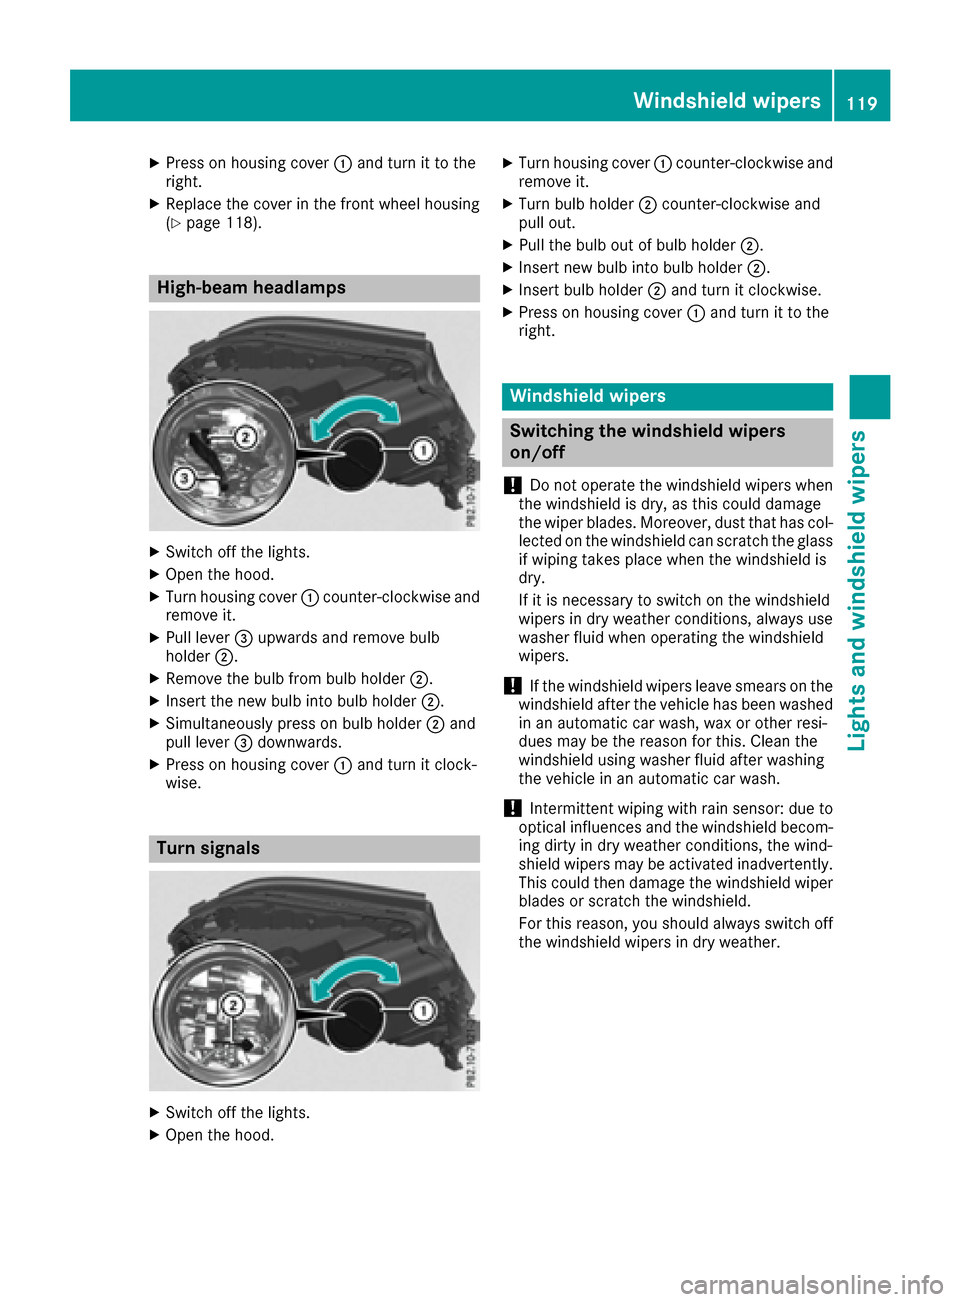
XPress on housing cover:and turn it to the
right.
XReplace the cover in the front wheel housing
(Ypage 118).
High-beam headlamps
XSwitch off the lights.
XOpen the hood.
XTurn housing cover :counter-clockwise and
remove it.
XPull lever =upwards and remove bulb
holder ;.
XRemove the bulb from bulb holder ;.
XInsert the new bulb into bulb holder ;.
XSimultaneously press on bulb holder ;and
pull lever =downwards.
XPress on housing cover :and turn it clock-
wise.
Turn signals
XSwitch off the lights.
XOpen the hood.
XTurn housing cover :counter-clockwise and
remove it.
XTurn bulb holder ;counter-clockwise and
pull out.
XPull the bulb out of bulb holder ;.
XInsert new bulb into bulb holder ;.
XInsert bulb holder;and turn it clockwise.
XPress on housing cover :and turn it to the
right.
Windshield wipers
Switching the windshield wipers
on/off
!
Do not operate the windshield wipers when
the windshield is dry, as this could damage
the wiper blades. Moreover, dust that has col-
lected on the windshield can scratch the glass
if wiping takes place when the windshield is
dry.
If it is necessary to switch on the windshield
wipers in dry weather conditions, always use
washer fluid when operating the windshield
wipers.
!If the windshield wipers leave smears on the
windshield after the vehicle has been washed
in an automatic car wash, wax or other resi-
dues may be the reason for this. Clean the
windshield using washer fluid after washing
the vehicle in an automatic car wash.
!Intermittent wiping with rain sensor: due to
optical influences and the windshield becom-
ing dirty in dry weather conditions, the wind-
shield wipers may be activated inadvertently.
This could then damage the windshield wiper
blades or scratch the windshield.
For this reason, you should always switch off
the windshield wipers in dry weather.
Windshield wipers119
Lights and windshield wipers
Z
Page 122 of 390

Combinationswitch
1
$ Windshield wiper off
2ÄIntermittent wipe, low (rain sensor set
to low sensitivity)
3Å Intermittent wipe, high (rain sensor
set to high sensitivity)
4° Continuous wipe, slow
5¯Continuous wipe, fast
BíSingle wipe
CîTo wipe with washer fluid
XSwitch on the ignition.
XTurn the combination switch to the corre-
sponding position.
In the ÄorÅ position, the appropriate
wiping frequency is set automatically according
to the intensity of the rain. In the Åposition,
the rain sensor is more sensitive than in
the Ä position, causing the windshield wiper
to wipe more frequently.
Vehicles with MAGIC VISION CONTROL: the
washer fluid is fed through the wiper blades and
when wiping with washer fluid îthe washer
fluid is emitted directly from the blades.
If the wiper blades are worn, the windshield will
no longer be wiped properly. This could prevent
you from observing the traffic conditions.
Switching the rear window wiper on/
off
Combination switch
:
è Rear window wiper switch
2bWipes with washer fluid
3ISwitches on intermittent wiping
40 Switches off intermittent wiping
5b Wipes with washer fluid
XTurn the SmartKey to position 1or 2in the
ignition lock (Ypage 138).
XTurn switch :on the combination switch to
the corresponding position.
When the rear window wiper is switched on,
the icon appears in the instrument cluster.
Replacing the wiper blades
Important safety notes
GWARNING
If the windshield wipers begin to move while
you are changing the wiper blades, you could be trapped by the wiper arm. There is a risk of
injury.
Always switch off the windshield wipers and
ignition before changing the wiper blades.
!To avoid damaging the wiper blades, make
sure that you touch only the wiper arm of the
wiper.
!Never open the hood/tailgate if a wiper arm
has been folded away from the windshield/
rear window.
Never fold a windshield wiper arm without a
wiper blade back onto the windshield/rear
window.
120Windshield wipers
Lights and windshield wipers
Page 275 of 390

Display messagesPossible causes/consequences andMSolutions
¥
Check Washer Fluid
The washer fluidlevel in th ewasher flui dreservoir has dropped belo w
th eminimum .
XAddwasher flui d (Ypage 322).
Wiper Malfunction‐ingThe windshield wiper sare malfunctioning .
XVisitaqualified specialist workshop .
Hazard WarningFlashers Malfunc‐tioning
The hazard warning lamp sare faulty.
XVisit aqualified specialist workshop .
SmartKey
Display messagesPossible causes/consequences and MSolutions
Â
KeyDoesNotBelongto Vehicl e
You haveput th ewrong SmartKey in th eignition lock.
XUse th ecorrec tSmartKey.
Â
Tak eYou rKey fro mIgnition
The SmartKey is in th eignition lock.
A warning tone also sounds.
XRemove th eSmartKey.
Â
Obtain aNew Key
The SmartKey needs to be replaced.
XVisit aqualified specialist workshop .
Â
ReplaceKey Batter y
The SmartKey battery is discharged.
XChange thebattery (Ypage 77) .
Â
Don't Forget You rKey
The SmartKey is notin th eignition lock. You hav eopened th edriver's
door wit hth eengin eswitched off .
A warning tone also sounds.
This display message is displayed for amaximum of 60 seconds and is
simply areminder.
XTak eth eSmartKey wit hyou when you leav eth evehicle.
Â
Key Not Detected(whit edisplay message )
The SmartKey is currentl yundetected.
XChange th elocation of th eSmartKey in th evehicle.
If th eSmartKey still canno tbe detected:
XOperat eth evehicl ewit hth eSmartKey in th eignition lock.
Display messages27 3
On-board computer and displays
Z
Page 324 of 390

Where possible, let the engine cool down andtouch only the components described in the
following.
GWARNING
The cooling system is pressurized, particularly
when the motor is warm. If you open the cap,
you could be scalded if hot coolant sprays out.
There is a risk of injury.
Let the engine cool down before you open the
cap. Wear gloves and eye protection. Slowly
open the cap to relieve pressure.
GWARNING
Windshield washer concentrate could ignite if it comes into contact with hot engine compo-
nents or the exhaust system. There is a risk of
fire and injury.
Make sure that no windshield washer con-
centrate is spilled next to the filler neck.
Checking coolant level
XPark the vehicle on a level surface.
Only check the coolant level when the vehicle
is on a level surface and the engine has cooled
down.
XTurn the SmartKey to position 2in the ignition
lock (Ypage 138).
On vehicles with KEYLESS-GO, press the
Start/Stop button twice (
Ypage 140).
XCheck the coolant temperature gauge in the
multifunction display.
The coolant temperature must be below
158 ‡ (70 †).
XTurn the SmartKey to position 0in the ignition
lock (Ypage 138).
XOn vehicles with KEYLESS-GO, press the
Start/Stop button (Ypage 140).
XPress the Start/Stop button (Ypage 140).
XSlowly turn cap :half a turn counter-clock-
wise and allow excess pressure to escape.
XTurn cap :further counter-clockwise and
remove it.
If the coolant is at the level of marker bar =
in the filler neck when cold, there is enough
coolant in coolant expansion tank ;.
If the coolant level is approximately 0.6 in
(1.5 cm) above marker bar =in the filler neck
when warm, there is enough coolant in expan-
sion tank ;.
XIf necessary, add coolant that has been tested
and approved by Mercedes-Benz.
XReplace cap :and turn it clockwise as far as
it will go.
For further information on coolant, see
(
Ypage 382).
Adding washer fluid to the windshield
washer system
Example: washer fluid reservoir
XTo open: pull cap:upwards by the tab.
XAdd the premixed washer fluid.
XTo close: press cap :onto the filler neck
until it engages.
If the washer fluid level drops below the recom-
mended minimum of 1 liter, a message appears
in the multifunction display prompting you to
add washer fluid (
Ypage 273).
Further information on windshield washer fluid
(
Ypage 383).
322Engine compartment
Maintenance and care
Page 328 of 390

Damaged seals or electrical components can
lead to leaks or failures.
Cleaning the paintwork
!Do not affix:
Rstickers
Rfilms
Rmagnetic plates or similar items
to painted surfaces. You could otherwise
damage the paintwork.
Scratches, corrosive deposits, areas affected by
corrosion and damage caused by inadequate
care cannot always be completely repaired. In
such cases, visit a qualified specialist workshop.
XRemove dirt immediately, where possible,
while avoiding rubbing too hard.
XSoak insect remains with insect remover and
rinse off the treated areas afterwards.
XSoak bird droppings with water and rinse off
the treated areas afterwards.
XRemove coolant, brake fluid, tree resin, oils,
fuels and greases by rubbing gently with a
cloth soaked in petroleum ether or lighter
fluid.
XUse tar remover to remove tar stains.
XUse silicone remover to remove wax.
If water no longer forms "beads" on the paint
surface, use the paint care products recommen-
ded and approved by Mercedes-Benz. This is the
case approximately every three to five months,
depending on the climate conditions and the
care product used.
If dirt has penetrated the paint surface or if the
paint has become dull, the paint cleaner reco m-
me
nded and approved by Mercedes-Benz
should be used.
Do not use these care products in the sun or on
the hood while the hood is hot.
XUse a suitable touch-up stick, e.g. MB Touch-
Up Stick, to repair slight damage to the paint- work quickly and provisionally.
Matte finish care
!Never polish the vehicle or the light alloy
wheels. Polishing causes the finish to shine.
!The following may cause the paint to
become shiny and thus reduce the matte
effect:
Rstrong rubbing of the paintwork with
unsuitable materials
Rfrequent use of automatic car washes
Rwashing the vehicle in direct sunlight
!Never use paint cleaner, buffing or polishing
products, or gloss preserver, e.g. wax, for the
purpose of paintwork care. These products
are only suitable for high-gloss surfaces. Their
use on vehicles with matte paintwork leads to considerable surface damage or, more spe-
cifically, to shiny, spotted areas.
Always have paintwork repairs carried out at a
qualified specialist workshop.
!Do not use wash programs with a hot wax
treatment under any circumstances.
Observe these notes if your vehicle has a clear
matte finish. This will help you to avoid damage to the paintwork due to incorrect treatment.
These notes also apply to light alloy wheels with
a clear matte finish.
iThe vehicle should ideally be washed by
hand using a soft sponge, car shampoo and
plenty of water.
iUse only insect remover and car shampoo
from the range of recommended and
approved Mercedes-Benz care products.
Cleaning the vehicle parts
Cleaning the wheels
GWARNING
The water jet from a circular jet nozzle (dirt
blasters) can cause invisible exterior damage
to the tires or chassis components. Compo-
nents damaged in this way may fail unexpect-
edly. There is a risk of an accident.
Do not use power washers with circular jet
nozzles to clean the vehicle. Have damaged
tires or chassis components replaced imme-
diately.
!Do not use acidic wheel cleaning products
to remove brake dust. This could damage
wheel bolts and brake components.
326Care
Maintenance and care