2017 MERCEDES-BENZ GLE43AMG SUV fold seats
[x] Cancel search: fold seatsPage 18 of 366

Warning display ............................. 175
Parking brake
Applying automatically ...................1 47
Applying or releasing manually ...... 147
Display message ............................ 224
Electric parking brake .................... 146
Emergency braking ........................ 148
General notes ................................ 146
Releasing automatically ................. 147
Warning lamp ................................. 258
Parking lamps
Switching on/off ........................... 105
Parking Pilot
Display Message ............................ 241
Exiting a parking space .................. 180
Function/notes .............................1 77
Important safety notes .................. 177
Parking .......................................... 179
PASSENGER AIR BAG
Display message ............................ 231
Indicator lamps ................................ 40
Problem (malfunction) ................... 231
Pets in the vehicle ............................... 60
Phone book
see also Digital Operator's Man-
ual ..................................................2 63
Plastic trim (cleaning instruc-
tions) ..................................................3 04
Power locks ......................................... 78
Power washers .................................. 300
Power windows
see Side windows
PRE-SAFE
®(anticipatory occupant
protection)
Display message ............................ 228
Operation ......................................... 53
PRE-SAFE
®PLUS (anticipatory
occupant protection PLUS)
Display message ............................ 228
Operation ......................................... 54
Protection against theft
ATA (Anti-Theft Alarm system) ......... 70
Immobilizer ...................................... 70
Protection of the environment
General notes .................................. 24
Pulling away
Automatic transmission ................. 128 General notes ................................ 128
Hill start assist ............................... 128
Trai
ler ............................................ 128
Q
QR code
Mercedes-Benz Guide App ................. 1
Rescue card ..................................... 29
Qualified specialist workshop ........... 28
R
RACETIMER (on-board computer) .... 218
Radiator cover ................................... 295
Radio
Selecting a station ......................... 211
see separate operating instructions
Radio mode
see also Digital Operator's Man-
ual .................................................. 263
Radio-wave reception/transmis-
sion in the vehicle
Declaration of conformity ................ 27
Rain closing feature (panorama
roof with power tilt/sliding panel) .... 88
Reading lamp ..................................... 108
Rear bench seat
Folding forwards/back .................. 274
Rear compartment
Setting the air vents ...................... 123
Setting the temperature ................ 119
Rear fog lamp
Display message ............................ 233
Switching on/off ........................... 105
Rear Seat Entertainment System
AUX jacks ...................................... 269
AUX jacks CD/DVD drive .............. 269
Rear seats
Adjusting ......................................... 95
Rear view camera
Cleaning instructions ..................... 303
Display in the multimedia system .. 182
Function/notes ............................. 181
Switching on/off ........................... 182
Rear window defroster
Problem (malfunction) ................... 121
Switching on/off ........................... 121
16Index
Page 19 of 366

Rear-view mirrorAnti-glare (manual) .......................... 99
Dipping (automatic) ....................... 101
Refrigerant (air-conditioning sys-
tem)
Important safety notes .................. 357
Refueling
Fuel gauge ....................................... 33
Important safety notes .................. 139
Refueling process .......................... 140
see Fuel
Remote control
Garage door opener ....................... 289
Programming (garage door
opener) .......................................... 290
Replacing bulbs
General notes ................................ 109
Reporting safety defects .................... 29
Rescue card ......................................... 29
Reserve (fuel tank)
see Fuel
Reserve fuel
Display message ............................ 236
Warning lamp ................................. 259
Residual heat (climate control) ........ 121
Restraint system
Display message ............................ 229
Introduction ..................................... 39
Warning lamp ................................. 258
Warning lamp (function) ................... 40
Reversing feature
Panorama sliding sunroof ................ 87
Roller sunblind ................................. 88
Side windows ................................... 83
Tailgate ............................................ 79
Reversing lamps (display mes-
sage) ................................................... 233
Roadside Assistance (breakdown) .... 26
Roller sunblind
Panorama roof with power tilt/
sliding panel ..................................... 88
Roof carrier ........................................ 277
Roof lining and carpets (cleaning
guidelines) ......................................... 305
Roof load (maximum) ........................ 358
Route (navigation)
see Route guidance (navigation) Route guidance
see also Digital Operator's Man-
ual .................................................. 263
Route guidance (navigation) ............ 210
S
Safety
Children in the vehicle ..................... 55
see Occupant safety
see Operating safety
SD card
Inserting ........................................ 268
Inserting/removing ........................ 268
Removing ....................................... 268
SD memory card
see also Digital Operator's Man-
ual .................................................. 263
Selecting ........................................ 212
Search & Send
see also Digital Operator's Man-
ual .................................................. 263
Seat belts
Adjusting the driver's and front-
passenger seat belt ......................... 43
Adjusting the height ......................... 42
Cleaning ......................................... 305
Correct usage .................................. 42
Fastening ......................................... 42
Important safety guidelines ............. 41
Introduction ..................................... 40
Releasing ......................................... 43
Switching belt adjustment on/off
(on-board computer) ...................... 217
Warning lamp ................................. 250
Warning lamp (function) ................... 43
Seats
Adjusting (electrically) ..................... 93
Adjusting the 4-way lumbar sup-
port .................................................. 95
Adjusting the head restraint ............ 93
Calling up a stored setting (mem-
ory function) .................................. 103
Cleaning the cover ......................... 305
Correct driver's seat position ........... 91
Folding the rear bench seat for-
wards/back ................................... 273
Important safety notes .................... 91
Index17
Page 40 of 366
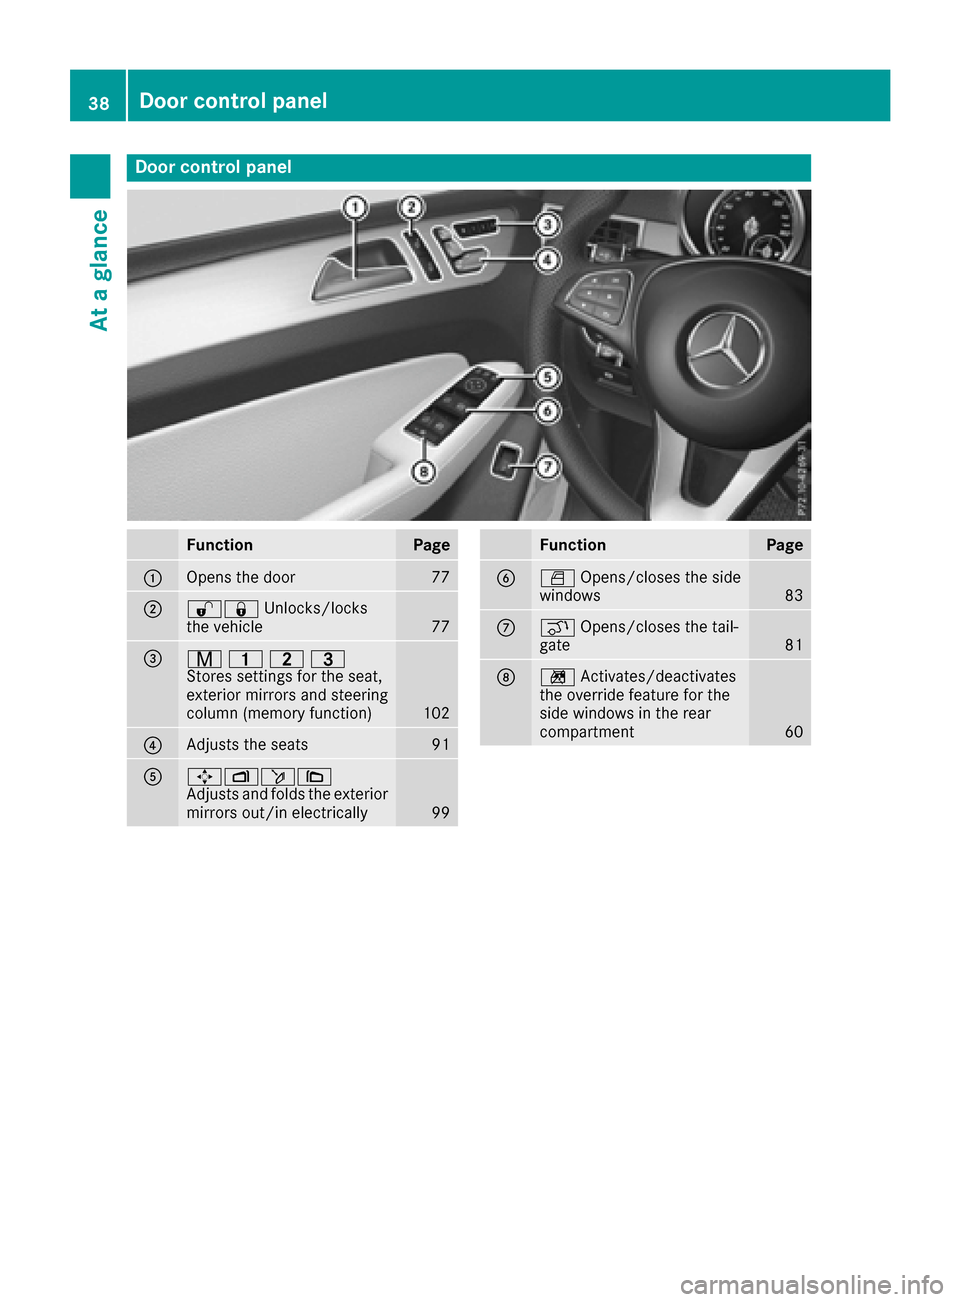
Door controlpanel
FunctionPage
:Opens th edoo r77
;%& Unlocks/lock s
th evehicle77
=r 45=
Stores settings for the seat,
exterior mirrors and steering
column (memory function)
102
?Adjusts the seats91
A7Zö\
Adjusts and folds the exterior
mirrors out/in electrically
99
FunctionPage
BW Opens/closes the side
windows83
Cq Opens/closes the tail-
gate81
Dn Activates/deactivates
the override feature for the
side windows in the rear
compartment
60
38Door control panel
At a glance
Page 59 of 366
If it is absolutely necessary to carry a child on
the front-passenger seat, be sure to observe the
information on the "Occupant Classification
System (OCS)" (
Ypage 46). There you will also
find information on deactivating the front-
passenger front air bag.
All child restraint systems must meet the fol-
lowing standards:
RU.S. Federal Motor Vehicle Safety Standards
213 and 225
RCanadian Motor Vehicle Safety Standards
213 and 210.2
Confirmation that the child restraint system cor-
responds to the standards can be found on an
instruction label on the child restraint system.
This confirmation can also be found in the instal-
lation instructions that are included with the
child restraint system.
Observe the warning labels in the vehicle inte-
rior and on the child restraint system.
LATCH-type (ISOFIX) child seat secur-
ing system
GWARNING
LATCH-type (ISOFIX) child restraint systems
do not offer sufficient protective effect for
children whose weight is greater than 48 lbs
(22 kg) who are secured using the safety belt integrated in the child restraint system. In the
event of an accident, a child might not be
restrained correctly. This poses an increased
risk of injury or even fatal injury.
If the child weighs more than 48 lbs (22 kg),
only use LATCH-type (ISOFIX) child restraint
systems with which the child is also secured
with the vehicle seat belt. Also secure the
child restraint system with the Top Tether
belt, if available.
Always comply with the manufacturer's instal-
lation and operating instructions for the child
restraint system used.
Before every trip, make sure that the LATCH-
type (ISOFIX) child restraint system is engaged
correctly in both LATCH-type (ISOFIX) securing
rings
!When installing the child restraint system,
make sure that the seat belt for the middle seat does not get trapped. The seat belt could
otherwise be damaged.
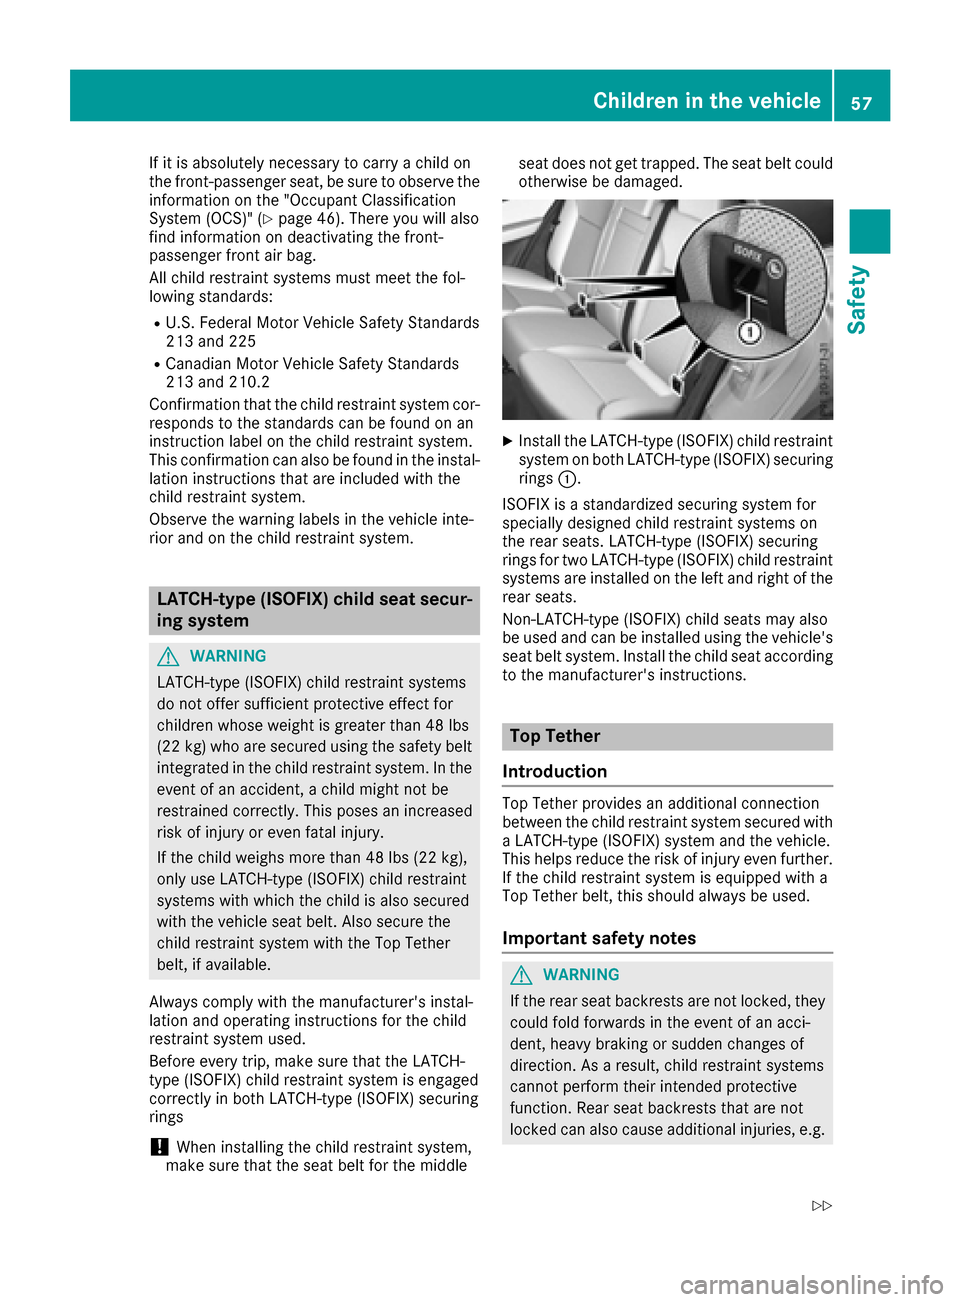
XInstall the LATCH-type (ISOFIX) child restraint
system on both LATCH-type (ISOFIX) securing
rings :.
ISOFIX is a standardized securing system for
specially designed child restraint systems on
the rear seats. LATCH-type (ISOFIX) securing
rings for two LATCH-type (ISOFIX) child restraint
systems are installed on the left and right of the
rear seats.
Non-LATCH-type (ISOFIX) child seats may also
be used and can be installed using the vehicle's
seat belt system. Install the child seat according
to the manufacturer's instructions.
Top Tether
Introduction
Top Tether provides an additional connection
between the child restraint system secured with
a LATCH-type (ISOFIX) system and the vehicle.
This helps reduce the risk of injury even further.
If the child restraint system is equipped with a
Top Tether belt, this should always be used.
Important safety notes
GWARNING
If the rear seat backrests are not locked, they
could fold forwards in the event of an acci-
dent, heavy braking or sudden changes of
direction. As a result, child restraint systems
cannot perform their intended protective
function. Rear seat backrests that are not
locked can also cause additional injuries, e.g.
Children in the vehicle57
Safety
Z
Page 94 of 366

GWARNING
You could lose control of your vehicle if you do the following while driving:
Radjust the driver's seat, head restraint,
steering wheel or mirrors
Rfasten the seat belt
There is a risk of an accident.
Adjust the driver's seat, head restraint, steer-
ing wheel and mirror and fasten your seat belt before starting the engine.
GWARNING
If you adjust the seat height carelessly, you or
other vehicle occupants could be trapped and
thereby injured. Children in particular could
accidentally press the electrical seat adjust-
ment buttons and become trapped. There is a
risk of injury.
While moving the seats, make sure that your
hands or other body parts do not get under the
lever assembly of the seat adjustment sys-
tem.
GWARNING
If the head restraints are not installed or not
adjusted correctly, they cannot provide pro-
tection as intended. There is an increased risk
of injury in the head and neck area, e.g. in the event of an accident or when braking.
Always drive with the head restraints instal-
led. Before driving off, make sure for every
vehicle occupant that the center of the head
restraint supports the back of the head at
about eye level.
GWARNING
The seat belt does not offer the intended level of protection if you have not moved the back-
rest to an almost vertical position. When brak-
ing or in the event of an accident, you could
slide underneath the seat belt and sustain
abdomen or neck injuries, for example. This
poses an increased risk of injury or even fatal injury.
Adjust the seat properly before beginning
your journey. Always ensure that the backrest
is in an almost vertical position and that the
shoulder section of your seat belt is routed
across the center of your shoulder.
!To avoid damage to the seats and the seat
heating, observe the following information:
Rkeep liquids from spilling on the seats. If
liquid is spilled on the seats, dry them as
soon as possible.
Rif the seat covers are damp or wet, do not
switch on the seat heating. The seat heat-
ing should also not be used to dry the seats.
Rclean the seat covers as recommended;
see "Interior care".
Rdo not transport heavy loads on the seats.
Do not place sharp objects on the seat
cushions, e.g. knives, nails or tools. The
seats should only be occupied by passen-
gers, if possible.
Rwhen the seat heating is in operation, do
not cover the seats with insulating materi-
als, e.g. blankets, coats, bags, seat covers,
child seats or booster seats.
!Make sure that there are no objects in the
footwell under or behind the seats when mov-
ing the seats back. There is a risk that the
seats and/or the objects could be damaged.
iThe head restraints cannot be removed from
the front and rear seats.
For more information, contact a qualified spe-
cialist workshop.
iFurther related subjects:
RCargo compartment enlargement (folding
down the rear bench seat) (Ypage 273)
92Seats
Seats, steering wheel and mirrors
Page 96 of 366
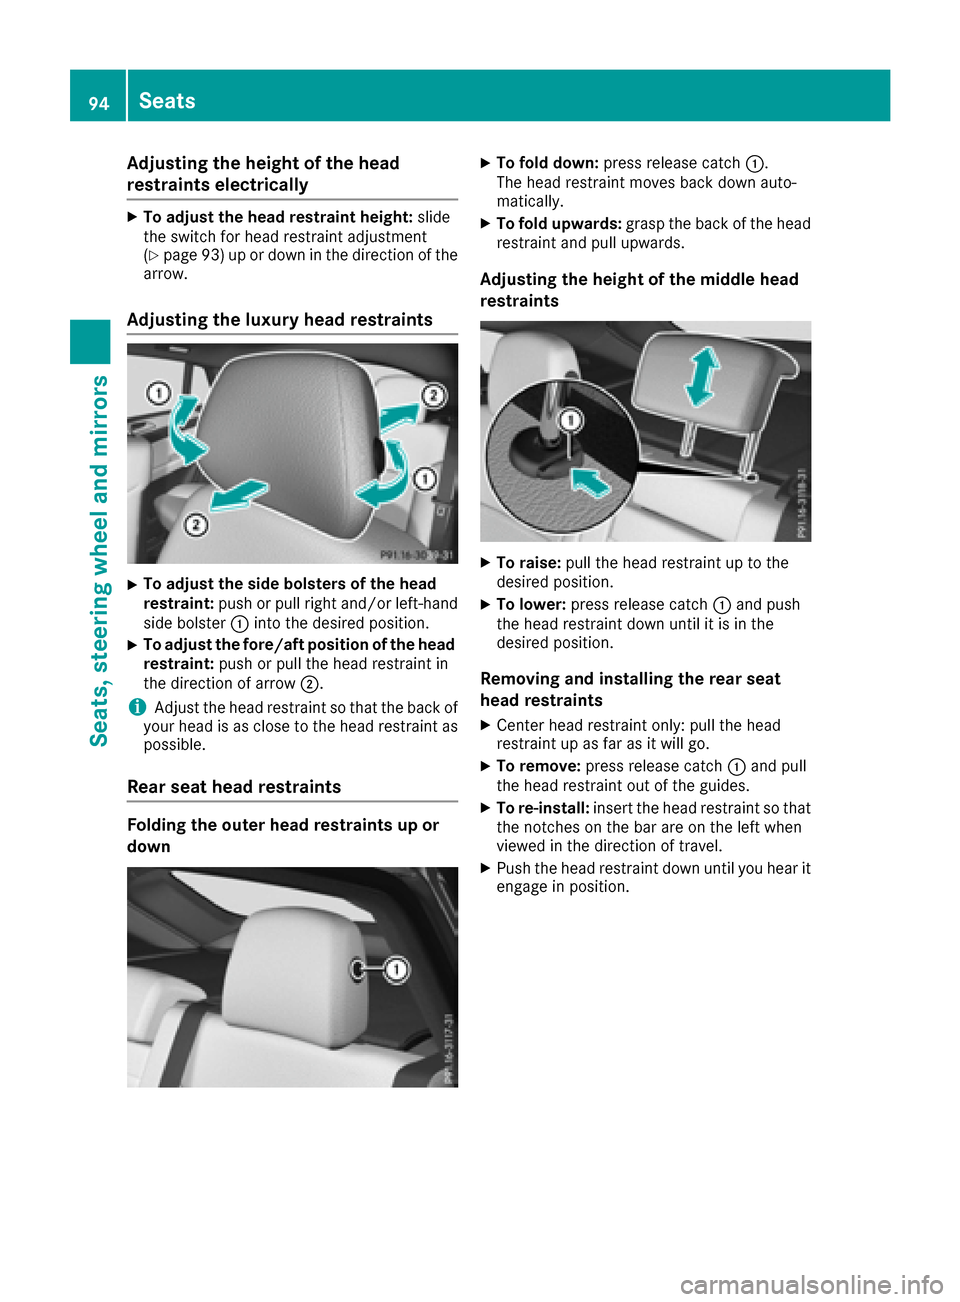
Adjusting the heightofthe head
restraints electri cally
XTo adjust thehea drestrain theight :slid e
th eswitch for head restrain tadjustmen t
(
Ypage 93 )up or down in the direction of the
arrow.
Adjusting the luxury head restraints
XTo adjust the side bolsters of the head
restraint: push or pull right and/or left-hand
side bolster :into the desired position.
XTo adjust the fore/aft position of the head
restraint: push or pull the head restraint in
the direction of arrow ;.
iAdjust the head restraint so that the back of
your head is as close to the head restraint as
possible.
Rear seat head restraints
Folding the outer head restraints up or
down
XTo fold down: press release catch :.
The head restraint moves back down auto-
matically.
XTo fold upwards: grasp the back of the head
restraint and pull upwards.
Adjusting the height of the middle head
restraints
XTo raise: pull the head restraint up to the
desired position.
XTo lower: press release catch :and push
the head restraint down until it is in the
desired position.
Removing and installing the rear seat
head restraints
XCenter head restraint only: pull the head
restraint up as far as it will go.
XTo remove: press release catch :and pull
the head restraint out of the guides.
XTo re-install: insert the head restraint so that
the notches on the bar are on the left when
viewed in the direction of travel.
XPush the head restraint down until you hear it engage in position.
94Seats
Seats, steering wheel and mirrors
Page 102 of 366
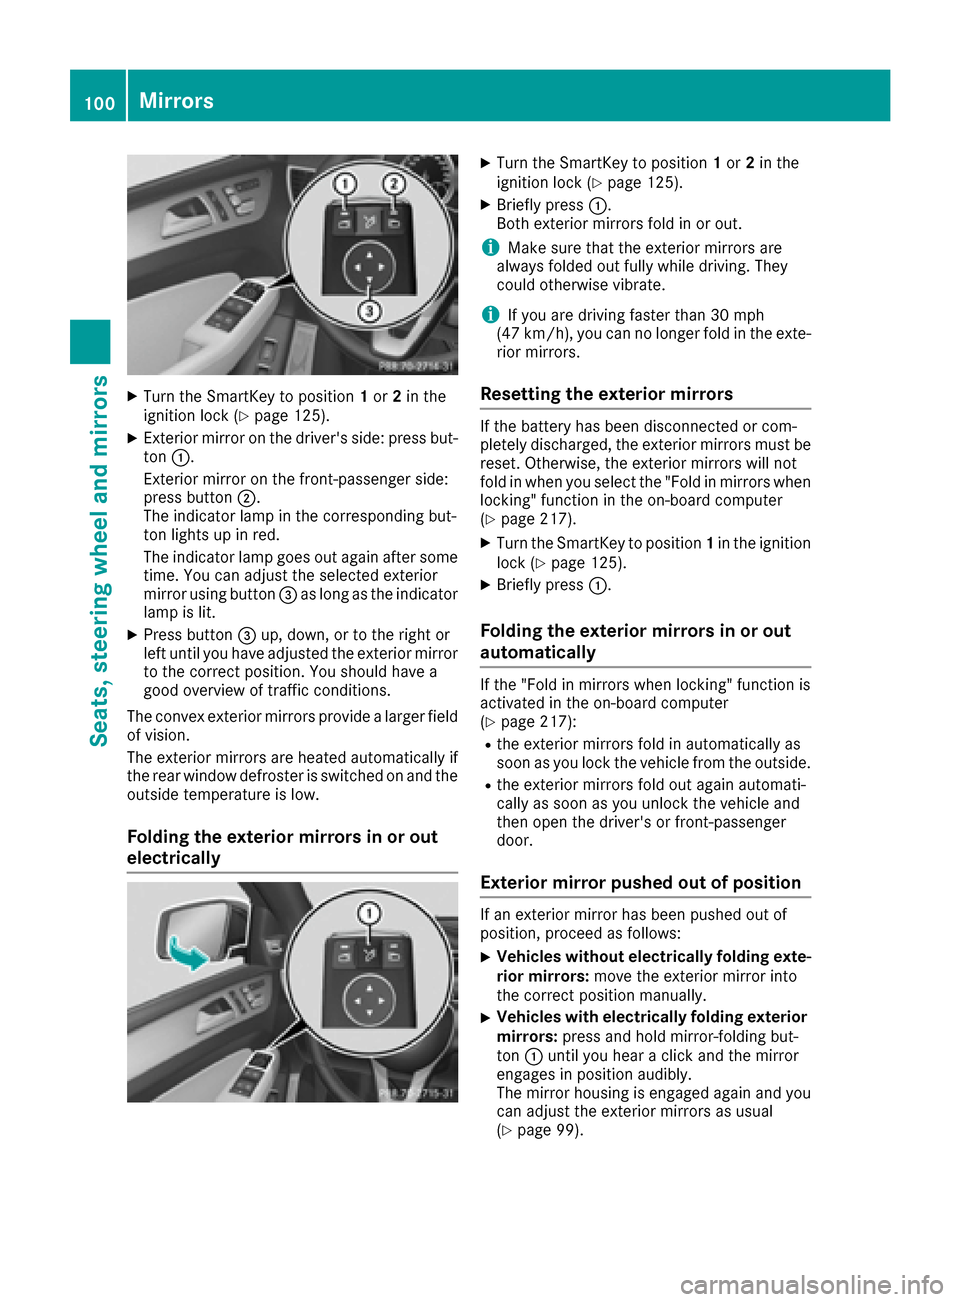
XTurn the SmartKey to position1or 2in the
ignition lock (Ypage 125).
XExterior mirror on the driver's side: press but-
ton :.
Exterior mirror on the front-passenger side:
press button ;.
The indicator lamp in the corresponding but-
ton lights up in red.
The indicator lamp goes out again after some
time. You can adjust the selected exterior
mirror using button =as long as the indicator
lamp is lit.
XPress button =up, down, or to the right or
left until you have adjusted the exterior mirror
to the correct position. You should have a
good overview of traffic conditions.
The convex exterior mirrors provide a larger field
of vision.
The exterior mirrors are heated automatically if
the rear window defroster is switched on and the
outside temperature is low.
Folding the exterior mirrors in or out
electrically
XTurn the SmartKey to position 1or 2in the
ignition lock (Ypage 125).
XBriefly press :.
Both exterior mirrors fold in or out.
iMake sure that the exterior mirrors are
always folded out fully while driving. They
could otherwise vibrate.
iIf you are driving faster than 30 mph
(47 km/h), you can no longer fold in the exte-
rior mirrors.
Resetting the exterior mirrors
If the battery has been disconnected or com-
pletely discharged, the exterior mirrors must be
reset. Otherwise, the exterior mirrors will not
fold in when you select the "Fold in mirrors when
locking" function in the on-board computer
(
Ypage 217).
XTurn the SmartKey to position 1in the ignition
lock (Ypage 125).
XBriefly press :.
Folding the exterior mirrors in or out
automatically
If the "Fold in mirrors when locking" function is
activated in the on-board computer
(
Ypage 217):
Rthe exterior mirrors fold in automatically as
soon as you lock the vehicle from the outside.
Rthe exterior mirrors fold out again automati-
cally as soon as you unlock the vehicle and
then open the driver's or front-passenger
door.
Exterior mirror pushed out of position
If an exterior mirror has been pushed out of
position, proceed as follows:
XVehicles without electrically folding exte-
rior mirrors: move the exterior mirror into
the correct position manually.
XVehicles with electrically folding exterior
mirrors: press and hold mirror-folding but-
ton :until you hear a click and the mirror
engages in position audibly.
The mirror housing is engaged again and you
can adjust the exterior mirrors as usual
(
Ypage 99).
100Mirrors
Seats, steering wheel and mirrors
Page 275 of 366
Depending on the equipment, the following
additional stowage areas are available in the
vehicle:
Rstowage net in front-passenger footwell
Rthe map pockets on the back of the driver's
and front-passenger seat
Rparcel nets on the right-hand side of the cargo
compartment
Rfolding coat hooks next to the grab handles inthe rear
Observe the loading guidelines (
Ypage 270)
and the safety notes regarding stowage spaces
(
Ypage 270).
Through-loading facility in the rear
If objects or loads are not secured when being
transported in the through-loading facility, they
could slip or be thrown around and thereby hit
vehicle occupants.
Observe the loading guidelines (
Ypage 270)
and the safety notes regarding stowage spaces
(
Ypage 270).
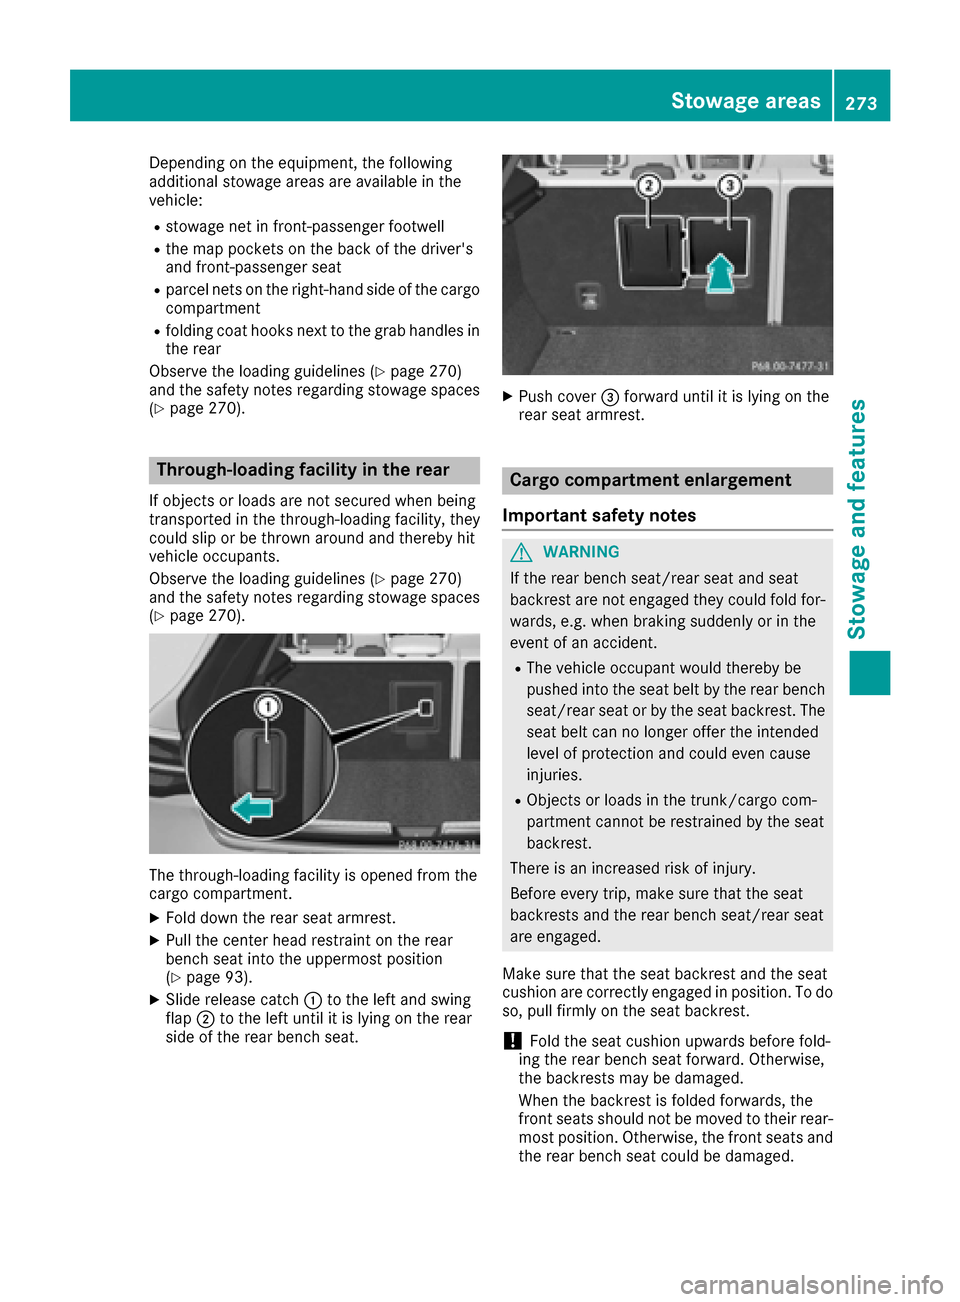
The through-loading facility is opened from the
cargo compartment.
XFold down the rear seat armrest.
XPull the center head restraint on the rear
bench seat into the uppermost position
(
Ypage 93).
XSlide release catch :to the left and swing
flap ;to the left until it is lying on the rear
side of the rear bench seat.
XPush cover =forward until it is lying on the
rear seat armrest.
Cargo compartment enlargement
Important safety notes
GWARNING
If the rear bench seat/rear seat and seat
backrest are not engaged they could fold for-
wards, e.g. when braking suddenly or in the
event of an accident.
RThe vehicle occupant would thereby be
pushed into the seat belt by the rear bench
seat/rear seat or by the seat backrest. The
seat belt can no longer offer the intended
level of protection and could even cause
injuries.
RObjects or loads in the trunk/cargo com-
partment cannot be restrained by the seat
backrest.
There is an increased risk of injury.
Before every trip, make sure that the seat
backrests and the rear bench seat/rear seat
are engaged.
Make sure that the seat backrest and the seat
cushion are correctly engaged in position. To do
so, pull firmly on the seat backrest.
!Fold the seat cushion upwards before fold-
ing the rear bench seat forward. Otherwise,
the backrests may be damaged.
When the backrest is folded forwards, the
front seats should not be moved to their rear-
most position. Otherwise, the front seats and
the rear bench seat could be damaged.
Stowag earea s273
Stowag ean d features
Z