2017 MERCEDES-BENZ GLE43AMG SUV trailer
[x] Cancel search: trailerPage 242 of 366
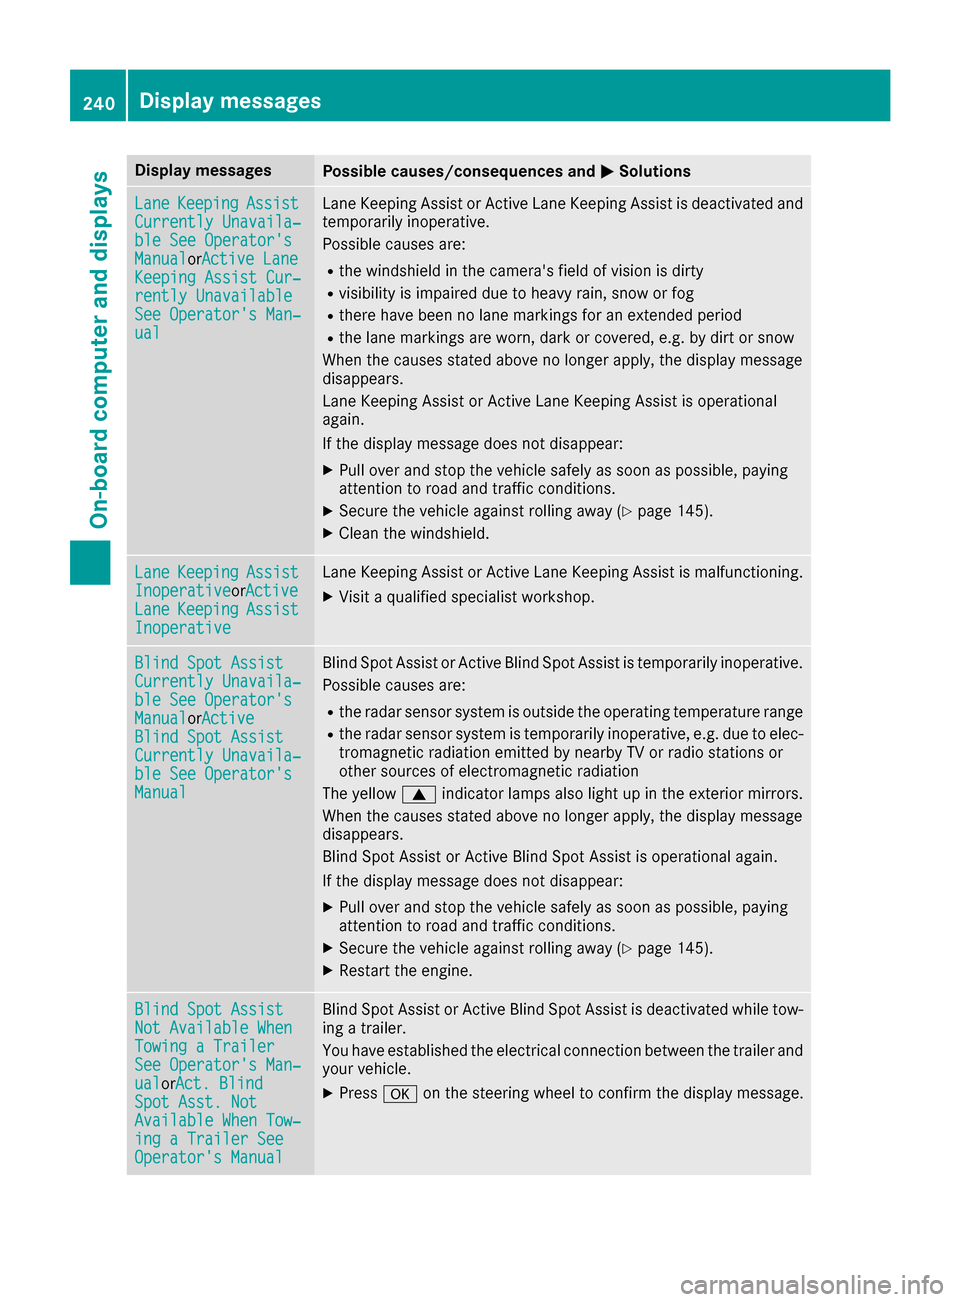
Display messagesPossible causes/consequences andMSolutions
LaneKeepin gAssistCurrently Unavaila‐ble See Operator' sManualorActive Lan eKeepingAssist Cur ‐rently UnavailableSee Operator' sMan ‐ual
LaneKeepin gAssis tor Active Lan eKeepin gAssis tis deactivated and
temporarily inoperative.
Possibl ecauses are:
Rth ewindshield in th ecamera' sfield of vision is dirty
Rvisibilit yis impaire ddue to heav yrain ,snow or fog
Rthere hav ebeen no lan emarking sfor an extended period
Rth elan emarking sare worn, dark or covered, e.g. by dir tor snow
Whe nth ecauses state dabov eno longer apply, th edisplay message
disappears.
Lan eKeepin gAssis tor Active Lan eKeepin gAssis tis operational
again .
If th edisplay message does no tdisappear :
XPull overand stop th evehicl esafely as soo nas possible, payin g
attention to roa dand traffic conditions.
XSecur eth evehicl eagainst rollin gaway (Ypage 145).
XClean th ewindshield.
Lan eKeepin gAssistInoperativeorActiveLan eKeepin gAssistInoperative
LaneKeepin gAssis tor Active Lan eKeepin gAssis tis malfunctioning .
XVisitaqualified specialist workshop .
Blind SpotAssistCurrently Unavaila‐ble See Operator' sManualorActiveBlind Spo tAssistCurrently Unavaila‐ble See Operator' sManual
Blind Spot Assistor Active Blind Spot Assis tis temporarily inoperative.
Possibl ecauses are:
Rth eradar sensor system is outside th eoperating temperature range
Rth eradar sensor system is temporarily inoperative, e.g. due to elec -
tromagneti cradiation emitted by nearby TV or radi ostation sor
other source sof electromagneti cradiation
The yellow 9indicator lamp salso ligh tup in th eexterio rmirrors.
Whe nth ecauses state dabov eno longer apply, th edisplay message
disappears.
Blind Spot Assis tor Active Blind Spot Assis tis operational again .
If th edisplay message does no tdisappear :
XPull overand stop th evehicl esafely as soo nas possible, payin g
attention to roa dand traffic conditions.
XSecur eth evehicl eagainst rollin gaway (Ypage 145).
XRestart th eengine.
Blind Spo tAssistNot Available Whe nTowingaTraile rSee Operator' sMan ‐ualorAct. BlindSpo tAsst. NotAvailable Whe nTow ‐ing aTraile rSeeOperator' sManual
Blind Spot Assis tor Active Blind Spot Assis tis deactivated while tow-
ing atrailer .
You hav eestablished th eelectrical connection between th etrailer and
your vehicle.
XPress aon thesteering whee lto confirm th edisplay message .
240Display messages
On-board computer and displays
Page 259 of 366
Warning/
indicator
lampNSignal type
Possible causes/consequences and M
Solutions
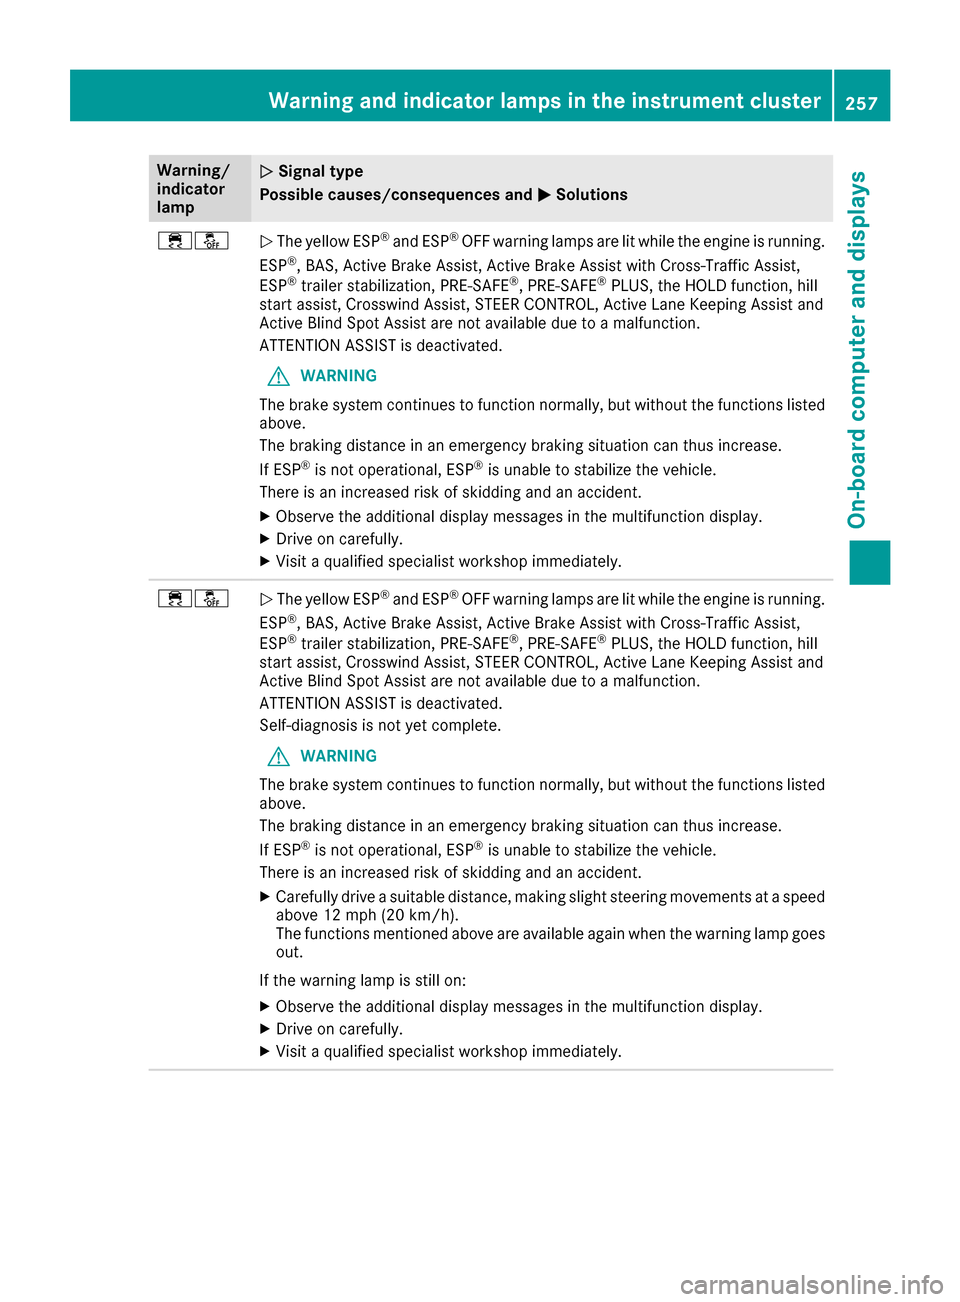
÷åNThe yellow ESP®and ESP®OFF warning lamps are lit while the engine is running.
ESP®, BAS, Active Brake Assist, Active Brake Assist with Cross-Traffic Assist,
ESP®trailer stabilization, PRE‑SAFE®, PRE‑SAFE®PLUS, the HOLD function, hill
start assist, Crosswind Assist, STEER CONTROL, Active Lane Keeping Assist and
Active Blind Spot Assist are not available due to a malfunction.
ATTENTION ASSIST is deactivated.
GWARNING
The brake system continues to function normally, but without the functions listed
above.
The braking distance in an emergency braking situation can thus increase.
If ESP
®is not operational, ESP®is unable to stabilize the vehicle.
There is an increased risk of skidding and an accident.
XObserve the additional display messages in the multifunction display.
XDrive on carefully.
XVisit a qualified specialist workshop immediately.
÷åN The yellow ESP®and ESP®OFF warning lamps are lit while the engine is running.
ESP®, BAS, Active Brake Assist, Active Brake Assist with Cross-Traffic Assist,
ESP®trailer stabilization, PRE‑SAFE®, PRE‑SAFE®PLUS, the HOLD function, hill
start assist, Crosswind Assist, STEER CONTROL, Active Lane Keeping Assist and
Active Blind Spot Assist are not available due to a malfunction.
ATTENTION ASSIST is deactivated.
Self-diagnosis is not yet complete.
GWARNING
The brake system continues to function normally, but without the functions listed
above.
The braking distance in an emergency braking situation can thus increase.
If ESP
®is not operational, ESP®is unable to stabilize the vehicle.
There is an increased risk of skidding and an accident.
XCarefully drive a suitable distance, making slight steering movements at a speed
above 12 mph (20 km/h).
The functions mentioned above are available again when the warning lamp goes
out.
If the warning lamp is still on:
XObserve the additional display messages in the multifunction display.
XDrive on carefully.
XVisit a qualified specialist workshop immediately.
Warning and indicator lamps in the instrument cluster257
On-board computer and displays
Z
Page 306 of 366
Cleaning the trailer tow hitch
HEnvironmental note
Dispose of rags soaked in oil and grease in an
environmentally responsible manner.
!Do not clean the ball coupling with a power
washer. Do not use solvents.
!Please note the care instructions in the
trailer coupling manufacturer's operating
instructions.
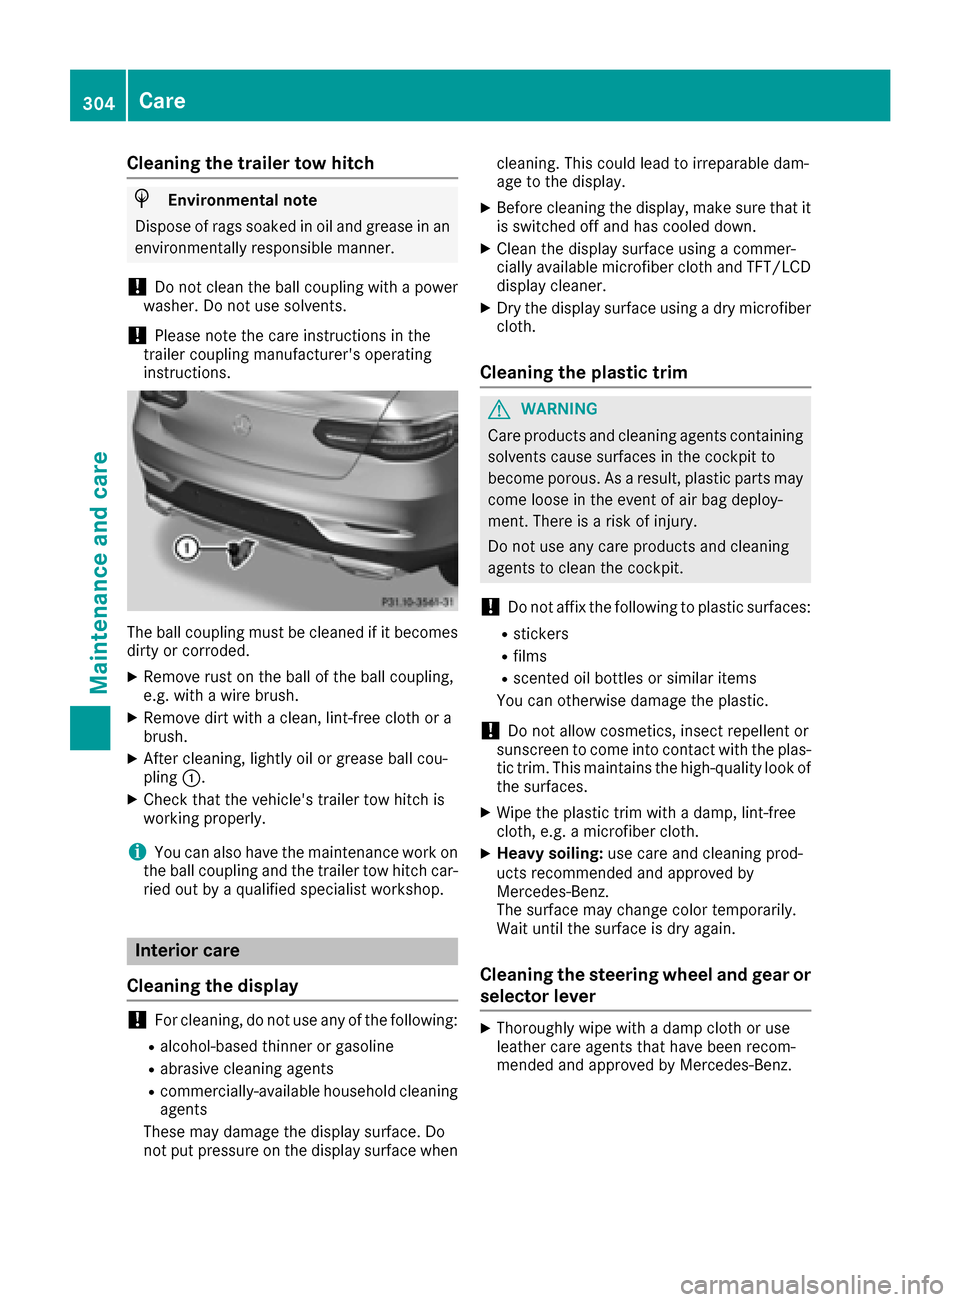
The ball coupling must be cleaned if it becomes
dirty or corroded.
XRemove rust on the ball of the ball coupling,
e.g. with a wire brush.
XRemove dirt with a clean, lint-free cloth or a
brush.
XAfter cleaning, lightly oil or grease ball cou-
pling :.
XCheck that the vehicle's trailer tow hitch is
working properly.
iYou can also have the maintenance work on
the ball coupling and the trailer tow hitch car-
ried out by a qualified specialist workshop.
Interior care
Cleaning the display
!For cleaning, do not use any of the following:
Ralcohol-based thinner or gasoline
Rabrasive cleaning agents
Rcommercially-available household cleaning
agents
These may damage the display surface. Do
not put pressure on the display surface when cleaning. This could lead to irreparable dam-
age to the display.
XBefore cleaning the display, make sure that it
is switched off and has cooled down.
XClean the display surface using a commer-
cially available microfiber cloth and TFT/LCD
display cleaner.
XDry the display surface using a dry microfiber
cloth.
Cleaning the plastic trim
GWARNING
Care products and cleaning agents containing solvents cause surfaces in the cockpit to
become porous. As a result, plastic parts may
come loose in the event of air bag deploy-
ment. There is a risk of injury.
Do not use any care products and cleaning
agents to clean the cockpit.
!Do not affix the following to plastic surfaces:
Rstickers
Rfilms
Rscented oil bottles or similar items
You can otherwise damage the plastic.
!Do not allow cosmetics, insect repellent or
sunscreen to come into contact with the plas-
tic trim. This maintains the high-quality look of
the surfaces.
XWipe the plastic trim with a damp, lint-free
cloth, e.g. a microfiber cloth.
XHeavy soiling: use care and cleaning prod-
ucts recommended and approved by
Mercedes-Benz.
The surface may change color temporarily.
Wait until the surface is dry again.
Cleaning the steering wheel and gear or
selector lever
XThoroughly wipe with a damp cloth or use
leather care agents that have been recom-
mended and approved by Mercedes-Benz.
304Care
Maintenance and care
Page 318 of 366
iJumper cables and further information regarding jump-starting can be obtained at any qualified
specialist workshop.
Towing and tow-starting
Important safety notes
GWARNING
Functions relevant to safety are restricted or
no longer available if:
Rthe engine is not running.
Rthe brake system or the power steering is
malfunctioning.
Rthere is a malfunction in the voltage supply or the vehicle's electrical system.
If your vehicle is being towed, much more
force may be necessary to steer or brake.
There is a risk of an accident.
In such cases, use a tow bar. Before towing,
make sure that the steering moves freely.
GWARNING
When towing or tow-starting another vehicle
and its weight is greater than the permissible
gross weight of your vehicle, the:
Rthe towing eye could detach itself
Rthe vehicle/trailer combination could roll-
over.
There is a risk of an accident.
When towing or tow-starting another vehicle,
its weight should not be greater than the per- missible gross weight of your vehicle.
Details on the permissible gross vehicle weight
of your vehicle can be found on the vehicle iden-
tification plate (
Ypage 351).
!When Active Brake Assist, Distance Pilot
DISTRONIC or the HOLD function is activated,
the vehicle brakes automatically in certain
situations.
To avoid damage to the vehicle, deactivate
these systems in the following or similar sit-
uations:
Rwhen towing the vehicle
Rin the car wash
!Make sure that the electric parking brake is
released. If the electric parking brake is faulty,
visit a qualified specialist workshop.
!Only secure the tow rope or tow bar at the
towing eyes, or the trailer tow hitch, if availa-
ble. You could otherwise damage the vehicle.
!Observe the following points when towing
with a tow rope:
RSecure the tow rope on the same side on
both vehicles.
REnsure that the tow cable is not longer than legally permitted. Mark the tow cable in the
middle, e.g. with a white c
loth
(30x30 cm).
This will make other road users aware that
the vehicle is being towed.
ROnly secure the tow cable to the towing
eye.
RObserve the brake lamps of the towing
vehicle while driving. Always maintain a dis-
tance so that the tow rope does not sag.
RDo not use steel cables or chains to tow
your vehicle. You could otherwise damage
the vehicle.
!Do not use the trailer tow hitch for recovery
or towing. Do not use the towing eye for
recovery. this could damage the vehicle. If in
doubt, have the vehicle recovered using a
crane.
!When towing, pull away slowly and
smoothly. Pull the towed vehicle as straight as
possible and not at an acute angle. Excessive
tractive power could damage the vehicles.
When towing, it is preferable to use a rigid tow- ing bar as opposed to a tow rope. A rigid towing
bar helps to keep the tractive power low.
!When towing vehicles with KEYLESS-GO,
use the key instead of the Start/Stop button.
Otherwise, the automatic transmission may
shift to position Pwhen the driver's or front-
passenger door are opened, which could lead
to damage to the transmission.
!Do not tow with sling-type equipment. This
could damage the vehicle.
!Vehicles with differential locks: make sure
the differential locks are in automatic mode.
316Towing and tow-starting
Breakdown assistance
Page 319 of 366

When towing, the differential locks must not
be switched on. The transmission may other-
wise be damaged.
!The vehicle can be towed a maximum of
30 miles (50km). The towing speed of 30 mph (50 km/h) must not be exceeded.
If the vehicle has to be towed more than
30 miles (50km), the entire vehicle must be
raised and transported.
It is better to have the vehicle transported than
to have it towed away.
If the vehicle has suffered transmission damage,
have it transported on a transporter or trailer.
The automatic transmission must be in position N when the vehicle is being towed.
The battery must be connected and charged.
Otherwise, you:
Rcannot turn the SmartKey to position 2in the
ignition lock
Rcannot release the electric parking brake
Rcannot shift the automatic transmission to
position N
Disarm the automatic locking feature before the
vehicle is towed (
Ypage 216). You could other-
wise be locked out when pushing or towing the
vehicle.
Installing/removing the towing eye
Installing the towing eye
The brackets for the screw-in towing eye are
located in the bumpers. They are at the front and
rear behind covers :;.
XRemove the towing eye from the vehicle tool
kit (Ypage 306).
XPress the mark on cover :or; inwards in
the direction of the arrow.
XTake cover :or; off the opening.
XScrew in the towing eye clockwise as far as it
will go and tighten it.
Removing the towing eye
XUnscrew and remove the towing eye.
XFront cover: position left-hand side of
cover :in the bumper and press it in on the
right-hand side until it engages.
XRear cover: position top of cover ;in the
bumper and press it in at the bottom until it
engages.
XPlace the towing eye in the vehicle tool kit.
Towing a vehicle with both axles on
the ground
The automatic transmission automatically shifts
to position Pwhen you open the driver's or front-
passenger door or when you remove the Smart-
Key from the ignition lock.
In order to ensure that the automatic transmis-
sion stays in position Nwhen towing the vehicle,
you must observe the following points:
XMake sure that the vehicle is stationary.
XTurn the SmartKey to position 2in the ignition
lock.
XDepress and hold the brake pedal.
XShift the automatic transmission to position
N .
XLeave the SmartKey in position 2in the igni-
tion lock.
XRelease the brake pedal.
XRelease the electric parking brake.
XSwitch on the hazard warning lamps
(Ypage 106).
In order to signal a change of direction when
towing the vehicle with the hazard warning
lamps switched on, use the combination switch
as usual. In this case, only the indicator lamps
for the direction of travel flash. After resetting
Towing and tow-starting317
Breakdown assistance
Z
Page 320 of 366
the combination switch, the hazard warning
lamp starts flashing again.
Transporting the vehicle
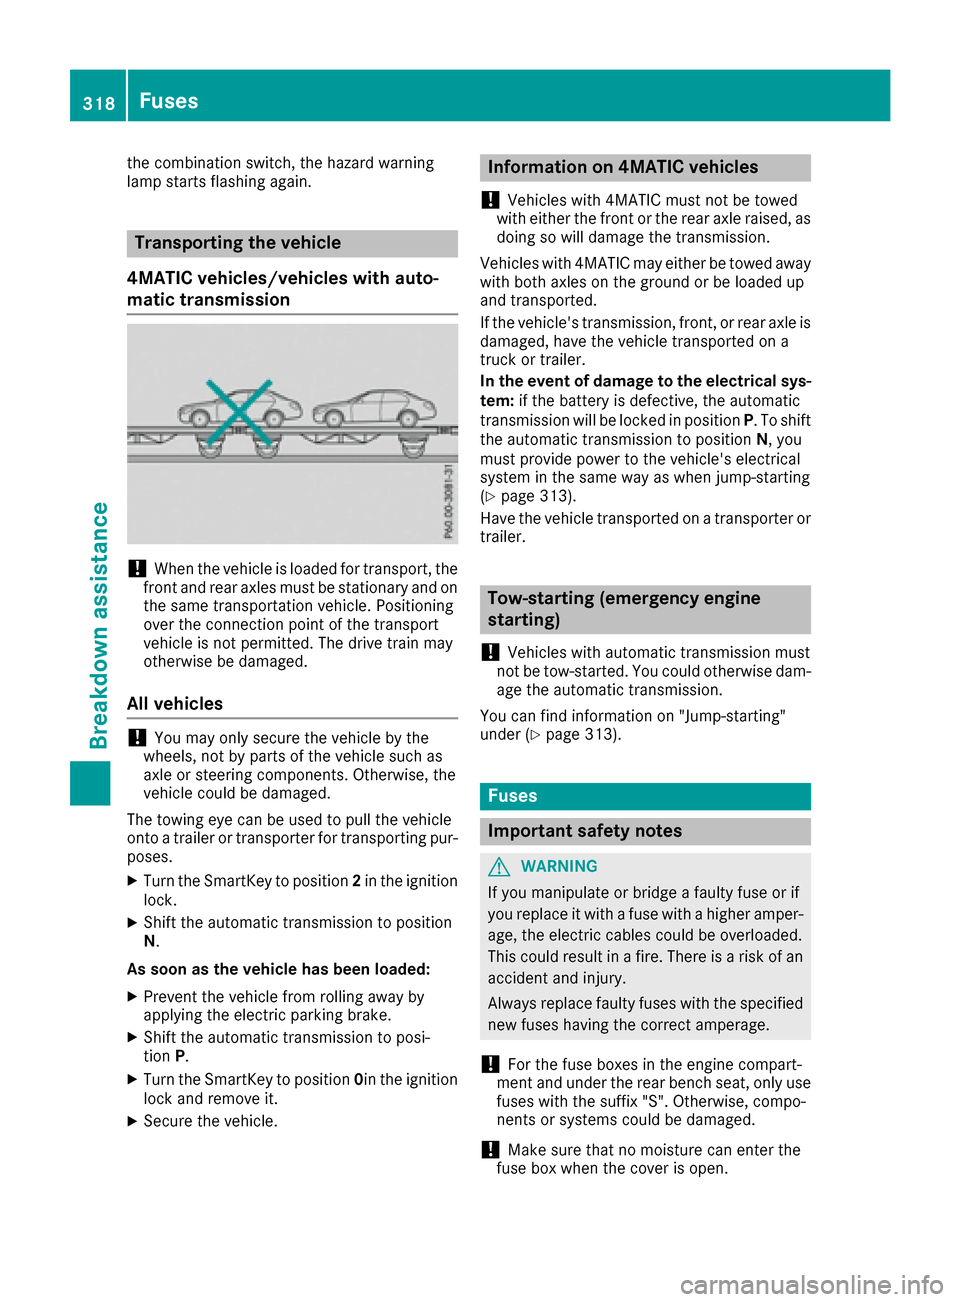
4MATIC vehicles/vehicles with auto-
matic transmission
!When the vehicle is loaded for transport, the
front and rear axles must be stationary and on
the same transportation vehicle. Positioning
over the connection point of the transport
vehicle is not permitted. The drive train may
otherwise be damaged.
All vehicles
!You may only secure the vehicle by the
wheels, not by parts of the vehicle such as
axle or steering components. Otherwise, the
vehicle could be damaged.
The towing eye can be used to pull the vehicle
onto a trailer or transporter for transporting pur-
poses.
XTurn the SmartKey to position 2in the ignition
lock.
XShift the automatic transmission to position
N.
As soon as the vehicle has been loaded:
XPrevent the vehicle from rolling away by
applying the electric parking brake.
XShift the automatic transmission to posi-
tion P.
XTurn the SmartKey to position 0in the ignition
lock and remove it.
XSecure the vehicle.
Information on 4MATIC vehicles
!
Vehicles with 4MATIC must not be towed
with either the front or the rear axle raised, as
doing so will damage the transmission.
Vehicles with 4MATIC may either be towed away with both axles on the ground or be loaded up
and transported.
If the vehicle's transmission, front, or rear axle is
damaged, have the vehicle transported on a
truck or trailer.
In the event of damage to the electrical sys-
tem: if the battery is defective, the automatic
transmission will be locked in position P. To shift
the automatic transmission to position N, you
must provide power to the vehicle's electrical
system in the same way as when jump-starting
(
Ypage 313).
Have the vehicle transported on a transporter or
trailer.
Tow-starting (emergency engine
starting)
!
Vehicles with automatic transmission must
not be tow-started. You could otherwise dam-
age the automatic transmission.
You can find information on "Jump-starting"
under (
Ypage 313).
Fuses
Important safety notes
GWARNING
If you manipulate or bridge a faulty fuse or if
you replace it with a fuse with a higher amper- age, the electric cables could be overloaded.
This could result in a fire. There is a risk of an
accident and injury.
Always replace faulty fuses with the specified
new fuses having the correct amperage.
!For the fuse boxes in the engine compart-
ment and under the rear bench seat, only use
fuses with the suffix "S". Otherwise, compo-
nents or systems could be damaged.
!Make sure that no moisture can enter the
fuse box when the cover is open.
318Fuses
Breakdown assistance
Page 326 of 366

To avoid hazardous situations:
Rnever install snow chains to the front
wheels
Ralways install snow chains in pairs to the
rear wheels.
!You must drive at raised vehicle level (height
1) if snow chains have been installed. The
vehicle may otherwise be damaged.
!Vehicles with ADS (Adaptive Damping
System): do not use the sport mode when
driving with snow chains mounted. The vehi-
cle may otherwise be damaged.
For safety reasons, Mercedes-Benz recom-
mends that you only use snow chains that have
been specially approved for your vehicle by
Mercedes-Benz, or are of a corresponding
standard of quality. For more information,
please contact a qualified specialist workshop.
Install the snow chains on all driven wheels for
maximum tractive power and driving stability. If
you own snow chains for two driven wheels only,
install the snow chains to the wheels on the rear
axle. The vehicle then remains more stable
under braking.
If you intend to mount snow chains, please bear
the following points in mind:
RSnow chains may not be mounted on all
wheel/tire combinations. Permissible
wheel/tire combinations (
Ypage 345).
ROnly use snow chains when driving on roads
completely covered by snow. Remove the
snow chains as soon as possible when you
come to a road that is not snow-covered.
RLocal regulations may restrict the use of snow chains. Observe the appropriate regulations if
you wish to mount snow chains.
RDo not exceed the maximum permissible
speed of 30 mph (50 km/h).
RNever use Parking Pilot when snow chains are
installed (Ypage 177).
You may wish to deactivate ESP®when pulling
away with snow chains installed (Ypage 65).
You can thereby allow the wheels to spin in a
controlled manner, achieving an increased driv-
ing force (cutting action).
Information about driving with an emergency
spare wheel (
Ypage 346).
Tire pressure
Tire pressure specifications
Important safety notes
GWARNING
Underinflated or overinflated tires pose the
following risks:
Rthe tires may burst, especially as the load
and vehicle speed increase.
Rthe tires may wear excessively and/or
unevenly, which may greatly impair tire
traction.
Rthe driving characteristics, as well as steer-
ing and braking, may be greatly impaired.
There is a risk of an accident.
Follow recommended tire inflation pressures
and check the pressure of all the tires includ-
ing the spare wheel:
Rmonthly, at least
Rif the load changes
Rbefore beginning a long journey
Runder different operating conditions, e.g.
off-road driving
If necessary, correct the tire pressure.
The data on the Tire and Loading Information
placard and tire pressure table shown here are
examples. Tire pressure specifications are vehi-
cle-specific and may deviate from the data
shown here. The tire pressure specifications
that are valid for your vehicle can be found on
the Tire and Loading Information placard and
tire pressure table on the vehicle.
General notes
The recommended tire pressures for the tires
mounted at the factory can be found on the
labels described here.
Operation with emergency spare wheel:
Information on operation with the emergency
spare wheel can be found under "Emergency
spare wheel" (
Ypage 346).
Operation with a trailer: the applicable value
for the rear axle is the maximum tire pressure
value stated in the table inside the fuel filler flap.
324Tire pressure
Wheels and tires
Page 335 of 366
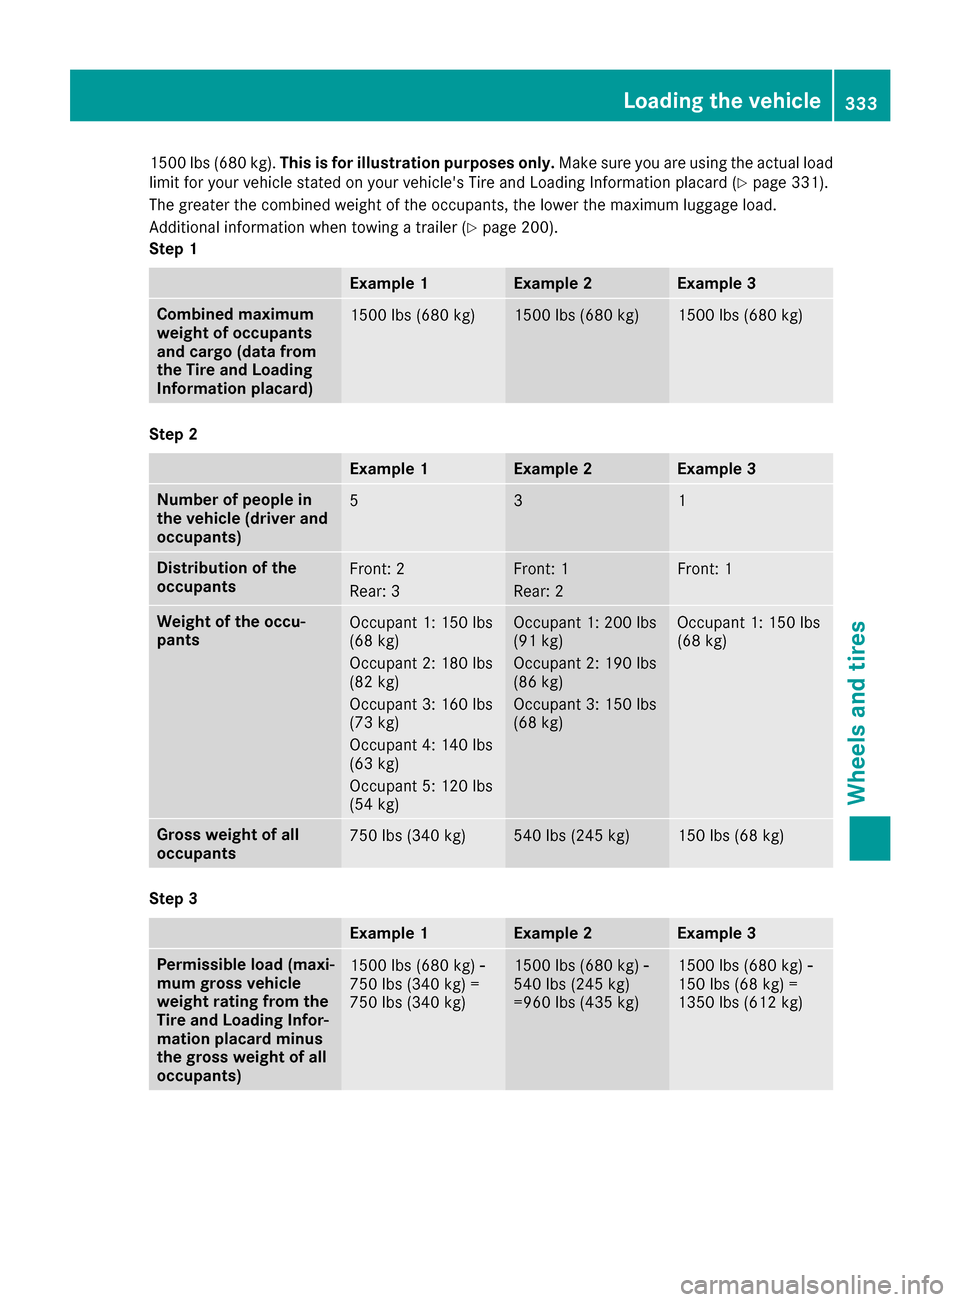
1500 lbs (680 kg).This is for illustration purposes only. Make sure you are using the actual load
limit for your vehicle stated on your vehicle's Tire and Loading Information placard (Ypage 331).
The greater the combined weight of the occupants, the lower the maximum luggage load.
Additional information when towing a trailer (
Ypage 200).
Step 1
Example 1Example 2Example 3
Combined maximum
weight of occupants
and cargo (data from
the Tire and Loading
Information placard)1500 lbs (680 kg)1500 lbs (680 kg)1500 lbs (680 kg)
Step 2
Example 1Example 2Example 3
Number of people in
the vehicle (driver and
occupants)531
Distribution of the
occupantsFront: 2
Rear: 3Front: 1
Rear: 2Front: 1
Weight of the occu-
pantsOccupant 1: 150 lbs
(68 kg)
Occupant 2: 180 lbs
(82 kg)
Occupant 3: 160 lbs
(73 kg)
Occupant 4: 140 lbs
(63 kg)
Occupant 5: 120 lbs
(54 kg)Occupant 1: 200 lbs
(91 kg)
Occupant 2: 190 lbs
(86 kg)
Occupant 3: 150 lbs
(68 kg)Occupant 1: 150 lbs
(68 kg)
Gross weight of all
occupants750 lbs (340 kg)540 lbs (245 kg)150 lbs (68 kg)
Step 3
Example 1Example 2Example 3
Permissible load (maxi-
mum gross vehicle
weight rating from the
Tire and Loading Infor-
mation placard minus
the gross weight of all
occupants)1500 lbs (680 kg) Ò
750 lbs (340 kg) =
750 lbs (340 kg)1500 lbs (680 kg) Ò
540 lbs (245 kg)
=960 lbs (435 kg)1500 lbs (680 kg) Ò
150 lbs (68 kg) =
1350 lbs (612 kg)
Loading the vehicle333
Wheels and tires
Z