2017 MERCEDES-BENZ GLE key battery
[x] Cancel search: key batteryPage 8 of 390

AUX ja cks
CD/DVD driv e .............................. .2 87
Axle load, permissible (trailer tow-
ing) ...................................................... 384
BBack button ....................................... 282
Bag hook ............................................ 293
Ball coupling
Installing ........................................ 217
Removing ....................................... 221
BAS (Brake Assist System) ................. 63
Battery (SmartKey)
Checking .......................................... 77
Important safety notes .................... 77
Replacing ......................................... 77
Battery (vehicle)
Charging ........................................ 333
Display message ............................ 252
Important safety notes .................. 331
Jump starting ................................. 333
Overview ........................................ 331
Belt
see Seat belts
Blind Spot Assist
Activating/deactivating ................. 232
Display message ............................ 259
Notes/function .............................. 201
Trailer towing ................................. 203
see Active Blind Spot Assist
Blootooth ®
Connecting a different mobile
phone ............................................ 286
BlueTEC
Adding DEF ................................... .1 50
BlueTEC (DEF) ................................... .3 76
Bluetooth ®
Searching for a mobile phone ....... .2 85
see also Digital Operator's Man-
ual ................................................. .2 81
Telephony ...................................... 284
Brake Assist
see BAS (Brake Assist System)
Brake fluid
Display message ............................ 244
Notes ............................................. 378 Brake force distribution
see EBD (electronic brake force
distribution)
Brake lamps
Display message ............................ 250
Brakes
ABS ................................................. .6 3
Adaptive Brake Assist ...................... 65
BAS .................................................. 63
Brake fluid (notes) ......................... 378
Display message ............................ 239
High-performance brake system .... 160
Hill start assist ............................... 136
Important safety notes .................. 158
Maintenance .................................. 159
Parking bra ke ................................ 154
R i ding tips ...................................... 158
Warning lamp ................................. 270
Breakdown
Where will I find...? ........................ 326
see Flat tire
see Towing away
Brightness control (instrument
cluster lighting) ................................... 34
Bulbs
see Replacing bulbs
C
California
Important notice for retail cus-
tomers and lessees .......................... 26
Calling up a malfunction
see Display messages
Car
see Vehicle
Care
360° camera ................................. 323
Car wash ........................................ 319
Carpets .......................................... 325
Display ........................................... 324
Exhaust pipe .................................. 323
Exterior lights ................................ 322
Gear or selector lever .................... 324
Interior ........................................... 324
Matte finish ................................... 321
Notes ............................................. 319
Paint .............................................. 3216
Index
Page 21 of 390

Warning lamp (function) .................. .4 5
Seats
Adjusting (electrically) ..................... 96
Adjusting the 4-way lumbar sup-
port .................................................. 98
Adjusting the head restraint ............ 96
Calling up a stored setting (mem-
ory function) ................................. .1 06
Cleaning the cover ......................... 325
Correct driver's seat position ........... 94
Folding the rear bench seat for-
wards/back ................................... 291
Important safety notes .................... 94
Overview .......................................... 94
Seat heating problem .................... 100
Seat ventilation problem ................ 100
Storing settings (memory func-
tion) ............................................... 105
Switching seat heating on/off ......... 98
Switching seat ventilation on/off .... 99
Section
Sliding sunroof ................................. 89
Securing hooks .................................. 293
Selector lever
Cleaning ......................................... 324
Sensors (cleaning instructions) ....... 323
Service message
see ASSYST PLUS
Service products
Brake fluid ..................................... 378
Coolant (engine) ............................ 378
DEF special additives ..................... 376
Engine oil ....................................... 377
Fuel ................................................ 374
Important safety notes .................. 373
Refrigerant (air-conditioning sys-
tem) ............................................... 379
Washer fluid ................................... 379
Setting the air distribution .............. .1 26
Setting the airflow ............................ 126
Setting the date/time format
see also Digital Operator's Man-
ual ................................................. .2 81
Setting the language
see also Digital Operator's Man-
ual ................................................. .2 81 Settin g the time
see a l
so Digital Operator's Man-
ual ................................................. .2 81
Settings
Factory (on-board computer) ......... 235
On-board computer ....................... 232
SETUP (on-board computer) ............. 235
Side impact air bag ............................ .4 8
Side marker lamp (display mes-
sage) ................................................... 250
Side windows
Cleaning ......................................... 322
Convenience closing feature ............ 87
Convenience opening feature ......... .8 6
Important safety information ........... 85
Opening/closing .............................. 86
Overview .......................................... 85
Problem (malfunction) .................... .8 8
Resettin g ........................................ .8 8
Reversin g feature ............................ .8 6
SIRIUS services
see also Digital Operator's Man-
ual .................................................. 281
Sliding sunroof
Important safety notes .................... 89
Opening/closing .............................. 90
Problem (malfunction) ..................... 92
Resetting ......................................... 90
see Panorama roof with power
tilt/sliding panel
SmartKey
Changing the battery ....................... 77
Changing the programming ............ .7 6
Checking the battery ...................... .7 7
Convenience closing feature ............ 87
Convenience opening feature .......... 86
Display message ............................ 267
Door central locking/unlo ckin g ...... .7 4
Importa nt safety notes .................... 74
KEYLESS-GO start function .............. 76
Loss ................................................ .7 8
Mechanical key ................................ 76
Overview .......................................... 74
Positions (ignition lock) ................. 132
Problem (malfunction) ..................... 78
Starting the engine ........................ 134
Smartphone
Starting the engine ........................ 134 Index 19
Page 25 of 390
Trailer towing
Active Blind Spot Assist ................. 207
Active Lane Keeping Assist ............ 209
Blind Spot Assist ............................ 203
Permissible trailer loads and
drawbar noseweights ..................... 221
Transfer case ..................................... 147
Transmission
see Automatic transmission
Transmission position display ......... 142
Transporting the vehicle .................. 338
Traveling uphill
Brow of hill ..................................... 165
Driving downhill ............................. 166
Maximum gradient-climbing capa-
bility .............................................. .1 65
Trim pieces (cleaning instruc-
tions) ................................................. .3 25
Trip computer (on-board com-
puter) ................................................. .2 26
Trip odometer
Calling up ....................................... 226
Resetting (on-board computer) ...... 227
Trunk
see Tailgate
Turn signals
Display message ............................ 250
Replacing bulbs (front) ................... 114
Switching on/off ........................... 108
Two-way radio
Frequencies ................................... 371
Installation ..................................... 371
Transmission output (maximum) .... 371
TWR (Tongue Weight Rating) (defi-
nition) ................................................. 361
Type identification plate
see Vehicle identification plate
U
Unlocking
Emergency unlocking ....................... 81
From inside the vehicle (central
unlocking button) ............................ .8 0
Upshift indicator (on-board com-
puter, Mercedes-AMG vehicles) ...... .2 35 USB devices
Connecting to the Media Inter-
face ............................................... 286
V Vanity mirror (in the sun visor) ....... .2 99
Vehicle
Correct use ...................................... 29
Data acquisition ............................... 30
Display message ............................ 264
Equipment ....................................... 26
Individual settings .......................... 232
Limited Warranty ............................ .3 0
Loading .......................................... 351
Locking (in an emergency) ............... 81
Locking (SmartKey) .......................... 74
Lowering ........................................ 365
Maintenance .................................... 27
Operating safety .............................. 28
Parking .......................................... 153
Parking for a long period ................ 156
Pulling away ................................... 135
Raising ........................................... 363
Reporting problems ......................... 29
Securing from rolling away ............ 362
Towing away .................................. 336
Transporting .................................. 338
Unlocking (in an emergency) ........... 81
Unlocking (SmartKey) ...................... 74
Vehicle data ................................... 380
Vehicle battery
see Battery (vehicle)
Vehicle data ....................................... 380
Vehicle data (off-road driving)
Approach/departure angle ............ 383
Fording depth ................................ 382
Maximum gradient climbing abil-
ity .................................................. 383
Vehicle dimensions ........................... 380
Vehicle emergency locking ................ 81
Vehicle identification number
see VIN
Vehicle identification plate .............. 372
Vehicle level
AIRMATIC ...................................... 182
Vehicle level (display message) ....... 255
Vehicle tool kit .................................. 326Index 23
Page 74 of 390
Up to a speed of approximately 44 mph
(70 km/h) the Active Brake Assist with cross-
traffic function assists you with braking in haz-
ardous situations with: R
stationary obstacles in the path of the vehicle,
e.g. stopped or parked vehicles R
stationary pedestrians in the path of the vehi-
cle R
obstacles crossing your path that move in the
detection range of the sensors and are detec-
ted X
Keep the brake pedal depressed until the
emergency braking situation is over.
ABS prevents the wheels from locking.
You can prevent the intervention of Active Brake
Assist with cross-traffic function at any time by: R
depressing the accelerator pedal further R
activating kickdown R
releasing the brake pedal
The braking application of Active Brake Assist
with cross-traffic function is ended automati-
cally if: R
you maneuver to avoid the obstacle R
there is no longer a risk of collision R
there is no longer an obstacle detected in
front of your vehicle
STEER CONTROL
General information STEER CONTROL helps you by transmitting a
noticeable steering force to the steering wheel
in the direction required for vehicle stabilization.
This steering assistance is provided in particular
if: R
both right wheels or both left wheels are on a
wet or slippery road surface when you brake R
the vehicle starts to skid
Important safety notes
i Observe the "Important safety notes" sec-
tion ( Y
page 62). No steering assistance is provided from STEER
CONTROL, if: R
ESP ®
is deactivated R
ESP ®
is malfunctioning R
the steering is malfunctioning
If ESP ®
is malfunctioning, you will be assisted
further by the electrical power steering.
Protection against theft
Immobilizer X
To activate with the SmartKey: remove the
SmartKey from the ignition lock. X
To activate with KEYLESS-GO: switch the
ignition off and open the driver's door. X
To deactivate: switch on the ignition.
The immobilizer prevents your vehicle from
being started without the correct SmartKey.
When leaving the vehicle, always take the
SmartKey with you and lock the vehicle. Anyone
can start the engine if a valid SmartKey has been
left inside the vehicle.
i The immobilizer is always deactivated when
you start the engine.
In the event that the engine cannot be started
(yet the vehicle's battery is charged), the sys-
tem is not operational. Contact an authorized
Mercedes-Benz Center or call
1-800-FOR-MERCedes (in the USA) or
1-800-387-0100 (in Canada).
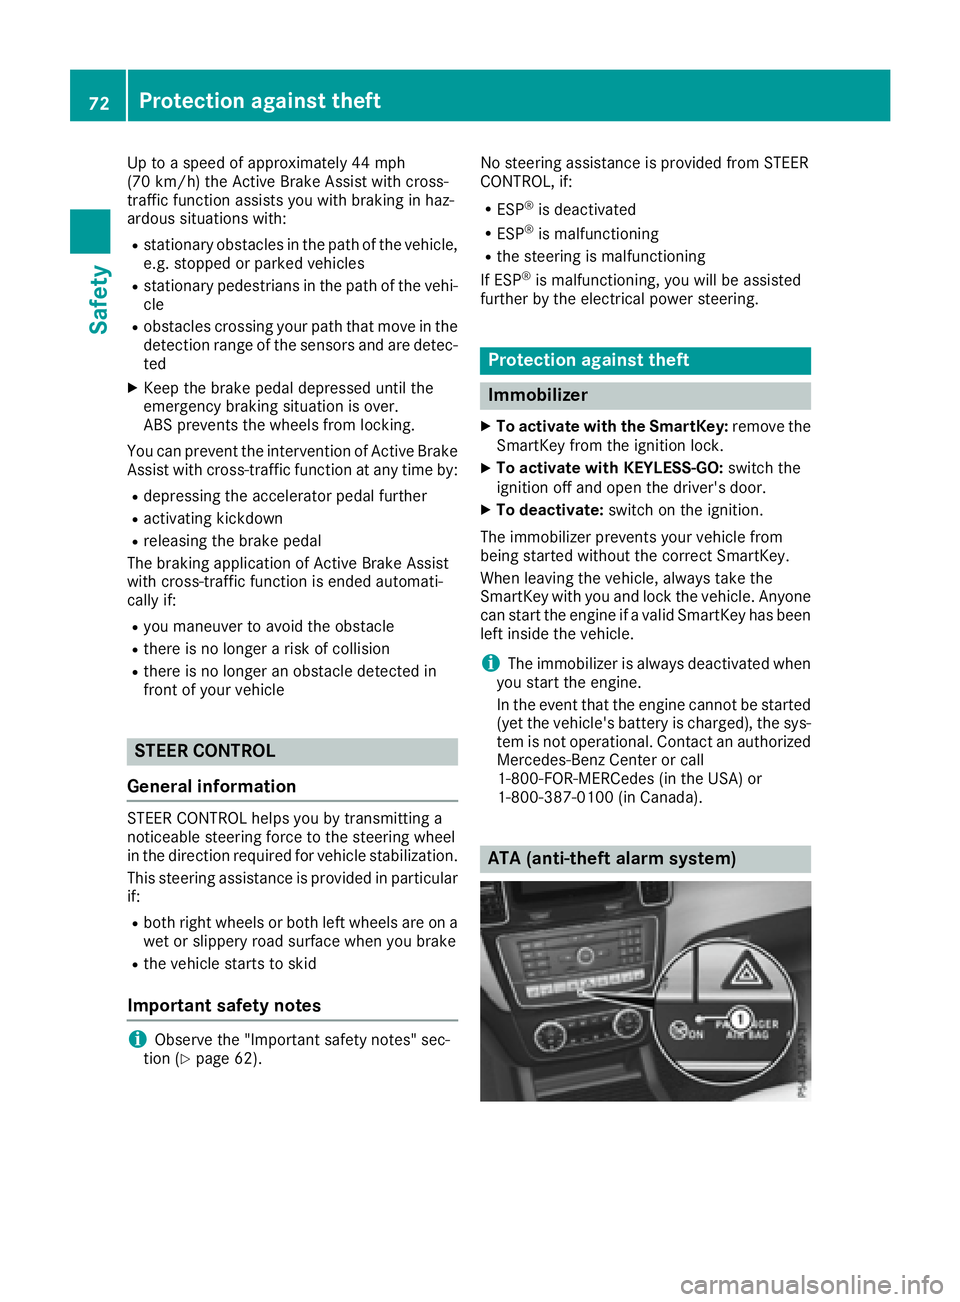
ATA (anti-theft alarm system)72
Protection against theft
Safety
Page 77 of 390
If activated in the multimedia system, the loca-
tor lighting also lights up in the dark (see sepa-
rate operating instructions). X
To open the tailgate automatically from
outside the vehicle: press and hold the �T
button until the tailgate opens.
Vehicles with KEYLESS-GO: X
To close the tailgate automatically from
outside the vehicle: if the SmartKey is loca-
ted in the immediate vicinity of the vehicle,
press the �T button on the SmartKey.
When the tailgate closes you can then release
the button.
KEYLESS-GO
General notes Bear in mind that the engine can be started by
any of the vehicle occupants if there is a KEY-
LESS-GO key in the vehicle ( Y
page 134).
Locking/unlocking centrally You can start, lock or unlock the vehicle using
KEYLESS-GO. To do this, you only need carry the
SmartKey with you. You can combine the func-
tions of KEYLESS-GO with those of a conven-
tional SmartKey. Unlock the vehicle by using
KEYLESS-GO, for instance, and lock it using the
�7 button on the SmartKey.
The driver's door and the door at which the han-
dle is used, must both be closed. The SmartKey
must be outside the vehicle. When locking or
unlocking with KEYLESS-GO, the distance
between the SmartKey and the corresponding
door handle must not be greater than 3 ft (1 m).
KEYLESS-GO checks whether a valid SmartKey
is in the vehicle by periodically establishing a
radio connection between the vehicle and the
SmartKey. This happens: R
when starting the engine R
while driving R
when the external door handles are touched R
during convenience closing X
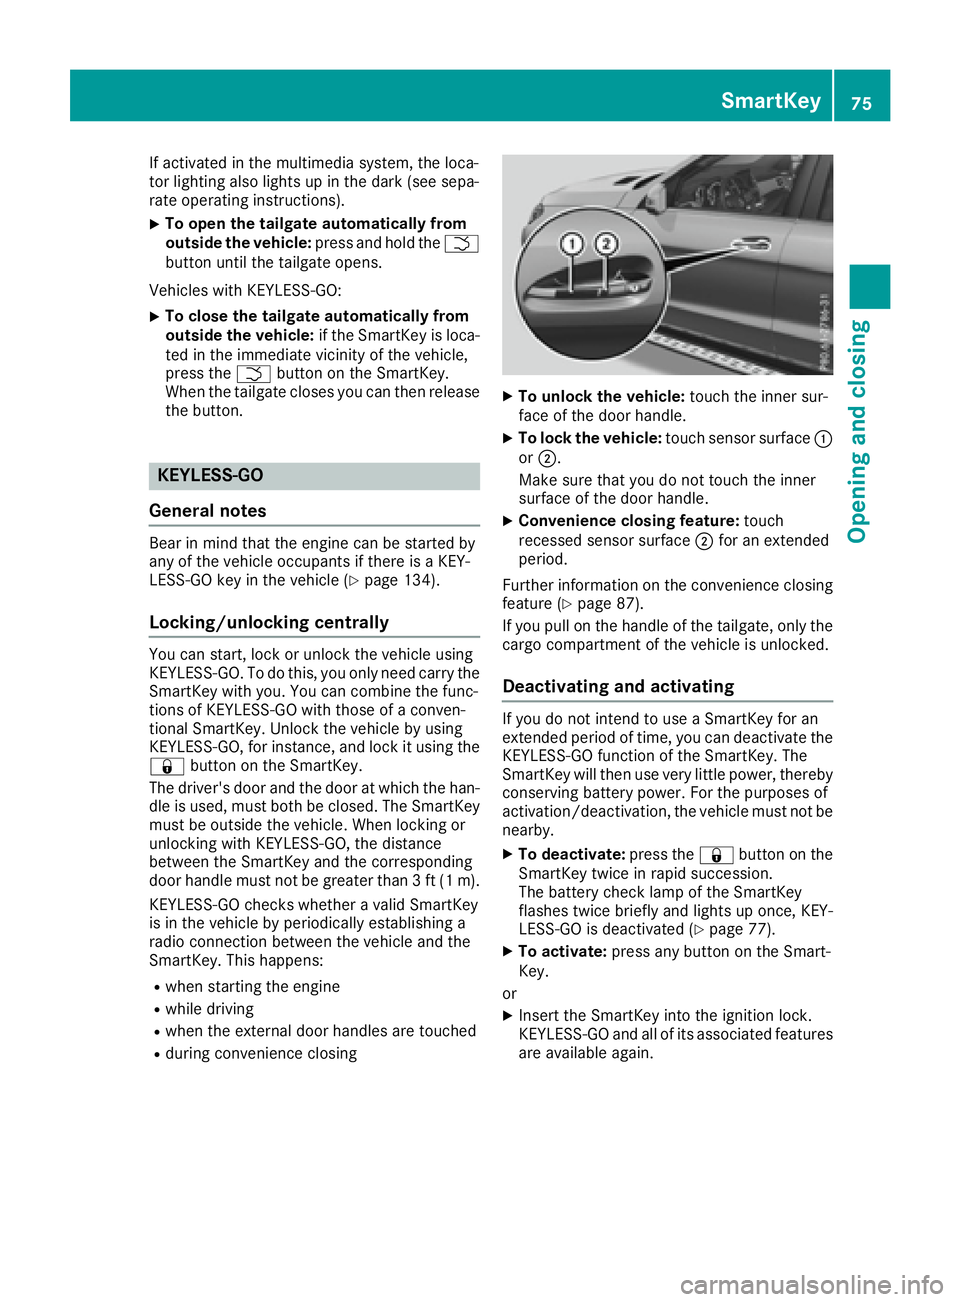
To unlock the vehicle: touch the inner sur-
face of the door handle. X
To lock the vehicle: touch sensor surface �C
or �D .
Make sure that you do not touch the inner
surface of the door handle. X
Convenience closing feature: touch
recessed sensor surface �D for an extended
period.
Further information on the convenience closing
feature ( Y
page 87).
If you pull on the handle of the tailgate, only the
cargo compartment of the vehicle is unlocked.
Deactivating and activating If you do not intend to use a SmartKey for an
extended period of time, you can deactivate the
KEYLESS-GO function of the SmartKey. The
SmartKey will then use very little power, thereby
conserving battery power. For the purposes of
activation/deactivation, the vehicle must not be
nearby. X
To deactivate: press the �7 button on the
SmartKey twice in rapid succession.
The battery check lamp of the SmartKey
flashes twice briefly and lights up once, KEY-
LESS-GO is deactivated ( Y
page 77).X
To activate: press any button on the Smart-
Key.
or X
Insert the SmartKey into the ignition lock.
KEYLESS-GO and all of its associated features
are available again. SmartKey 75
Opening and closing Z
Page 78 of 390
KEYLESS- GO start function
Gene ra l notesBear in min d that th e engin e can be started by
any of th e vehicl e occupant s if there is a Smart -
Key in th e vehicl e ( Y
page 134).
Changing the settings of the locking
system You can chang e th e setting s of th e locking sys-
tem. This mean s that only th e driver's door and
th e fuel filler flap are unlocke d when th e vehicl e
is unlocked. This is useful if you frequentl y travel
alone. X
To change th e setting: press and hold down
th e �6 and �7 buttons simultaneousl y
for about six seconds until th e battery indica-
to r lamp flashes twice ( Y
page 77) .
If th e setting of th e locking system is changed
within th e signal range of th e vehicle, pressing
th e �7 or �6 button:R
locks or R
unlocks th e vehicl e
The SmartKey no w function s as follows :X
To unlock: press th e �6 butto n once .X
To unlock centrally: press th e �6 butto n
twice .X
To lock centrally: press th e �7 button.
The KEYLESS-GO function is changed as fol -
lows : X
To unlock th e driver's door : touch th e inner
surfac e of th e door handle on th e driver's
door .X
To unlock centrally: touch th e inner surfac e
of th e door handle on th e front-passenger
door or th e rear door .X
To lock centrally: touch th e outer sensor
surfac e on on e of th e door handles
( Y
page 75) .X
To restor e th e factory settings: press and
hold down th e �6 and �7 buttons s imul-
ta
neously for approximately six seconds until
th e battery chec k lamp flashes twice
( Y
page 77) . Mechanical key
Gene ra l notesIf th e vehicl e can no longer be locke d or
unlocke d wit h th e SmartKey or wit h KEYLESS -
GO, use th e mechanical key.
If you use th e mechanical ke y to unloc k and
open th e driver's door , th e anti-thef t alarm sys-
te m will be triggered . Switc h off th e alarm
( Y
page 72) .
If you unloc k th e vehicl e usin g th e mechanical
key, th e fuel filler flap will no t be unlocke d auto -
matically. X
To unlock th e fuel filler flap: insert th e
SmartKey int o th e ignition lock.
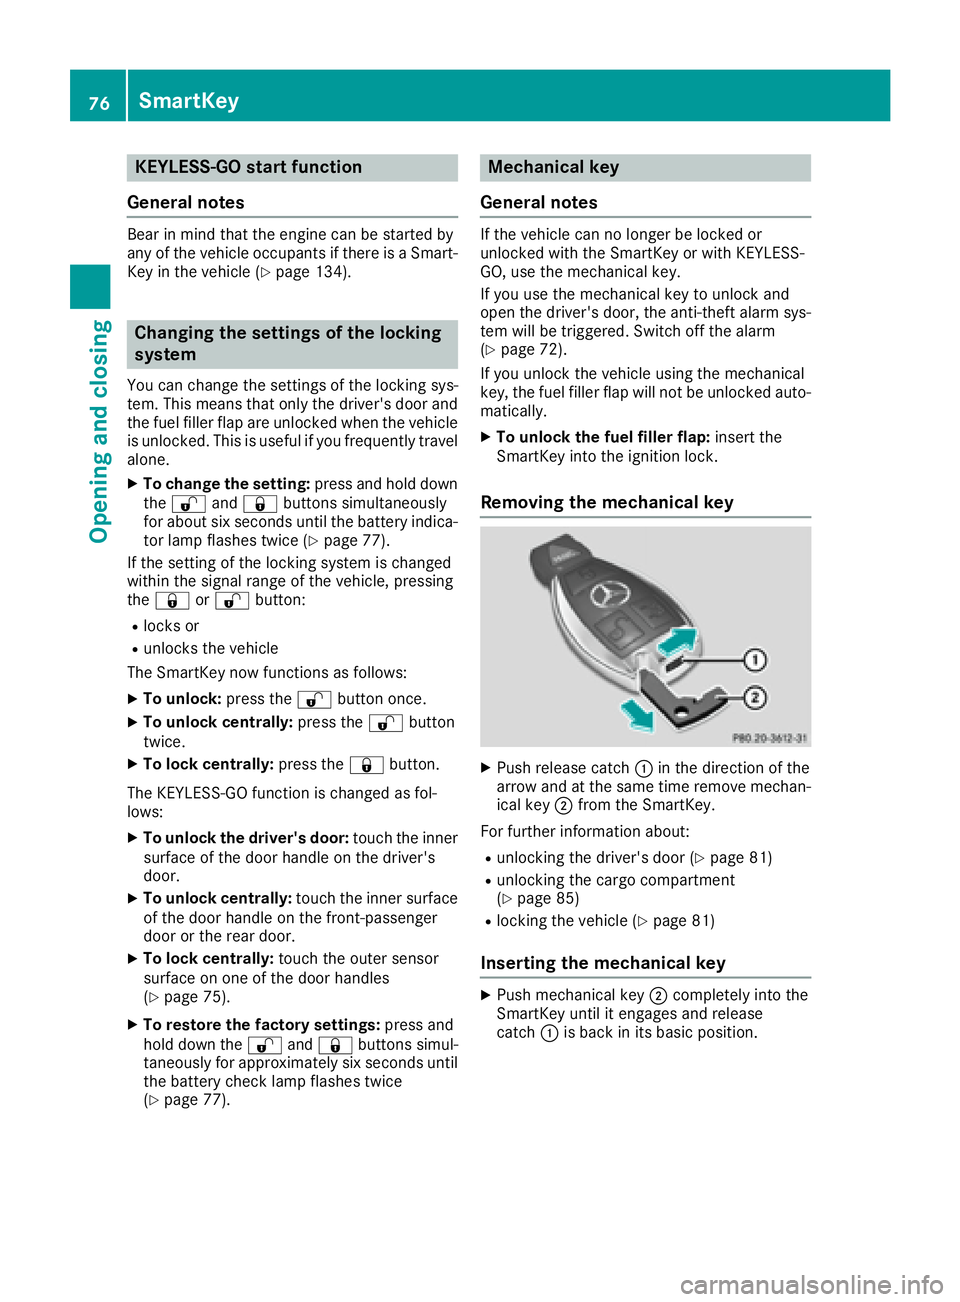
Removing the me chanical key
X
Push release catch �C in th e direction of th e
arrow and at th e sam e time remove mechan -
ical ke y �D from th e SmartKey.
Fo r further information about :R
unlocking th e driver's door ( Y
page 81)R
unlocking th e cargo compartmen t
( Y
page 85) R
locking th e vehicl e ( Y
page 81)
Inserting the me chanical key X
Push mechanical ke y �D completely int o th e
SmartKey until it engage s and release
catch �C is bac k in it s basic position .76
SmartKey
Opening and closing
Page 79 of 390
SmartKey battery
Important safety notes
G WARNING
Batteries contain toxic and corrosive substan-
ces. If batteries are swallowed, it can result in
severe health problems. There is a risk of fatal
injury.
Keep batteries out of the reach of children. If
a battery is swallowed, seek medical attention
immediately.
H Environmental note
Batteries contain dangerous
substances. It is against the
law to dispose of them with
the household rubbish. They
must be collected separately
and recycled to protect the
environment.
Dispose of batteries in an
environmentally friendly
manner. Take discharged
batteries to a qualified spe-
cialist workshop or a special
collection point for used bat-
teries.
The SmartKey batteries contain perchlorate
material, which may require special handling
and regard for the environment. National guide-
lines must be observed during disposal. In Cal-
ifornia, see www.dtsc.ca.gov/
HazardousWaste/Perchlorate/index.cfm .
Mercedes-Benz recommends that you have the
batteries replaced at a qualified specialist work-
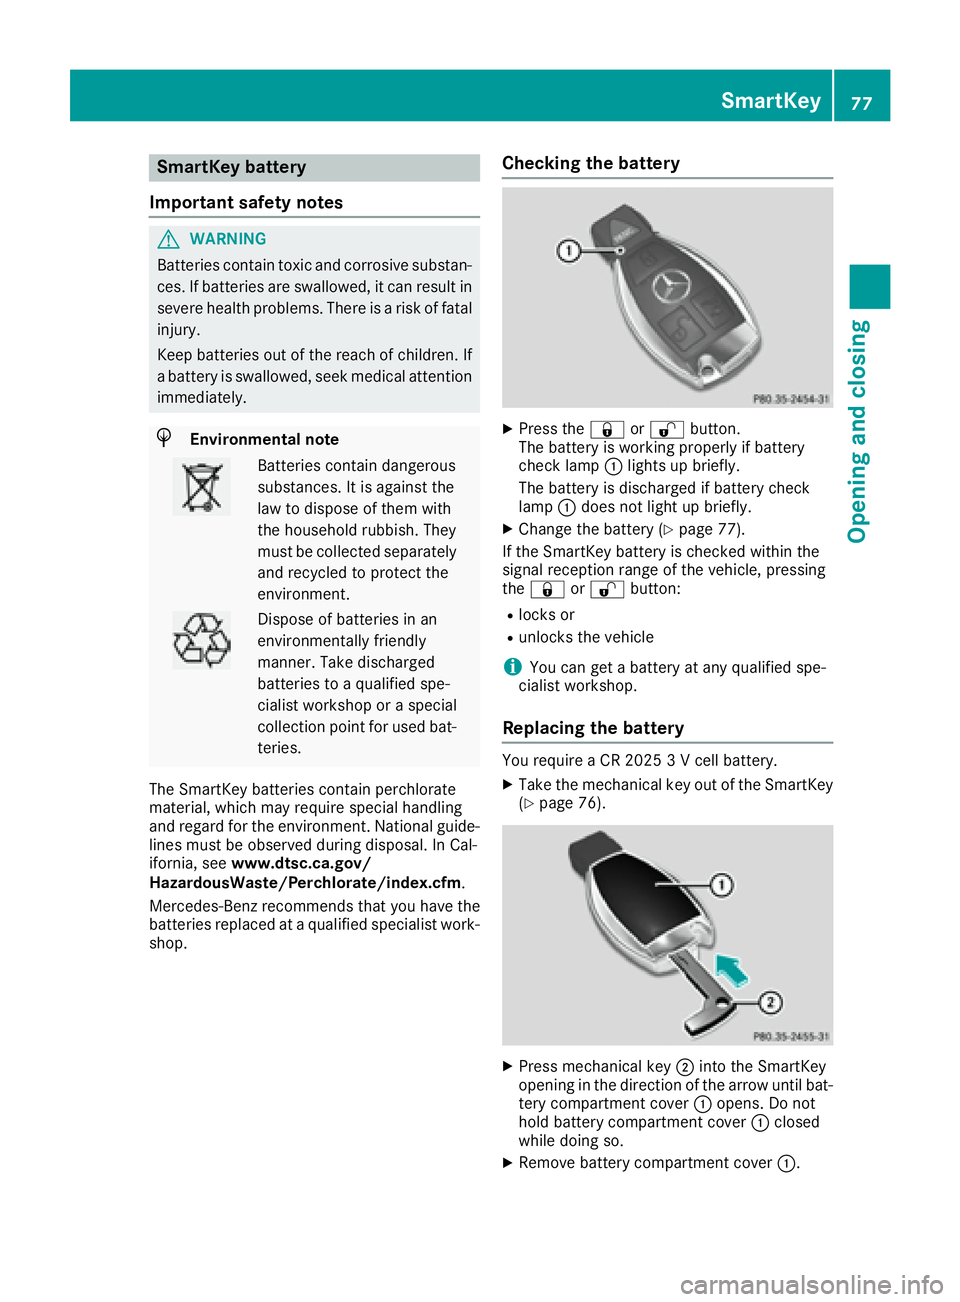
shop. Checking the battery X
Press the �7 or �6 button.
The battery is working properly if battery
check lamp �C lights up briefly.
The battery is discharged if battery check
lamp �C does not light up briefly. X
Change the battery ( Y
page 77).
If the SmartKey battery is checked within the
signal reception range of the vehicle, pressing
the �7 or �6 button: R
locks or R
unlocks the vehicle
i You can get a battery at any qualified spe-
cialist workshop.
Replacing the battery You require a CR 2025 3 V cell battery. X
Take the mechanical key out of the SmartKey
( Y
page 76).
X
Press mechanical key �D into the SmartKey
opening in the direction of the arrow until bat-
tery compartment cover �C opens. Do not
hold battery compartment cover �C closed
while doing so. X
Remove battery compartment cover �C .SmartKey 77
Opening and closing Z
Page 80 of 390
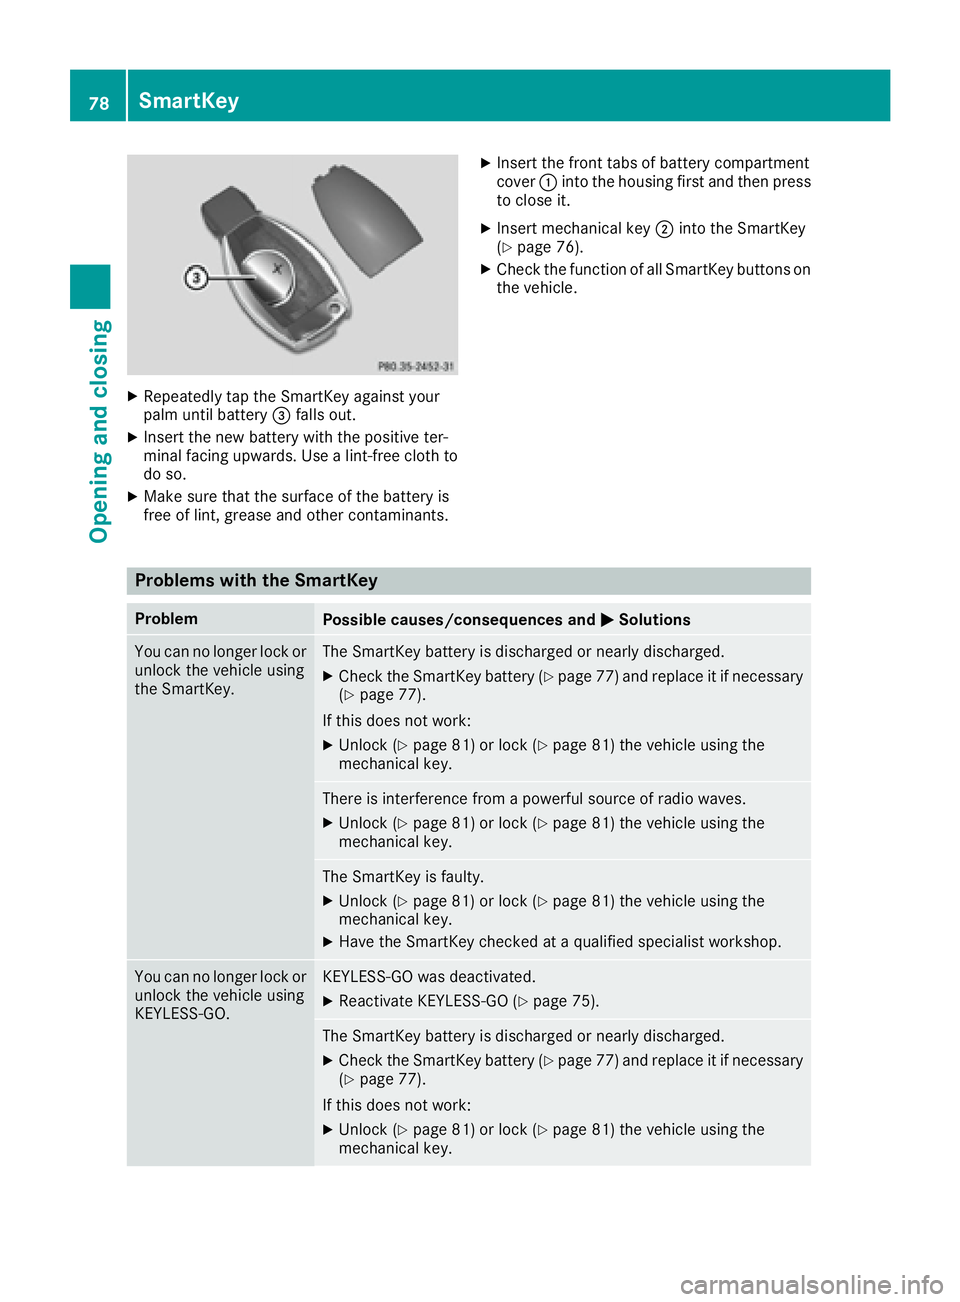
X
Repeatedly tap th e SmartKey against your
palm until battery �