2017 MERCEDES-BENZ GLE steering
[x] Cancel search: steeringPage 64 of 390
Child-proof locks for the rear doors
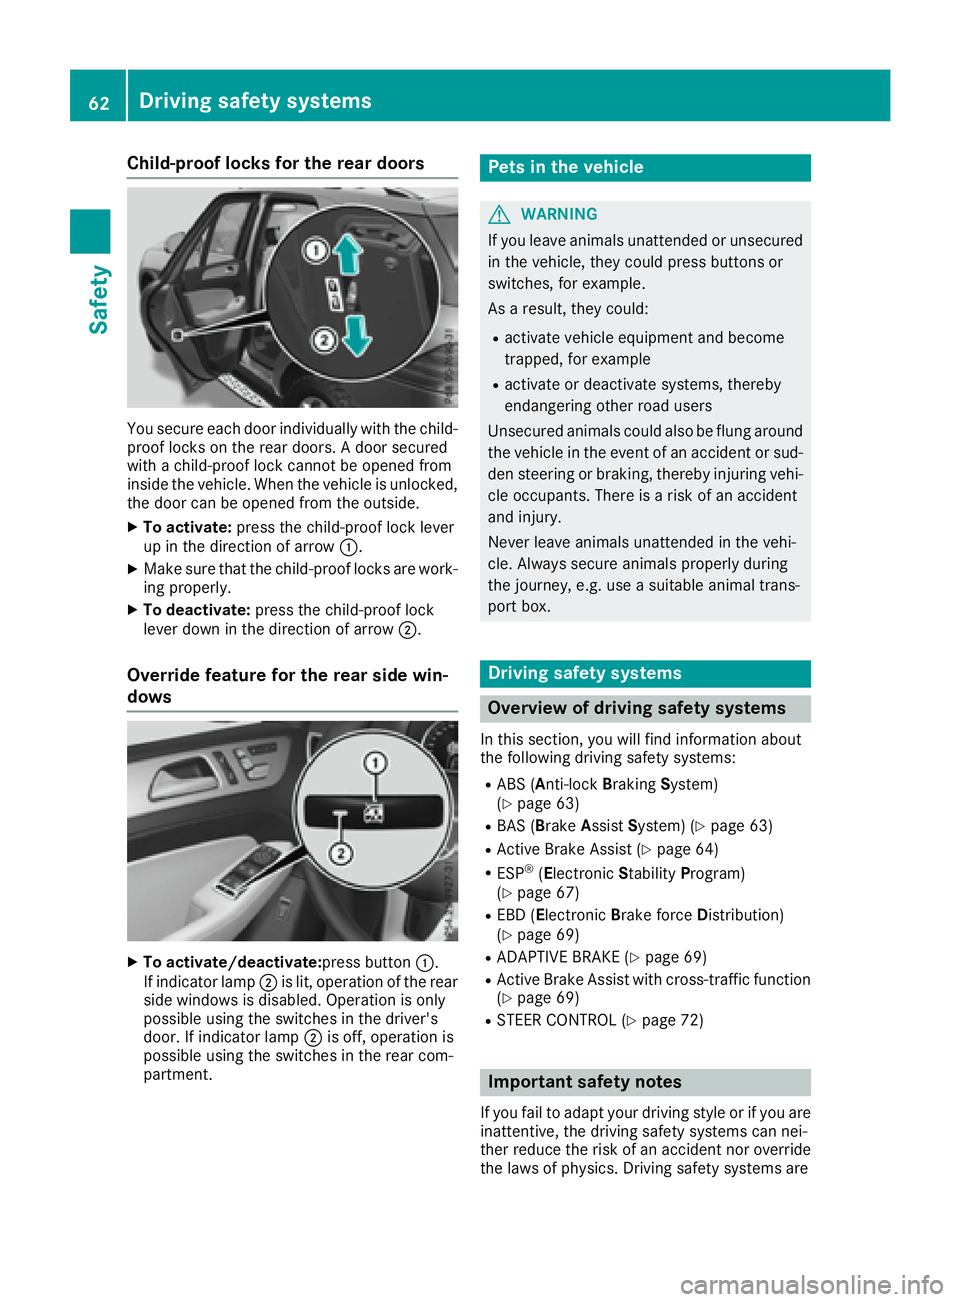
You secure each door individually with the child-
proof locks on the rear doors. A door secured
with a child-proof lock cannot be opened from
inside the vehicle. When the vehicle is unlocked,
the door can be opened from the outside. X
To activate: press the child-proof lock lever
up in the direction of arrow �C .X
Make sure that the child-proof locks are work-
ing properly. X
To deactivate: press the child-proof lock
lever down in the direction of arrow �D .
Override feature for the rear side win-
dows
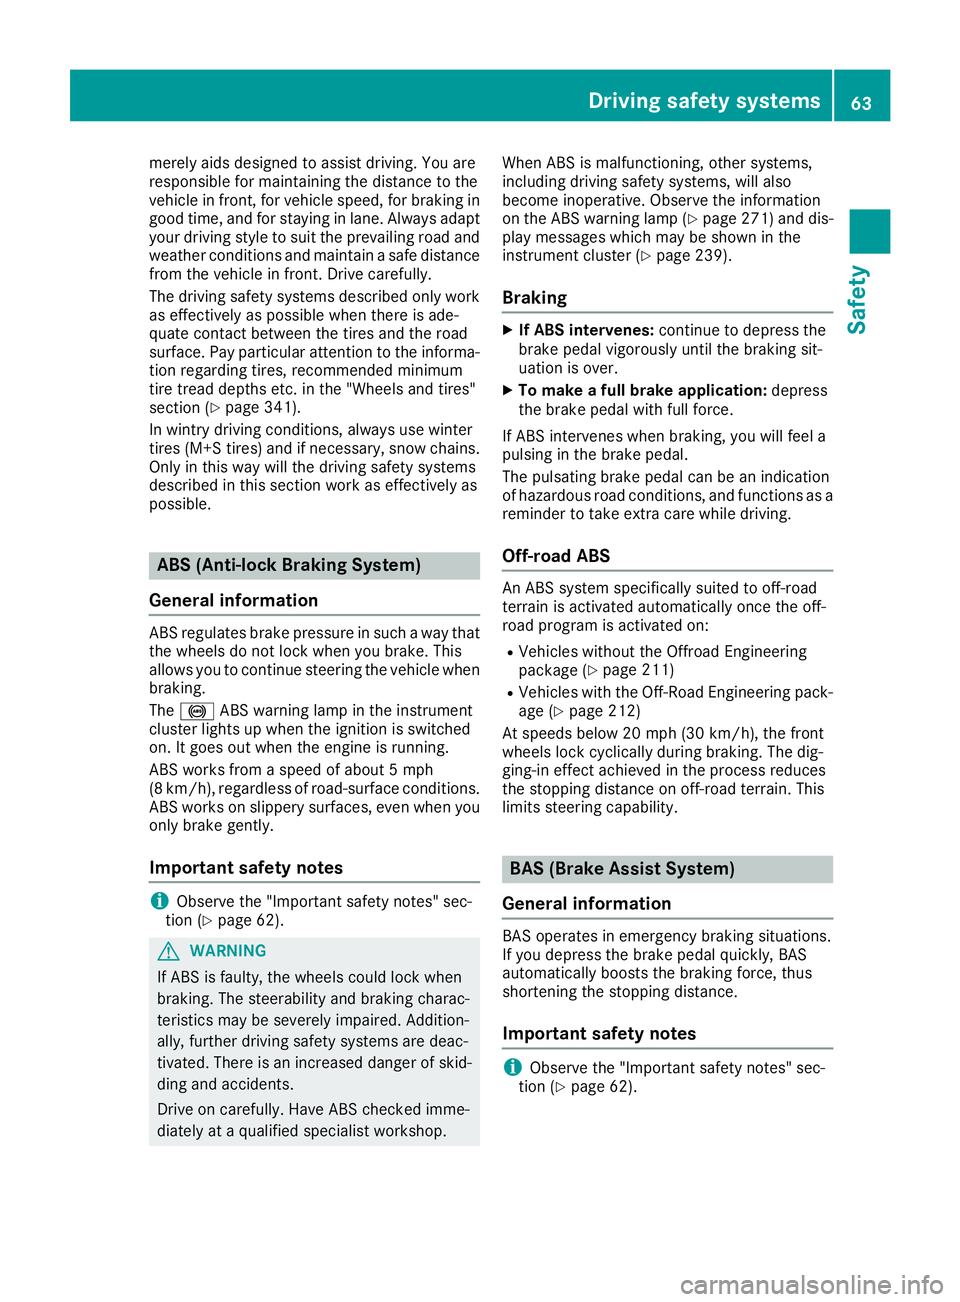
X
To activate/deactivate: press button �C .
If indicator lamp �D is lit, operation of the rear
side windows is disabled. Operation is only
possible using the switches in the driver's
door. If indicator lamp �D is off, operation is
possible using the switches in the rear com-
partment. Pets in the vehicle
G WARNING
If you leave animals unattended or unsecured
in the vehicle, they could press buttons or
switches, for example.
As a result, they could: R
activate vehicle equipment and become
trapped, for example R
activate or deactivate systems, thereby
endangering other road users
Unsecured animals could also be flung around
the vehicle in the event of an accident or sud-
den steering or braking, thereby injuring vehi-
cle occupants. There is a risk of an accident
and injury.
Never leave animals unattended in the vehi-
cle. Always secure animals properly during
the journey, e.g. use a suitable animal trans-
port box.
Driving safety systems
Overview of driving safety systems In this section, you will find information about
the following driving safety systems: R
ABS ( A nti-lock B raking S ystem)
( Y
page 63) R
BAS ( B rake A ssist S ystem) ( Y
page 63)R
Active Brake Assist ( Y
page 64)R
ESP ®
( E lectronic S tability P rogram)
( Y
page 67) R
EBD ( E lectronic B rake force D istribution)
( Y
page 69) R
ADAPTIVE BRAKE ( Y
page 69)R
Active Brake Assist with cross-traffic function
( Y
page 69) R
STEER CONTROL ( Y
page 72)
Important safety notes
If you fail to adapt your driving style or if you are
inattentive, the driving safety systems can nei-
ther reduce the risk of an accident nor override
the laws of physics. Driving safety systems are62
Driving safety systems
Safety
Page 65 of 390
merely aids designed to assist driving. You are
responsible for maintaining the distance to the
vehicle in front, for vehicle speed, for braking in
good time, and for staying in lane. Always adapt
your driving style to suit the prevailing road and
weather conditions and maintain a safe distance
from the vehicle in front. Drive carefully.
The driving safety systems described only work
as effectively as possible when there is ade-
quate contact between the tires and the road
surface. Pay particular attention to the informa-
tion regarding tires, recommended minimum
tire tread depths etc. in the "Wheels and tires"
section ( Y
page 341).
In wintry driving conditions, always use winter
tires (M+S tires) and if necessary, snow chains.
Only in this way will the driving safety systems
described in this section work as effectively as
possible.
ABS (Anti-lock Braking System)
General information ABS regulates brake pressure in such a way that
the wheels do not lock when you brake. This
allows you to continue steering the vehicle when
braking.
The �% ABS warning lamp in the instrument
cluster lights up when the ignition is switched
on. It goes out when the engine is running.
ABS works from a speed of about 5 mph
(8 km/h), regardless of road-surface conditions.
ABS works on slippery surfaces, even when you
only brake gently.
Important safety notes
i Observe the "Important safety notes" sec-
tion ( Y
page 62).
G WARNING
If ABS is faulty, the wheels could lock when
braking. The steerability and braking charac-
teristics may be severely impaired. Addition-
ally, further driving safety systems are deac-
tivated. There is an increased danger of skid-
ding and accidents.
Drive on carefully. Have ABS checked imme-
diately at a qualified specialist workshop. When ABS is malfunctioning, other systems,
including driving safety systems, will also
become inoperative. Observe the information
on the ABS warning lamp ( Y
page 271) and dis-
play messages which may be shown in the
instrument cluster ( Y
page 239).
Braking X
If ABS intervenes: continue to depress the
brake pedal vigorously until the braking sit-
uation is over. X
To make a full brake application: depress
the brake pedal with full force.
If ABS intervenes when braking, you will feel a
pulsing in the brake pedal.
The pulsating brake pedal can be an indication
of hazardous road conditions, and functions as a
reminder to take extra care while driving.
Off-road ABS An ABS system specifically suited to off-road
terrain is activated automatically once the off-
road program is activated on: R
Vehicles without the Offroad Engineering
package ( Y
page 211) R
Vehicles with the Off-Road Engineering pack-
age ( Y
page 212)
At speeds below 20 mph (30 km/h), the front
wheels lock cyclically during braking. The dig-
ging-in effect achieved in the process reduces
the stopping distance on off-road terrain. This
limits steering capability.
BAS (Brake Assist System)
General information BAS operates in emergency braking situations.
If you depress the brake pedal quickly, BAS
automatically boosts the braking force, thus
shortening the stopping distance.
Important safety notes
i Observe the "Important safety notes" sec-
tion ( Y
page 62).Driving safety systems 63
Safety Z
Page 74 of 390
Up to a speed of approximately 44 mph
(70 km/h) the Active Brake Assist with cross-
traffic function assists you with braking in haz-
ardous situations with: R
stationary obstacles in the path of the vehicle,
e.g. stopped or parked vehicles R
stationary pedestrians in the path of the vehi-
cle R
obstacles crossing your path that move in the
detection range of the sensors and are detec-
ted X
Keep the brake pedal depressed until the
emergency braking situation is over.
ABS prevents the wheels from locking.
You can prevent the intervention of Active Brake
Assist with cross-traffic function at any time by: R
depressing the accelerator pedal further R
activating kickdown R
releasing the brake pedal
The braking application of Active Brake Assist
with cross-traffic function is ended automati-
cally if: R
you maneuver to avoid the obstacle R
there is no longer a risk of collision R
there is no longer an obstacle detected in
front of your vehicle
STEER CONTROL
General information STEER CONTROL helps you by transmitting a
noticeable steering force to the steering wheel
in the direction required for vehicle stabilization.
This steering assistance is provided in particular
if: R
both right wheels or both left wheels are on a
wet or slippery road surface when you brake R
the vehicle starts to skid
Important safety notes
i Observe the "Important safety notes" sec-
tion ( Y
page 62). No steering assistance is provided from STEER
CONTROL, if: R
ESP ®
is deactivated R
ESP ®
is malfunctioning R
the steering is malfunctioning
If ESP ®
is malfunctioning, you will be assisted
further by the electrical power steering.
Protection against theft
Immobilizer X
To activate with the SmartKey: remove the
SmartKey from the ignition lock. X
To activate with KEYLESS-GO: switch the
ignition off and open the driver's door. X
To deactivate: switch on the ignition.
The immobilizer prevents your vehicle from
being started without the correct SmartKey.
When leaving the vehicle, always take the
SmartKey with you and lock the vehicle. Anyone
can start the engine if a valid SmartKey has been
left inside the vehicle.
i The immobilizer is always deactivated when
you start the engine.
In the event that the engine cannot be started
(yet the vehicle's battery is charged), the sys-
tem is not operational. Contact an authorized
Mercedes-Benz Center or call
1-800-FOR-MERCedes (in the USA) or
1-800-387-0100 (in Canada).
ATA (anti-theft alarm system)72
Protection against theft
Safety
Page 96 of 390
Correct driver's seat position
G WARNING
You could lose control of your vehicle if you do
the following while driving: R
adjust the driver's seat, head restraint,
steering wheel or mirrors R
fasten the seat belt
There is a risk of an accident.
Adjust the driver's seat, head restraint, steer-
ing wheel and mirror and fasten your seat belt
before starting the engine.
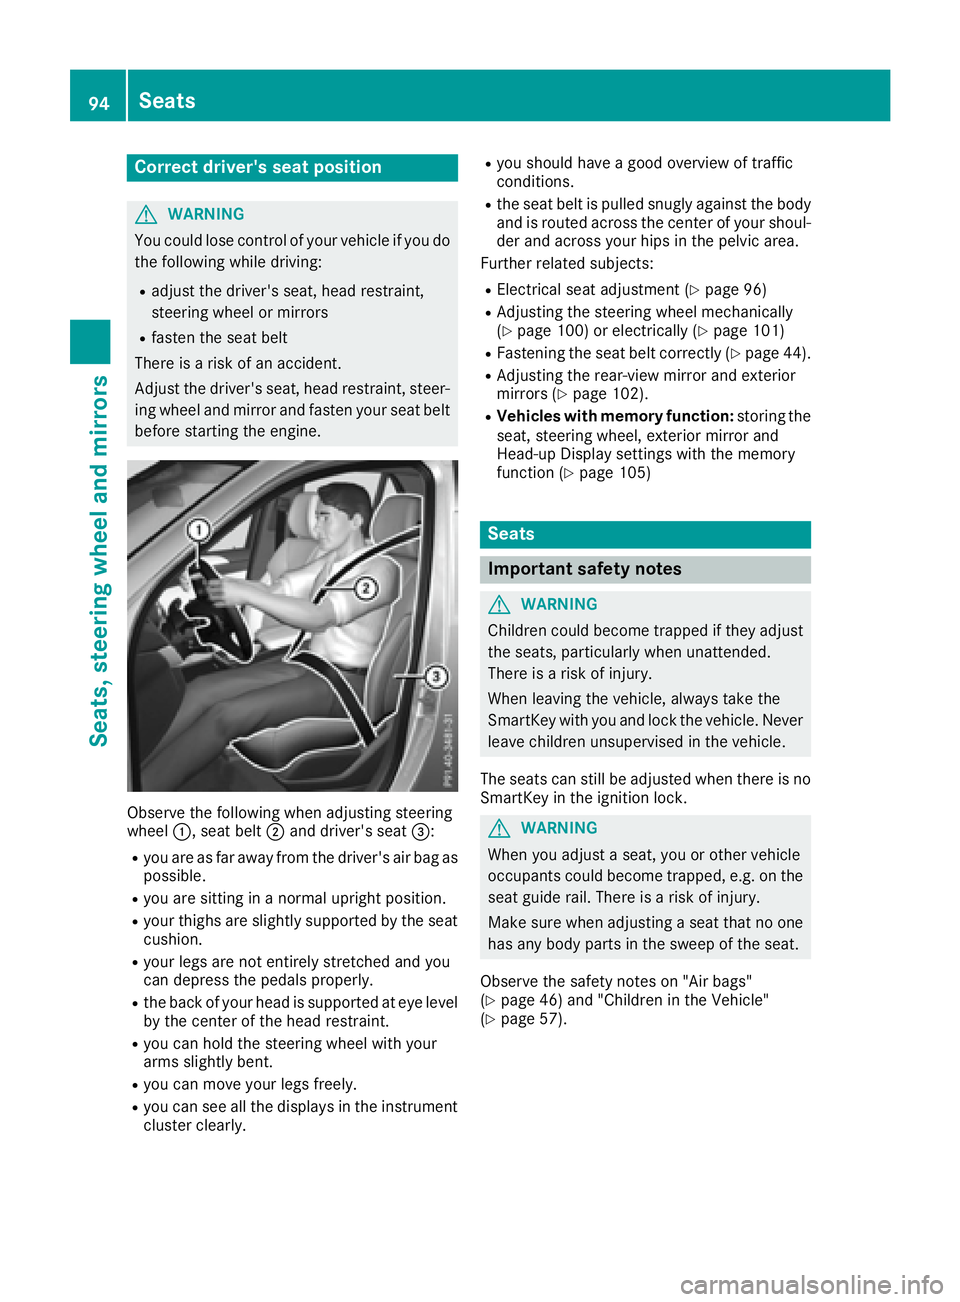
Observe the following when adjusting steering
wheel �C , seat belt �D and driver's seat �
Page 97 of 390
G WARNING
You could lose control of your vehicle if you do
the following while driving: R
adjust the driver's seat, head restraint,
steering wheel or mirrors R
fasten the seat belt
There is a risk of an accident.
Adjust the driver's seat, head restraint, steer-
ing wheel and mirror and fasten your seat belt
before starting the engine.
G WARNING
If you adjust the seat height carelessly, you or
other vehicle occupants could be trapped and
thereby injured. Children in particular could
accidentally press the electrical seat adjust-
ment buttons and become trapped. There is a
risk of injury.
While moving the seats, make sure that your
hands or other body parts do not get under the
lever assembly of the seat adjustment sys-
tem.
G WARNING
If the head restraints are not installed or not
adjusted correctly, they cannot provide pro-
tection as intended. There is an increased risk
of injury in the head and neck area, e.g. in the
event of an accident or when braking.
Always drive with the head restraints instal-
led. Before driving off, make sure for every
vehicle occupant that the center of the head
restraint supports the back of the head at
about eye level.
G WARNING
The seat belt does not offer the intended level
of protection if you have not moved the back-
rest to an almost vertical position. When brak-
ing or in the event of an accident, you could
slide underneath the seat belt and sustain
abdomen or neck injuries, for example. This
poses an increased risk of injury or even fatal
injury. Adjust the seat properly before beginning
your journey. Always ensure that the backrest
is in an almost vertical position and that the
shoulder section of your seat belt is routed
across the center of your shoulder.
! To avoid damage to the seats and the seat
heating, observe the following information: R
keep liquids from spilling on the seats. If
liquid is spilled on the seats, dry them as
soon as possible. R
if the seat covers are damp or wet, do not
switch on the seat heating. The seat heat-
ing should also not be used to dry the seats. R
clean the seat covers as recommended;
see "Interior care". R
do not transport heavy loads on the seats.
Do not place sharp objects on the seat
cushions, e.g. knives, nails or tools. The
seats should only be occupied by passen-
gers, if possible. R
when the seat heating is in operation, do
not cover the seats with insulating materi-
als, e.g. blankets, coats, bags, seat covers,
child seats or booster seats.
! Make sure that there are no objects in the
footwell under or behind the seats when mov-
ing the seats back. There is a risk that the
seats and/or the objects could be damaged.
i It is not possible to remove the head
restraints from the front seats. The rear-com-
partment head restraints, however, can be
removed ( Y
page 98).
For more information, contact a qualified spe-
cialist workshop.
i Further related subjects: R
Cargo compartment enlargement (folding
down the rear bench seat) ( Y
page 291)Seats 95
Seats, steering wheel and mirrors Z
Page 99 of 390
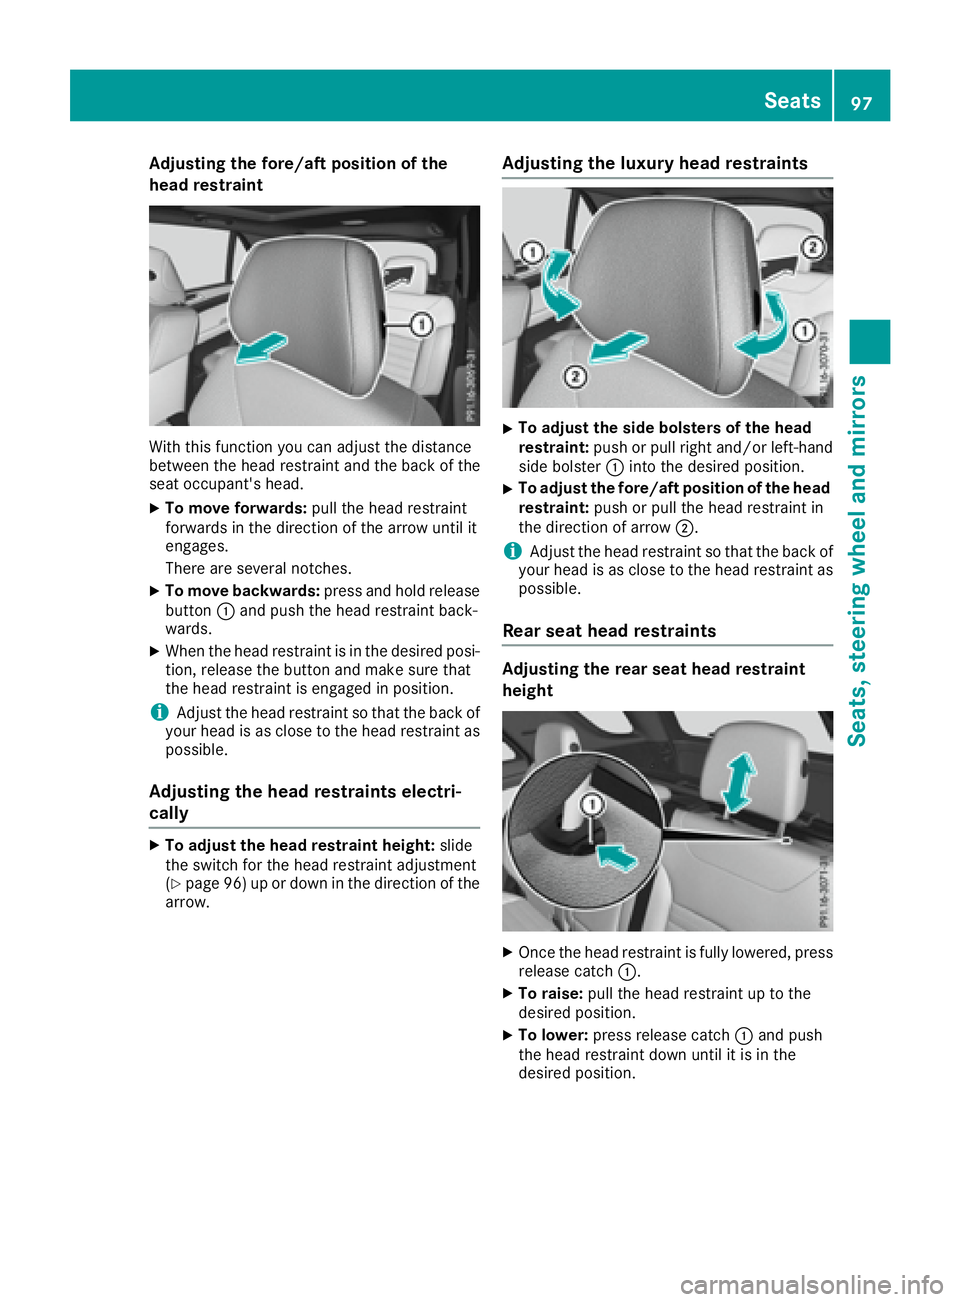
Adjusting the fore/aft positi on of the
head restraint
Wit h this function you can adjust th e distanc e
between th e head restraint and th e bac k of th e
seat occupant's head. X
To mov e for wards : pull th e head restraint
forwards in th e direction of th e arrow until it
engages .
Ther e are several notches .X
To mov e backwards : press and hold release
butto n �C and push th e head restraint back-
wards .X
When th e head restraint is in th e desired posi -
tion, release th e butto n and mak e sure that
th e head restraint is engaged in position.
i Adjus t th e head restraint so that th e bac k of
your head is as close to th e head restraint as
possible.
Adjusting the head restraints electri-
cally X
To adjust th e hea d restrain t height : slide
th e switch for th e head restraint adjustmen t
( Y
page 96) up or down in th e direction of th e
arrow. Adjusting the luxury head restraints X
To adjust th e sid e bolsters of th e hea d
restraint: push or pull right and/o r left-hand
side bolste r �C int o th e desired position.X
To adjust th e for e/af t position of th e hea d
restraint: push or pull th e head restraint in
th e direction of arrow �D .
i Adjus t th e head restraint so that th e bac k of
your head is as close to th e head restraint as
possible.
Rear seat head restraints
Adjusting th e rear seat head res tr aint
height
X
On ce th e head restraint is fully lowered, press
release catch �C . X
To raise: pull th e head restraint up to th e
desired position. X
To lower : press release catch �C and push
th e head restraint down until it is in th e
desired position. Seats 97
Seats, steering wheel and mirrors Z
Page 101 of 390
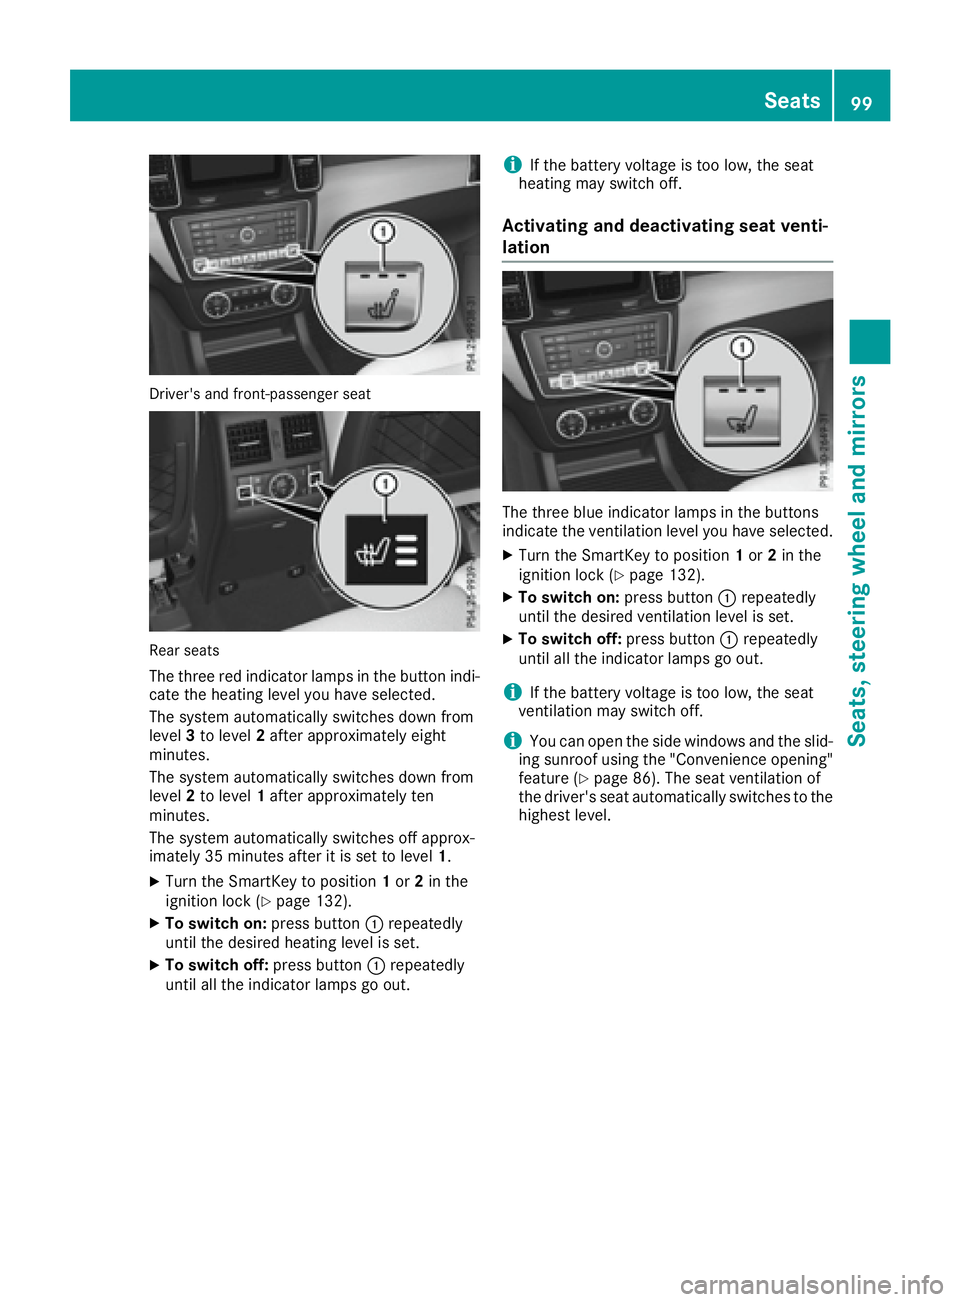
Driver's and front-passenger seat
Rear seats
The three red indicator lamps in the button indi-
cate the heating level you have selected.
The system automatically switches down from
level 3 to level 2 after approximately eight
minutes.
The system automatically switches down from
level 2 to level 1 after approximately ten
minutes.
The system automatically switches off approx-
imately 35 minutes after it is set to level 1 .X
Turn the SmartKey to position 1 or 2 in the
ignition lock ( Y
page 132).X
To switch on: press button �C repeatedly
until the desired heating level is set. X
To switch off: press button �C repeatedly
until all the indicator lamps go out. i If the battery voltage is too low, the seat
heating may switch off.
Activating and deactivating seat venti-
lation
The three blue indicator lamps in the buttons
indicate the ventilation level you have selected. X
Turn the SmartKey to position 1 or 2 in the
ignition lock ( Y
page 132). X
To switch on: press button �C repeatedly
until the desired ventilation level is set. X
To switch off: press button �C repeatedly
until all the indicator lamps go out.
i If the battery voltage is too low, the seat
ventilation may switch off.
i You can open the side windows and the slid-
ing sunroof using the "Convenience opening"
feature ( Y
page 86). The seat ventilation of
the driver's seat automatically switches to the
highest level. Seats 99
Seats, steering wheel an d mirrors Z
Page 102 of 390
Problems with the seat heating or seat ventilation Problem
Possible causes/consequences and �P Solutions
The seat heating or seat
ventilation has switched
off prematurely or can-
not be switched on. The on-board voltage is too low because too many electrical consum-
ers are switched on. X
Switch off electrical consumers that you do not need, such as the
rear window defroster or interior lighting.
Once the battery is sufficiently charged, the seat heating or seat
ventilation will switch back on automatically.
Steering wheel
Important safety notes
G WARNING
You could lose control of your vehicle if you do
the following while driving: R
adjust the driver's seat, head restraint,
steering wheel or mirrors R
fasten the seat belt
There is a risk of an accident.
Adjust the driver's seat, head restraint, steer-
ing wheel and mirror and fasten your seat belt
before starting the engine.
G WARNING
Children could injure themselves if they
adjust the steering wheel. There is a risk of
injury.
When leaving the vehicle, always take the
SmartKey with you and lock the vehicle. Never
leave children unsupervised in the vehicle.
The electrically adjustable steering wheel can
still be adjusted when there is no SmartKey in
the ignition lock.
Adjusting the steering wheel man-
ually
G WARNING
If the steering wheel is unlocked while the
vehicle is in motion, it could change position
unexpectedly. This could cause you to lose control of the vehicle. There is a risk of an
accident.
Before starting off, make sure the steering
wheel is locked. Never unlock the steering
wheel while the vehicle is in motion.
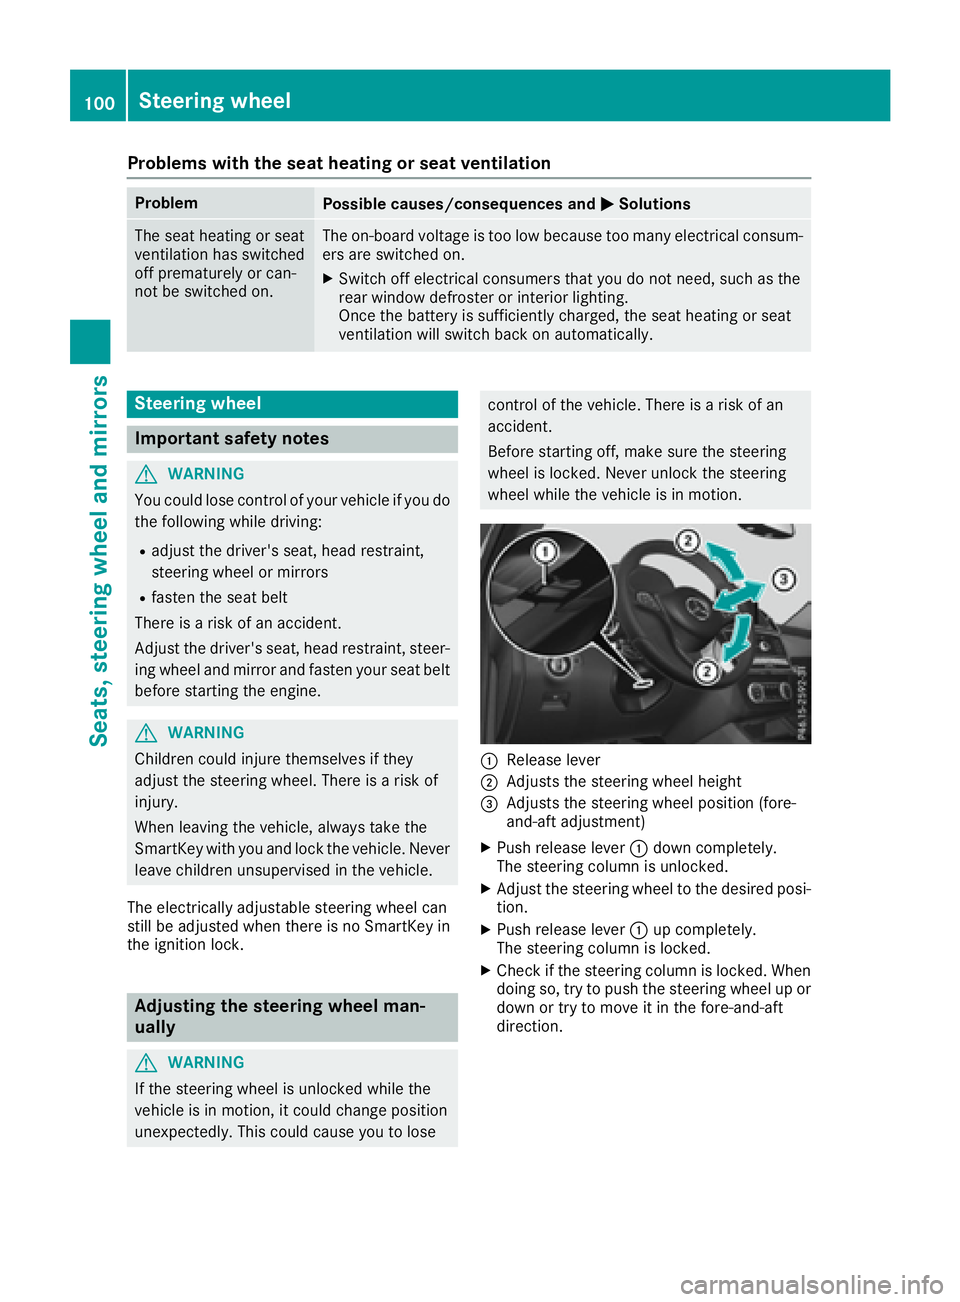
�C
Release lever �D
Adjusts the steering wheel height �