2017 MERCEDES-BENZ GLE brakes
[x] Cancel search: brakesPage 166 of 390
Comfort or Slippery drive program
( Y
page 139).X
Deactivate the LOW RANGE off-road gear
( Y
page 213).X
Deactivate DSR ( Y
page 210).X
Lower the vehicle level again to a level suita-
ble to the road conditions, e.g. to the normal
level. X
Clean the headlamps and rear lights and
check for damage. X
Clean the front and rear license plates. X
Clean the wheels and tires with a water jet
and remove any foreign objects. X
Clean the wheels, wheel housings and the
vehicle underside with a water jet; check for
any foreign objects and damage. X
Check whether twigs or other parts of plants
have become trapped. These increase the risk
of fire and can damage fuel pipes, brake
hoses or the rubber bellows of the axle joints
and propeller shafts. X
After the trip, examine without fail the entire
undercarriage, wheels, tires, brakes, body-
work structure, steering, chassis and exhaust
system for damage. X
After driving for extended periods across
sand, mud, gravel, water or in similarly dirty
conditions, have the brake discs, wheels,
brake pads/linings and axle joints checked
and cleaned. X
If you detect strong vibrations after off-road
travel, check for foreign objects in the wheels
and drive train and remove them if necessary.
Foreign objects can disturb the balance and
cause vibrations.
Driving on sand Observe the following rules when driving on
sand: R
Select the Offroad drive program (vehicles
with Off-Road Engineering package)
( Y
page 212).R
Select the Offroad drive program (vehicles
without Off-Road Engineering package)
( Y
page 211).R
Select a higher vehicle level. R
Avoid high engine speeds. R
Use the left-hand steering wheel paddle
shifter to shift to a lower gear appropriate to
the terrain. R
Drive quickly to overcome the rolling resist-
ance. Otherwise the vehicle's wheels could
become stuck in loose ground. R
Drive in the tracks of other vehicles if possi-
ble. Make sure that: -
the tire ruts are not too deep. -
the sand is sufficiently firm. -
the ground clearance of the vehicle is suf-
ficient.
Tire ruts and gravel roads
! Check that the ruts are not too deep and
that your vehicle has sufficient clearance.
Otherwise, your vehicle could be damaged or
bottom out and get stuck.
Observe the following rules when driving along
ruts in off-road terrain or on roads with loose
gravel: R
Select the Offroad drive program (vehicles
with Off-Road Engineering package)
( Y
page 212). R
Select the Offroad drive program (vehicles
without Off-Road Engineering package)
( Y
page 211). R
Select a higher vehicle level. R
Avoid high engine speeds. R
Shift to a lower gear using the left-hand steer-
ing wheel paddle shifter. R
Drive slowly. R
Where ruts are too deep, drive with the
wheels of one side on the center grassy area,
if possible.
Driving over obstacles
! Obstacles could damage the floor of the
vehicle or components of the chassis. Ask
passengers for guidance when driving over
large obstacles. The passenger should always
keep a safe distance from the vehicle when
doing so in order to avoid injury as a result of
unexpected vehicle movements. After driving
off-road or over obstacles, check the vehicle
for possible damage, especially to the under-
body and the components of the chassis.164
Driving tips
Driving and parking
Page 167 of 390
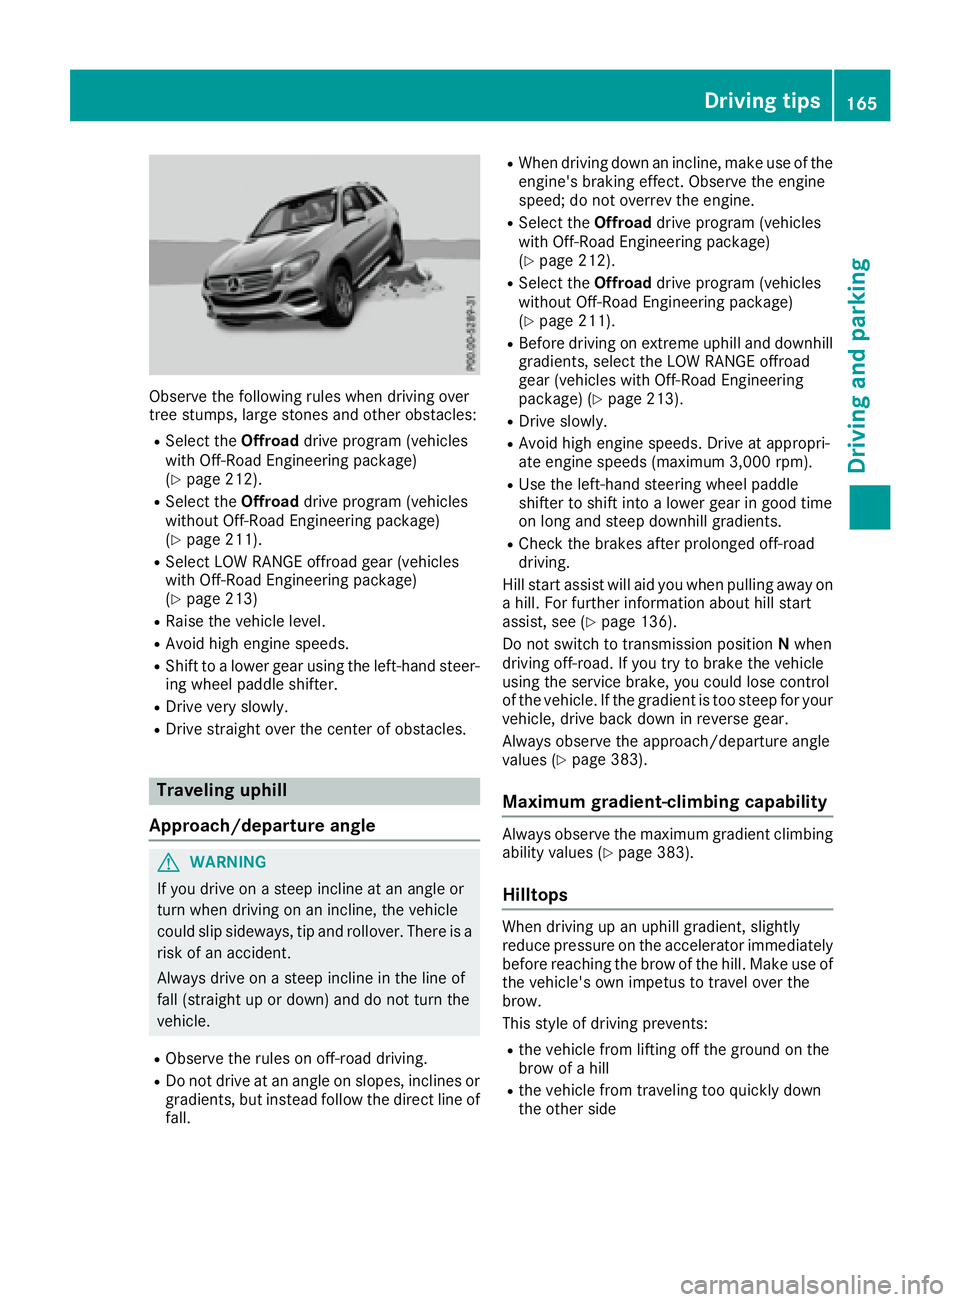
Observe the following rules when driving over
tree stumps, large stones and other obstacles: R
Select the Offroad drive program (vehicles
with Off-Road Engineering package)
( Y
page 212). R
Select the Offroad drive program (vehicles
without Off-Road Engineering package)
( Y
page 211). R
Select LOW RANGE offroad gear (vehicles
with Off-Road Engineering package)
( Y
page 213) R
Raise the vehicle level. R
Avoid high engine speeds. R
Shift to a lower gear using the left-hand steer-
ing wheel paddle shifter. R
Drive very slowly. R
Drive straight over the center of obstacles.
Traveling uphill
Approach/departure angle
G WARNING
If you drive on a steep incline at an angle or
turn when driving on an incline, the vehicle
could slip sideways, tip and rollover. There is a
risk of an accident.
Always drive on a steep incline in the line of
fall (straight up or down) and do not turn the
vehicle. R
Observe the rules on off-road driving. R
Do not drive at an angle on slopes, inclines or
gradients, but instead follow the direct line of
fall. R
When driving down an incline, make use of the
engine's braking effect. Observe the engine
speed; do not overrev the engine. R
Select the Offroad drive program (vehicles
with Off-Road Engineering package)
( Y
page 212). R
Select the Offroad drive program (vehicles
without Off-Road Engineering package)
( Y
page 211). R
Before driving on extreme uphill and downhill
gradients, select the LOW RANGE offroad
gear (vehicles with Off-Road Engineering
package) ( Y
page 213). R
Drive slowly. R
Avoid high engine speeds. Drive at appropri-
ate engine speeds (maximum 3,000 rpm). R
Use the left-hand steering wheel paddle
shifter to shift into a lower gear in good time
on long and steep downhill gradients. R
Check the brakes after prolonged off-road
driving.
Hill start assist will aid you when pulling away on
a hill. For further information about hill start
assist, see ( Y
page 136).
Do not switch to transmission position N when
driving off-road. If you try to brake the vehicle
using the service brake, you could lose control
of the vehicle. If the gradient is too steep for your
vehicle, drive back down in reverse gear.
Always observe the approach/departure angle
values ( Y
page 383).
Maximum gradient-climbing capability Always observe the maximum gradient climbing
ability values ( Y
page 383).
Hilltops When driving up an uphill gradient, slightly
reduce pressure on the accelerator immediately
before reaching the brow of the hill. Make use of
the vehicle's own impetus to travel over the
brow.
This style of driving prevents: R
the vehicle from lifting off the ground on the
brow of a hill R
the vehicle from traveling too quickly down
the other side Driving tips 165
Driving and parking Z
Page 170 of 390
R
you activat e th e Offroad Plus progra m (vehi-
cle s wit h th e Off-Road Engineerin g package)R
you shift th e transmission to position N while
drivin g
If cruise control is deactivated, you will hear a
warnin g tone . You will see th e Cruise Con ‐
tro l Off message in th e multifunction display
for approximately fiv e seconds.
i Whe n you switch off th e engine, th e last
speed store d is cleared .
Distance Pilot DISTRONIC
Gene ra l notesDistanc e Pilo t DISTRONI C regulates th e speed
and automatically help s you maintai n th e dis-
tance to th e vehicl e detecte d in front. Vehicles
are detecte d wit h th e aid of th e rada r sensor
system. Distanc e Pilo t DISTRONI C brakes auto-
matically so that th e set speed is no t exceeded .
You mus t select a lower gear in goo d time on
lon g and steep downhill gradients , especially if
th e vehicl e is laden or towin g a trailer . By doin g
so, you will mak e use of th e brakin g effec t of th e
engine. This relieves th e load on th e brak e sys-
te m and prevents th e brakes from overheating
and wearin g to o quickly.
If Distanc e Pilo t DISTRONI C detects that there is
a ris k of a collision , you will be warned visually
and acoustically. Without your intervention , Dis-
tance Pilo t DISTRONI C canno t preven t a colli-
sion . An intermittent warnin g tone will then
soun d and th e distanc e warnin g lamp will ligh t
up in th e instrumen t cluster. Brake immediately
in order to increase th e distanc e to th e vehicl e in
fron t or tak e evasive action provided it is saf e to
do so.
Fo r Distanc e Pilo t DISTRONI C to assist you
when driving, th e rada r sensor system mus t be
operational.
Dis tanc e P
ilo t DISTRONI C operate s in th e range
between 0 mph (0 km/h) and 12 0 mph
(20 0 km/h).
Do no t use Distanc e Pilo t DISTRONI C while driv-
in g on roads wit h steep gradients .
Since Distanc e Pilo t DISTRONI C transmit s rada r
waves, it can resemble th e rada r detectors of
th e responsibl e authorities. You can refer to th e
relevan t chapter in th e Operator' s Manual if
question s are asked about this. i US A only:
This device has been approve d by th e FCC as
a "Vehicular Radar System". The rada r sensor
is intended for use in an automotive rada r
system only. Removing, tamperin g with, or
altering th e device will voi d any warranties,
and is no t permitte d by th e FCC. Do no t tam -
per with, alter, or use in any non-approve d
way.
An y unauthorize d modification to this device
could voi d th e user’s authorit y to operate th e
equipment.
i Canada only: This device complies wit h
RSS-210 of Industry Canada. Operation is
subjec t to th e followin g tw o conditions:
1. This device may no t caus e harmful inter-
ference , and
2. This device mus t accept any interferenc e
received, includin g interferenc e that may
caus e undesired operation of th e device .
Removal, tampering, or altering of th e d evice
w
ill voi d any warranties, and is no t permitted.
Do no t tamper with, alter, or use in any non-
approve d way.
An y unauthorize d modification to this device
could voi d th e user's authorit y to operate th e
equipment.
Imp or tant safety notes
G WARNIN G
Distanc e Pilo t DISTRONI C does no t reac t to :R
people or animals R
stationary objects on th e road, e.g. stoppe d
or parked vehicles R
oncomin g vehicles and crossin g traffic
As a result , Distanc e Pilo t DISTRONI C may
neither giv e warnings no r interven e in suc h
situations. There is a ris k of an accident.
Always pay careful attention to th e traffic sit -
uation and be read y to brake.
G WARNIN G
Distanc e Pilo t DISTRONI C canno t always
clearly identify other roa d user s and complex
traffic situations.168
Driving systems
Driving and parking
Page 171 of 390
In such cases, Distance Pilot DISTRONIC may: R
give an unnecessary warning and then
brake the vehicle R
neither give a warning nor intervene R
accelerate or brake unexpectedly
There is a risk of an accident.
Continue to drive carefully and be ready to
brake, especially if Distance Pilot DISTRONIC
warns you.
G WARNING
Distance Pilot DISTRONIC brakes your vehicle
with up to 50% of the maximum possible
deceleration. If this deceleration is not suffi-
cient, Distance Pilot DISTRONIC alerts you
with a visual and acoustic warning. There is a
risk of an accident.
Apply the brakes yourself in these situations
and try to take evasive action.
! When Distance Pilot DISTRONIC or the
HOLD function is activated, the vehicle
brakes automatically in certain situations.
To avoid damage to the vehicle, deactivate
DISTRONIC PLUS and the HOLD function in
the following or similar situations: R
when towing the vehicle R
in the car wash
If you fail to adapt your driving style, Distance
Pilot DISTRONIC can neither reduce the risk of
an accident nor override the laws of physics.
Distance Pilot DISTRONIC cannot take into
account road, weather or traffic conditions. Dis-
tance Pilot DISTRONIC is only an aid. You are
responsible for the distance to the vehicle in
front, for vehicle speed, for braking in good time
and for staying in your lane.
Do not use Distance Pilot DISTRONIC: R
in road and traffic conditions which do not
allow you to maintain a constant speed, e.g. in
heavy traffic or on winding roads R
on slippery road surfaces. Braking or accel-
erating could cause the drive wheels to lose
traction and the vehicle could then skid R
when there is poor visibility, e.g. due to fog,
heavy rain or snow Distance Pilot DISTRONIC may not detect nar-
row vehicles driving in front, e.g. motorcycles, or
vehicles driving on a different line.
In particular, the detection of obstacles can be
impaired if: R
there is dirt on the sensors or anything else
covering the sensors R
there is snow or heavy rain R
there is interference by other radar sources R
there are strong radar reflections, for exam-
ple, in parking garages
If Distance Pilot DISTRONIC no longer detects a
vehicle in front, it may unexpectedly accelerate
to the speed stored.
This speed may: R
be too high if you are driving in a filter lane or
an exit lane R
be so high when driving in the right-hand lane
that you overtake vehicles in the left-hand
lane R
be so high when driving in the left-hand lane
that you overtake vehicles in the right-hand
lane
If there is a change of drivers, advise the new
driver of the speed stored.
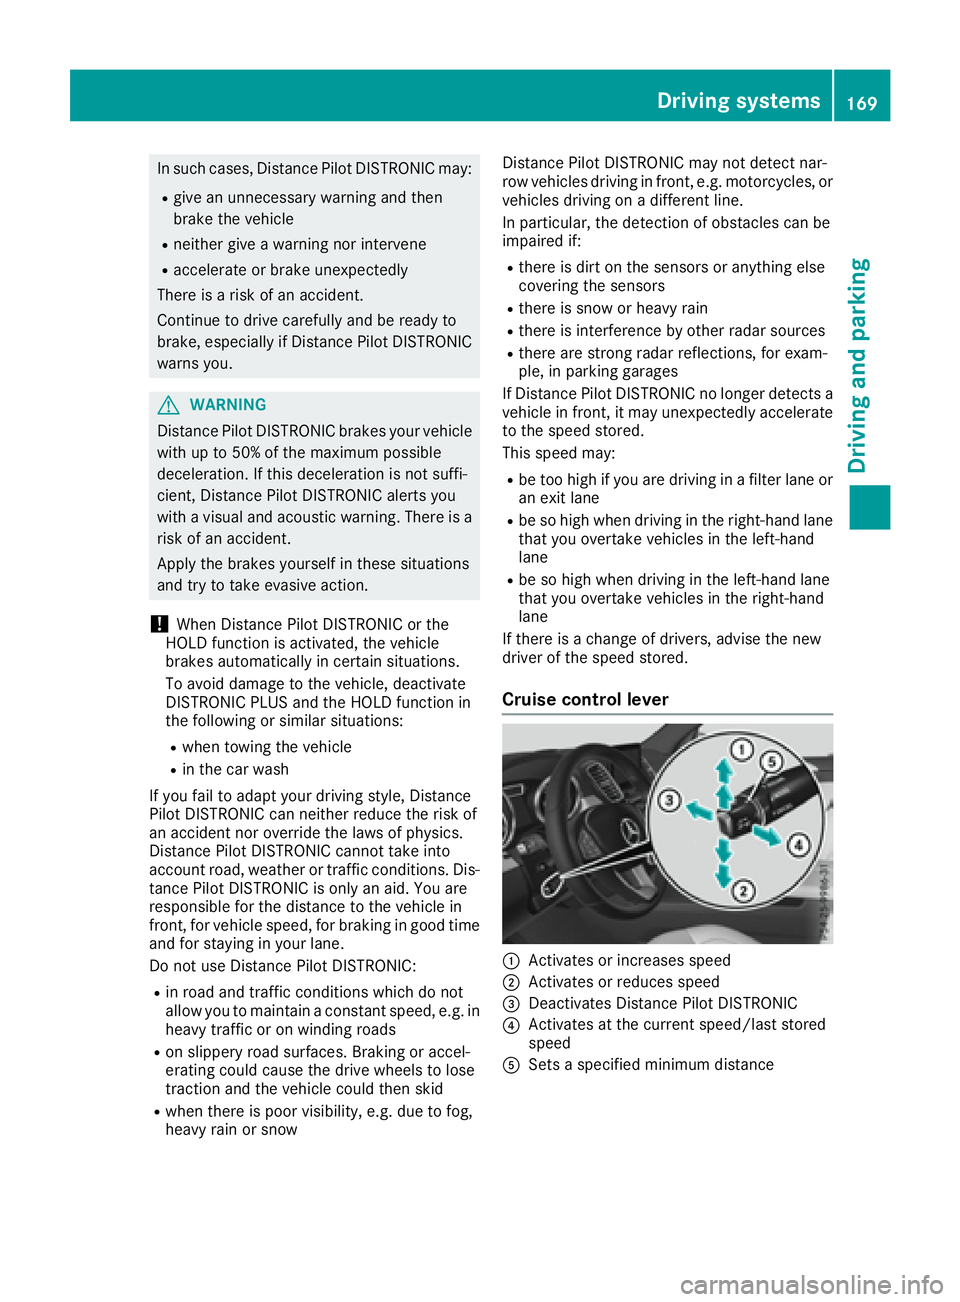
Cruise control lever
�C
Activates or increases speed
�D
Activates or reduces speed
�
Page 173 of 390
Selecting the drive program Distance Pilot DISTRONIC supports a sporty
driving style if you have selected the Sport or
Sport Plus drive program ( Y
page 143). Accel-
eration behind the vehicle in front or to the set
speed is then noticeably more dynamic. If you
have selected the Comfort drive program, the
vehicle accelerates more gently. This setting is
recommended in stop-and-start traffic.
Changing lanes If you change to the overtaking lane, Distance
Pilot DISTRONIC supports you if: R
you are driving faster than 45 mph (70 km/h) R
you switch on the appropriate turn signal R
Distance Pilot DISTRONIC does not currently
detect a danger of collision
If these conditions are fulfilled, your vehicle is
accelerated. Acceleration will be interrupted if
changing lanes takes too long or if the distance
between your vehicle and the vehicle in front
becomes too small.
i When you change lanes, Distance Pilot
DISTRONIC monitors the right lane (in left-
side traffic) or the left lane (in right-side traf-
fic).
Stopping
G WARNING
When leaving the vehicle, even if it is braked
only by DISTRONIC PLUS, it could roll away if: R
there is a malfunction in the system or in
the voltage supply. R
DISTRONIC PLUS has been deactivated
with the cruise control lever, e.g. by a vehi-
cle occupant or from outside the vehicle. R
the electrical system in the engine com-
partment, the battery or the fuses have
been tampered with. R
the battery is disconnected. R
the accelerator pedal has been depressed,
e.g. by a vehicle occupant.
There is a risk of an accident.
If you wish to exit the vehicle, always turn off
DISTRONIC PLUS and secure the vehicle
against rolling away. If Distance Pilot DISTRONIC detects that the
vehicle in front is stopping, it brakes your vehicle
to a stop.
Once your vehicle is stationary, it remains sta-
tionary and you do not need to depress the
brake.
After a time, the electric parking brake secures
the vehicle and relieves the service brake.
Depending on the specified minimum distance,
your vehicle will come to a standstill at a suffi-
cient distance behind the vehicle in front. The
specified minimum distance is set using the
control on the cruise control lever.
The transmission is shifted automatically to
position P if, with Distance Pilot DISTRONIC
activated and the vehicle stationary: R
the driver's door is open and the driver's seat
belt is unfastened. R
the engine is switched off, unless it is auto-
matically switched off by the ECO start/stop
function.
The electric parking brake secures the vehicle
automatically if, with Distance Pilot DISTRONIC
activated and the vehicle stationary: R
a system malfunction occurs. R
the power supply is not sufficient.
On steep uphill or downhill inclines or if there is
a malfunction, the transmission may also be
automatically shifted into position P .
Setting a speed Keep in mind that it may take a brief moment
until the vehicle has accelerated or braked to
the speed set. X
Press the cruise control lever up �C for a
higher speed or down �
Page 181 of 390
HOLD function
General notes The HOLD function can assist the driver in the
following situations: R
when pulling away, especially on steep slopes R
when maneuvering on steep slopes R
when waiting in traffic
The vehicle is kept stationary without the driver
having to depress the brake pedal.
The braking effect is canceled and the HOLD
function deactivated when you depress the
accelerator pedal to pull away.
i Do not use the HOLD function when driving
off-road, on steep uphill or downhill gradients
or on slippery or loose surfaces. The HOLD
function cannot hold the vehicle on such sur-
faces.
Important safety notes
G WARNING
When leaving the vehicle, it can still roll away
despite being braked by the HOLD function if: R
there is a malfunction in the system or in
the voltage supply. R
the HOLD function has been deactivated by
pressing the accelerator pedal or the brake
pedal, e.g. by a vehicle occupant. R
the electrical system in the engine com-
partment, the battery or the fuses have
been tampered with. R
the battery is disconnected
There is a risk of an accident.
If you wish to exit the vehicle, always turn off
the HOLD function and secure the vehicle
against rolling away.
! When DISTRONIC PLUS or the HOLD func-
tion is activated, the vehicle brakes automat-
ically in certain situations.
To avoid damage to the vehicle, deactivate
DISTRONIC PLUS and the HOLD function in
the following or similar situations: R
when towing the vehicle R
in the car wash
Deactivating the HOLD function ( Y
page 179). Activation conditions You can activate the HOLD function if: R
the vehicle is stationary R
the engine is running or if it has been auto-
matically switched off by the ECO start/stop
function R
the driver's door is closed or your seat belt is
fastened R
the electric parking brake is released R
the transmission is in position D , R or NR
Distance Pilot DISTRONIC is deactivated
Activating the HOLD function X
Make sure that the activation conditions are
met. X
Depress the brake pedal. X
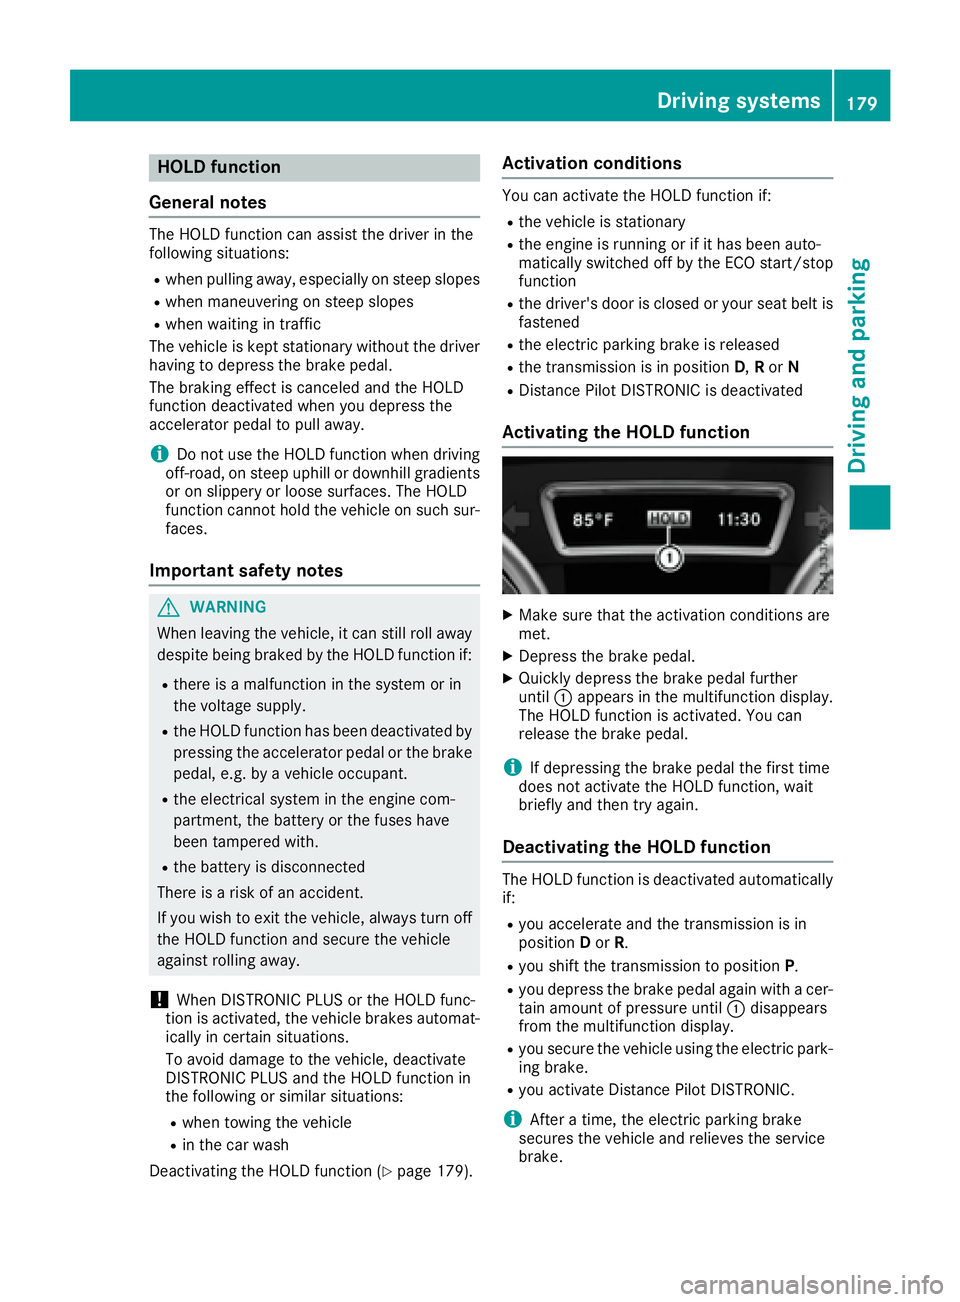
Quickly depress the brake pedal further
until �C appears in the multifunction display.
The HOLD function is activated. You can
release the brake pedal.
i If depressing the brake pedal the first time
does not activate the HOLD function, wait
briefly and then try again.
Deactivating the HOLD function The HOLD function is deactivated automatically
if: R
you accelerate and the transmission is in
position D or R . R
you shift the transmission to position P .R
you depress the brake pedal again with a cer-
tain amount of pressure until �C disappears
from the multifunction display. R
you secure the vehicle using the electric park-
ing brake. R
you activate Distance Pilot DISTRONIC.
i After a time, the electric parking brake
secures the vehicle and relieves the service
brake.Driving systems 179
Driving and parking Z
Page 187 of 390
the immediate vicinity of the vehicle. You
could damage the vehicle or the objects.
The sensors may not detect snow and other
objects that absorb ultrasonic waves.
Ultrasonic sources such as an automatic car
wash, the compressed-air brakes on a truck
or a pneumatic drill could cause PARKTRONIC
to malfunction.
PARKTRONIC may not function correctly on
uneven terrain.
! Fold in the ball coupling if the trailer tow
hitch is not required. PARKTRONIC measures
the minimum detection range to an obstacle
from the bumper, not the ball coupling.
Parking Assist PARKTRONIC is deactivated for
the rear area when you establish an electrical
connection between your vehicle and a trailer.
Parking Assist PARKTRONIC is activated auto-
matically when you: R
switch on the ignition R
shift the transmission to position D , R or NR
release the electric parking brake
Parking Assist PARKTRONIC is deactivated at
speeds above 11 mph (18 km/h). It is reactiva-
ted at lower speeds.
Range of the sensors
General notes Parking Assist PARKTRONIC does not take into
account obstacles located: R
below the detection range, e.g. people, ani-
mals or objects. R
above the detection range, e.g. overhanging
loads, truck overhangs or loading ramps.
�C
Sensors in the front bumper, left-hand side
(example) The sensors must be free from dirt, ice or slush.
They can otherwise not function correctly. Clean
the sensors regularly, taking care not to scratch
or damage them ( Y
page 323).
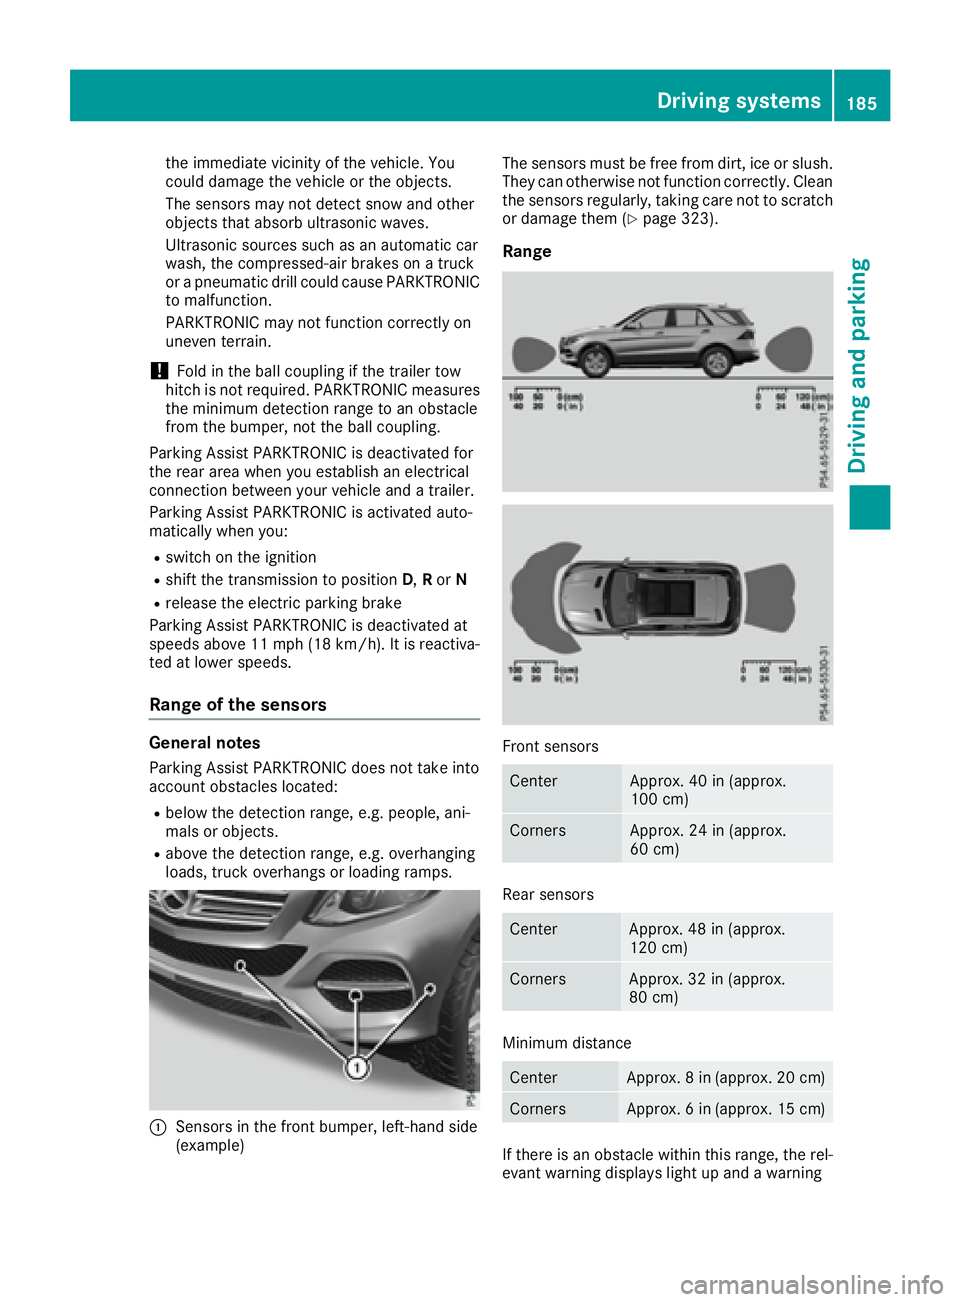
Range
Front sensors
Center Approx. 40 in (approx.
100 cm)
Corners Approx. 24 in (approx.
60 cm)
Rear sensors
Center Approx. 48 in (approx.
120 cm)
Corners Approx. 32 in (approx.
80 cm)
Minimum distance
Center Approx. 8 in (approx. 20 cm)
Corners Approx. 6 in (approx. 15 cm)
If there is an obstacle within this range, the rel-
evant warning displays light up and a warningDriving system s 185
Dr ivi ng an d parking Z
Page 191 of 390
R
that are parallel to the direction of travel and
at least 39.5 in (1.0 m) longer than your vehi-
cle R
that are at right angles to the direction of
travel and at least 39.5 in (1.0 m) wider than
your vehicle
i Note that Parking Pilot PARKTRONIC cannot
measure the depth of parking spaces if they
are at right angles to the direction of travel.
You need to judge whether your vehicle will fit
into the parking space.
When driving at speeds below 19 mph
(30 km/h), you will see parking symbol �D as a
status indicator in the instrument cluster. When
a parking space has been detected, an arrow
towards the right or the left also appears. Park-
ing Pilot displays only parking spaces on the
front-passenger side as standard. Parking
spaces on the driver's side are displayed as
soon as the turn signal on the driver's side is
activated. When parking on the driver's side,
this must remain activated until you confirm the
use of Parking Pilot by pressing the �v button
on the multifunction steering wheel. The system
automatically determines whether the parking
space is parallel or at right angles to the direc-
tion of travel.
A parking space is displayed while you are driv-
ing past it, and until you are approximately 50 ft
(15 m) away from it.
Parking
G WARNING
If you leave the vehicle when it is only being
braked by Active Parking Assist it could roll
away if: R
there is a malfunction in the system or in
the voltage supply. R
the electrical system in the engine com-
partment, the battery or the fuses have
been tampered with. R
the battery is disconnected. R
the accelerator pedal has been depressed,
e.g. by a vehicle occupant.
There is a risk of an accident.
Before leaving the vehicle, always secure it
against rolling away. i If Parking Assist PARKTRONIC detects
obstacles, Parking Pilot brakes automatically
whilst the vehicle is being parked. You are
responsible for braking in good time. X
Stop the vehicle when the parking space sym-
bol shows the desired parking space in the
instrument cluster. X
Shift the transmission to position R .
The Start Parking Pilot? Yes: OK No:
�8 message appears in the multifunction
display. X
To cancel the procedure: press the �8
button on the multifunction steering wheel or
pull away.
or X
To park using Parking Pilot: press the �v
button on the multifunction steering wheel.
The Parking Pilot Active Accelerate
and Brake Observe Surroundings mes-
sage appears in the multifunction display. X
Let go of the multifunction steering wheel. X
Back up the vehicle, being ready to brake at all
times. When backing up, drive at a speed
below approximately 6 mph (10 km/h). Oth-
erwise, Parking Pilot will be canceled.
Parking Pilot brakes the vehicle to a standstill
when the vehicle approaches the rear border
of the parking space.
Maneuvering may be required in tight parking
spaces.
The Parking Pilot Active Select D
Observe Surroundings message appears in
the multifunction display. X
Shift the transmission to position D while the
vehicle is stationary.
Parking Pilot immediately steers in the other
direction.
The Parking Pilot Active Accelerate
and Brake Observe Surroundings mes-
sage appears in the multifunction display.
i You will achieve the best results by waiting
for the steering procedure to complete before
pulling away. X
Drive forwards and be ready to brake at all
times.
Parking Pilot brakes the vehicle to a standstill.
The Parking Pilot Active Select R
Observe Surroundings message appears in
the multifunction display.
As soon as the parking procedure is complete,
the Parking Pilot Finished messageDriving systems 189
Driving and parking Z