2017 MERCEDES-BENZ GLE ignition
[x] Cancel search: ignitionPage 311 of 390
existing call, vehicle data is transferred to the
Customer Assistance Center.
The customer service representative can use
the received data to decide what kind of assis-
tance is required. You are then, for example,
guided to the nearest Mercedes-Benz Service
Center or a recovery vehicle is called.
If vehicle data needs to be transferred during an
MB Info call or a Roadside Assistance call, this is
initiated by the Customer Assistance Center.
The Roadside Assistance Connected mes-
sage appears in the display. If the Vehicle Health
Check can be started, the Request for Vehi‐
cle Diagnostics Received Start vehi‐
cle diagnostics? message appears in the
display. X
Press the Yes button to confirm the message.X
When the Vehicle Diagnostics Please
Start Ignition message appears: turn the
SmartKey to position 2 in the ignition lock
( Y
page 132). X
If the Please follow the instructions
received by phone and move your vehi‐
cle to a safe position. message
appears: please follow the instructions
received by phone and move your vehicle to a
safe position.
The message in the display disappears.
The vehicle operating state check begins.
During this procedure, you will see the Vehi‐
cle Diagnostics Active message.
If you select Cancel
, the Vehicle Health
Check is canceled completely.
When the check is complete, the Sending
vehicle diagnostics data. (Voice con‐
nection may be interrupted during
data transfer) message appears. The vehicle
data can now be sent. X
Press the OK button to confirm the message.
The voice connection with the Customer
Assistance Center is terminated.
The Vehicle Diagnostics: Transfer‐
ring Data... message appears.
The vehicle data is sent to the Customer
Assistance Center.
Depending on what the customer service rep-
resentative agreed with you, the voice connec-
tion is re-established after the transfer is com-
plete. If necessary, you will be contacted at a
later time by another means, e.g. by e-mail or
phone. Another function of the Vehicle Health Check is
the transfer of service data to the Customer
Assistance Center. If a service is due, the display
shows a message to this effect together with
information about any special offers at your
workshop.
This information can also be called up under
"Owners Online" at http://www.mbusa.com.
Information on the data stored in the vehicle
( Y
page 30).
Information on Roadside Assistance
( Y
page 27).
Downloading routes Downloading routes allows you to transfer and
save predefined routes in the navigation sys-
tem.
A route can be prepared and sent by either a
customer service representative or under "Own-
ers Online" at http://www.mbusa.com.
Each route can include up to four way points.
Once a route has been received by the naviga-
tion system, you will see the Do you want to
start route guidance? Destination
Received destination has been saved
in "Previous destinations". message on
the multimedia system display.
The route is saved. X
To start route guidance: select Yes .
An overview of the route is shown in the dis-
play.
If you select No , the saved route can be called
up later in the navigation menu. X
Select Start .
Route guidance starts.
Downloaded and saved routes can be called up
again.
Speed alert You can define the upper speed limit, which
must not be exceeded by the vehicle.
If this selected speed is exceeded by the vehicle,
a message will be sent to the Customer Assis-
tance Center. The Customer Assistance Center
then forwards this information to you.
You can select the way in which you receive this
information beforehand. Possible options
include text message, e-mail or an automated
call. Features 309
Stowage and features Z
Page 315 of 390
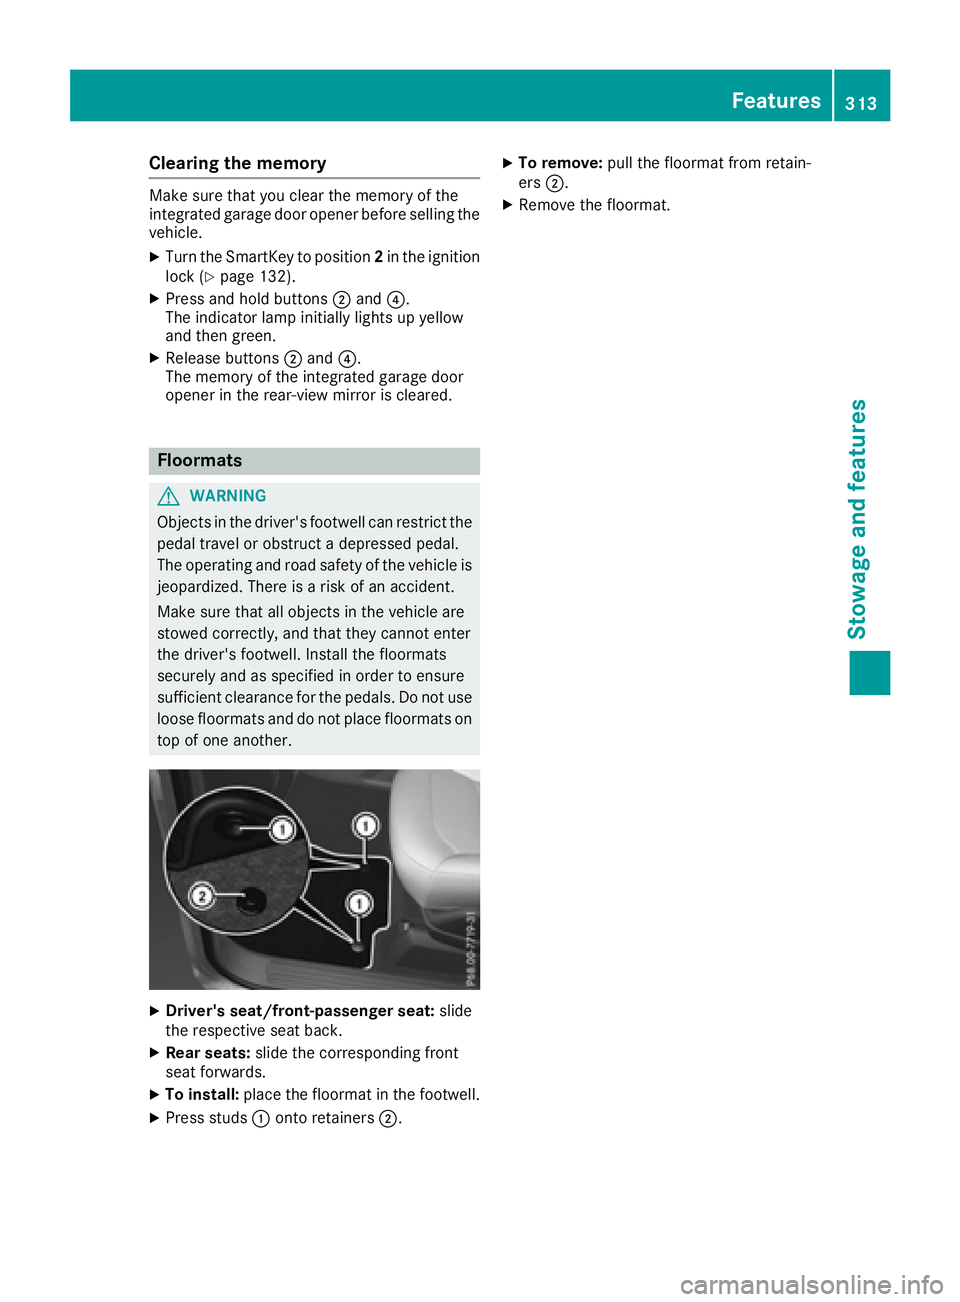
Clearing the memory Make sure that you clear the memory of the
integrated garage door opener before selling the
vehicle. X
Turn the SmartKey to position 2 in the ignition
lock ( Y
page 132).X
Press and hold buttons �D and �
Page 316 of 390
Engine compartment
Hood
Important safety notes
G WARNING
If the hood is unlatched, it may open up when
the vehicle is in motion and block your view.
There is a risk of an accident.
Never unlatch the hood while driving. Before
every trip, ensure that the hood is locked.
G WARNING
When opening and closing the hood, it may
suddenly fall into the closed position. There is
a risk of injury to persons within range of
movement of the hood.
Open and close the hood only when no one is
within its range of movement.
G WARNING
Opening the hood when the engine is over-
heated or when there is a fire in the engine
compartment could expose you to hot gases
or other service products. There is a risk of
injury.
Let an overheated engine cool down before
opening the hood. If there is a fire in the
engine compartment, keep the hood closed
and contact the fire department.
G WARNING
The engine compartment contains moving
components. Certain components, such as
the radiator fan, may continue to run or start
again suddenly when the ignition is off. There
is a risk of injury.
If you need to do any work inside the engine
compartment: R
switch off the ignition R
never reach into the area where there is a
risk of danger from moving components,
such as the fan rotation area R
remove jewelry and watches R
keep items of clothing and hair, for exam-
ple, away from moving parts
G WARNING
The ignition system and the fuel injection sys-
tem work under high voltage. If you touch
components which are under voltage, you
could get an electric shock. There is a risk of
injury.
Never touch components of the ignition sys-
tem or fuel injection system when the ignition
is switched on.
PLUG ‑ IN HYBRID vehicles: it is essential to
comply with the separate operating instruc-
tions. You could otherwise fail to recognize dan-
gers e.g. due to high voltage.
Opening the hood
G WARNING
Certain components in the engine compart-
ment, such as the engine, radiator and parts
of the exhaust system, can become very hot.
Working in the engine compartment poses a
risk of injury.
Where possible, let the engine cool down and
touch only the components described in the
following.
G WARNING
When the hood is open and the windshield
wipers are set in motion, you can be injured by
the wiper linkage. There is a risk of injury.
Always switch off the windshield wipers and
the ignition before opening the hood.
! Make sure that the windshield wipers are
not folded away from the windshield. You
could otherwise damage the windshield wip-
ers or the hood.314
Engine compartment
Maintenance and care
Page 319 of 390
Where possible, let the engine cool down and
touch only the components described in the
following.
G WARNING
The cooling system is pressurized, particularly
when the motor is warm. If you open the cap,
you could be scalded if hot coolant sprays out.
There is a risk of injury.
Let the engine cool down before you open the
cap. Wear gloves and eye protection. Slowly
open the cap to relieve pressure.
G WARNING
Windshield washer concentrate could ignite if
it comes into contact with hot engine compo-
nents or the exhaust system. There is a risk of
fire and injury.
Make sure that no windshield washer con-
centrate is spilled next to the filler neck.
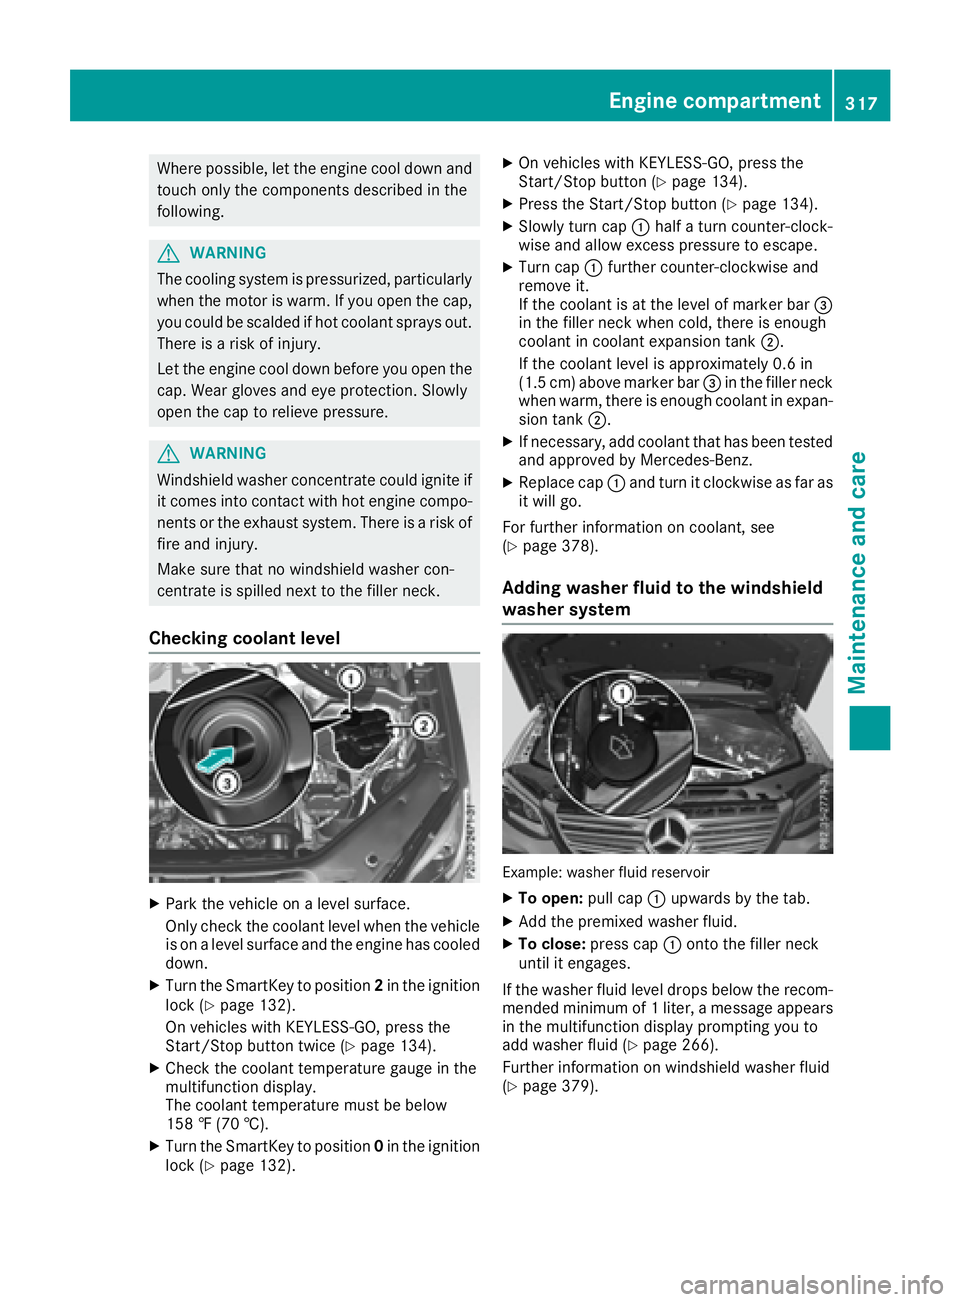
Checking coolant level
X
Park the vehicle on a level surface.
Only check the coolant level when the vehicle
is on a level surface and the engine has cooled
down. X
Turn the SmartKey to position 2 in the ignition
lock ( Y
page 132).
On vehicles with KEYLESS-GO, press the
Start/Stop button twice ( Y
page 134).X
Check the coolant temperature gauge in the
multifunction display.
The coolant temperature must be below
158 ‡ (70 †). X
Turn the SmartKey to position 0 in the ignition
lock ( Y
page 132). X
On vehicles with KEYLESS-GO, press the
Start/Stop button ( Y
page 134).X
Press the Start/Stop button ( Y
page 134).X
Slowly turn cap �C half a turn counter-clock-
wise and allow excess pressure to escape. X
Turn cap �C further counter-clockwise and
remove it.
If the coolant is at the level of marker bar �
Page 320 of 390
ASSYST PLUS
Service message The ASSYS T PLU S servic e interval display
inform s you of th e next servic e due date.
Information on th e typ e of servic e and servic e
intervals (see th e separat e Maintenance Book -
let).
You can obtain further information from an
authorize d Mercedes-Benz Cente r or at
http://www.mbusa.co m (US A only).
i The ASSYS T PLU S servic e interval display
does no t sho w any information on th e engin e
oil level. Observ e th e note s on th e engin e oil
level ( Y
page 315).
The multifunction display shows a servic e mes -
sage for several seconds, e.g. :R
Servic e A in .. Day sR
Servic e A DueR
Servic e A Overdu e by .. Day s
Dependin g on th e operating condition s of th e
vehicle, th e remaining time or distanc e until th e
next servic e due dat e is displayed.
The lette r A or B , possibl y in connection wit h a
number or another letter, shows th e typ e of ser -
vice. A stand s for a minor servic e and B for a
major service.
You can obtain further information from an
authorize d Mercedes-Benz Center.
The ASSYS T PLU S servic e interval display does
no t tak e int o accoun t any periods of time during
whic h th e battery is disconnected.
Maintainin g th e time-dependen t servic e sched-
ule: X
Not e down th e servic e due dat e displayed in
th e multifunction display before disconnect -
ing th e battery.
or X
Afte r reconnecting th e battery, subtrac t th e
battery disconnection periods from th e ser -
vic e dat e shown on th e display.
Hiding a service message X
Press th e �8 or �v butto n on th e steering
wheel. Displaying service messages X
Switc h on th e ignition .X
Press th e �Y or �e butto n on th e steering
whee l to select th e Serv. menu.X
Press th e �c or �d butto n to select th e
ASSYST PLU S submen u and confirm by press-
ing th e �v button.
The servic e due dat e appear s in th e multi-
function display.
Infor ma ti on about Service
Resetting the ASSYST PLUS service
interval display
! If th e ASSYS T PLU S servic e interval display
has been inadvertentl y reset , this setting can
be correcte d at a qualified specialist work-
shop.
Hav e servic e wor k carrie d out as described in
th e Maintenance Booklet . This may otherwise
lead to increased wear and damag e to th e
major assemblies or th e vehicle.
A qualified specialist workshop , e.g. an author-
ized Mercedes-Benz Center, will reset th e
ASSYS T PLU S servic e interval display after th e
servic e wor k has been carrie d out . You can also
obtain further information on maintenance
work, for example.
Special service requirements The specifie d maintenance interval takes only
th e normal operation of th e vehicl e int o
account. Under arduous operating condition s or
increased load on th e vehicle, maintenance
wor k mus t be carrie d out mor e frequently, for
example: R
regular cit y drivin g wit h frequen t intermediat e
stops R
if th e vehicl e is primarily used to travel short
distances R
use in mountainous terrain or on poor road
surfaces R
if th e engin e is often lef t idlin g for lon g periods
Under these or similar conditions, have, for
example, th e air filter, engin e oil and oil filter
replace d or changed mor e frequently. Under
arduous operating conditions, th e tires mus t be
checke d mor e often . Further information can be318
ASSYST PLUS
Maintenance and care
Page 322 of 390
! In car washes with a towing mechanism,
make sure that the automatic transmission is
in transmission position N , otherwise the
vehicle could be damaged. R
Vehicles with a SmartKey:
Do not remove the SmartKey from the igni-
tion lock. Do not open the driver's door or
front-passenger door when the engine is
switched off. Otherwise, the automatic
transmission selects park position P auto-
matically and locks the wheels. You can
prevent this by shifting the automatic trans-
mission to N beforehand.R
Vehicles with KEYLESS-GO:
Do not open the driver's door or front-
passenger door when the engine is
switched off. Otherwise, the automatic
transmission selects park position P auto-
matically and locks the wheels.
Observe the following to make sure that the
automatic transmission stays in position N :X
Make sure the vehicle is stationary and the
ignition is switched off. X
Turn the SmartKey to position 2 in the ignition
lock ( Y
page 132).
Use the SmartKey instead of the Start/Stop
button on vehicles with KEYLESS-GO. X
Depress and hold the brake pedal. X
Shift the automatic transmission to position
N . X
Release the brake pedal. X
Release the electric parking brake. X
Switch off the ignition and leave the SmartKey
in the ignition lock.
You can wash the vehicle in an automatic car
wash from the very start.
If the vehicle is very dirty, pre-wash it before
cleaning it in an automatic car wash.
After using an automatic car wash, wipe off wax
from the windshield and the wiper blades. This
will prevent smears and reduce wiping noises
caused by residue on the windshield.
Washing by hand
In some countries, washing by hand is only
allowed at specially equipped washing bays.
Observe the legal requirements in all countries
concerned. X
Do not use hot water and do not wash the
vehicle in direct sunlight. X
Use a soft sponge to clean. X
Use a mild cleaning agent, such as a car
shampoo approved by Mercedes-Benz. X
Thoroughly hose down the vehicle with a gen-
tle jet of water. X
Do not point the water jet directly towards the
air inlets. X
Use plenty of water and rinse out the sponge
frequently. X
Rinse the vehicle with clean water and dry
thoroughly with a chamois. X
Do not let the cleaning agent dry on the paint-
work.
When using the vehicle in winter, remove all
traces of road salt deposits carefully and as
soon as possible.
Power washers
G WARNING
The water jet from a circular jet nozzle (dirt
blasters) can cause invisible exterior damage
to the tires or chassis components. Compo-
nents damaged in this way may fail unexpect-
edly. There is a risk of an accident.
Do not use power washers with circular jet
nozzles to clean the vehicle. Have damaged
tires or chassis components replaced imme-
diately.
! Always maintain a distance of at least
11.8 in (30 cm) between the vehicle and the
power washer nozzle. Information about the
correct distance is available from the equip-
ment manufacturer.
Move the power washer nozzle around when
cleaning your vehicle.
Do not aim directly at any of the following: R
Tires R
Door gaps, roof gaps, joints, etc. R
Electrical components R
Battery R
Connectors R
Lamps R
Seals R
Trim R
Ventilation slots320
Care
Maintenance and care
Page 324 of 390
! Do not park your vehicle for a long period of
time directly after cleaning, particularly after
cleaning the wheel rim with wheel cleaner.
Wheel cleaner can lead to the increased cor-
rosion of the brake discs and pads. Therefore,
drive for a few minutes after cleaning. By
heating up the brakes, the brake discs and
pads dry. The vehicle can then be parked for a
long period of time.
Cleaning the windows
G WARNING
You could become trapped by the windshield
wipers if they start moving while cleaning the
windshield or wiper blades. There is a risk of
injury.
Always switch off the windshield wipers and
the ignition before cleaning the windshield or
wiper blades.
! Do not use dry cloths, abrasive products,
solvents or cleaning agents containing sol-
vents to clean the inside of the windows. Do
not touch the insides of the windows with
hard objects, e.g. an ice scraper or ring. There
is otherwise a risk of damaging the windows.
! Clean the water drainage channels of the
windshield and the rear window at regular
intervals. Deposits such as leaves, petals and
pollen may under certain circumstances pre-
vent water from draining away. This can lead
to corrosion damage and damage to elec-
tronic components. X
Clean the inside and outside of the windows
with a damp cloth and a cleaning product that
is recommended and approved by Mercedes-
Benz.
Cleaning wiper blades
G WARNING
You could become trapped by the windshield
wipers if they start moving while cleaning the
windshield or wiper blades. There is a risk of
injury.
Always switch off the windshield wipers and
the ignition before cleaning the windshield or
wiper blades. ! Do not pull the wiper blade. Otherwise, the
wiper blade could be damaged.
! Do not clean wiper blades too often and do
not rub them too hard. Otherwise, the graph-
ite coating could be damaged. This could
cause wiper noise.
! Hold the wiper arm securely when folding
back. The windshield could be damaged if the
wiper arm smacks against it suddenly. X
Fold the windshield wiper arms away from the
windshield ( Y
page 115). X
Carefully clean the wiper blades with a damp
cloth. X
Fold the windshield wiper arms back again
before switching on the ignition.
Cleaning the exterior lighting
! Only use cleaning agents or cleaning cloths
which are suitable for plastic light lenses.
Unsuitable cleaning agents or cleaning cloths
could scratch or damage the plastic light len-
ses. X
Clean the plastic lenses of the exterior light-
ing using a wet sponge and a mild cleaning
agent, e. g. Mercedes-Benz car shampoo or
cleaning cloths.
Cleaning the mirror turn signals
! Only use cleaning agents or cleaning cloths
that are suitable for plastic lenses. Unsuitable
cleaning agents or cleaning cloths could
scratch or damage the plastic lenses of the
mirror turn signals. X
Clean the plastic lenses of the mirror turn sig-
nals in the exterior mirror housing using a wet
sponge and mild cleaning agent, e.g.
Mercedes-Benz car shampoo or cleaning
cloths.
Cleaning the side running board
! Do not clean the aluminum inserts of the
side running board with alkaline or acidic
cleaners, such as wheel cleaner. Do not use
acidic wheel cleaners to remove brake dust.
The aluminum inserts could otherwise be
damaged.322
Care
Maintenance and care
Page 325 of 390
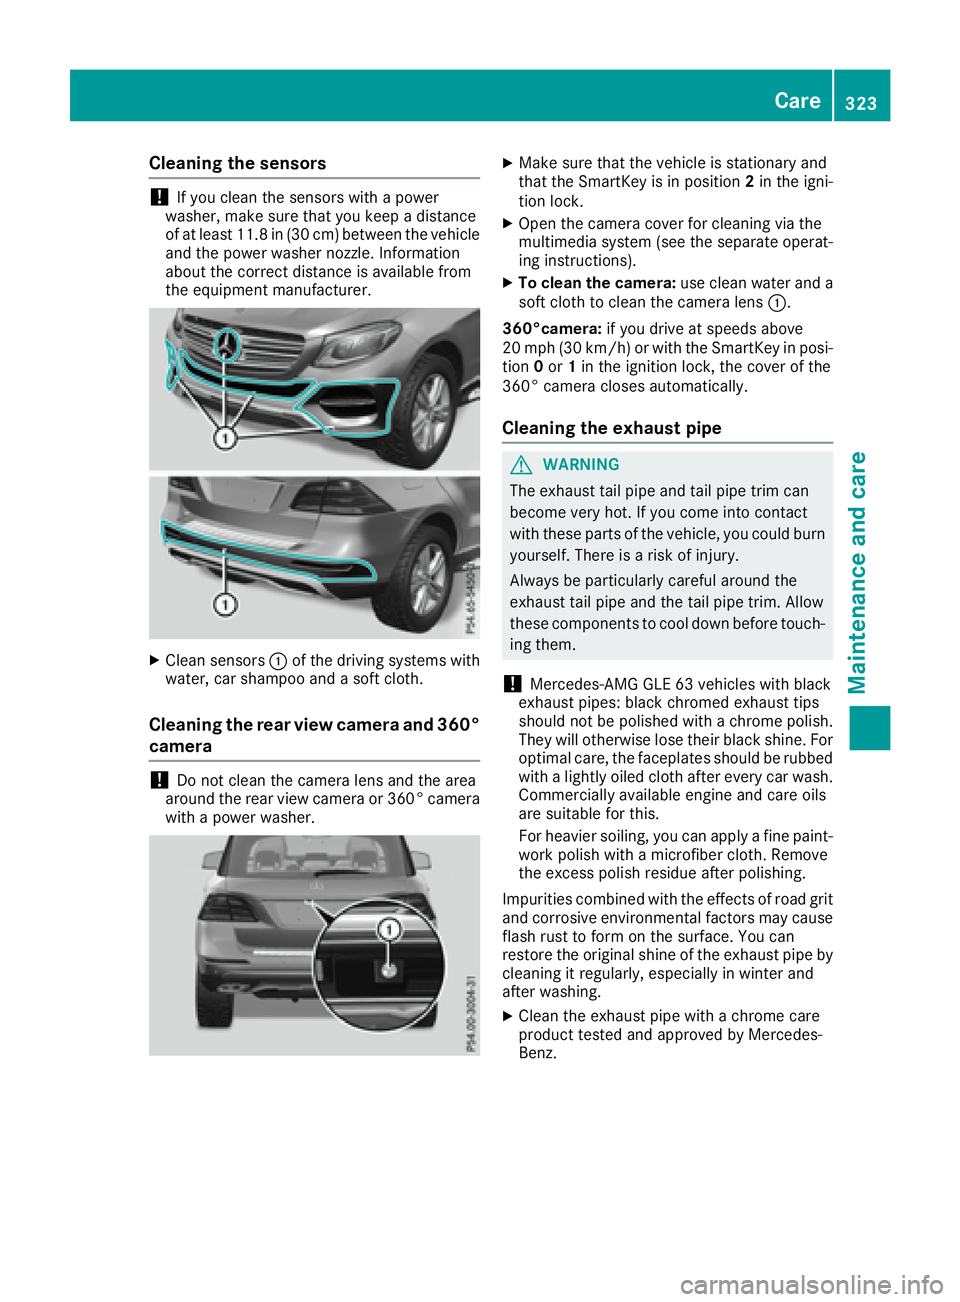
Cleaning the sensors
! If you clean the sensors with a power
washer, make sure that you keep a distance
of at least 11.8 in (30 cm ) betwee n the vehicl e
and the power washer nozzle. Information
about the correct distance is available from
the equipment manufacturer.
X
Clean sensors �C of the driving systems with
water, car shampoo and a soft cloth.
Cleaning the rear view camera and 360°
camera
! Do not clean the camera lens and the area
around the rear view camera or 360° camera
with a power washer. X
Make sure that the vehicle is stationary and
that the SmartKey is in position 2 in the igni-
tion lock. X
Open the camera cover for cleaning via the
multimedia system (see the separate operat-
ing instructions). X
To clean the camera: use clean water and a
soft cloth to clean the camera lens �C .
360°camera: if you drive at speeds above
20 mph (30 km/h) or with the SmartKey in posi-
tion 0 or 1 in the ignition lock, the cover of the
360° camera closes automatically.
Cleaning the exhaust pipe
G WARNING
The exhaust tail pipe and tail pipe trim can
become very hot. If you come into contact
with these parts of the vehicle, you could burn
yourself. There is a risk of injury.
Always be particularly careful around the
exhaust tail pipe and the tail pipe trim. Allow
these components to cool down before touch-
ing them.
! Mercedes-AMG GLE 63 vehicles with black
exhaust pipes: black chromed exhaust tips
should not be polished with a chrome polish.
They will otherwise lose their black shine. For
optimal care, the faceplates should be rubbed
with a lightly oiled cloth after every car wash.
Commercially available engine and care oils
are suitable for this.
For heavier soiling, you can apply a fine paint-
work polish with a microfiber cloth. Remove
the excess polish residue after polishing.
Impurities combined with the effects of road grit
and corrosive environmental factors may cause
flash rust to form on the surface. You can
restore the original shine of the exhaust pipe by
cleaning it regularly, especially in winter and
after washing. X
Clean the exhaust pipe with a chrome care
product tested and approved by Mercedes-
Benz. Care 323
Maintenance and care Z