2017 MERCEDES-BENZ GLE COUPE steering
[x] Cancel search: steeringPage 63 of 366
merely aids designed to assist driving. You are
responsible for maintaining the distance to the
vehicle in front, for vehicle speed, for braking in
good time, and for staying in lane. Always adapt
your driving style to suit the prevailing road and
weather conditions and maintain a safe distance
from the vehicle in front. Drive carefully.
The driving safety systems described only work
as effectively as possible when there is ade-
quate contact between the tires and the road
surface. Pay particular attention to the informa-
tion regarding tires, recommended minimum
tire tread depths etc. in the "Wheels and tires"
section (
Ypage 321).
In wintry driving conditions, always use winter
tires (M+S tires) and if necessary, snow chains.
Only in this way will the driving safety systems
described in this section work as effectively as
possible.
ABS (Anti-lock Braking System)
General information
ABS regulates brake pressure in such a way that
the wheels do not lock when you brake. This
allows you to continue steering the vehicle when
braking.
The ! ABS warning lamp in the instrument
cluster lights up when the ignition is switched
on. It goes out when the engine is running.
ABS works from a speed of about 5 mph
(8 km/h), regardless of road-surface conditions.
ABS works on slippery surfaces, even when you
only brake gently.
Important safety notes
iObserve the "Important safety notes" sec-
tion (Ypage 60).
GWARNING
If ABS is faulty, the wheels could lock when
braking. The steerability and braking charac-
teristics may be severely impaired. Addition-
ally, further driving safety systems are deac-
tivated. There is an increased danger of skid-
ding and accidents.
Drive on carefully. Have ABS checked imme-
diately at a qualified specialist workshop. When ABS is malfunctioning, other systems,
including driving safety systems, will also
become inoperative. Observe the information
on the ABS warning lamp (
Ypage 253) and dis-
play messages which may be shown in the
instrument cluster (
Ypage 222).
Braking
XIf ABS intervenes: continue to depress the
brake pedal vigorously until the braking sit-
uation is over.
XTo make a full brake application: depress
the brake pedal with full force.
If ABS intervenes when braking, you will feel a
pulsing in the brake pedal.
The pulsating brake pedal can be an indication
of hazardous road conditions, and functions as a reminder to take extra care while driving.
BAS (Brake Assist System)
General information
BAS operates in emergency braking situations.
If you depress the brake pedal quickly, BAS
automatically boosts the braking force, thus
shortening the stopping distance.
Important safety notes
iObserve the "Important safety notes" sec-
tion (Ypage 60).
GWARNING
If BAS is malfunctioning, the braking distance
in an emergency braking situation is
increased. There is a risk of an accident.
In an emergency braking situation, depress
the brake pedal with full force. ABS prevents
the wheels from locking.
Braking
XKeep the brake pedal firmly depressed until
the emergency braking situation is over.
ABS prevents the wheels from locking.
The brakes will function as usual once you
release the brake pedal. BAS is deactivated.
Driving safety systems61
Safety
Z
Page 71 of 366
Up to a speed of approximately 44 mph
(70 km/h), Active Brake Assist with cross-traffic
function may react to:
Rstationary objects in the path of your vehicle,
e.g. stopped or parked vehicles
Rpedestrians in the path of your vehicle
iIf there is an increased risk of a collision,
preventive passenger protection measures
(PRE-SAFE
®) are triggered (Ypage 53).
If the risk of collision with the vehicle in front
remains and you do not brake, take evasive
action or accelerate significantly, the vehicle
may perform automatic emergency braking, up
to the point of full brake application. Automatic
emergency braking is not performed until imme-
diately prior to an imminent accident.
If you apply the brake yourself in a critical sit-
uation or during autonomous braking, braking
assistance is provided according to the situa-
tion. If necessary, this increases the brake pres-
sure up to full brake application.
To avoid a collision, Active Brake Assist with
cross-traffic function calculates the brake force
necessary if:
Ryou approach an obstacle, and
RActive Brake Assist with cross-traffic function
has detected a risk of a collision
When driving at a speed
under20 mph(30 km/h): if you depress the
brake pedal, Active Brake Assist with cross-traf-
fic function is activated. The increase in brake
pressure from Active Brake Assist with cross-
traffic function is carried out at the last possible
moment.
When driving at a speed
above20 mph(30 km/h): if you depress the
brake pedal sharply, Active Brake Assist with
cross-traffic function automatically increases
the brake pressure to a degree suited to the
traffic situation.
Active Brake Assist with cross-traffic function
provides braking assistance in hazardous situa- tions with vehicles in front within a speed range
between 4 mph (7 km/h) and 155 mph
(250 km/h). Up to a speed of approximately 44 mph
(70 km/h) the Active Brake Assist with cross-
traffic function assists you with braking in haz-
ardous situations with:
Rstationary obstacles in the path of the vehicle,
e.g. stopped or parked vehicles
Rstationary pedestrians in the path of the vehi-
cle
Robstacles crossing your path that move in the
detection range of the sensors and are detec-
ted
XKeep the brake pedal depressed until the
emergency
braking situation is over.
ABS prevents the wheels from locking.
You can prevent the intervent
ion of Active Brake
Assist with cross-traffic function at any time by:
Rdepressing the accelerator pedal further
Ractivating kickdown
Rreleasing the brake pedal
The braking application of Active Brake Assist
with cross-traffic function is ended automati-
cally if:
Ryou maneuver to avoid the obstacle
Rthere is no longer a risk of collision
Rthere is no longer an obstacle detected in
front of your vehicle
STEER CONTROL
General information
STEER CONTROL helps you by transmitting a
noticeable steering force to the steering wheel
in the direction required for vehicle stabilization.
This steering assistance is provided in particular
if:
Rboth right wheels or both left wheels are on a wet or slippery road surface when you brake
Rthe vehicle starts to skid
Important safety notes
iObserve the "Important safety notes" sec-
tion (Ypage 60).
Driving safety systems69
Safety
Z
Page 72 of 366

No steering assistance is provided from STEER
CONTROL, if:
RESP®is deactivated
RESP®is malfunctioning
Rthe steering is malfunctioning
If ESP®is malfunctioning, you will be assisted
further by the electrical power steering.
Protection against theft
Immobilizer
XTo activate with the SmartKey: remove the
SmartKey from the ignition lock.
XTo activate with KEYLESS-GO: switch the
ignition off and open the driver's door.
XTo deactivate: switch on the ignition.
The immobilizer prevents your vehicle from
being started without the correct SmartKey.
When leaving the vehicle, always take the
SmartKey with you and lock the vehicle. Anyone
can start the engine if a valid SmartKey has been
left inside the vehicle.
iThe immobilizer is always deactivated when
you start the engine.
In the event that the engine cannot be started
(yet the vehicle's battery is charged), the sys-
tem is not operational. Contact an authorized
Mercedes-Benz Center or call
1-800-FOR-MERCedes (in the USA) or
1-800-387-0100 (in Canada).
ATA (anti-theft alarm system)
XTo arm: lock the vehicle with the SmartKey or
KEYLESS-GO.
Indicator lamp :flashes. The alarm system
is armed after approximately 15 seconds.
XTo deactivate: unlock the vehicle with the
SmartKey or KEYLESS-GO.
or
XInsert the SmartKey into the ignition lock.
A visual and audible alarm is triggered if the
alarm system is armed and you open:
Ra door
Rthe vehicle with the mechanical key
Rthe tailgate
Rthe hood
XTo switch the alarm off with the Smart-
Key: press the %or& button on the
SmartKey.
The alarm is switched off.
or
XRemove the Start/Stop button from the igni-
tion lock.
XInsert the SmartKey into the ignition lock.
The alarm is switched off.
XTo stop the alarm using KEYLESS-GO:
grasp the outside door handle. The SmartKey
must be outside the vehicle.
The alarm is switched off.
or
XPress the Start/Stop button on the dash-
board. The SmartKey must be inside the vehi- cle.
The alarm is switched off.
The alarm is not switched off, even if you close
the open door that triggered it, for example.
iIf the alarm continues for more than
30 seconds, the mbrace emergency call sys-
tem automatically notifies the Customer
Assistance Center. This is done either by text message or data connection. The emergency
call system sends the message or data provi-
ded that:
Ryou have subscribed to the mbrace service.
Rthe mbrace service has been activated
properly.
Rthe necessary mobile phone network is
available.
70Protection against theft
Safety
Page 93 of 366
Correct driver's seat position
GWARNING
You could lose control of your vehicle if you do the following while driving:
Radjust the driver's seat, head restraint,
steering wheel or mirrors
Rfasten the seat belt
There is a risk of an accident.
Adjust the driver's seat, head restraint, steer-
ing wheel and mirror and fasten your seat belt before starting the engine.
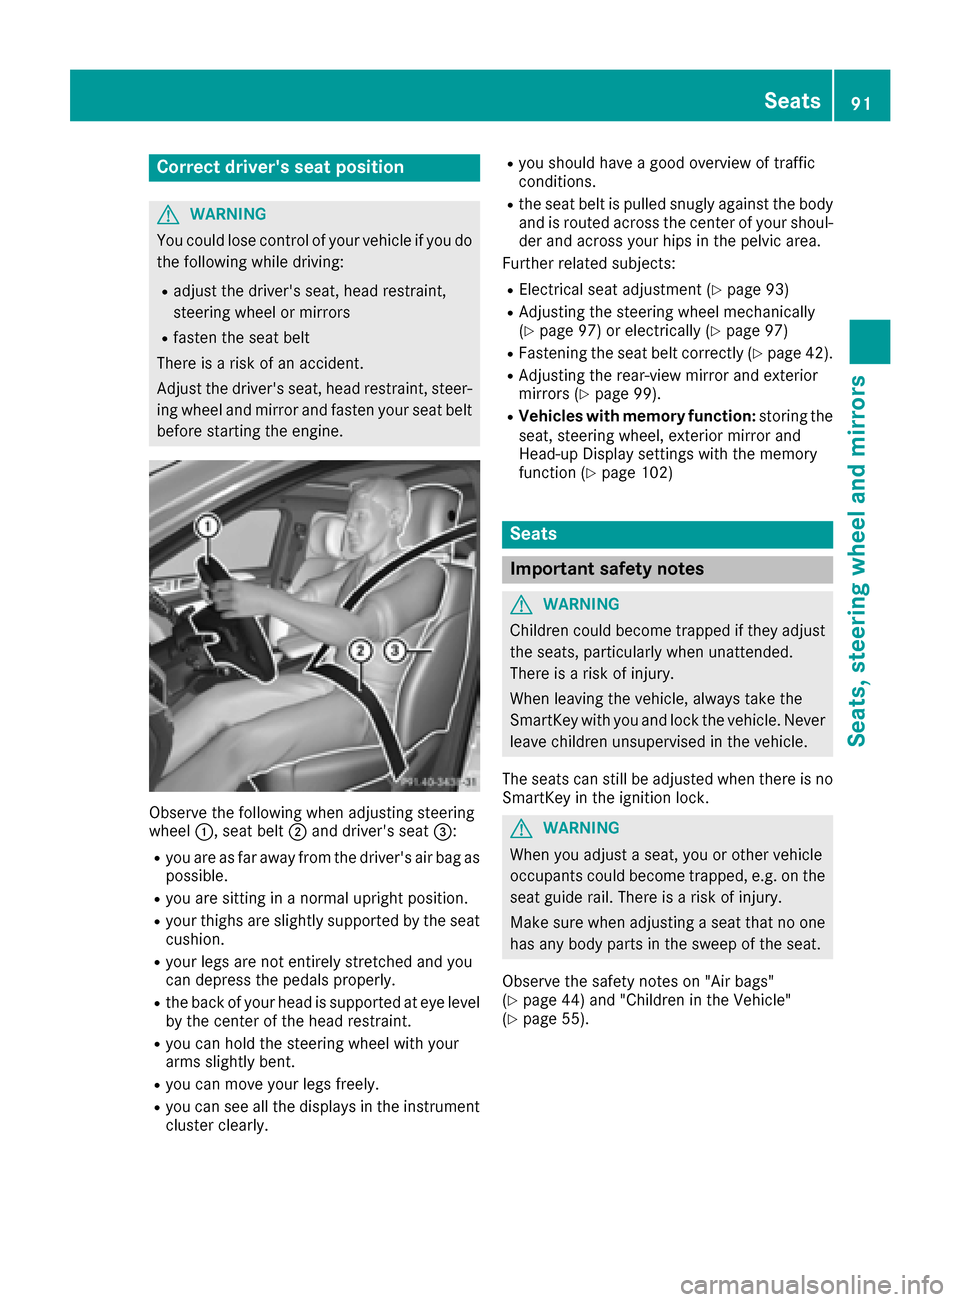
Observe the following when adjusting steering
wheel :, seat belt ;and driver's seat =:
Ryou are as far away from the driver's air bag as
possible.
Ryou are sitting in a normal upright position.
Ryour thighs are slightly supported by the seat
cushion.
Ryour legs are not entirely stretched and you
can depress the pedals properly.
Rthe back of your head is supported at eye level
by the center of the head restraint.
Ryou can hold the steering wheel with your
arms slightly bent.
Ryou can move your legs freely.
Ryou can see all the displays in the instrument
cluster clearly.
Ryou should have a good overview of traffic
conditions.
Rthe seat belt is pulled snugly against the bodyand is routed across the center of your shoul-
der and across your hips in the pelvic area.
Further related subjects:
RElectrical seat adjustment (Ypage 93)
RAdjusting the steering wheel mechanically
(Ypage 97) or electrically (Ypage 97)
RFastening the seat belt correctly (Ypage 42).
RAdjusting the rear-view mirror and exterior
mirrors (Ypage 99).
RVehicles with memory function: storing the
seat, steering wheel, exterior mirror and
Head-up Display settings with the memory
function (
Ypage 102)
Seats
Important safety notes
GWARNING
Children could become trapped if they adjust
the seats, particularly when unattended.
There is a risk of injury.
When leaving the vehicle, always take the
SmartKey with you and lock the vehicle. Never
leave children unsupervised in the vehicle.
The seats can still be adjusted when there is no
SmartKey in the ignition lock.
GWARNING
When you adjust a seat, you or other vehicle
occupants could become trapped, e.g. on the seat guide rail. There is a risk of injury.
Make sure when adjusting a seat that no one
has any body parts in the sweep of the seat.
Observe the safety notes on "Air bags"
(
Ypage 44) and "Children in the Vehicle"
(Ypage 55).
Seats91
Seats, steering wheel and mirrors
Z
Page 94 of 366
GWARNING
You could lose control of your vehicle if you do the following while driving:
Radjust the driver's seat, head restraint,
steering wheel or mirrors
Rfasten the seat belt
There is a risk of an accident.
Adjust the driver's seat, head restraint, steer-
ing wheel and mirror and fasten your seat belt before starting the engine.
GWARNING
If you adjust the seat height carelessly, you or
other vehicle occupants could be trapped and
thereby injured. Children in particular could
accidentally press the electrical seat adjust-
ment buttons and become trapped. There is a
risk of injury.
While moving the seats, make sure that your
hands or other body parts do not get under the
lever assembly of the seat adjustment sys-
tem.
GWARNING
If the head restraints are not installed or not
adjusted correctly, they cannot provide pro-
tection as intended. There is an increased risk
of injury in the head and neck area, e.g. in the event of an accident or when braking.
Always drive with the head restraints instal-
led. Before driving off, make sure for every
vehicle occupant that the center of the head
restraint supports the back of the head at
about eye level.
GWARNING
The seat belt does not offer the intended level of protection if you have not moved the back-
rest to an almost vertical position. When brak-
ing or in the event of an accident, you could
slide underneath the seat belt and sustain
abdomen or neck injuries, for example. This
poses an increased risk of injury or even fatal injury.
Adjust the seat properly before beginning
your journey. Always ensure that the backrest
is in an almost vertical position and that the
shoulder section of your seat belt is routed
across the center of your shoulder.
!To avoid damage to the seats and the seat
heating, observe the following information:
Rkeep liquids from spilling on the seats. If
liquid is spilled on the seats, dry them as
soon as possible.
Rif the seat covers are damp or wet, do not
switch on the seat heating. The seat heat-
ing should also not be used to dry the seats.
Rclean the seat covers as recommended;
see "Interior care".
Rdo not transport heavy loads on the seats.
Do not place sharp objects on the seat
cushions, e.g. knives, nails or tools. The
seats should only be occupied by passen-
gers, if possible.
Rwhen the seat heating is in operation, do
not cover the seats with insulating materi-
als, e.g. blankets, coats, bags, seat covers,
child seats or booster seats.
!Make sure that there are no objects in the
footwell under or behind the seats when mov-
ing the seats back. There is a risk that the
seats and/or the objects could be damaged.
iThe head restraints cannot be removed from
the front and rear seats.
For more information, contact a qualified spe-
cialist workshop.
iFurther related subjects:
RCargo compartment enlargement (folding
down the rear bench seat) (Ypage 273)
92Seats
Seats, steering wheel and mirrors
Page 95 of 366

Adjusting the seats electrically
:Headrestrain theight
;Seat cushion angle
=Seat height
?Seat fore-and-af tadjustmen t
ABackrest angle
iVehicles wit hmemory function :if PRE -
SAFE®has been triggered ,th efront-
passenger seat will be moved to abette rposi-
tion if it was previously in an unfavorable posi-
tion .
iVehicles wit hmemory function :when th e
seat is moved forward sor backwards ,th e
headres tis moved up or down automatically.
Adjusting the head restraints
Import ant safety notes
GWARNIN G
You could lose control of your vehicl eif you do
th efollowin gwhile driving:
Radjust th edriver's seat ,head restraint,
steering whee lor mirror s
Rfastenth eseat belt
There is aris kof an accident.
Adjus tth edriver's seat ,head restraint, steer -
ing whee land mirror and faste nyour seat belt
before starting th eengine.
GWARNIN G
If th ehead restraints are no tinstalled or no t
adjusted correctly, they canno tprovid epro -
tection as intended. There is an increased ris k
of injury in thehead and neck area, e.g. in th e
event of an acciden tor when braking .
Always drive wit hth ehead restraints instal -
led. Befor edrivin goff ,mak esur efor every
vehicl eoccupant that th ecenter of th ehead
restrain tsupport sth ebac kof th ehead at
about eye level.
Do no trotate th ehead restraints of th efron tand
rear seats. Otherwise ,you canno tadjust th e
height and angle of th ehead restraints to th e
correc tposition .
Using th efore-and-af tadjustment, adjust th e
head restrain tso that it is as close as possibl eto
your head .
Observ eth eimportant safet ynote sregarding
th eseat s (
Ypage 91).
Adjusting the front head restraints fore-
and-aft position
Withthis function you can adjust th edistanc e
between th ehead restrain tand th ebac kof th e
seat occupant's head .
XTo moveforwards :pull th ehead restrain t
forward sin th edirection of th earrow until it
engages.
There are several notches .
XTo movebackwards :press and hold release
butto n: and push th ehead restrain tback-
wards.
XWhen th ehead restrain tis in th edesired posi-
tion ,release th ebutto nand mak esur ethat
th ehead restrain tis engage din position .
iAdjustth ehead restrain tso that th ebac kof
your head is as close to th ehead restrain tas
possible.
Seats93
Seats, steering wheel and mirrors
Z
Page 96 of 366

Adjusting the heightofthe head
restraints electri cally
XTo adjust thehea drestrain theight :slid e
th eswitch for head restrain tadjustmen t
(
Ypage 93 )up or down in the direction of the
arrow.
Adjusting the luxury head restraints
XTo adjust the side bolsters of the head
restraint: push or pull right and/or left-hand
side bolster :into the desired position.
XTo adjust the fore/aft position of the head
restraint: push or pull the head restraint in
the direction of arrow ;.
iAdjust the head restraint so that the back of
your head is as close to the head restraint as
possible.
Rear seat head restraints
Folding the outer head restraints up or
down
XTo fold down: press release catch :.
The head restraint moves back down auto-
matically.
XTo fold upwards: grasp the back of the head
restraint and pull upwards.
Adjusting the height of the middle head
restraints
XTo raise: pull the head restraint up to the
desired position.
XTo lower: press release catch :and push
the head restraint down until it is in the
desired position.
Removing and installing the rear seat
head restraints
XCenter head restraint only: pull the head
restraint up as far as it will go.
XTo remove: press release catch :and pull
the head restraint out of the guides.
XTo re-install: insert the head restraint so that
the notches on the bar are on the left when
viewed in the direction of travel.
XPush the head restraint down until you hear it engage in position.
94Seats
Seats, steering wheel and mirrors
Page 97 of 366
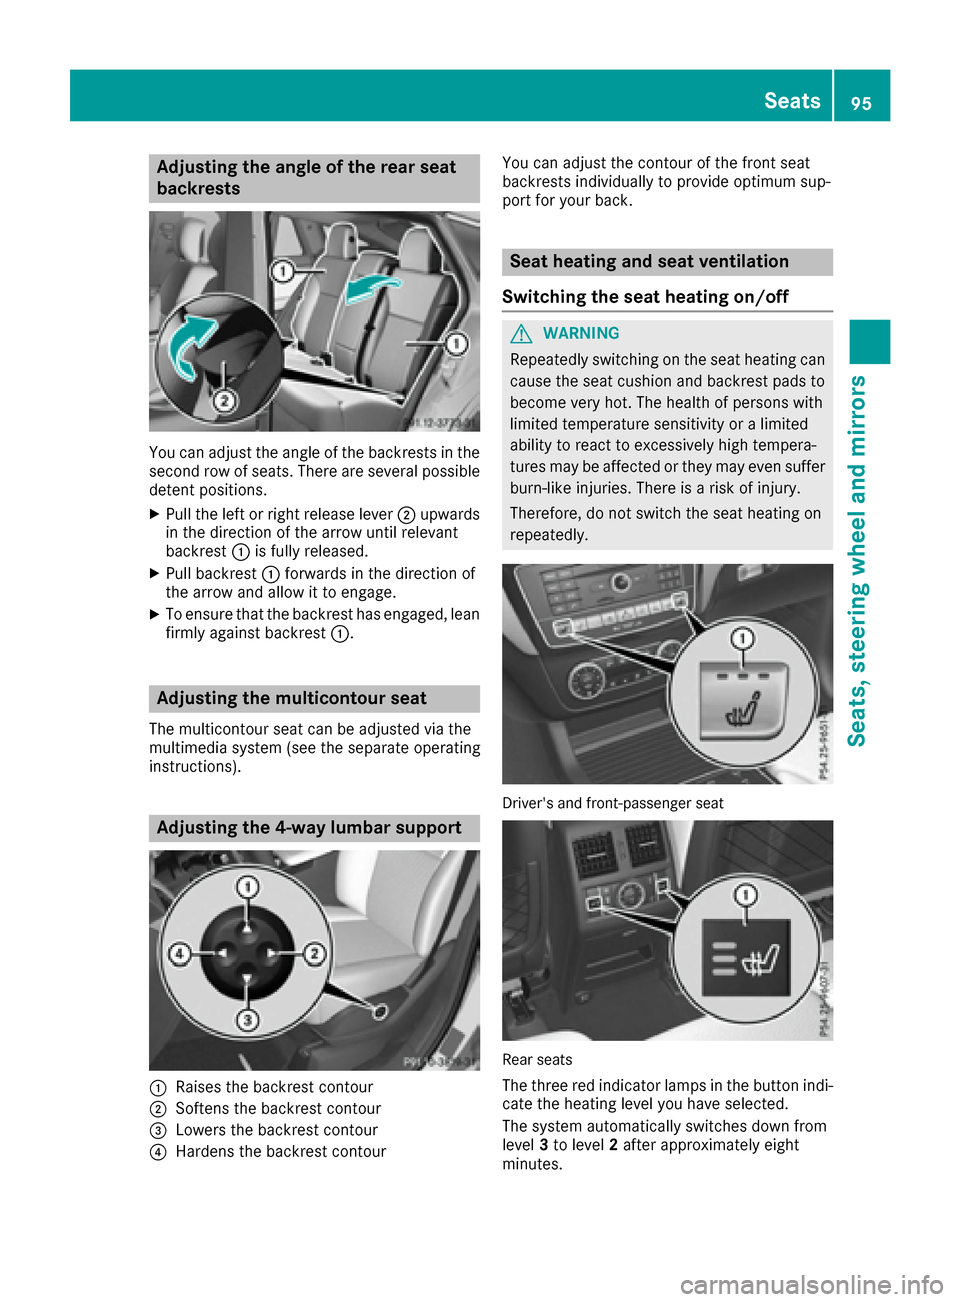
Adjusting the angleofthe rear seat
backrests
You can adjust th eangle of th ebackrest sin th e
secon drow of seats. There are several possibl e
deten tpositions.
XPull th elef tor right release lever ;upwards
in th edirection of th earrow until relevan t
backrest :is fully released.
XPull backrest :forward sin th edirection of
th earrow and allow it to engage .
XTo ensurethat th ebackrest has engaged, lean
firmly against backrest :.
Adjusting themulticontour seat
The multicontour seat can be adjusted via th e
multimedia system (see th eseparat eoperating
instructions).
Adjusting the 4-way lumbar support
:Raises th ebackrest contour
;Soften sth ebackrest contour
=Lowers th ebackrest contour
?Harden sth ebackrest contour You can adjust th
econtour of th efron tseat
backrest sindividually to provid eoptimum sup-
por tfor your back.
Seat heating and seat ventilati on
Switching the seat heating on/off
GWARNIN G
Repeatedly switching on th eseat heating can
caus eth eseat cushion and backrest pads to
become ver yhot .The healt hof person swit h
limite dtemperature sensitivit yor alimite d
abilit yto reac tto excessivel yhigh tempera-
tures may be affecte dor they may eve nsuffer
burn-like injuries. There is aris kof injury.
Therefore ,do no tswitch th eseat heating on
repeatedly.
Driver's and front-passenger seat
Rear seat s
The three red indicator lamp sin th ebutto nindi-
cat eth eheating level you hav eselected.
The system automatically switches down from
level 3to level 2after approximately eigh t
minutes.
Seats95
Seats, steering wheel and mirrors
Z