2017 MERCEDES-BENZ GLE COUPE warning
[x] Cancel search: warningPage 346 of 366
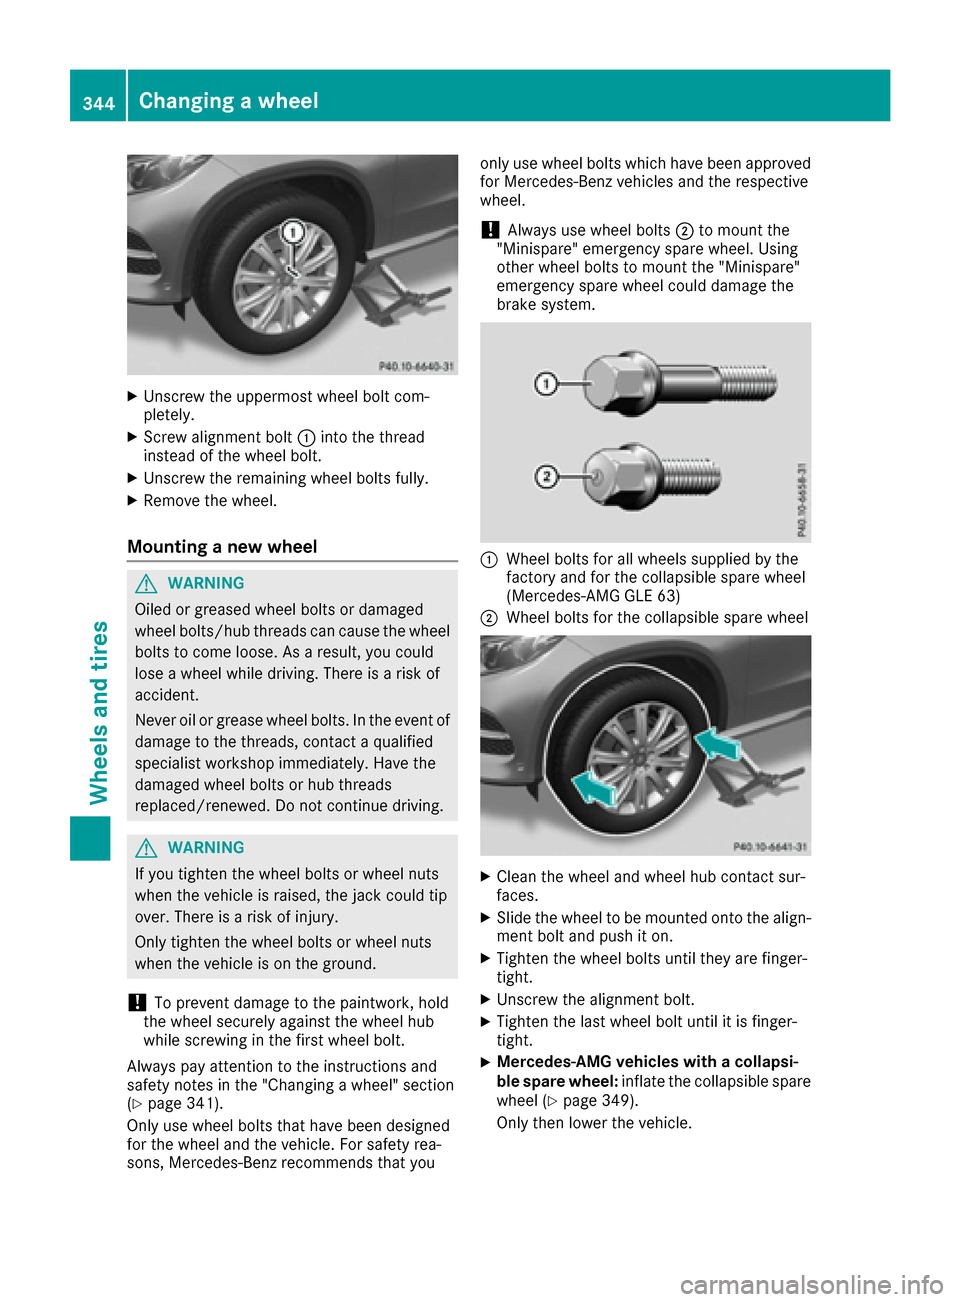
XUnscrew the uppermost wheel bolt com-
pletely.
XScrew alignment bolt:into the thread
instead of the wheel bolt.
XUnscrew the remaining wheel bolts fully.
XRemove the wheel.
Mounting a new wheel
GWARNING
Oiled or greased wheel bolts or damaged
wheel bolts/hub threads can cause the wheel bolts to come loose. As a result, you could
lose a wheel while driving. There is a risk of
accident.
Never oil or grease wheel bolts. In the event of
damage to the threads, contact a qualified
specialist workshop immediately. Have the
damaged wheel bolts or hub threads
replaced/renewed. Do not continue driving.
GWARNING
If you tighten the wheel bolts or wheel nuts
when the vehicle is raised, the jack could tip
over. There is a risk of injury.
Only tighten the wheel bolts or wheel nuts
when the vehicle is on the ground.
!To prevent damage to the paintwork, hold
the wheel securely against the wheel hub
while screwing in the first wheel bolt.
Always pay attention to the instructions and
safety notes in the "Changing a wheel" section
(
Ypage 341).
Only use wheel bolts that have been designed
for the wheel and the vehicle. For safety rea-
sons, Mercedes-Benz recommends that you only use wheel bolts which have been approved
for Mercedes-Benz vehicles and the respective
wheel.
!Always use wheel bolts
;to mount the
"Minispare" emergency spare wheel. Using
other wheel bolts to mount the "Minispare"
emergency spare wheel could damage the
brake system.
:Wheel bolts for all wheels supplied by the
factory and for the collapsible spare wheel
(Mercedes-AMG GLE 63)
;Wheel bolts for the collapsible spare wheel
XClean the wheel and wheel hub contact sur-
faces.
XSlide the wheel to be mounted onto the align-
ment bolt and push it on.
XTighten the wheel bolts until they are finger-
tight.
XUnscrew the alignment bolt.
XTighten the last wheel bolt until it is finger-
tight.
XMercedes-AMG vehicles with a collapsi-
ble spare wheel: inflate the collapsible spare
wheel (
Ypage 349).
Only then lower the vehicle.
344Changing a wheel
Wheels and tires
Page 347 of 366
Lowering the vehicle
GWARNING
The wheels could work loose if the wheel nuts and bolts are not tightened to the specified
tightening torque. There is a risk of accident.
Have the tightening torque immediately
checked at a qualified specialist workshop
after a wheel is changed.
!Mercedes-AMG vehicles with a collapsi-
ble spare wheel: before lowering the vehicle,
inflate the collapsible spare wheel with the
tire inflation compressor. The wheel rim could
otherwise be damaged.
XPlace the ratchet wrench onto the hexagon
nut of the jack so that the letters ABare visi-
ble.
XTurn the ratchet wrench until the vehicle is
once again standing firmly on the ground.
XPlace the jack to one side.
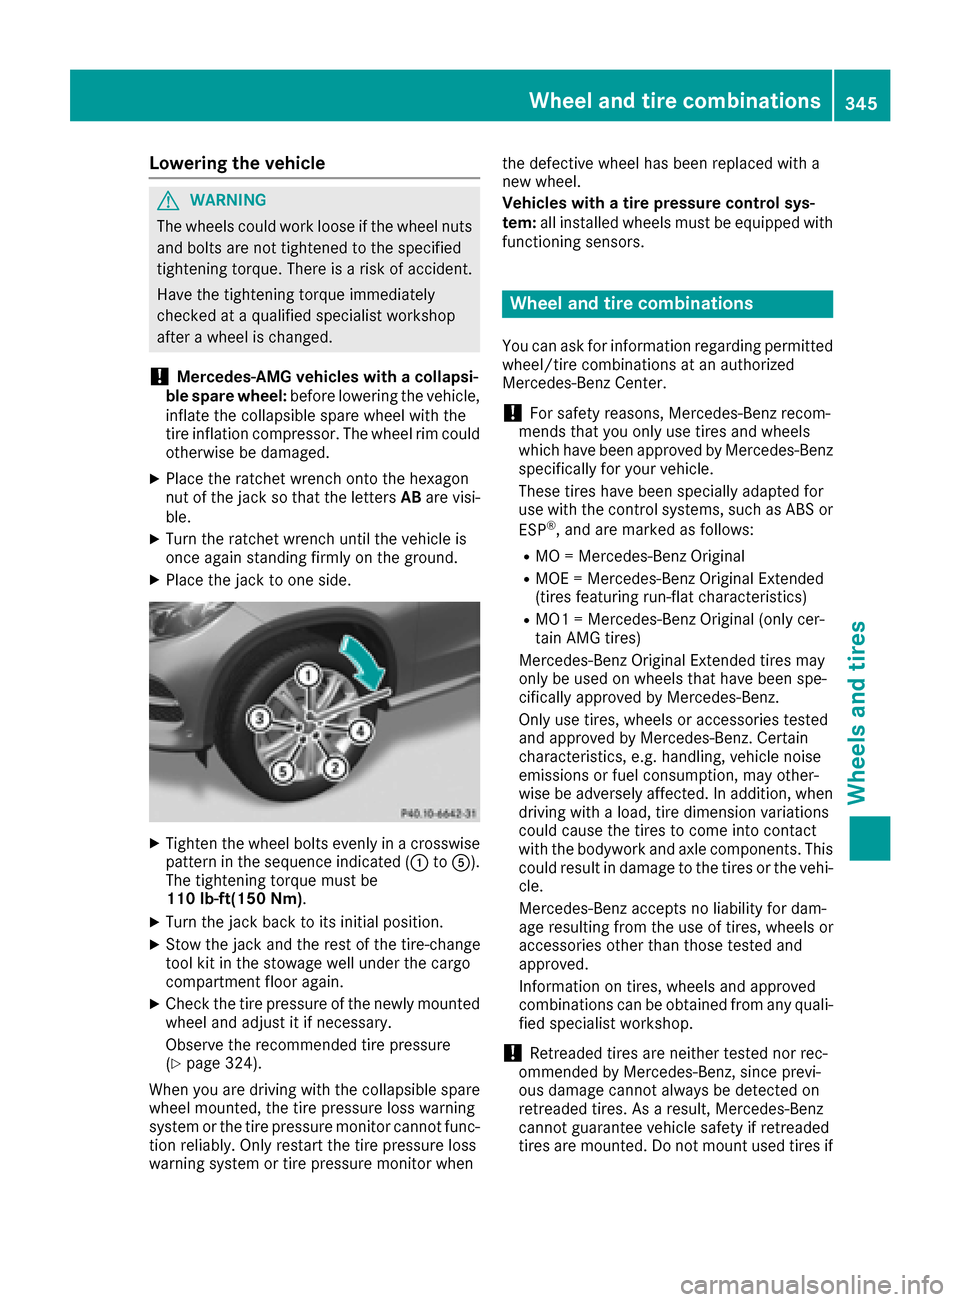
XTighten the wheel bolts evenly in a crosswise pattern in the sequence indicated (: toA).
The tightening torque must be
110 lb-f t(150 Nm).
XTurn the jack back to its initial position.
XStow the jack and the rest of the tire-change
tool kit in the stowage well under the cargo
compartment floor again.
XCheck the tire pressure of the newly mounted
wheel and adjust it if necessary.
Observe the recommended tire pressure
(
Ypage 324).
When you are driving with the collapsible spare
wheel mounted, the tire pressure loss warning
system or the tire pressure monitor cannot func-
tion reliably. Only restart the tire pressure loss
warning system or tire pressure monitor when the defective wheel has been replaced with a
new wheel.
Vehicles with a tire pressure control sys-
tem:
all installed wheels must be equipped with
functioning sensors.
Wheel and tire combinations
You can ask for information regarding permitted
wheel/tire combinations at an authorized
Mercedes-Benz Center.
!For safety reasons, Mercedes-Benz recom-
mends that you only use tires and wheels
which have been approved by Mercedes-Benz
specifically for your vehicle.
These tires have been specially adapted for
use with the control systems, such as ABS or
ESP
®, and are marked as follows:
RMO = Mercedes-Benz Original
RMOE = Mercedes-Benz Original Extended
(tires featuring run-flat characteristics)
RMO1 = Mercedes-Benz Original (only cer-
tain AMG tires)
Mercedes-Benz Original Extended tires may
only be used on wheels that have been spe-
cifically approved by Mercedes-Benz.
Only use tires, wheels or accessories tested
and approved by Mercedes-Benz. Certain
characteristics, e.g. handling, vehicle noise
emissions or fuel consumption, may other-
wise be adversely affected. In addition, when
driving with a load, tire dimension variations
could cause the tires to come into contact
with the bodywork and axle components. This
could result in damage to the tires or the vehi- cle.
Mercedes-Benz accepts no liability for dam-
age resulting from the use of tires, wheels or
accessories other than those tested and
approved.
Information on tires, wheels and approved
combinations can be obtained from any quali-
fied specialist workshop.
!Retreaded tires are neither tested nor rec-
ommended by Mercedes-Benz, since previ-
ous damage cannot always be detected on
retreaded tires. As a result, Mercedes-Benz
cannot guarantee vehicle safety if retreaded
tires are mounted. Do not mount used tires if
Wheel and tire combinations345
Wheels and tires
Z
Page 349 of 366
tion reliably. Only restart the tire pressure loss
warning system or tire pressure monitor when
the defective wheel has been replaced with a
new wheel.
Vehicles with tire pressure monitor:after
mounting an emergency spare wheel, the sys-
tem may still display the tire pressure of the
removed wheel for a few minutes. The value dis-
played for the mounted emergency spare wheel
is not the same as the current tire pressure of
the emergency spare wheel.
Removing/stowing the emergency
spare wheel
Vehicles with a "Minispare" emergency
spare wheel under the cargo compart-
ment floor
Always observe the instructions and safety
notes in the "Mounting a wheel" section
(
Ypage 341).
The "Minispare" emergency spare wheel can be
found in the stowage well under the cargo com-
partment floor.
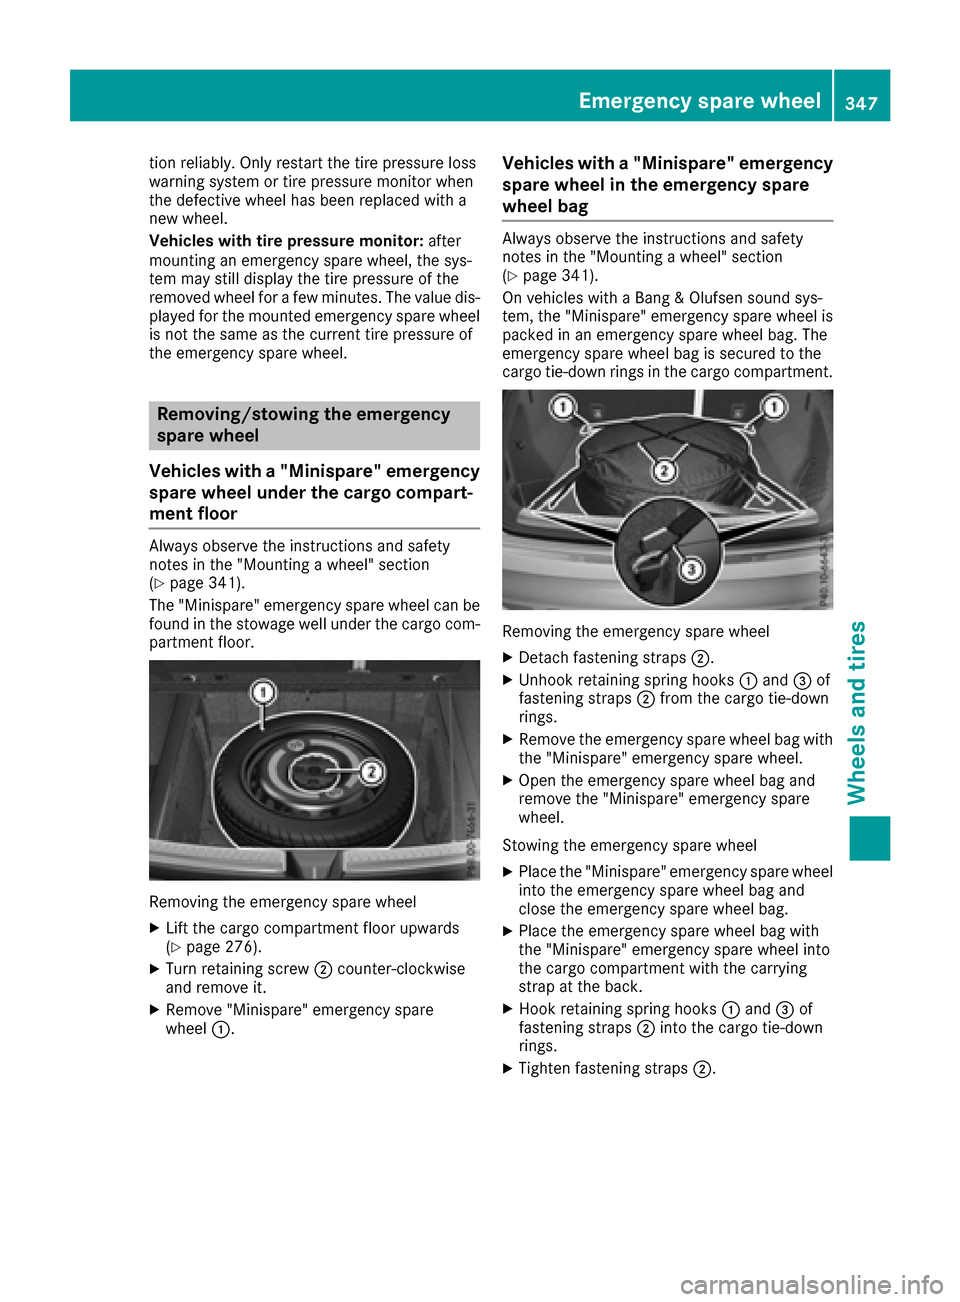
Removing the emergency spare wheel
XLift the cargo compartment floor upwards
(Ypage 276).
XTurn retaining screw ;counter-clockwise
and remove it.
XRemove "Minispare" emergency spare
wheel :.
Vehicles with a "Minispare" emergency
spare wheel in the emergency spare
wheel bag
Always observe the instructions and safety
notes in the "Mounting a wheel" section
(
Ypage 341).
On vehicles with a Bang & Olufsen sound sys-
tem, the "Minispare" emergency spare wheel is packed in an emergency spare wheel bag. The
emergency spare wheel bag is secured to the
cargo tie-down rings in the cargo compartment.
Removing the emergency spare wheel
XDetach fastening straps ;.
XUnhook retaining spring hooks :and =of
fastening straps ;from the cargo tie-down
rings.
XRemove the emergency spare wheel bag with
the "Minispare" emergency spare wheel.
XOpen the emergency spare wheel bag and
remove the "Minispare" emergency spare
wheel.
Stowing the emergency spare wheel
XPlace the "Minispare" emergency spare wheel
into the emergency spare wheel bag and
close the emergency spare wheel bag.
XPlace the emergency spare wheel bag with
the "Minispare" emergency spare wheel into
the cargo compartment with the carrying
strap at the back.
XHook retaining spring hooks :and =of
fastening straps ;into the cargo tie-down
rings.
XTighten fastening straps ;.
Emergency sparewheel347
Wheels an d tires
Z
Page 354 of 366
from the data shown here. You can find the
data applicable to your vehicle on the vehicle
identification plate.
Vehicle identification number (VIN)
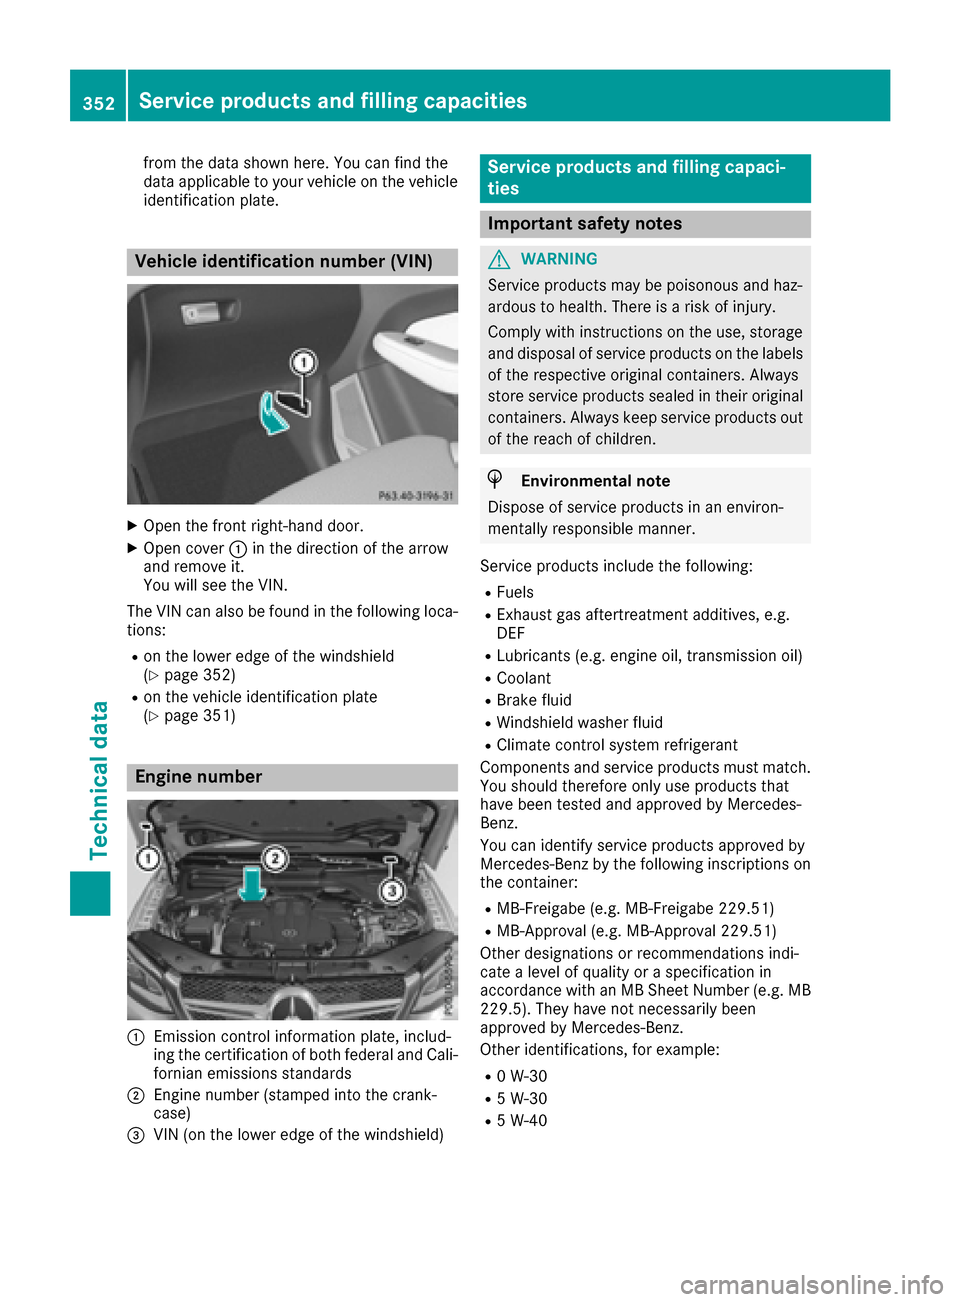
XOpen the front right-hand door.
XOpen cover:in the direction of the arrow
and remove it.
You will see the VIN.
The VIN can also be found in the following loca-
tions:
Ron the lower edge of the windshield
(Ypage 352)
Ron the vehicle identification plate
(Ypage 351)
Engine number
:Emission control information plate, includ-
ing the certification of both federal and Cali-
fornian emissions standards
;Engine number (stamped into the crank-
case)
=VIN (on the lower edge of the windshield)
Service products and filling capaci-
ties
Important safety notes
GWARNING
Service products may be poisonous and haz-
ardous to health. There is a risk of injury.
Comply with instructions on the use, storage
and disposal of service products on the labels
of the respective original containers. Always
store service products sealed in their original
containers. Always keep service products out
of the reach of children.
HEnvironmental note
Dispose of service products in an environ-
mentally responsible manner.
Service products include the following:
RFuels
RExhaust gas aftertreatment additives, e.g.
DEF
RLubricants (e.g. engine oil, transmission oil)
RCoolant
RBrake fluid
RWindshield washer fluid
RClimate control system refrigerant
Components and service products must match.
You should therefore only use products that
have been tested and approved by Mercedes-
Benz.
You can identify service products approved by
Mercedes-Benz by the following inscriptions on
the container:
RMB-Freigabe (e.g. MB-Freigabe 229.51)
RMB-Approval (e.g. MB-Approval 229.51)
Other designations or recommendations indi-
cate a level of quality or a specification in
accordance with an MB Sheet Number (e.g. MB 229.5). They have not necessarily been
approved by Mercedes-Benz.
Other identifications, for example:
R0 W-30
R5 W-30
R5 W-40
352Service products and filling capacities
Technical data
Page 356 of 366
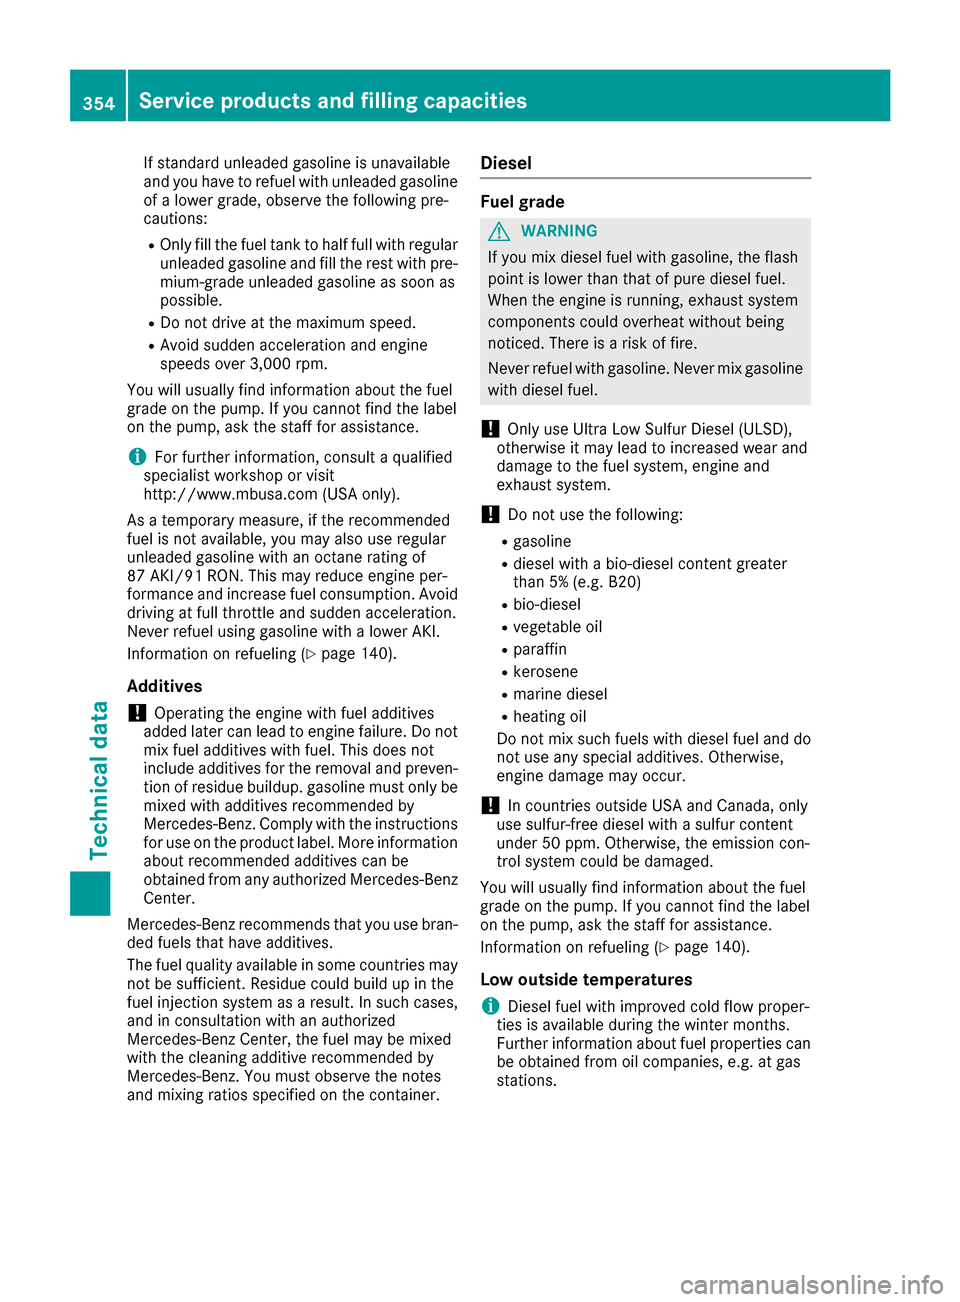
If standard unleaded gasoline is unavailable
and you have to refuel with unleaded gasoline
of a lower grade, observe the following pre-
cautions:
ROnly fill the fuel tank to half full with regular unleaded gasoline and fill the rest with pre-
mium-grade unleaded gasoline as soon as
possible.
RDo not drive at the maximum speed.
RAvoid sudden acceleration and engine
speeds over 3,000 rpm.
You will usually find information about the fuel
grade on the pump. If you cannot find the label
on the pump, ask the staff for assistance.
iFor further information, consult a qualified
specialist workshop or visit
http://www.mbusa.com (USA only).
As a temporary measure, if the recommended
fuel is not available, you may also use regular
unleaded gasoline with an octane rating of
87 AKI/91 RON. This may reduce engine per-
formance and increase fuel consumption. Avoid
driving at full throttle and sudden acceleration.
Never refuel using gasoline with a lower AKI.
Information on refueling (
Ypage 140).
Additives
!Operating the engine with fuel additives
added later can lead to engine failure. Do not
mix fuel additives with fuel. This does not
include additives for the removal and preven-
tion of residue buildup. gasoline must only be mixed with additives recommended by
Mercedes-Benz. Comply with the instructions
for use on the product label. More information
about recommended additives can be
obtained from any authorized Mercedes-Benz Center.
Mercedes-Benz recommends that you use bran-
ded fuels that have additives.
The fuel quality available in some countries may
not be sufficient. Residue could build up in the
fuel injection system as a result. In such cases,
and in consultation with an authorized
Mercedes-Benz Center, the fuel may be mixed
with the cleaning additive recommended by
Mercedes-Benz. You must observe the notes
and mixing ratios specified on the container.
Diesel
Fuel grade
GWARNING
If you mix diesel fuel with gasoline, the flash
point is lower than that of pure diesel fuel.
When the engine is running, exhaust system
components could overheat without being
noticed. There is a risk of fire.
Never refuel with gasoline. Never mix gasoline with diesel fuel.
!Only use Ultra Low Sulfur Diesel (ULSD),
otherwise it may lead to increased wear and
damage to the fuel system, engine and
exhaust system.
!Do not use the following:
Rgasoline
Rdiesel with a bio-diesel content greater
than 5% (e.g. B20)
Rbio-diesel
Rvegetable oil
Rparaffin
Rkerosene
Rmarine diesel
Rheating oil
Do not mix such fuels with diesel fuel and do
not use any special additives. Otherwise,
engine damage may occur.
!In countries outside USA and Canada, only
use sulfur-free diesel with a sulfur content
under 50 ppm. Otherwise, the emission con-
trol system could be damaged.
You will usually find information about the fuel
grade on the pump. If you cannot find the label
on the pump, ask the staff for assistance.
Information on refueling (
Ypage 140).
Low outside temperatures
iDiesel fuel with improved cold flow proper-
ties is available during the winter months.
Further information about fuel properties can
be obtained from oil companies, e.g. at gas
stations.
354Service products and filling capacities
Technical data
Page 358 of 366
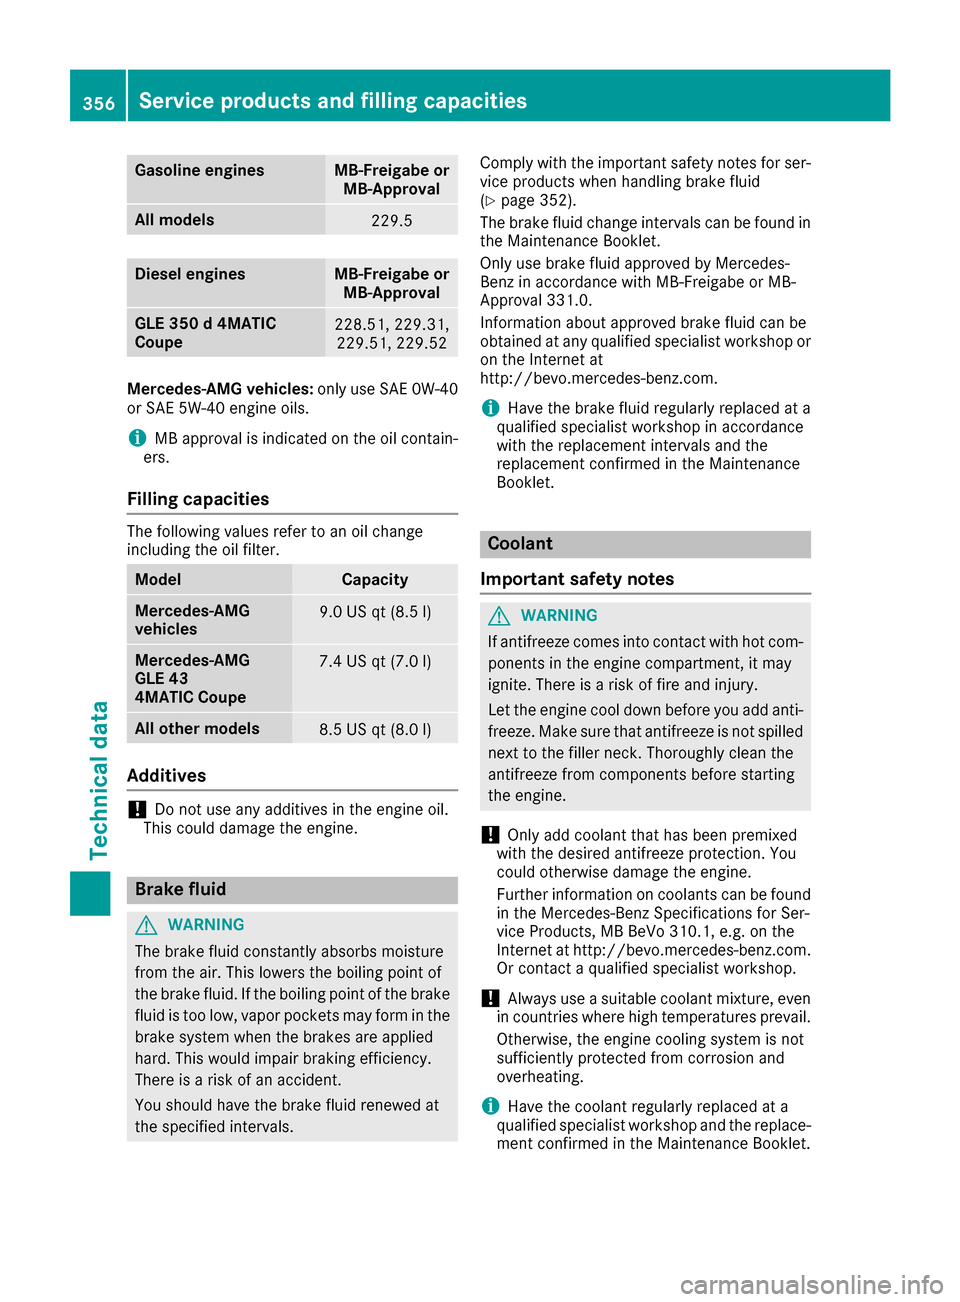
Gasoline enginesMB-Freigabe orMB-Approval
All models229.5
Diesel enginesMB-Freigabe orMB-Approval
GLE 350 d 4MATIC
Coupe228.51, 229.31,229.51, 229.52
Mercedes-AMG vehicles: only use SAE 0W-40
or SAE 5W-40 engine oils.
iMB approval is indicated on the oil contain-
ers.
Filling capacities
The following values refer to an oil change
including the oil filter.
ModelCapacity
Mercedes‑AMG
vehicles9.0 US qt (8.5 l)
Mercedes-AMG
GLE 43
4MATIC Coupe7.4 US qt (7.0l)
Allot her models8.5 US qt (8.0 l)
Additives
!Do not use any additives in the engine oil.
This could damage the engine.
Brake fluid
GWARNING
The brake fluid constantly absorbs moisture
from the air. This lowers the boiling point of
the brake fluid. If the boiling point of the brake
fluid is too low, vapor pockets may form in the
brake system when the brakes are applied
hard. This would impair braking efficiency.
There is a risk of an accident.
You should have the brake fluid renewed at
the specified intervals. Comply with the important safety notes for ser-
vice products when handling brake fluid
(
Ypage 352).
The brake fluid change intervals can be found in
the Maintenance Booklet.
Only use brake fluid approved by Mercedes-
Benz in accordance with MB-Freigabe or MB-
Approval 331.0.
Information about approved brake fluid can be
obtained at any qualified specialist workshop or on the Internet at
http://bevo.mercedes-benz.co m.
iHave the brake fluid regularly replaced at a
qualified specialist workshop in accordance
with the replacement intervals and the
replacement confirmed in the Maintenance
Booklet.
Coolant
Important safety notes
GWARNING
If antifreeze comes into contact with hot com- ponents in the engine compartment, it may
ignite. There is a risk of fire and injury.
Let the engine cool down before you add anti-
freeze. Make sure that antifreeze is not spilled
next to the filler neck. Thoroughly clean the
antifreeze from components before starting
the engine.
!Only add coolant that has been premixed
with the desired antifreeze protection. You
could otherwise damage the engine.
Further information on coolants can be found
in the Mercedes-Benz Specifications for Ser-
vice Products, MB BeVo 310.1, e.g. on the
Internet at http://bevo.mercedes-benz.com.
Or contact a qualified specialist workshop.
!Always use a suitable coolant mixture, even
in countries where high temperatures prevail.
Otherwise, the engine cooling system is not
sufficiently protected from corrosion and
overheating.
iHave the coolant regularly replaced at a
qualified specialist workshop and the replace-
ment confirmed in the Maintenance Booklet.
356Service products and filling capacities
Technical data
Page 359 of 366
Comply with the important safety notes for ser-
vice products when handlin g coolant
(
Ypage 352).
The coolant isa mixture of water and ant i-
freeze/corrosion inh ibitor. It is responsible for
the foll owing:
RAnti-corrosion protection
RAntifreeze protection
RRaisin g the boiling point
If the coolant has antifreeze protection downto
-35 ‡ (-37 †), the boilingpoin t of the coolant
during operation is approximately 266 ‡
(130 †).
The antifreeze concentrate /corrosion inh ibitor
concentration inthe engine co oling system
should:
Rbe at least 50 %.This willprotect the engine
co olin g system against freezing downto
approximate ly-35 ‡ (-37 †).
Rnot exceed 55% (antifreeze protection down
to -49 ‡ [-45 †]). Otherwise, heat willnotbe
dissipat ed as effectively.
Mercedes-Benz recommends an antifreeze/
corrosion inh ibitor concentrate inaccordance
wit h MB Specifications for Service Products
310.1.
iWhen the veh icle isfirstdeliv ered, it is fille d
wit h a coolant mixture that ensures adequate
antifreeze and anti-corrosion protection.
iThe coolant ischecked with every mainte-
nance interval at a qualified specialist work-
shop.
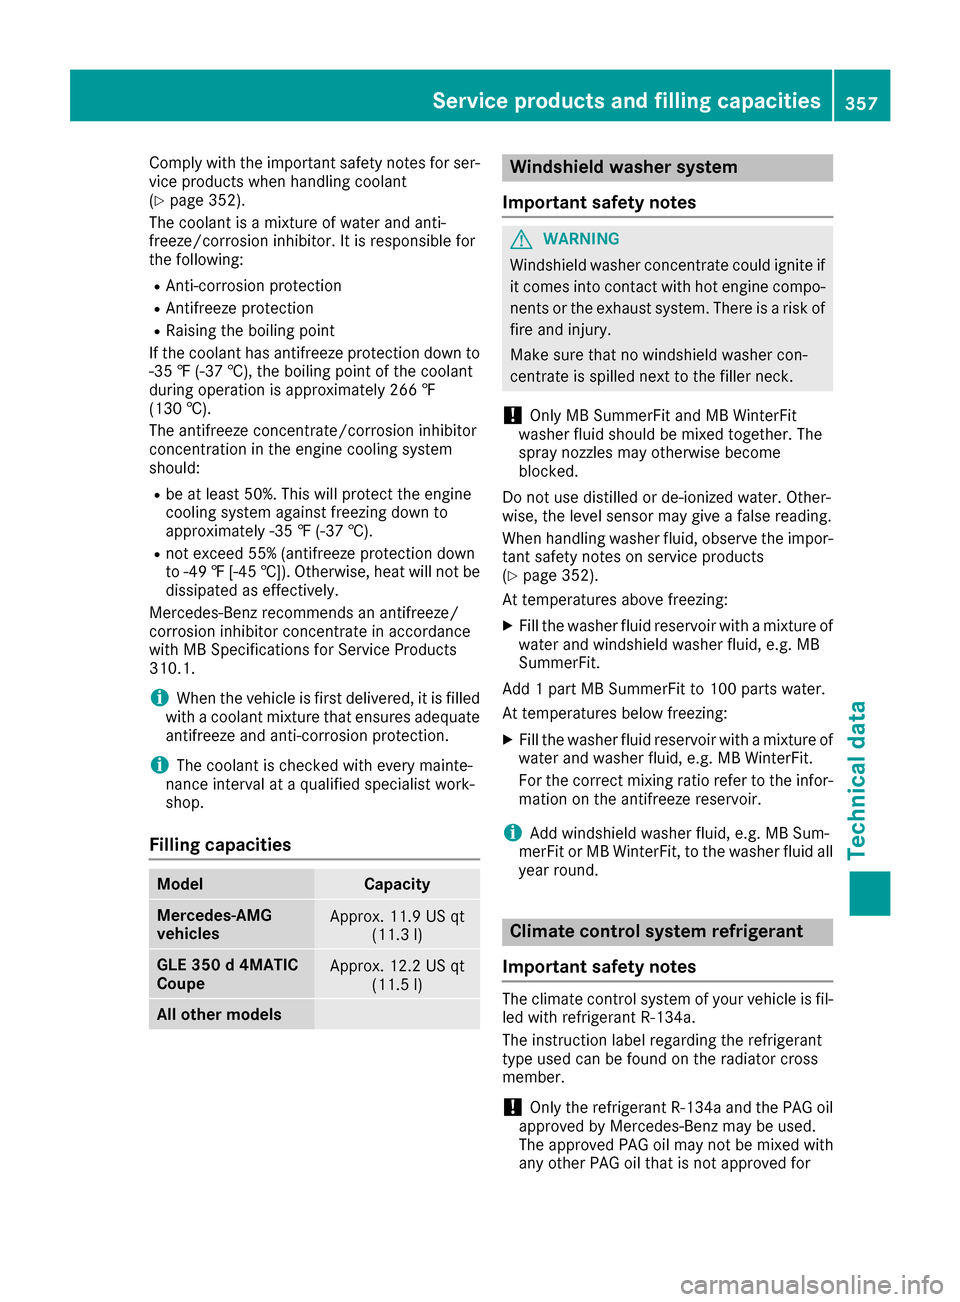
Filling capacities
ModelCapacity
Mercedes ‑AMG
vehiclesApprox. 11.9 US qt
(11.3 l)
GLE350 d4MATIC
CoupeApprox. 12.2 US qt
(11.5 l)
All other models
Windshield washer system
Important safety notes
GWARNING
Windshield washer concentrate could ignite if
it comes into contact with hot engine compo-
nents or the exhaust system. There isa risk of
fire and injury.
Make sure that no windshield washer con-
centrate is spilled next to the filler neck.
!Only MB SummerFit and MB WinterF it
washer fluid should bemixed together. The
spray nozzles may otherwise become
blocked.
Do not use distilled or de-ionized water. Other-
wise, the level sensor may givea false reading.
When handling washer fluid, observe the impor-
tant safety notes on service products
(
Ypage 352).
At temperatures above freezing:
XFill the washer fluid reservoir with a mixture of
water and windshield washer fluid, e.g. MB
SummerFit.
Add 1 part MB SummerFit to 100 parts water.
At temperatures below freezing:
XFill the washer fluid reservoir with a mixture of
water and washer fluid, e.g. MB WinterFit.
For the correct mixing ratio refer to the infor-
mation on the antifreeze reservoir.
iAdd windshield washer fluid, e.g. MB Sum-
merFit or MB WinterFit, to the washer fluid all
year roun d.
Climate control system refrigerant
Important safety notes
The clim ate control system of your vehicle is fil-
led with refrigerant R‑ 134a.
The instruction label regarding the refrigerant
type used can be found on the radiator cross
member.
!Only the refrigerant R‑134a and the PAG oil
approved by Mercedes-Benz may be used.
The appr oved PAG oil may not be mixed with
any other PAG oil that is not approved for
Service products and filling capacities357
Technical data
Z
Page 360 of 366
R-134arefrigerant. Otherwise, th eclimat e
control system may be damaged.
Service work, suc has refillin gwit hrefrigeran tor
replacing component parts, may only be carrie d
out by aqualified specialist workshop. All appli-
cable regulations, as well as SA Estandard J639,
mus tbe adhered to .
Always hav ewor kon th eclimat econtrol system
carrie dout at aqualified specialist workshop.
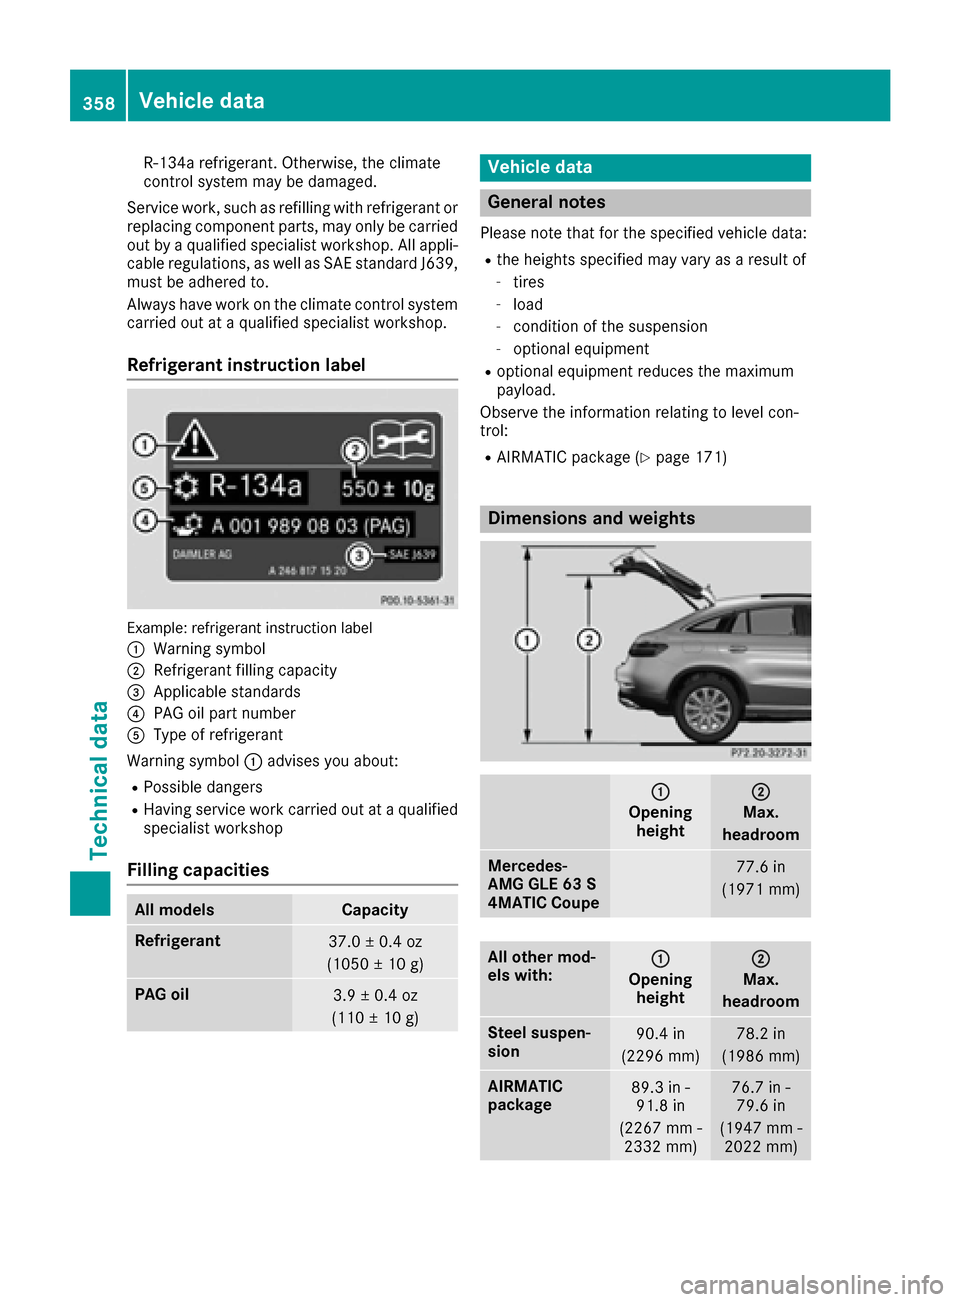
Refrigerant instruction label
Example: refrigeran tinstruction label
:
Warning symbol
;Refrigerant filling capacit y
=Applicable standards
?PAGoil part number
AType of refrigeran t
Warning symbol :advises you about :
RPossibledanger s
RHaving servic ewor kcarrie dout at aqualified
specialist workshop
Filling capacities
All modelsCapacit y
Refrigerant37.0±0. 4oz
(1050 ±10 g)
PAG oil3.9 ± 0.4 oz
(110 ± 10 g)
Vehicle data
General notes
Please note that for the specified vehicle data:
Rthe heights specified may vary as a result of
-tires
-load
-condition of the suspension
-optional equipment
Roptional equipment reduces the maximum
payload.
Observe the information relating to level con-
trol:
RAIRMATIC package (Ypage 171)
Dimensions and weights
:
Opening height
;
Max.
headroom
Mercedes-
AMG GLE 63 S
4MATIC Coupe77.6 in
(1971 mm)
All other mod-
els with::
Opening height
;
Max.
headroom
Steel suspen-
sion90.4 in
(2296 mm)78.2 in
(1986 mm)
AIRMATIC
package89.3 in - 91.8 in
(2267 mm - 2332 mm)76.7 in -79.6 in
(1947 mm - 2022 mm)
358Vehicle data
Technical data