2017 MERCEDES-BENZ GLC SUV Touch
[x] Cancel search: TouchPage 14 of 374

Front wheel arch coverInstalling/removing ...................... .117
Fuel
Additives ........................................ 366
Consumption statistics .................. 213
Displaying the current consump-
tion ................................................ 213
Displaying the range ......................2 13
Driving tips ....................................1 57
E10 ................................................ 365
Fuel gauge ....................................... 36
Gasoline ......................................... 365
Grade (gasoline) ............................ 365
Important safety notes .................. 365
Low outside temperatures ............. 367
Problem (malfunction) ................... 151
Quality (diesel) ............................... 366
Refueling ........................................ 148
Tank content/reserve fuel ............. 365
Fuel filler flap
Closing ........................................... 150
Fuel filter (display message) ............ 243
Fuel level
Calling up the range (on-board
computer) ...................................... 213
Fuel tank
Capacity ........................................ 365
Problem (malfunction) ................... 151
Fuses
Allocation chart ............................. 334
Before changing ............................. 333
Dashboard fuse box ....................... 334
Fuse box in the cargo compart-
ment .............................................. 334
Fuse box in the engine compart-
ment .............................................. 334
Fuse box in the front-passenger
footwell .......................................... 334
Important safety notes .................. 333
G
G-Meter (on-board computer,
Mercedes-AMG vehicles) .................. 224
Garage door opener
Clearing the memory ..................... 305
General notes ................................ 302
Important safety notes .................. 302 Opening/closing the garage doo
r..3 04
Problems when programming ........3 04
Programming (button in the rear-
view mirror) ................................... 303
Synchronizing the rolling code ....... 303
Gasoline ............................................. 365
Gear indicator (on-board com-
puter, Mercedes-AMG vehicles) ....... 224
Genuine parts ...................................... 27
Glove box ...........................................2 79
Google™ Local Search
see also Digital Operator's Man-
ual ..................................................2 68
H
HANDS-FREE ACCESS.......................... 87
Handwriting recognition
Switching text reader function
on/off ............................................ 271
Touchpad ....................................... 270
Hazard warning lamps ......................113
Head restraints
Adjusting (electrically) ................... 101
Adjusting (manually) ......................1 01
Adjusting (rear) .............................. 101
Adjusting the fore-and-aft posi-
tion manually ................................. 101
General notes ................................ 101
Important safety notes .................. 100
Installing/removing (rear) .............. 102
Head-up display
Adjusting the brightness ................ 222
Displays and operating .................. 211
Function/notes .............................2 11
Important safety notes .................. 211
Selecting displays .......................... 222
Setting the position ....................... 222
Storing settings (memory func-
tion) ............................................... 109
Headlamps
Display message ............................ 239
Fogging up ..................................... 114
see Automatic headlamp mode
Heating
see Climate control
High beam flasher .............................1 12
12Index
Page 24 of 374

Using ............................................. 323
Tires
Aspect ratio (definition) ................. 355
Average weight of the vehicle
occupants (definition) .................... 354
Bar (definition) ...............................3 54
Changing a wheel .......................... 356
Characteristics .............................. 354
Checking ........................................ 336
Curb weight (definition) ................. 355
Definition of terms ......................... 354
Direction of rotation ...................... 356
Display message ............................ 250
Distribution of the vehicle occu-
pants (definition) ............................ 356
DOT (Department of Transporta-
tion) (definition) ............................. 354
DOT, Tire Identification Number
(TIN) ............................................... 353
GAWR (Gross Axle Weight Rating)
(definition) ..................................... 354
GVW (Gross Vehicle Weight) (def-
inition) ........................................... 355
GVWR (Gross Vehicle Weight Rat-
ing) (definition) .............................. 355
Important safety notes .................. 336
Increased vehicle weight due to
optional equipment (definition) ...... 354
Information on driving .................... 336
Kilopascal (kPa) (definition) ........... 355
Labeling (overview) ........................ 351
Load bearing index (definition) ...... 356
Load index ..................................... 353
Load index (definition) ................... 355
Maximum load on a tire (defini-
tion) ............................................... 355
Maximum loaded vehicle weight
(definition) ..................................... 355
Maximum permissible tire pres-
sure (definition) ............................. 355
Maximum tire load ......................... 353
Maximum tire load (definition) ....... 355
MOExtended tires .......................... 338
Optional equipment weight (defi-
nition) ............................................ 356
P
SI (pounds per square inch) (def-
inition) ........................................... 355
Replacing ....................................... 356 Service life ..................................... 337
Sidewall (definition) ....................... 355
Snow chains .................................. 338
Speed rating (definition) ................ 355
Storing ........................................... 357
Structure and characteristics
(definition) ..................................... 354
Summer tires in winter .................. 338
Temperature .................................. 350
TIN (Tire Identification Number)
(definition) ..................................... 356
Tire bead (definition) ...................... 355
Tire pressure (definition) ................ 355
Tire pressures (recommended) ...... 354
Tire size (data) ............................... 360
Tire size designation, load-bearing
capacity, speed rating .................... 351
Tire tread ....................................... 337
Tire tread (definition) ..................... 355
Total load limit (definition) ............. 356
Traction ......................................... 350
Traction (definition) ....................... 356
Tread wear ..................................... 350
Uniform Tire Quality Grading
Standards ...................................... 349
Uniform Tire Quality Grading
Standards (definition) .................... 354
Wear indicator (definition) ............. 356
Wheel and tire combination ........... 360
Wheel rim (definition) .................... 354
see Flat tire
Top Tether ............................................ 61
Topping up
DEF ................................................ 151
Touchpad
Changing the station/music
track .............................................. 271
Character suggestions ................... 270
Deleting characters ....................... 270
Entering a space ............................ 270
Entering characters ....................... 270
Gesture control .............................. 270
Handwriting recognition ................ 270
Operating the touchpad ................. 270
Overview ........................................ 270
Quick access for Audio .................. 271
Switching ....................................... 270
Switching input line ....................... 270
22Index
Page 41 of 374
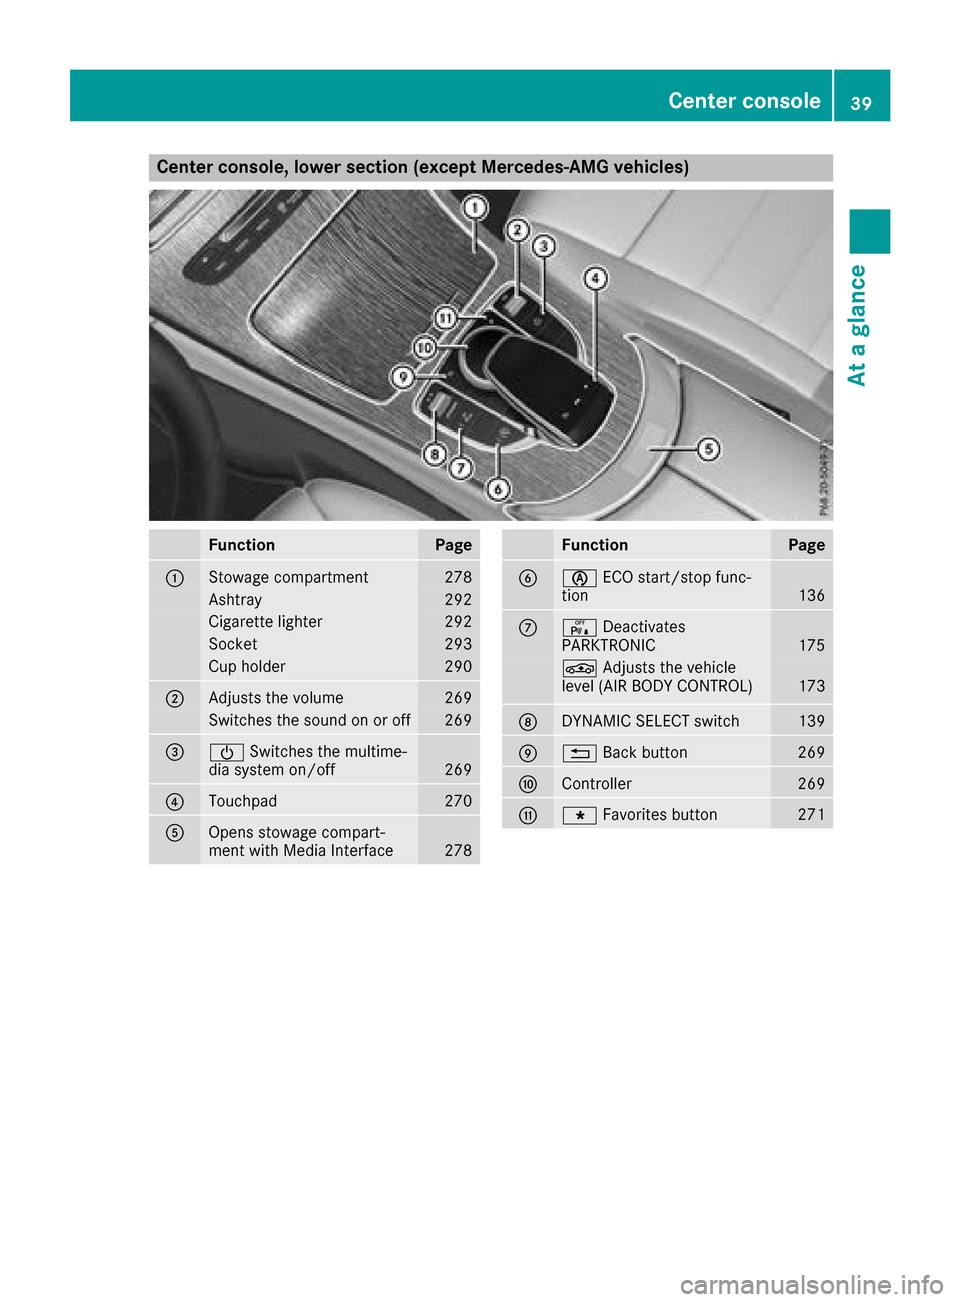
Center console, lower section (except Mercedes-AMG vehicles)
FunctionPage
:Stowage compartment278
Ashtray292
Cigarette lighter292
Socket293
Cup holder290
;Adjusts the volume269
Switches the sound on or off269
=ÜSwitches the multime-
dia system on/off269
?Touchpad270
AOpens stowage compart-
ment with Media Interface278
FunctionPage
Bè ECO start/stop func-
tion136
Cc Deactivates
PARKTRONIC175
É Adjusts the vehicle
level (AIR BODY CONTROL)173
DDYNAMIC SELECT switch139
E% Back button269
FController269
GgFavorites button271
Center console39
At a glance
Page 42 of 374

Center console, lower section (Mercedes-AMG vehicles)
FunctionPage
:Stowage compartment278
Ashtray292
Cigarette lighter292
Socket293
Cup holder290
;Adjusts the volume269
Switches the sound on or off269
=ÜSwitches the multime-
dia system on/off269
?è ECO start/stop func-
tion136
AÉ Adjusts the vehicle
level (AIR BODY CONTROL)173
BOpens stowage compart-
ment with Media Interface278
FunctionPage
CTouchpad270
Då Activates/deactivates
ESP®71
M Activates/deactivates
SPORT handling mode71
EAMG sports suspension
based on AIR BODY CON-
TROL
174
FManual gearshifting (perma-
nent setting)145
GDYNAMIC SELECT switch139
H% Back button269
IController269
JgFavorites button271
40Center console
At a glance
Page 53 of 374
Occupant Classification System
(OCS)
Introduction
The Occupant Classification System (OCS) cat-
egorizes the person in the front-passenger seat.
Depending on that result, the front-passenger
front air bag is either enabled or deactivated.
The system does not deactivate:
Rthe side impact air bag
Rthe window curtain air bag
Rthe Emergency Tensioning Devices
Requirements
To be classified correctly, the front passenger
must sit:
Rwith the seat belt fastened correctly
Rin an almost upright position with their back
against the seat backrest
Rwith their feet resting on the floor, if possible
If the front passenger does not observe these
conditions, OCS may produce a false classifica-
tion, e.g. because the front passenger:
Rtransfers their weight by supporting them-
selves on a vehicle armrest
Rsits in such a way that their weight is raised
from the seat cushion
If it is absolutely necessary to install a child
restraint system on the front-passenger seat, be
sure to observe the correct positioning of the
child restraint system. Never place objects
under or behind the child restraint system, e.g. a
cushion. Fully retract the seat cushion length.
The entire base of the child restraint system
must always rest on the seat cushion of the
front-passenger seat. The backrest of the
forward-facing child restraint system must lie as
flat as possible against the backrest of the front-
passenger seat.
The child restraint system must not touch the
roof or be subjected to a load by the head
restraint. Adjust the angle of the seat backrest
and the head restraint position accordingly.
Only then can OCS be guaranteed to function
correctly. Always observe the child restraint sys-
tem manufacturer's installation and operating
instructions.
Occupant Classification System opera-
tion (OCS)
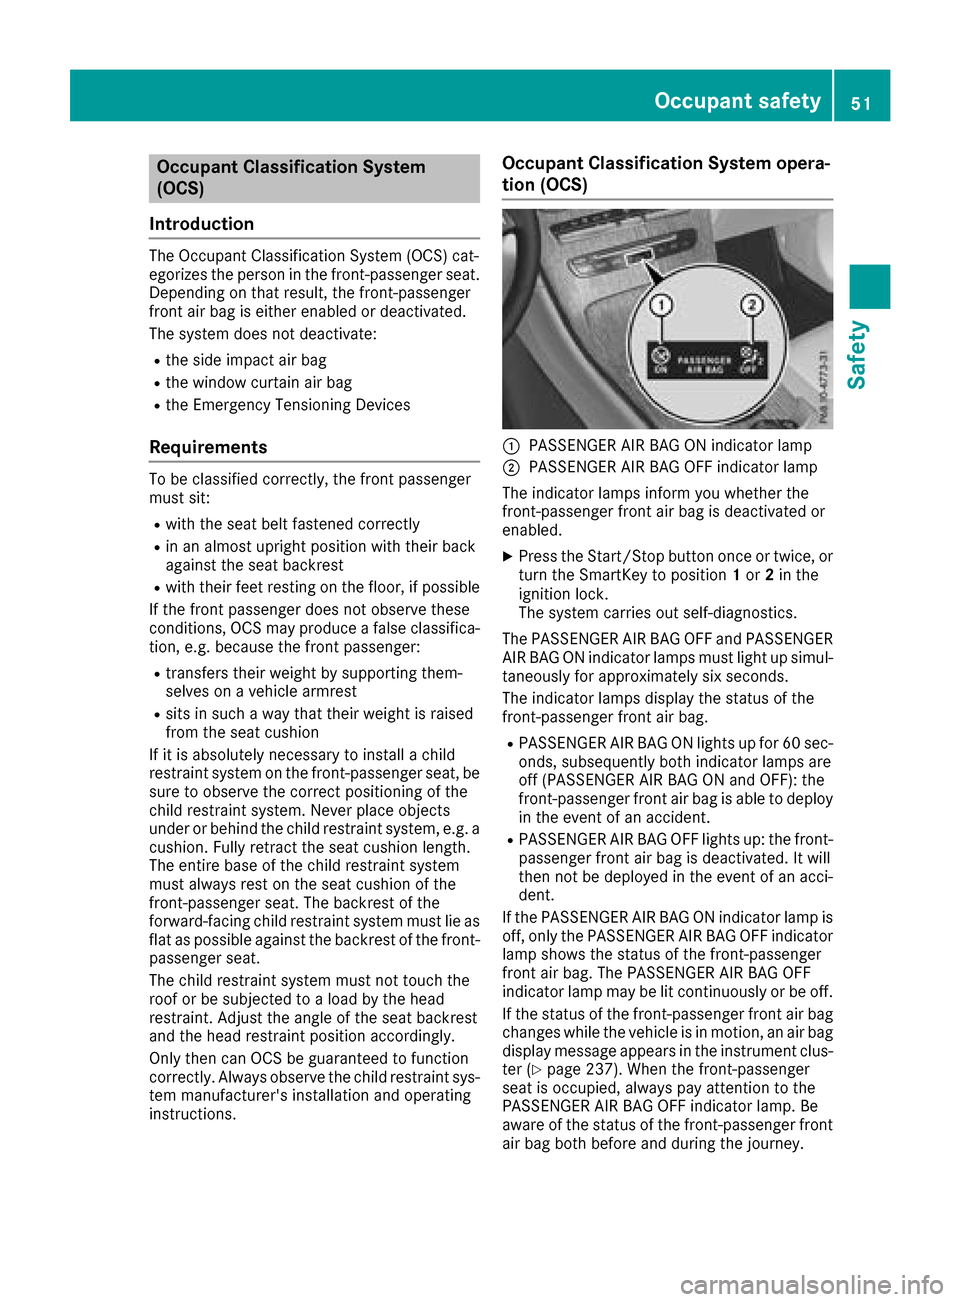
:PASSENGER AIR BAG ON indicator lamp
;PASSENGER AIR BAG OFF indicator lamp
The indicator lamps inform you whether the
front-passenger front air bag is deactivated or
enabled.
XPress the Start/Stop button once or twice, or
turn the SmartKey to position 1or 2in the
ignition lock.
The system carries out self-diagnostics.
The PASSENGER AIR BAG OFF and PASSENGER AIR BAG ON indicator lamps must light up simul-
taneously for approximately six seconds.
The indicator lamps display the status of the
front-passenger front air bag.
RPASSENGER AIR BAG ON lights up for 60 sec-
onds, subsequently both indicator lamps are
off (PASSENGER AIR BAG ON and OFF): the
front-passenger front air bag is able to deploy
in the event of an accident.
RPASSENGER AIR BAG OFF lights up: the front-
passenger front air bag is deactivated. It will
then not be deployed in the event of an acci-
dent.
If the PASSENGER AIR BAG ON indicator lamp is
off, only the PASSENGER AIR BAG OFF indicator lamp shows the status of the front-passenger
front air bag. The PASSENGER AIR BAG OFF
indicator lamp may be lit continuously or be off.
If the status of the front-passenger front air bag
changes while the vehicle is in motion, an air bag
display message appears in the instrument clus-
ter (
Ypage 237). When the front-passenger
seat is occupied, always pay attention to the
PASSENGER AIR BAG OFF indicator lamp. Be
aware of the status of the front-passenger front air bag both before and during the journey.
Occupant safety51
Safety
Z
Page 57 of 374
ProblemPossible causes/consequences andMSolutions
The PASSENGER AIR
BAG OFF indicator lamp
lights up and remains lit,
even though the front-
passenger seat is occu-
pied by an adult or a per-
son of a stature corre-
sponding to that of an
adult.The classification of the person on the front-passenger seat is incor-
rect.
XMake sure the conditions for a correct classification of the person
on the front-passenger seat are met (Ypage 51).
XIf the PASSENGER AIR BAG OFF indicator lamp remains lit, the front-
passenger seat may not be used.
XHave OCS checked as soon as possible at an authorized Mercedes- Benz Center.
The PASSENGER AIR
BAG OFF indicator lamp
does not light up and/or
does not stay on.
The front-passenger seat
is:
Runoccupied
Roccupied with the
weight of a child up to
twelve months old in a
child restraint system
OCS is malfunctioning.
XMake sure there is nothing between the seat cushion and the child
seat.
XMake sure that the entire base of the child restraint system rests on
the seat cushion of the front-passenger seat. The backrest of the
forward-facing child restraint system must lie as flat as possible
against the backrest of the front-passenger seat. If necessary,
adjust the position of the front-passenger seat.
XMake sure that the seat cushion length is fully retracted.
XWhen installing the child restraint system, make sure that the seat
belt is tight. Do not pull the seat belt tight using the front-passenger seat adjustment. This could result in the seat belt and the child
restraint system being pulled too tightly.
XCheck for correct installation of the child restraint system.
Make sure that the head restraint does not apply a load to the child
restraint system. If necessary, adjust the head restraint accord-
ingly.
XMake sure that no objects are applying additional weight onto the
seat.
XIf the PASSENGER AIR BAG OFF indicator lamp remains off and/or
the PASSENGER AIR BAG ON indicator lamp lights up, do not install a child restraint system on the front-passenger seat. It is recom-
mended that you install the child restraint system on a suitable rear
seat.
XHave OCS checked as soon as possible at an authorized Mercedes-Benz Center.
Deployment of Emergency Tensioning
Devices and air bags
Important safety notes
GWARNING
The air bag parts are hot after an air bag has
been deployed. There is a risk of injury.
Do not touch the air bag parts. Have a
deployed air bag replaced at a qualified spe-
cialist workshop as soon as possible.
GWARNING
A deployed air bag no longer offers any pro-
tection and cannot provide the intended pro-
tection in an accident. There is an increased
risk of injury.
Have the vehicle towed to a qualified special-
ist workshop in order to have a deployed air
bag replaced.
It is important for your safety and that of your
passenger to have deployed air bags replaced
Occupant safety55
Safety
Z
Page 65 of 374
Forward-facing child restraint system
Always moveth efront-passenger's seat as far
bac kas possible if th echild must be secured on
th efront-passenger seat in aforward-facing
child restrain tsystem. Full yretrac tth eseat
cushion length. The base of th echild restrain t
system must always res ton th eseat cushion of
th efront-passenger's seat .As muc has possible
of th ebackrest of th echild restrain tsystem
must be resting on th ebackrest of th efront-
passenger's seat .The child restrain tsystem
may no ttouch th eroo for be subjected to aload
by th ehead restraint. Adjus tth eangle of th e
seat backrest and th ehead restraint position
accordingly. Always mak esure th eshoulder belt
is correctly secured ,runnin gfrom th ebelt outlet
to th ebelt guide of th echild restrain tsystem.
The shoulder belt strap must be routed forward
and down from th evehicl ebelt outlet .Adjus tth e
belt outlet and front-passenger seat as required.
Always comply wit hth emanufacturer' sinstal -
lation and operating instruction sfor th echild
restrain tsystem.
Child-proof locks
Important safety notes
GWARNIN G
If children are traveling in th evehicle, they
could:
Ropen doors, thus endangering other people
or road user s
Rexit thevehicl eand be caught by oncomin g
traffic
Roperate vehicl eequipmen tand become
trapped
Ther eis aris kof an acciden tand injury.
Always activat eth echild-proof locks and
override feature if children are traveling in th e
vehicle. When leaving th evehicle, always tak e
th eke ywit hyou and loc kth evehicle. Never
leav echildren unattended in th evehicle.
Override feature for :
Rtherear door s (Ypage 64)
Rtherear side windows (Ypage 64)
GWARNING
If you leav echildren unsupervised in th evehi-
cle ,they could set it in motion by, for example :
Rrelease theparking brake.
Rshif tth eautomatic transmission out of th e
parking position P.
Rstart theengine.
In addition ,they may operate vehicl eequip-
men tand become trapped .Ther eis aris kof
an acciden tand injury.
When leaving th evehicle, always tak eth e
SmartKey wit hyou and loc kth evehicle. Never
leav echildren unsupervised in th evehicle.
GWARNIN G
If persons, particularly children are subjected to prolonged exposure to extreme heat or
cold, there is aris kof injury, possibly eve n
fatal. Never leav echildren unattended in th e
vehicle.
GWARNIN G
If th echild restraint system is subjected to
direct sunlight, part smay get ver yhot .Chil-
dre nmay burn themselve son these parts,
particularly on th emetal part sof th echild
restraint system. Ther eis aris kof injury.
If you leav eth evehicle, taking th echild wit h
you, always ensure that th echild restraint
system is no texpose dto direct sunlight. Pro -
tect it wit h ablanket, for example .If th echild
restraint system has been expose dto direct
sunlight, let it cool down before securin gth e
child in it .Never leav echildren unattended in
th evehicle.
Children in the vehicle63
Safety
Z
Page 79 of 374
SmartKey
Important safety notes
GWARNING
If children are left unsupervised in the vehicle,
they could:
Ropen the doors, thus endangering other
people or road users.
Rget out and disrupt traffic.
Roperate the vehicle's equipment.
Additionally, children could set the vehicle in
motion if, for example, they:
Rrelease the parking brake.
Rshifting the automatic transmission out of
park position P
RStart the engine.
There is a risk of an accident and injury.
When leaving the vehicle, always take the
SmartKey with you and lock the vehicle. Never
leave children or animals unattended in the
vehicle. Always keep the SmartKey out of
reach of children.
GWARNING
If you attach heavy or large objects to the
SmartKey, the SmartKey could be uninten-
tionally turned in the ignition lock. This could
cause the engine to be switched off. There is a risk of an accident.
Do not attach any heavy or large objects to the
SmartKey. Remove any bulky key rings before
inserting the SmartKey into the ignition lock.
!Keep the SmartKey away from strong mag-
netic fields. Otherwise, the remote control
function could be affected.
Strong magnetic fields can occur in the vicin-
ity of powerful electrical installations.
Do not keep the SmartKey:
Rwith electronic devices, e.g. a mobile phone
or another SmartKey.
Rwith metallic objects, e.g. coins or metal foil.
Rinside metallic objects, e.g. a metal case.
This can affect the functionality of the Smart- Key. Vehicles with KEYLESS-GO start function:
do
not keep the SmartKey in the cargo compart-
ment. Otherwise, the SmartKey may not be
detected, e.g. when starting the engine using
the Start/Stop button.
A brief radio connection between the vehicle
and the SmartKey determines whether a valid
SmartKey is in, or in the direct vicinity of, the
vehicle. This occurs, for example:
Rwhen starting the engine
Rwhile driving
Rwhen using HANDS-FREE ACCESS
Rwhen the external door handles are touched
Rduring convenience closing
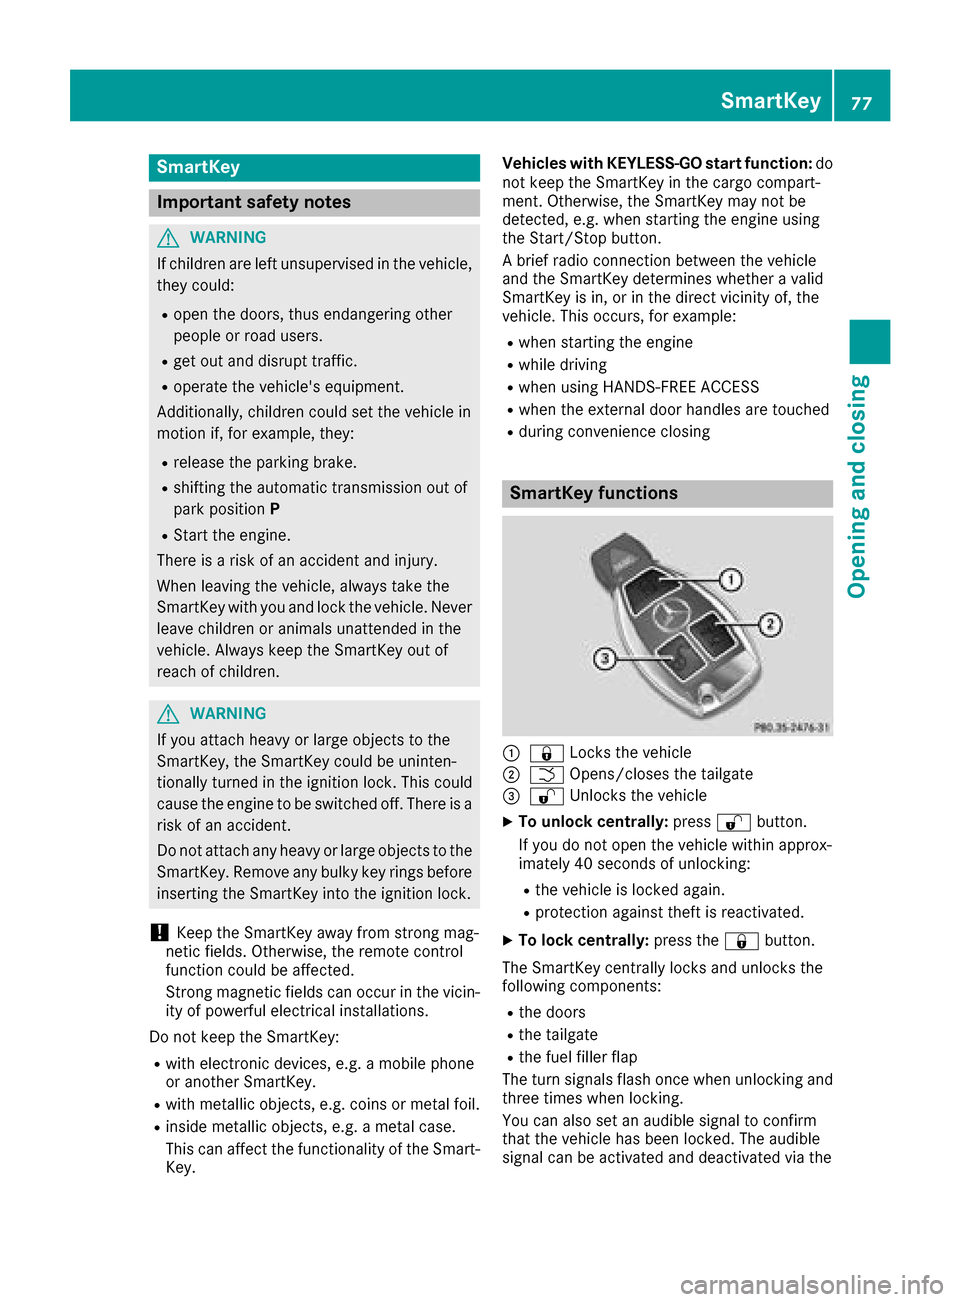
SmartKey functions
:& Locks the vehicle
;FOpens/closes the tailgate
=%Unlocks the vehicle
XTo unlock centrally: press%button.
If you do not open the vehicle within approx-
imately 40 seconds of unlocking:
Rthe vehicle is locked again.
Rprotection against theft is reactivated.
XTo lock centrally: press the&button.
The SmartKey centrally locks and unlocks the
following components:
Rthe doors
Rthe tailgate
Rthe fuel filler flap
The turn signals flash once when unlocking and
three times when locking.
You can also set an audible signal to confirm
that the vehicle has been locked. The audible
signal can be activated and deactivated via the
SmartKey77
Opening and closing
Z