2017 MERCEDES-BENZ GLC SUV Luggage
[x] Cancel search: LuggagePage 62 of 374
Installing a child restraint system:
XMake sure you observe the child restraint
system manufacturer's installation instruc-
tions.
XPull the seat belt smoothly from the belt out-
let.
XEngage seat belt tongue in belt buckle.
Activating the special seat belt retractor:
XPull the seat belt out fully and let the inertia
reel retract it again.
While the seat belt is retracting, you should
hear a ratcheting sound. The special seat belt
retractor is enabled.
XPush the child restraint system down so that
the seat belt is tight and does not loosen.
Removing the child restraint system and deac-
tivating the special seat belt retractor:
XMake sure you observe the child restraint
system manufacturer's installation instruc-
tions.
XPress the release button of the seat belt
buckle and guide the seat belt tongue back
towards the belt sash guide.
The special seat belt retractor is deactivated.
Child restraint system
The use of seat belts and infant and child
restraint systems is required by law in:
Rall 50 states
Rthe U.S. territories
Rthe District of Columbia
Rall Canadian provinces
You can obtain further information about the
correct child restraint system from any author-
ized Mercedes-Benz Center.
GWARNING
If the child restraint system is installed incor-
rectly on a suitable seat, it cannot protect as
intended. The child cannot then be restrained
in the event of an accident, heavy braking or
sudden changes of direction. There is an
increased risk of injury, possibly even fatal.
Make sure that you observe the child restraint
system manufacturer's installation instruc-
tions and the notes on use. Please ensure,
that the base of the child restraint system is
always resting completely on the seat cush-
ion. Never place objects, e.g. cushions, under or behind the child restraint system. Only use
child restraint systems with the original cover
designed for them. Only replace damaged
covers with genuine covers.
GWARNING
If the child restraint system is installed incor-
rectly or is not secured, it can come loose in
the event of an accident, heavy braking or a
sudden change in direction. The child
restraint system could be thrown about, strik-
ing vehicle occupants. There is an increased
risk of injury, possibly even fatal.
Always install child restraint systems prop-
erly, even if they are not being used. Make
sure that you observe the child restraint sys-
tem manufacturer's installation instructions.
You will find further information on stowing
objects, luggage and loads securely under
"Loading guidelines" (
Ypage 278).
GWARNING
Child restraint systems or their securing sys-
tems which have been damaged or subjected
to a load in an accident can no longer protect
as intended. The child cannot then be
restrained in the event of an accident, heavy
braking or sudden changes of direction. There is an increased risk of injury, possibly even
fatal.
Replace child restraint systems which have
been damaged or subjected to a load in an
accident as soon as possible. Have the secur-
ing systems on the child restraint system
checked at a qualified specialist workshop,
before you install a child restraint system
again.
Securing systems for child restraint systems
include:
Rthe seat belt system
Rthe LATCH-type (ISOFIX) securing rings
RTop Tether anchorage points
If it is absolutely necessary to carry a child on
the front-passenger's seat, be sure to observe
60Children in the vehicle
Safety
Page 87 of 374
could enter the passenger compartment.
There is a risk of poisoning.
Turn off the engine before opening the tail-
gate. Never drive with the tailgate open.
GWARNING
If objects, luggage or loads are not secured or
not secured sufficiently, they could slip, tip
over or be flung around and thereby hit vehicle
occupants. There is a risk of injury, particu-
larly in the event of sudden braking or a sud-
den change in direction.
Always store objects so that they cannot be
flung around. Secure objects, luggage or
loads against slipping or tipping before the
journey.
!The tailgate swings upwards and to the rear
when opened. Therefore, make sure that
there is sufficient clearance above and behind
the tailgate.
The opening dimensions of the tailgate can be
found in the "Vehicle data" section
(
Ypage 370).
You can limit the opening angle of the tailgate
(
Ypage 89).
Do not leave the SmartKey in the cargo com-
partment. You could otherwise lock yourself
out.
You should preferably place luggage or loads in
the cargo compartment. Observe the loading
guidelines (
Ypage 278).
Tailgate obstruction detection with
reversing feature
Vehicles with remote tailgate closing:
The tailgate is equipped with automatic obstruc- tion detection with reversing feature. If a solid
object blocks or restricts the tailgate when auto-
matically opening, this procedure is stopped. If a
solid object blocks or restricts the tailgate when
automatically closing, the tailgate automatically
opens again slightly. The automatic obstruction
detection with reversing feature is only an aid. It
is not a substitute for your attentiveness when
opening and closing the tailgate.
GWARNING
The reversing feature does not respond:
Rto soft, light and thin objects, e.g. fingers
Rover the last Óin (8 mm) of the closing
movement
The reversing feature cannot prevent some-
one from becoming trapped in these situa-
tions in particular. There is a risk of injury.
Make sure that no body parts are in close
proximity during the closing procedure.
If somebody becomes trapped:
Rpress the Fbutton on the SmartKey, or
Rpull or press the remote operating switch
on the driver's door or
Rpress the closing or locking button on the
tailgate or
Rpull the handle on the tailgate
Vehicles with HANDS-FREE ACCESS:
It is also possible to stop the closing process by
performing a kicking movement under the rear
bumper.
Opening and closing manually
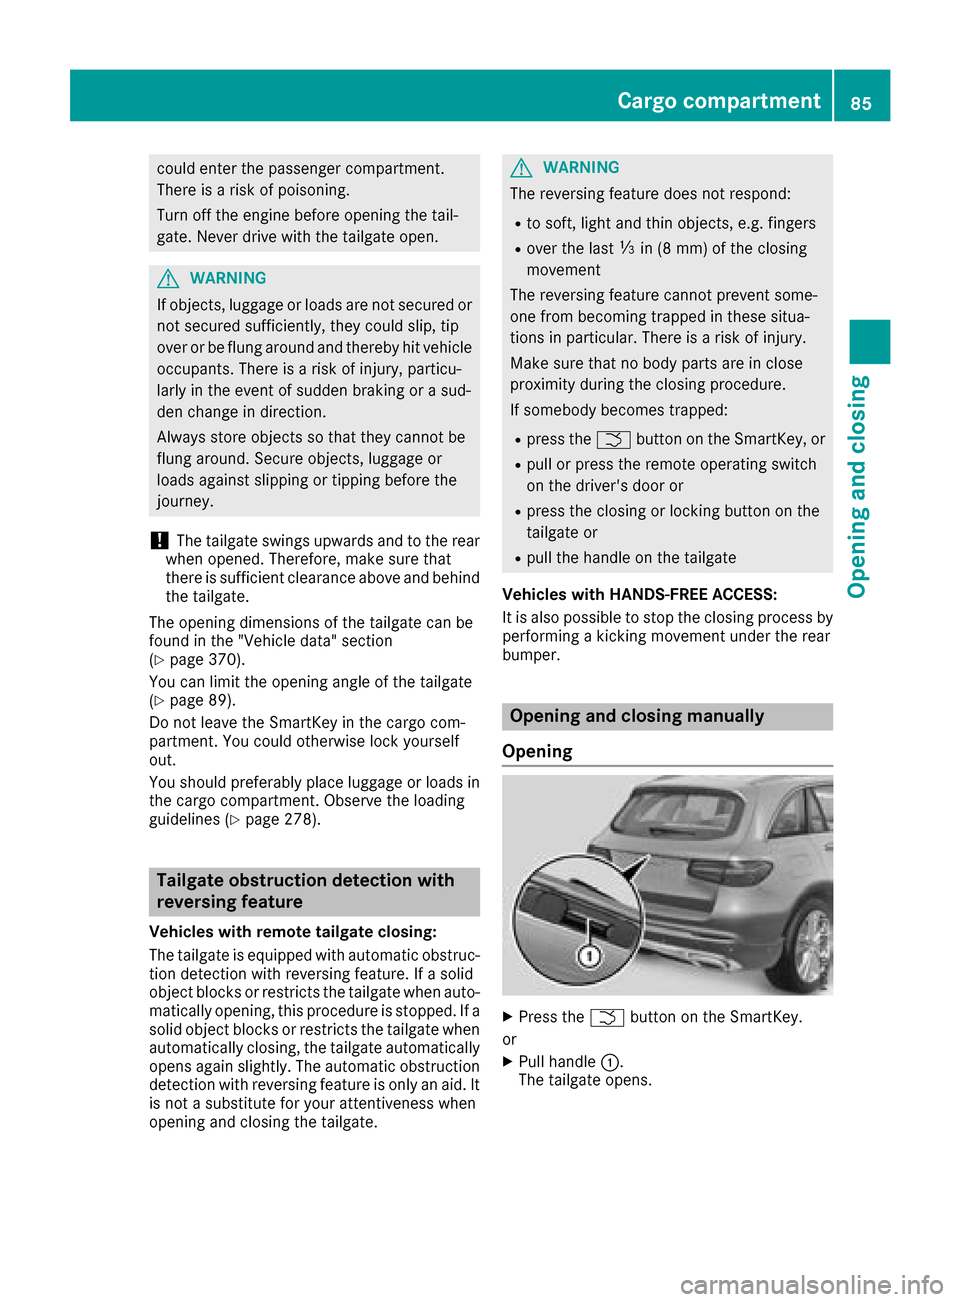
Opening
XPress the Fbutton on the SmartKey.
or
XPull handle :.
The tailgate opens.
Cargo compartment85
Opening and closing
Z
Page 280 of 374
Stowage areas
Loading guidelines
GWARNING
Combustion engines emit poisonous exhaust
gases such as carbon monoxide. If the tailgate
is open when the engine is running, particu-
larly if the vehicle is moving, exhaust fumes
could enter the passenger compartment.
There is a risk of poisoning.
Turn off the engine before opening the tail-
gate. Never drive with the tailgate open.
GWARNING
If objects, luggage or loads are not secured or
not secured sufficiently, they could slip, tip
over or be flung around and thereby hit vehicle
occupants. There is a risk of injury, particu-
larly in the event of sudden braking or a sud-
den change in direction.
Always store objects so that they cannot be
flung around. Secure objects, luggage or
loads against slipping or tipping before the
journey.
GWARNING
The exhaust tail pipe and tail pipe trim can
become very hot. If you come into contact
with these parts of the vehicle, you could burn
yourself. There is a risk of injury.
Always be particularly careful around the
exhaust tail pipe and the tail pipe trim. Allow
these components to cool down before touch-
ing them.
The handling characteristics of a laden vehicle
are dependent on the distribution of the load
within the vehicle. For this reason, you should
observe the following notes when transporting a
load:
RNever exceed the maximum permissible
gross vehicle mass or the gross axle weight
rating for the vehicle (including occupants).
The values are specified on the vehicle iden-
tification plate on the B-pillar of the driver's
door.
RThe cargo compartment is the preferred place
to carry objects.
RPosition heavy loads as far forwards as pos-
sible and as low down in the cargo compart-
ment as possible.
RThe load must not protrude above the upper
edge of the seat backrests.
RAlways place the load behind unoccupied
seats if possible.
RHook in the cargo net when loading.
RSecure the load with sufficiently strong and
wear-resistant tie-downs. Pad sharp edges for protection.
Stowage spaces
Important safety notes
GWARNING
If you transport objects in the vehicle interior
and these are not adequately secured, they
could slip or be flung around and thereby
strike vehicle occupants. In addition, cup
holders, open stowage spaces and mobile
phone brackets may not always be able to
hold the objects placed in them in the event of
an accident. There is a risk of injury, particu-
larly in the event of sharp braking or sudden
changes of direction.
RAlways stow objects in such a way that they cannot be tossed about in these or similar
situations.
RAlways make sure that objects do not pro-
trude out of the stowage spaces, luggage
nets or stowage nets.
REnsure that closable stowage spaces are
shut before beginning your journey.
RAlways stow and secure heavy, hard, poin-
ted, sharp-edged, fragile or large objects in
the cargo compartment.
Observe the loading guidelines (
Ypage 278).
278Stowage areas
Stowage and features
Page 286 of 374
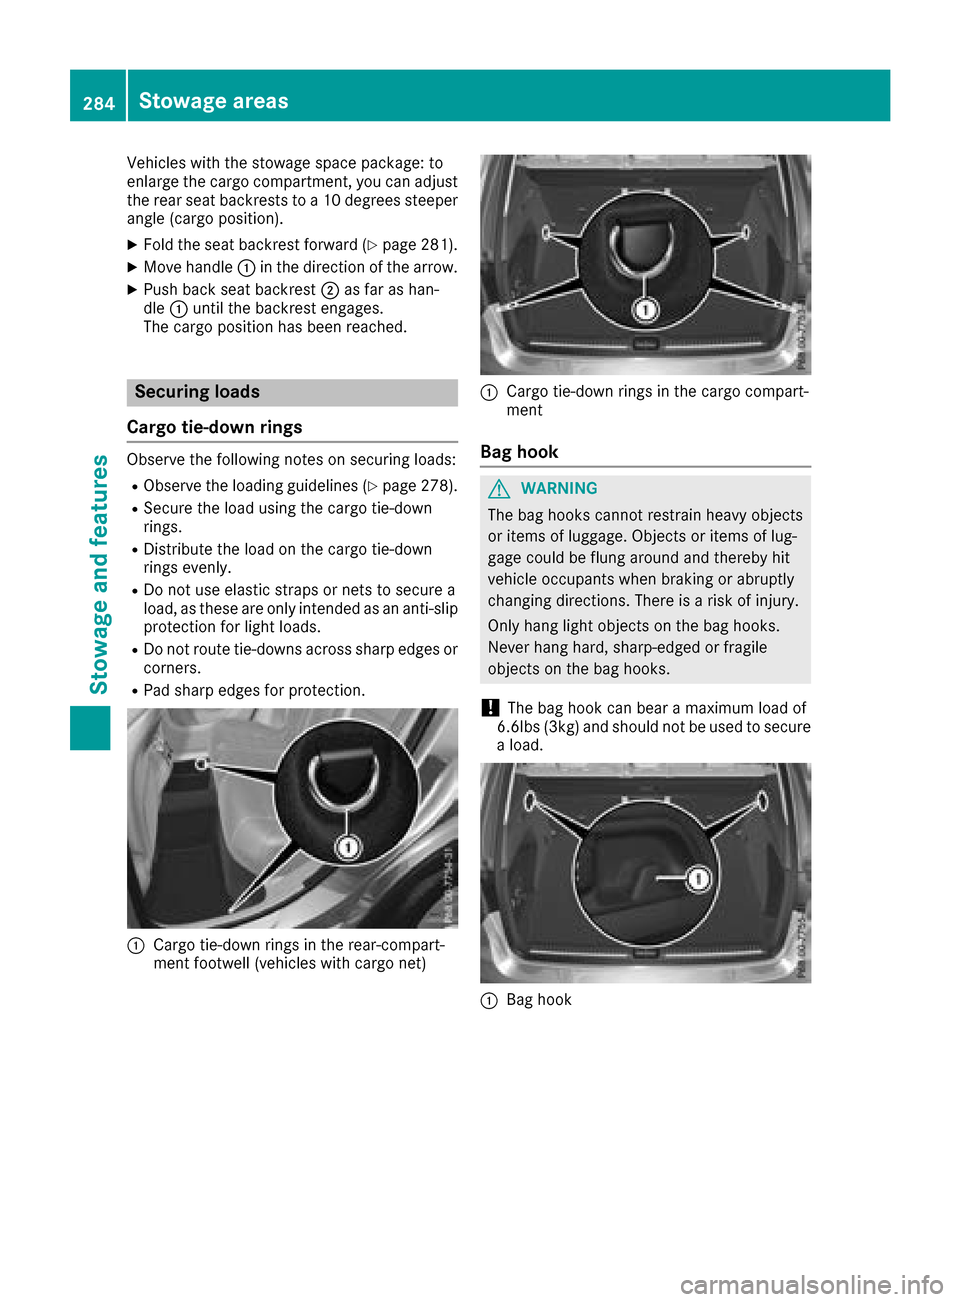
Vehicles with the stowage space package: to
enlarge the cargo compartment, you can adjust
the rear seat backrests to a 10 degrees steeper
angle (cargo position).
XFold the seat backrest forward (Ypage 281).
XMove handle:in the direction of the arrow.
XPush back seat backrest ;as far as han-
dle :until the backrest engages.
The cargo position has been reached.
Securing loads
Cargo tie-down rings
Observe the following notes on securing loads:
RObserve the loading guidelines (Ypage 278).
RSecure the load using the cargo tie-down
rings.
RDistribute the load on the cargo tie-down
rings evenly.
RDo not use elastic straps or nets to secure a
load, as these are only intended as an anti-slip
protection for light loads.
RDo not route tie-downs across sharp edges or corners.
RPad sharp edges for protection.
:Cargo tie-down rings in the rear-compart-
ment footwell (vehicles with cargo net)
:Cargo tie-down rings in the cargo compart-
ment
Bag hook
GWARNING
The bag hooks cannot restrain heavy objects
or items of luggage. Objects or items of lug-
gage could be flung around and thereby hit
vehicle occupants when braking or abruptly
changing directions. There is a risk of injury.
Only hang light objects on the bag hooks.
Never hang hard, sharp-edged or fragile
objects on the bag hooks.
!The bag hook can bear a maximum load of
6.6lbs (3kg) and should not be used to secure
a load.
:Bag hook
284Stowage areas
Stowage and features
Page 287 of 374
Cargo compartment cover
Important safety notes
GWARNING
On its own, the cargo compartment cover
cannot secure or restrain heavy objects,
items of luggage and heavy loads. You could
be hit by an unsecured load during sudden
changes in direction, braking or in the event of
an accident. There is an increased risk of
injury or even fatal injury.
Always store objects so that they cannot be
flung around. Secure objects, luggage or
loads against slipping or tipping over, e.g. by
using tie downs, even if you are using the
cargo compartment cover.
!When loading the vehicle, make sure that
you do not stack the load in the cargo com-
partment higher than the lower edge of the
side windows. Do not place heavy objects on
top of the cargo compartment cover.
The cargo compartment cover is secured behind
the rear bench seat backrest.
Extending and retracting the cargo
compartment cover
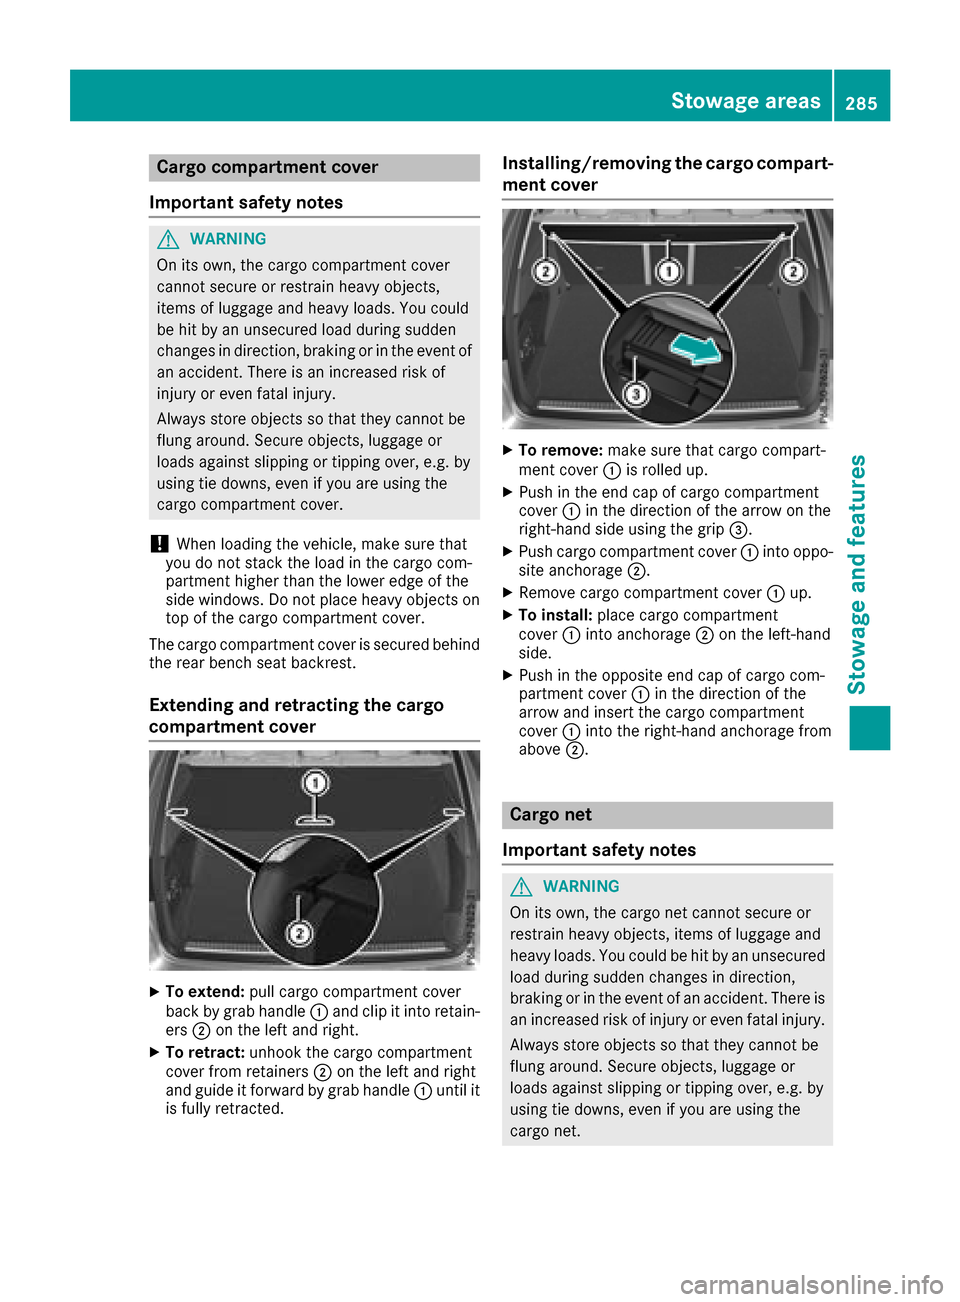
XTo extend: pull cargo compartment cover
back by grab handle :and clip it into retain-
ers ;on the left and right.
XTo retract: unhook the cargo compartment
cover from retainers ;on the left and right
and guide it forward by grab handle :until it
is fully retracted.
Installing/removing the cargo compart-
ment cover
XTo remove: make sure that cargo compart-
ment cover :is rolled up.
XPush in the end cap of cargo compartment
cover :in the direction of the arrow on the
right-hand side using the grip =.
XPush cargo compartment cover :into oppo-
site anchorage ;.
XRemove cargo compartment cover :up.
XTo install: place cargo compartment
cover :into anchorage ;on the left-hand
side.
XPush in the opposite end cap of cargo com-
partment cover :in the direction of the
arrow and insert the cargo compartment
cover :into the right-hand anchorage from
above ;.
Cargo net
Important safety notes
GWARNING
On its own, the cargo net cannot secure or
restrain heavy objects, items of luggage and
heavy loads. You could be hit by an unsecured
load during sudden changes in direction,
braking or in the event of an accident. There is
an increased risk of injury or even fatal injury.
Always store objects so that they cannot be
flung around. Secure objects, luggage or
loads against slipping or tipping over, e.g. by
using tie downs, even if you are using the
cargo net.
Stowage areas285
Stowage and features
Z
Page 289 of 374
an accident. There is a risk of injury, particu-
larly in the event of sharp braking or sudden
changes of direction.
RAlways stow objects in such a way that theycannot be tossed about in these or similar
situations.
RAlways make sure that objects do not pro-
trude out of the stowage spaces, luggage
nets or stowage nets.
REnsure that closable stowage spaces are
shut before beginning your journey.
RAlways stow and secure heavy, hard, poin-
ted, sharp-edged, fragile or large objects in
the cargo compartment.
Observe the following notes:
RObserve the loading guidelines (Ypage 278).
RTo avoid damaging the side trim panels in the
cargo compartment, maintain a sufficient dis-
tance from the side trim panels in the cargo
compartment when removing and inserting
the cargo compartment floor.
Installing the parcel net
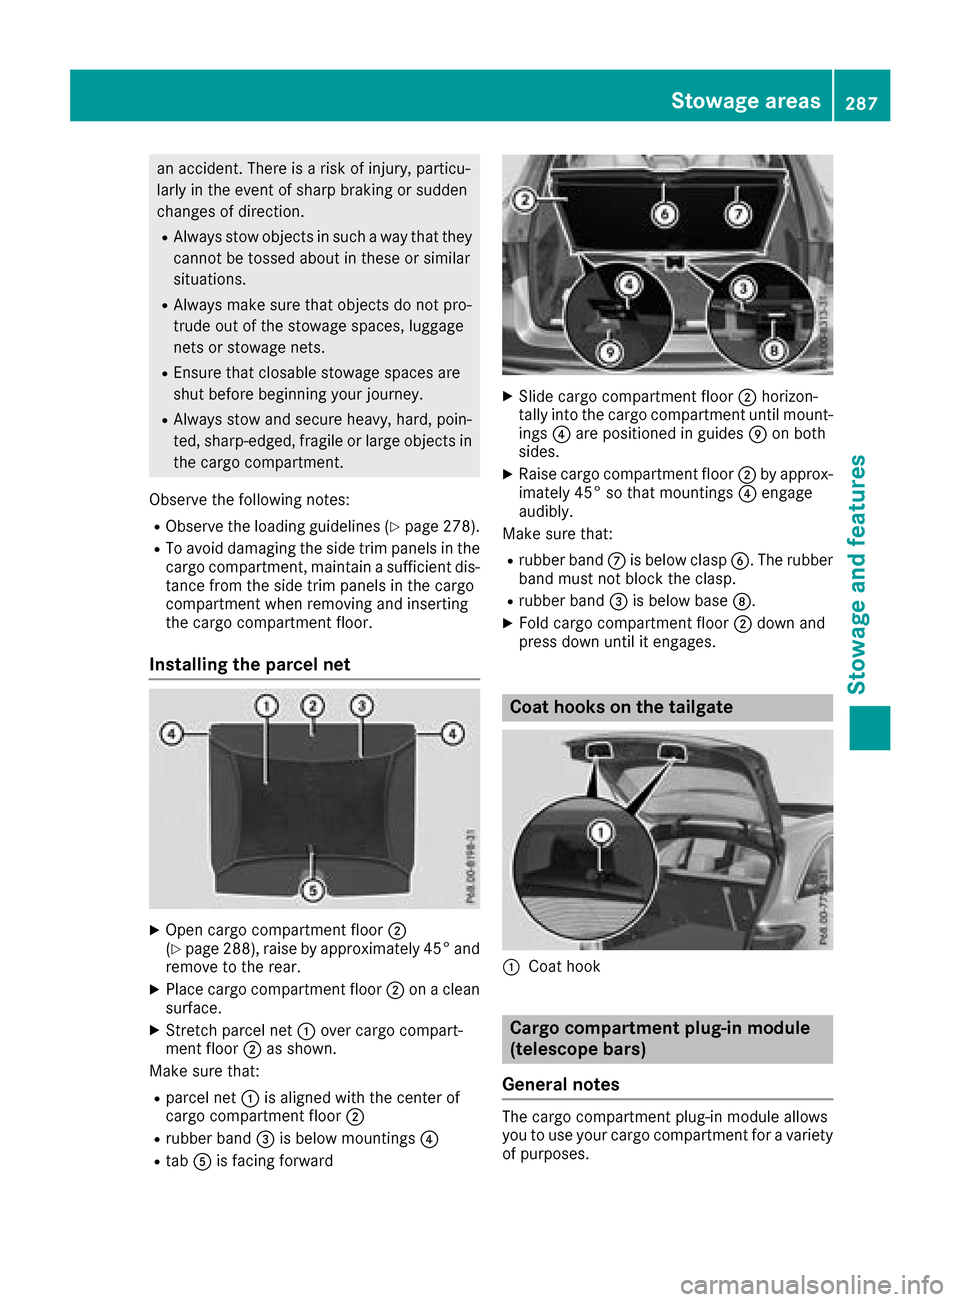
XOpen cargo compartment floor ;
(Ypage 288), raise by approximately 45° and
remove to the rear.
XPlace cargo compartment floor ;on a clean
surface.
XStretch parcel net :over cargo compart-
ment floor ;as shown.
Make sure that:
Rparcel net :is aligned with the center of
cargo compartment floor ;
Rrubber band=is below mountings ?
RtabAis facing forward
XSlide cargo compartment floor ;horizon-
tally into the cargo compartment until mount-
ings ?are positioned in guides Eon both
sides.
XRaise cargo compartment floor ;by approx-
imately 45° so that mountings ?engage
audibly.
Make sure that:
Rrubber band Cis below clasp B. The rubber
band must not block the clasp.
Rrubber band =is below base D.
XFold cargo compartment floor ;down and
press down until it engages.
Coat hooks on the tailgate
:Coat hook
Cargo compartment plug-in module
(telescope bars)
General notes
The cargo compartment plug-in module allows
you to use your cargo compartment for a variety
of purposes.
Stowage areas287
Stowage and features
Z
Page 292 of 374

An incorrectly secured roof carrier or roof load
may become detached from the vehicle. You
must therefore ensure that you observe the roof
carrier manufacturer's installation instructions.
Vehicles with a panorama roof with power
tilt/sliding panel:the panorama roof with
power tilt/sliding panel cannot be opened if a
roof carrier is installed. The panorama roof with power tilt/sliding panel can still be raised to
allow ventilation of the vehicle interior. If the
panorama roof with power tilt/sliding panel
makes contact with a roof carrier approved by
Mercedes-Benz, the sunroof will lower slightly
but remain raised at the rear.
Attaching the roof carrier
XSecure the roof carrier to the roof rails.
XObserve the manufacturer's installation
instructions.
Features
Cup holder
Important safety notes
GWARNING
If you transport objects in the vehicle interior
and these are not adequately secured, they
could slip or be flung around and thereby
strike vehicle occupants. In addition, cup
holders, open stowage spaces and mobile
phone brackets may not always be able to
hold the objects placed in them in the event of
an accident. There is a risk of injury, particu-
larly in the event of sharp braking or sudden
changes of direction.
RAlways stow objects in such a way that they cannot be tossed about in these or similar
situations.
RAlways make sure that objects do not pro-
trude out of the stowage spaces, luggage
nets or stowage nets.
REnsure that closable stowage spaces are
shut before beginning your journey.
RAlways stow and secure heavy, hard, poin-
ted, sharp-edged, fragile or large objects in
the cargo compartment.
!Only use the cup holders for containers of
the right size and which have lids. The drinks could otherwise spill.
!Do not expose drinks bottles in the cup
holder in the center console to continuous,
strong and direct sunlight. The passenger
compartment in the area of the center con-
sole can otherwise be damaged by the con-
centrated and reflected sunlight.
Observe the loa
ding guidelines (Ypage 278).
Cup holder in the front center console
XTo open:
open the stowage compartment
(Ypage 279).
XTo remove: slide catch=forward and pull
out cup holder ;.
XTo insert:insert cup holder ;and slide back
catch =.
XTo close: push cover :of the stowage com-
partment closed.
If you remove the cup holder insert, you can use
the resulting compartment for stowage.
You can remove the cup holder's rubber mat for
cleaning. Clean with clear, lukewarm water only.
Cup holder in the rear seat armrest
!Do not sit on or support your body weight on
the rear seat armrest when it is folded down,
as you could otherwise damage it.
!Close the cup holder before folding the rear
seat armrest up. Otherwise, the cup holder
could be damaged.
290Features
Stowag ean d features
Page 342 of 374
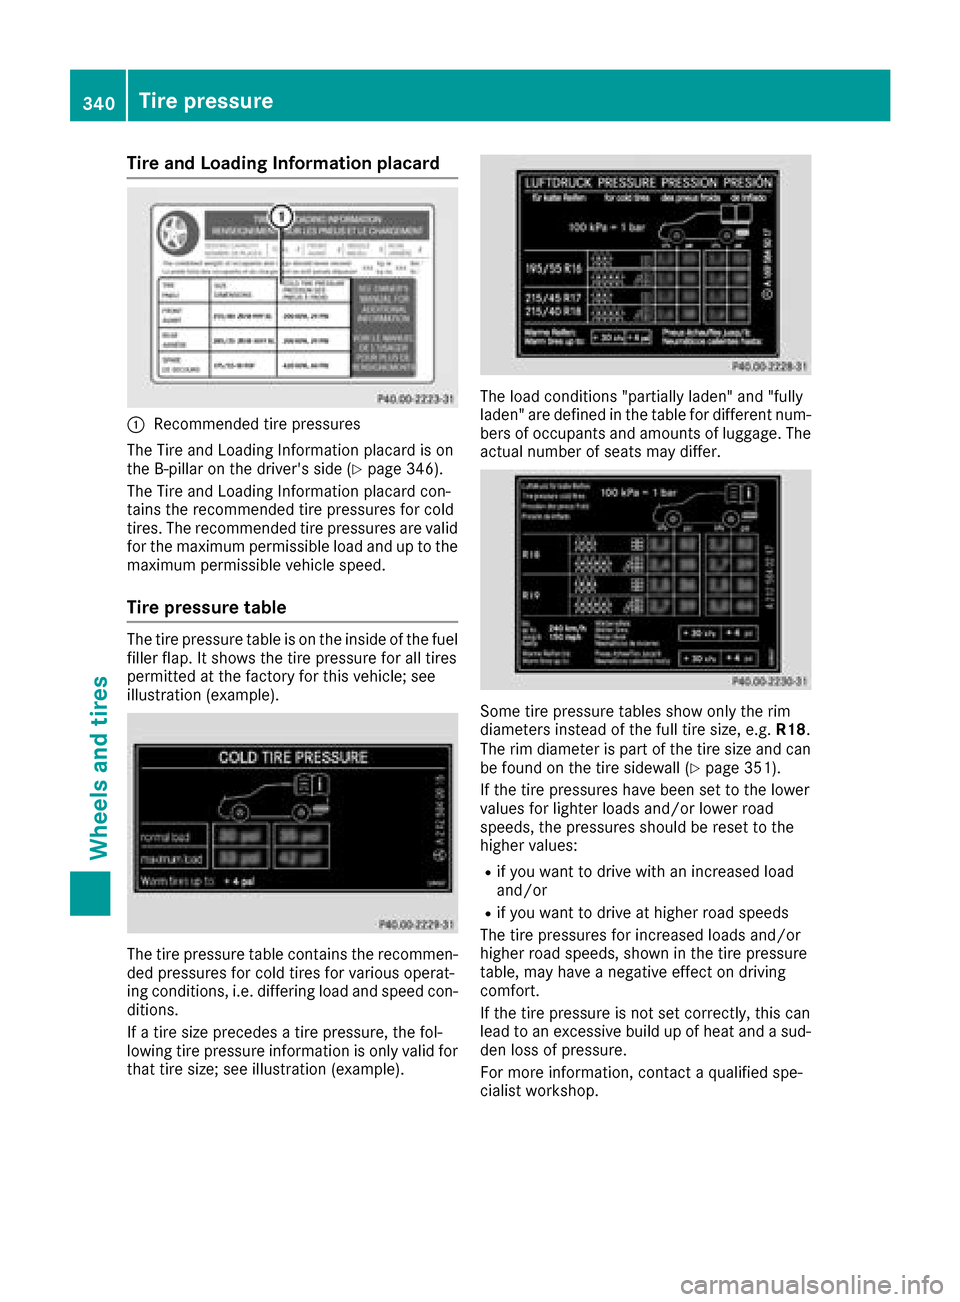
Tire and Loading Information placard
:Recommended tire pressures
The Tire and Loading Information placard is on
the B-pillar on the driver's side (
Ypage 346).
The Tire and Loading Information placard con-
tains the recommended tire pressures for cold
tires. The recommended tire pressures are valid
for the maximum permissible load and up to the
maximum permissible vehicle speed.
Tire pressure table
The tire pressure table is on the inside of the fuel
filler flap. It shows the tire pressure for all tires
permitted at the factory for this vehicle; see
illustration (example).
The tire pressure table contains the recommen-
ded pressures for cold tires for various operat-
ing conditions, i.e. differing load and speed con-
ditions.
If a tire size precedes a tire pressure, the fol-
lowing tire pressure information is only valid for that tire size; see illustration (example).
The load conditions "partially laden" and "fully
laden" are defined in the table for different num-
bers of occupants and amounts of luggage. The
actual number of seats may differ.
Some tire pressure tables show only the rim
diameters instead of the full tire size, e.g. R18.
The rim diameter is part of the tire size and can
be found on the tire sidewall (
Ypage 351).
If the tire pressures have been set to the lower
values for lighter loads and/or lower road
speeds, the pressures should be reset to the
higher values:
Rif you want to drive with an increased load
and/or
Rif you want to drive at higher road speeds
The tire pressures for increased loads and/or
higher road speeds, shown in the tire pressure
table, may have a negative effect on driving
comfort.
If the tire pressure is not set correctly, this can
lead to an excessive build up of heat and a sud-
den loss of pressure.
For more information, contact a qualified spe-
cialist workshop.
340Tire pressure
Wheels and tires